Oplon release 10 VAPP creation from scratch
Compatibility Matrix: Operating System Modules and Services
VAPPs are provided with the services necessary for the operation of the Oplon system. Nevertheless, it is possible to install other features to the base operating system pre-verified the coexistence of modules with the services provided by the Oplon suite.
Creating a Virtual Appliance from a Linux Image
In many circumstances, it is more convenient to create a Virtual Appliance directly from operating system images provided by cloud providers. This allows you to use certified and proven Virtual Appliances in the environment in which they will operate with in most cases also the APIs that serve to make the Virtual Appliance a perfectly integrated tool.
Creating a Virtual Appliance in an already installed operating system is very simple and requires very few steps to have a fully integrated VAPP Oplon.
Installation can be done both online, if the Virtual Appliance has Internet connectivity, or offline, if the Virtual Appliance does not have Internet connectivity. Installing the Virtual Appliance plans to perform some steps to prepare for the setup that will be fully guided.
The supported operating systems for the ADC system are:
- All Linux distributions with Kernel 3 or higher based on CentOS or Debian derivatives (yum / dnf / apt packages management tools)
-
Administrator User Creation (if not exists)
# groupadd administrator # useradd -m -g administrator administrator -
Enabling the administrator user to run sudo
vi /etc/sudoers ##Allow root to run any commands anywhere root ALL(ALL) ALL administrator ALL(ALL) ALL -
Creating the Support Directory
# mkdir /share # chmod 777 /share -
Adjusting the host name (name is at discretion)
# hostname OPLONR10 -
Add the host name to: (the name is at your discretion)
# vi /etc/hosts 127.0.1.1 OPLONR10 -
Add the host name to: (the name is at your discretion)
# vi /etc/hostname OPLONR10 -
Disabling Linux SE getenforce test se enforce abilitata
# vi /etc/selinux/config # This file controls the state of SELinux on the system. # SELINUX= can take one of these three values: # enforcing - SELinux security policy is enforced. # permissive - SELinux prints warnings instead of enforcing. # disabled - No SELinux policy is loaded. SELINUX=disabled # SELINUXTYPE= can take one of three two values: # targeted - Targeted processes are protected, # minimum - Modification of targeted policy. Only selected processes are protected. # mls - Multi Level Security protection.\ # SELINUXTYPE=targeted -
Firewall Stop and disable
# systemctl stop firewalld # systemctl disable firewalld or # ufw disable -
Disable Link-Local Multicast Name Resolution (LLMNR) (only if it exists)
# vi /etc/systemd/resolved.conf #[Resolve] #DNS= #FallbackDNS= #Domains= LLMNR=no #MulticastDNS=yes #DNSSEC=allow-downgrade #DNSOverTLS=no #Cache=yes #DNSStubListener=udp -
Restart systemd-resolved (only if /etc/systemd/resolved.conf exists)
# service systemd-resolved restart or # systemctl restart systemd-resolved -
Make sure you can’t access from root through ssh
# vi /etc/ssh/sshd_config #LoginGranceTime 2m PermitRootLogin no #StrictMode yes #MaxAuthTries 6 #MaxSessions 10 -
Restarting the ssh service
# systemctl restart sshd.service -
Installing the required packages (dnf versioni CentOS 8, yum CentOS 7)
# dnf -y update
# dnf -y install yum-utils
# dnf -y install unzip
# dnf -y install wget
# dnf -y install rsync
# dnf -y install bzip2
# dnf -y install tar
# dnf -y install open-vm-tools
Ubuntu:
    # apt-get update
    # apt-get -y install unzip
    # apt-get -y install wget
    # apt-get -y install rsync
    # apt-get -y install bzip2
    # apt-get -y install tar
# apt-get -y install open-vm-tools- Service ntp (CentOS7) / chrony (CentOS8) CentOS 7 - ntp installation:
   # yum -y install ntp
   # vi /etc/ntp.conf
//// modificare come di seguito
interface ignore wildcard
interface listen 127.0.0.1
interface listen ::1
#restrict 127.0.0.1
#restrict ::1
# systemctl restart ntpd.service
Verifica dei listeners (ss -nlptu) Disabilitazione dei listeners:
# systemctl stop ntpd.service
# systemctl disable ntpd.service
CentOS 8 - chrony installation:
# dnf -y install chrony
# systemctl stop chronyd
# systemctl disable chronyd-
Stop and disable postfix (if any)
# systemctl stop postfix.service # systemctl disable postfix.service -
Network manager (if existing) edit the following file to disable the disabling functionality of the card in case of cable disconnection:
# vi /etc/NetworkManager/NetworkManager.confadd or change
ignore-carrier=* -
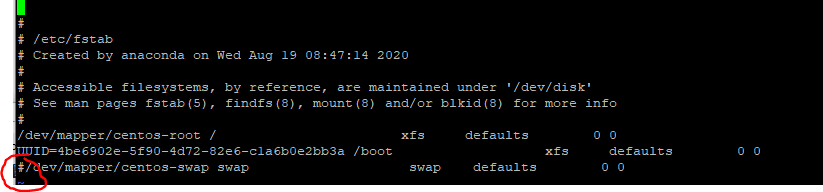
Permanently disable the swap partition Commentare le righe di “mount” delle partizioni di swap
# vi /etc/fstab
- Reboot, New10
# reboot - CHECKING ACTIVE LISTENERS
For security reasons, make sure that there are no processes with active
listeners on addresses exposed to the public or 0.0.0.0. Only SSHD
listeners must remain, which will need to be modified to accept
connections only from trusted addresses (e.g. backend network, magement, etc.).
# ss -nlptu
or
# netstat -nlptu
OPLON Virtual Appliance creation from the Internet
To install the Virtual Appliance from the Internet, simply do the following:
-
From root go to /share
# cd /share -
Download intsaller from www.oplon.net
# wget --no-cache --no-check-certificate -N "https://www.oplon.net/OPLON_INSTALL_LASTUPDATE.sh" -
Start installer from /share
# bash OPLON_INSTALL_LASTUPDATE.sh
....
....
Login: vostro_login_OPLON
Password: vostra_password_OPLON
… downloads packages…
-
If update will appear this message, if new installation will not be prompted
PLEASE CONSIDER A BACKUP BEFORE PERFORMING ANY UPDATE! (THIS MESSAGE ONLY IF IT IS AN UPDATE) Do you wish to backup TCOProject files (yes/no/y/n) ? Y -
Operating system update and upload packages from the Internet (ANSWER YES THE FIRST TIME WHY IT INSTALLS THE USEFUL PACKAGES TO OPLON)
Do you wish to update Operating System (yes/no/y/n) ? y -
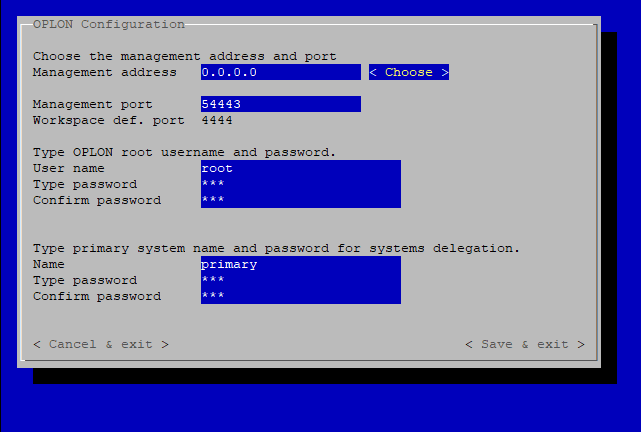
When you’re done, the appliance setup screen will appear:
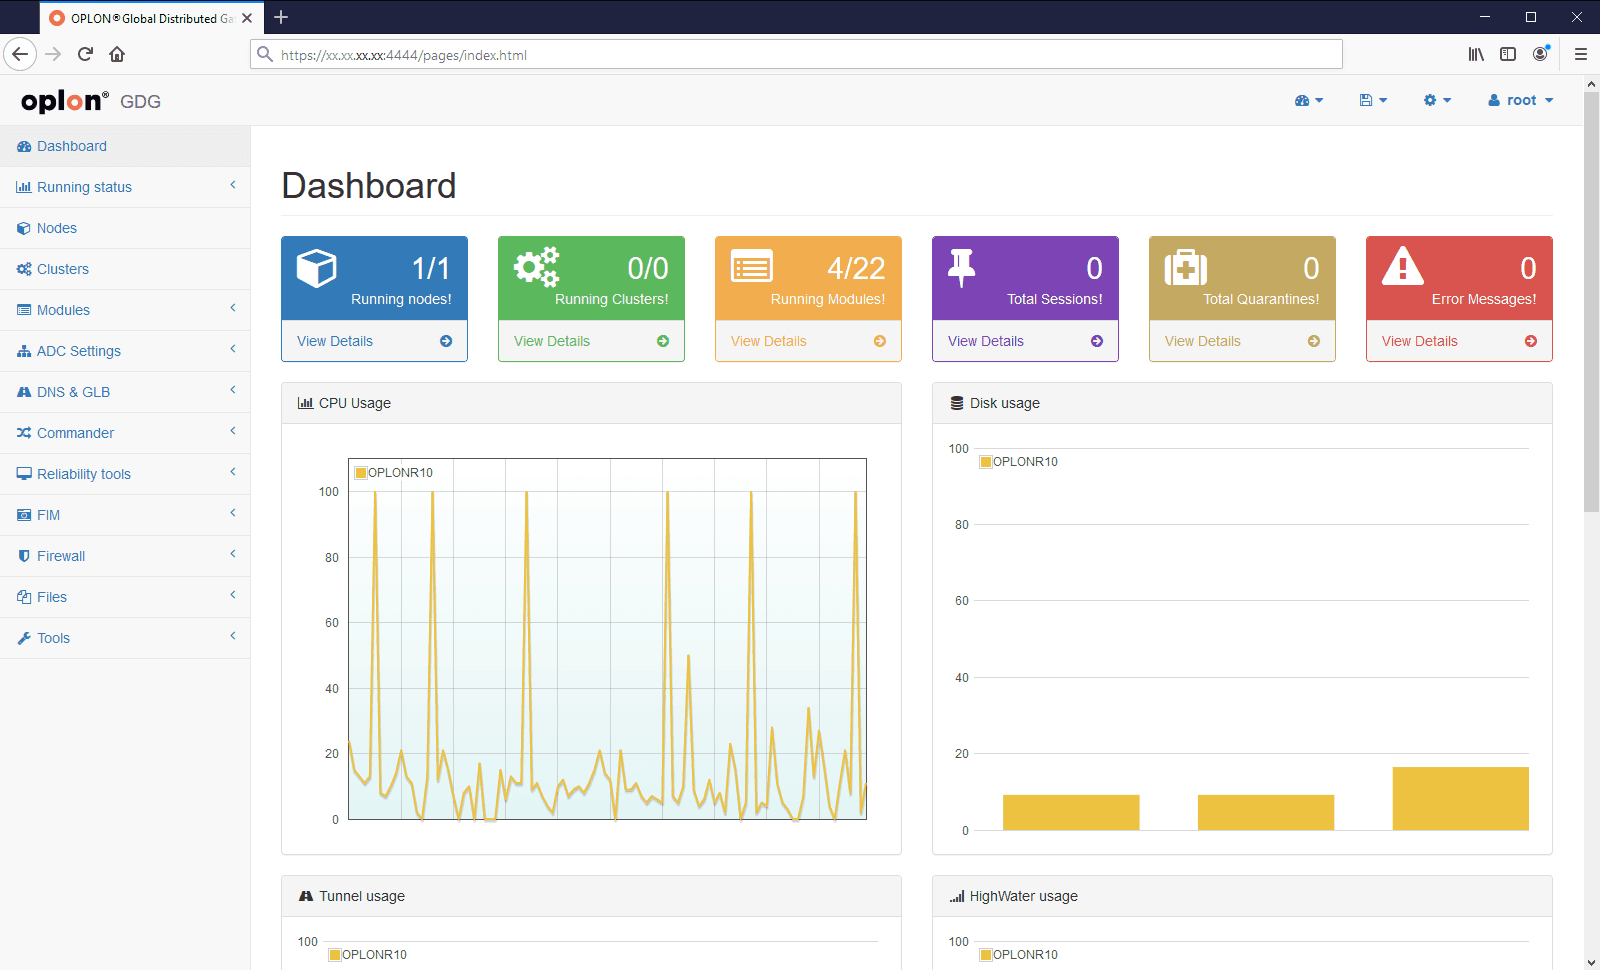
First login from Oplon Global Distributed Gateway
From the console you can verify the current configuration and associated DHCP address through normal Linux commands (ip addr).
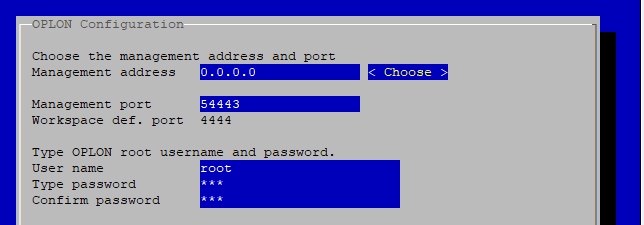 The Oplon Monitor and Oplon Global Distributed Gateway system are by default set to accept connections from
all networks.
The Oplon Monitor and Oplon Global Distributed Gateway system are by default set to accept connections from
all networks.
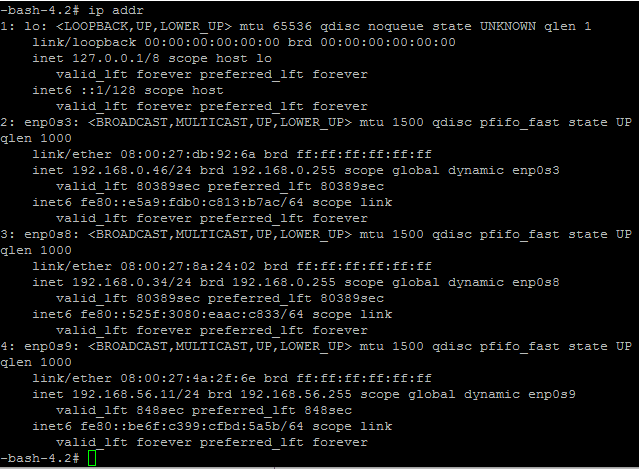 Then, check with the “ip addr” command
for an available address and log in from Oplon Management Console, Oplon
Web Console, or Oplon Global Distributed Gateway at the specified
address, e.g.:
Then, check with the “ip addr” command
for an available address and log in from Oplon Management Console, Oplon
Web Console, or Oplon Global Distributed Gateway at the specified
address, e.g.:
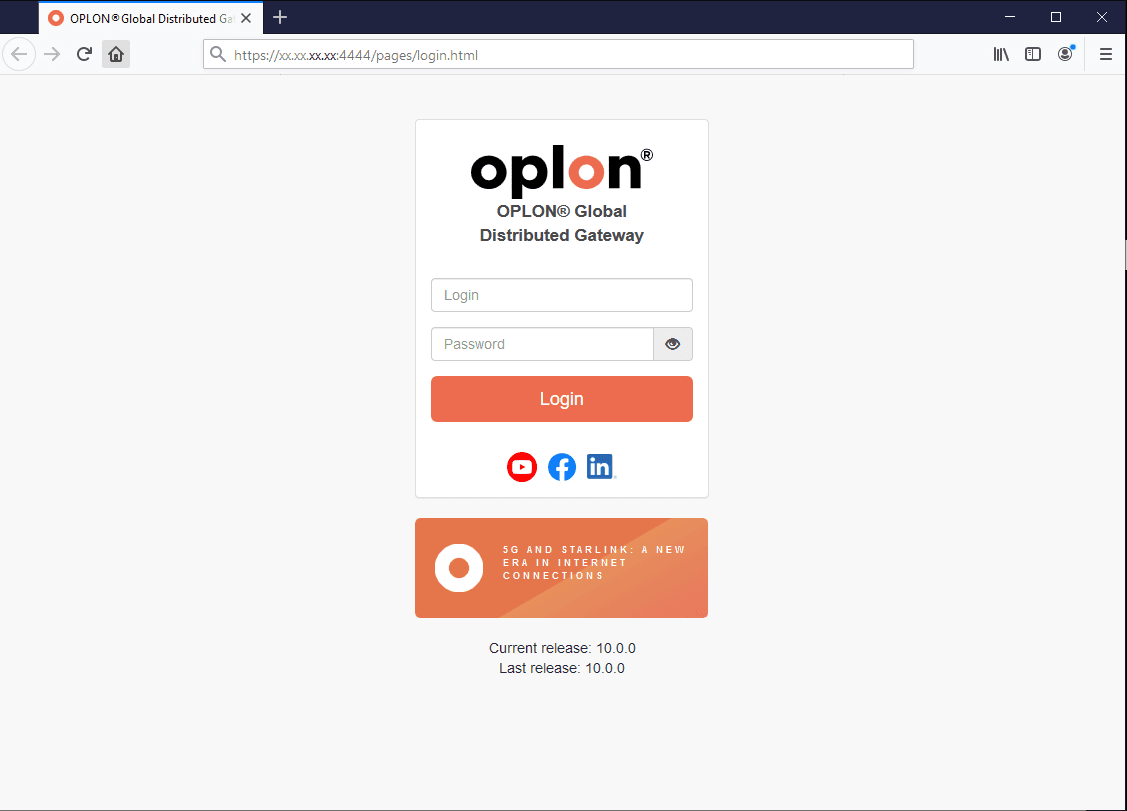
To access Oplon Global Distributed Gateway services, type:
https://x.x.x.x:4444
(where x.x.x.x is any system address if you haven’t changed the address 0.0.0.0 or the address you choose with oplonsetup).
(where x.x.x.x is any system address if you haven’t changed the address 0.0.0.0 or the address you choose with oplonsetup).
If not modified during setup the login is: root