Oplon Secure Access User Guide
This guide is intended for all end users of Oplon Secure Access. Here we will explain how to open a resource of type Host, RDP Remote App or Web App and how to make the best use of the features such as Copy&Paste, File Manager and integrated text editor.
Browser compatibility (recommended)
Quick overview of tested and recommended browsers for use with Oplon Secure Access (minimal icons/emoji for clarity):
| Browser | Compatibility |
|---|---|
| 🟦 Google Chrome / Chromium / Microsoft Edge (Chromium) / Opera | ✅ Fully compatible: supports all features (File Manager, Drag & Drop, Shared Clipboard, CTRL+V also in RDP sessions) |
| 🦊 Mozilla Firefox | ⚠️ Compatible with most features. Note: direct paste (CTRL+V) in RDP sessions may not work on some versions; use the Graphic Clipboard or the contextual menu as a workaround. |
| 🧭 Safari and other browsers | ⚠️ Partial compatibility: some advanced features (e.g. direct paste in RDP) may not be supported. |
Recommendation: for the best user experience we recommend using Google Chrome or a Chromium-based browser (✅). If you use Firefox or Safari, be aware of the limitations mentioned and use the Graphic Clipboard or contextual menu if CTRL+V does not work.
First login and home screen
To access Oplon Secure Access, go to the address provided by your organization and log in with double authentication factor. In case of absolute first access, we refer to the guide which explains step by step how to register and log in for the first time.
Once you land in the dashboard, the screen of accessible resources will immediately be shown.

From here it is also possible to see:
- The “Resources” button
- The File Manager button
- The “Settings” button
- The search bar
Resources
Once the button dedicated to opening the Resources (1) has been clicked, the menu containing them will be shown on the left all resources that can be accessed.
Within Oplon Secure Access a resource can be:
- Hosts:
- Linux/Windows with RDP/VNC/SSH
- Remote App RDP
- Web Apps (HTTP/HTTPS)
- Native
- Browser Isolation
Tree View and Resource Opening
The resources menu can also be accessed in tree mode. Once you have clicked the button dedicated to opening the Resources (1), the menu containing all the resources that can be accessed will be shown on the left.
To open a new resource, from the tree view (the grid view is very similar), simply click
- or on the Open in a new Tab (4) button (only choice in the case of non-Browser Isolation Web Apps)
- or on Open here (5).
If there are multiple types of SSH/RDP/VNC access, the interface will show a submenu (6) which will select one of the protocols required to access the resources. Again in the case of multiple Os login names configured for that resource, the system will also ask (7) which user to select for access.
If the resource is opened via the Open Here button, a screen (8) will be shown asking us in which of the 4 layouts granted we want to have our new resource.

- Search Bar: It is used to search resources by IP/Hostname, Name or Description
- User group: it is the group of users (class of privileges) with which access is made, it is decided by the Manager and is used to assign a group of resources
- Location: it is a logical label that serves to group together a set of Resources
- Open in a new Tab: button used to open the resource on a new tab
- Open here: this is a button used to open the resource on the current layout
- Access types: it is a list (if present) which contains all the types of access to the machine
- Users List: it is a list (if present) that contains all the os login names with which it is possible to access the machine
- Select Layout: Arrange
- Full screen
- Two vertical windows
- Two horizontal windows
- Four windows
- Resource info: indicates the information of the currently selected resource
Once the resource has been opened, it will appear as a window within the Secure Access layout. Omitting to describe the normal user interactions that can be had on the resource we will focus on listing interface features.

- File Manager
- Graphic Copy&Paste
- File Editor: Single file editor per shell
- Resource Settings
- Reload: Used to reload the current session
- Full layout mode: Used to occupy as much space as possible in the layout
- Close: Used to close the resource
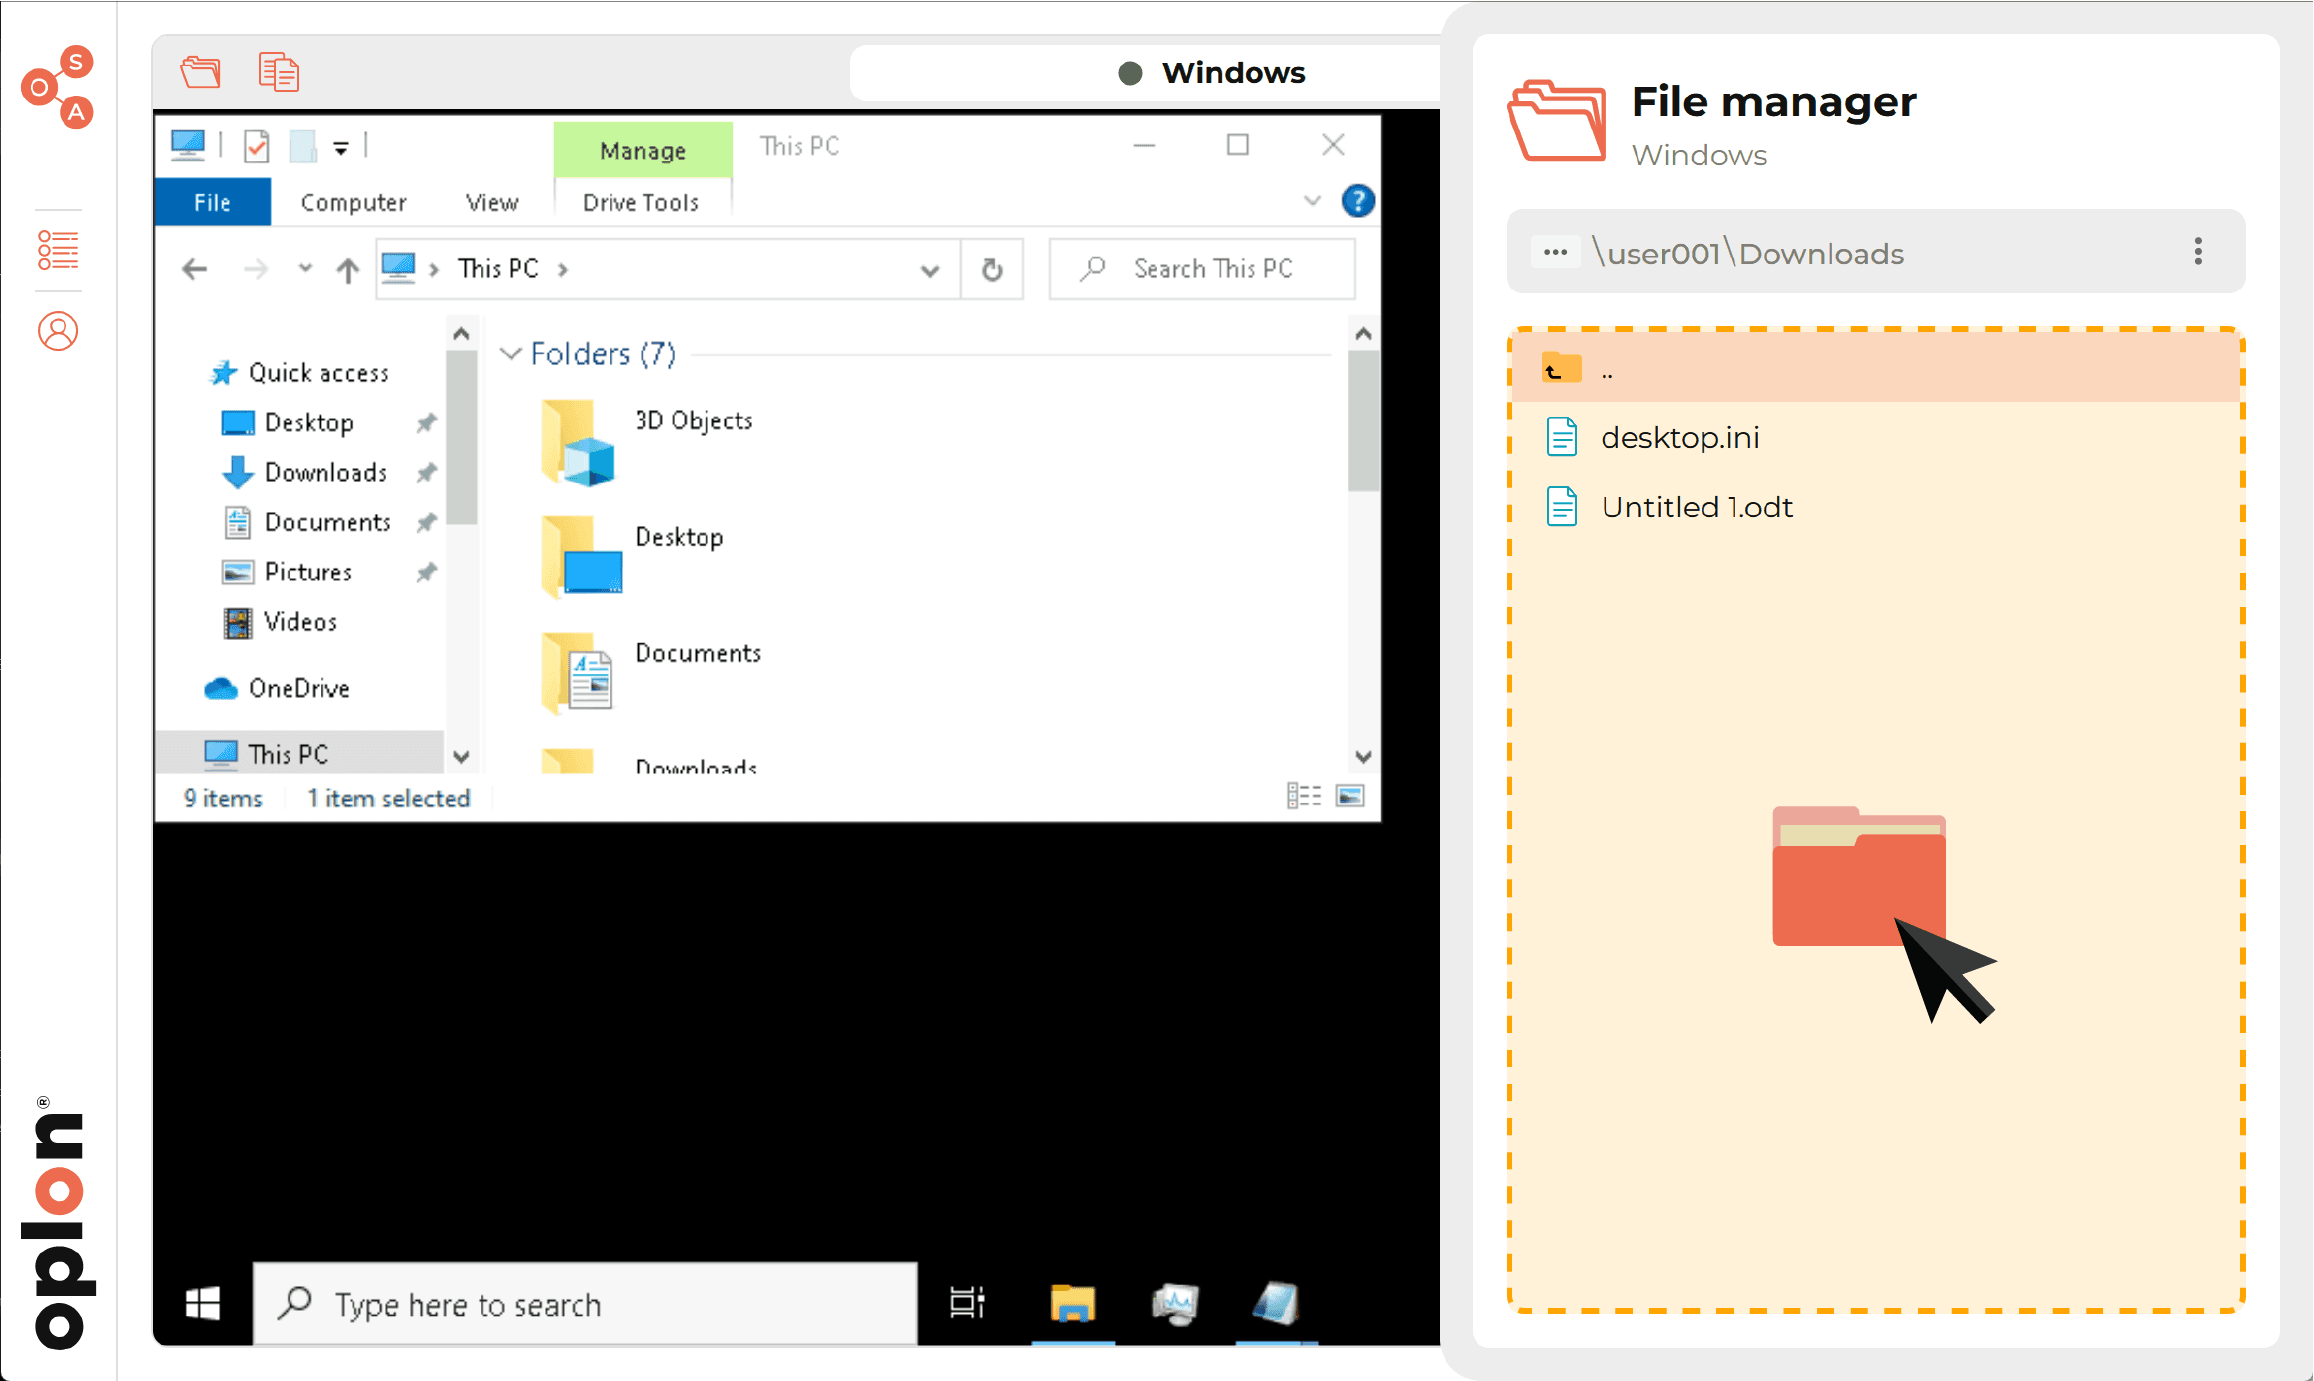
File Manager
The File Manager of each Host is accessible through the folder-shaped icon located in the upper left corner of each open resource. By clicking on it, the File Manager of the selected machine will be shown on the right side of the interface.

- Path: the path in which we reside is shown here
- Search And Go: Allows you to search for a file in the current path, or to navigate the paths absolutely
- Menu button (three vertical dots): clicking on it will bring up a contextual menu that will allow us to:
- Create a new file
- Create a new folder
- Go to your Home Directory
- Copy current path
- Refresh displayed content
- File Manager Context Menu: contextual menu to files by pressing the right button. From here it will be possible to do:
- Opening via the File Editor (multiple)
- Rename files
- Deletion of files and folders (multiple)
- Copy of the path
- Hypercopy (multiple)
- Download (multiple)
- File info
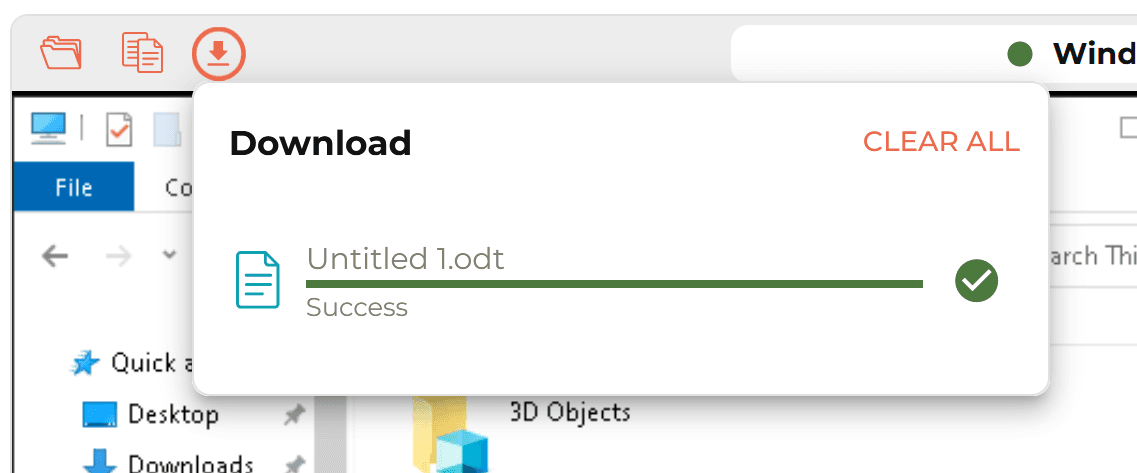
Download
To download a file, from the file manager, simply right-click on the file you want to download and click on “Download”. This will start a Download operation which will be handled entirely within the browser. It is also possible to see the progress/result of the operation, at the top left of the open window.
Upload
The download operation is mediated through simple Drag&Drop of files. To do this you need to open the file manager, position yourself in the path where you want to upload the file and Drag&Drop the file into the File Manager area. This will start an upload procedure. You can check the status/progress of the operation on the top left of the open host.
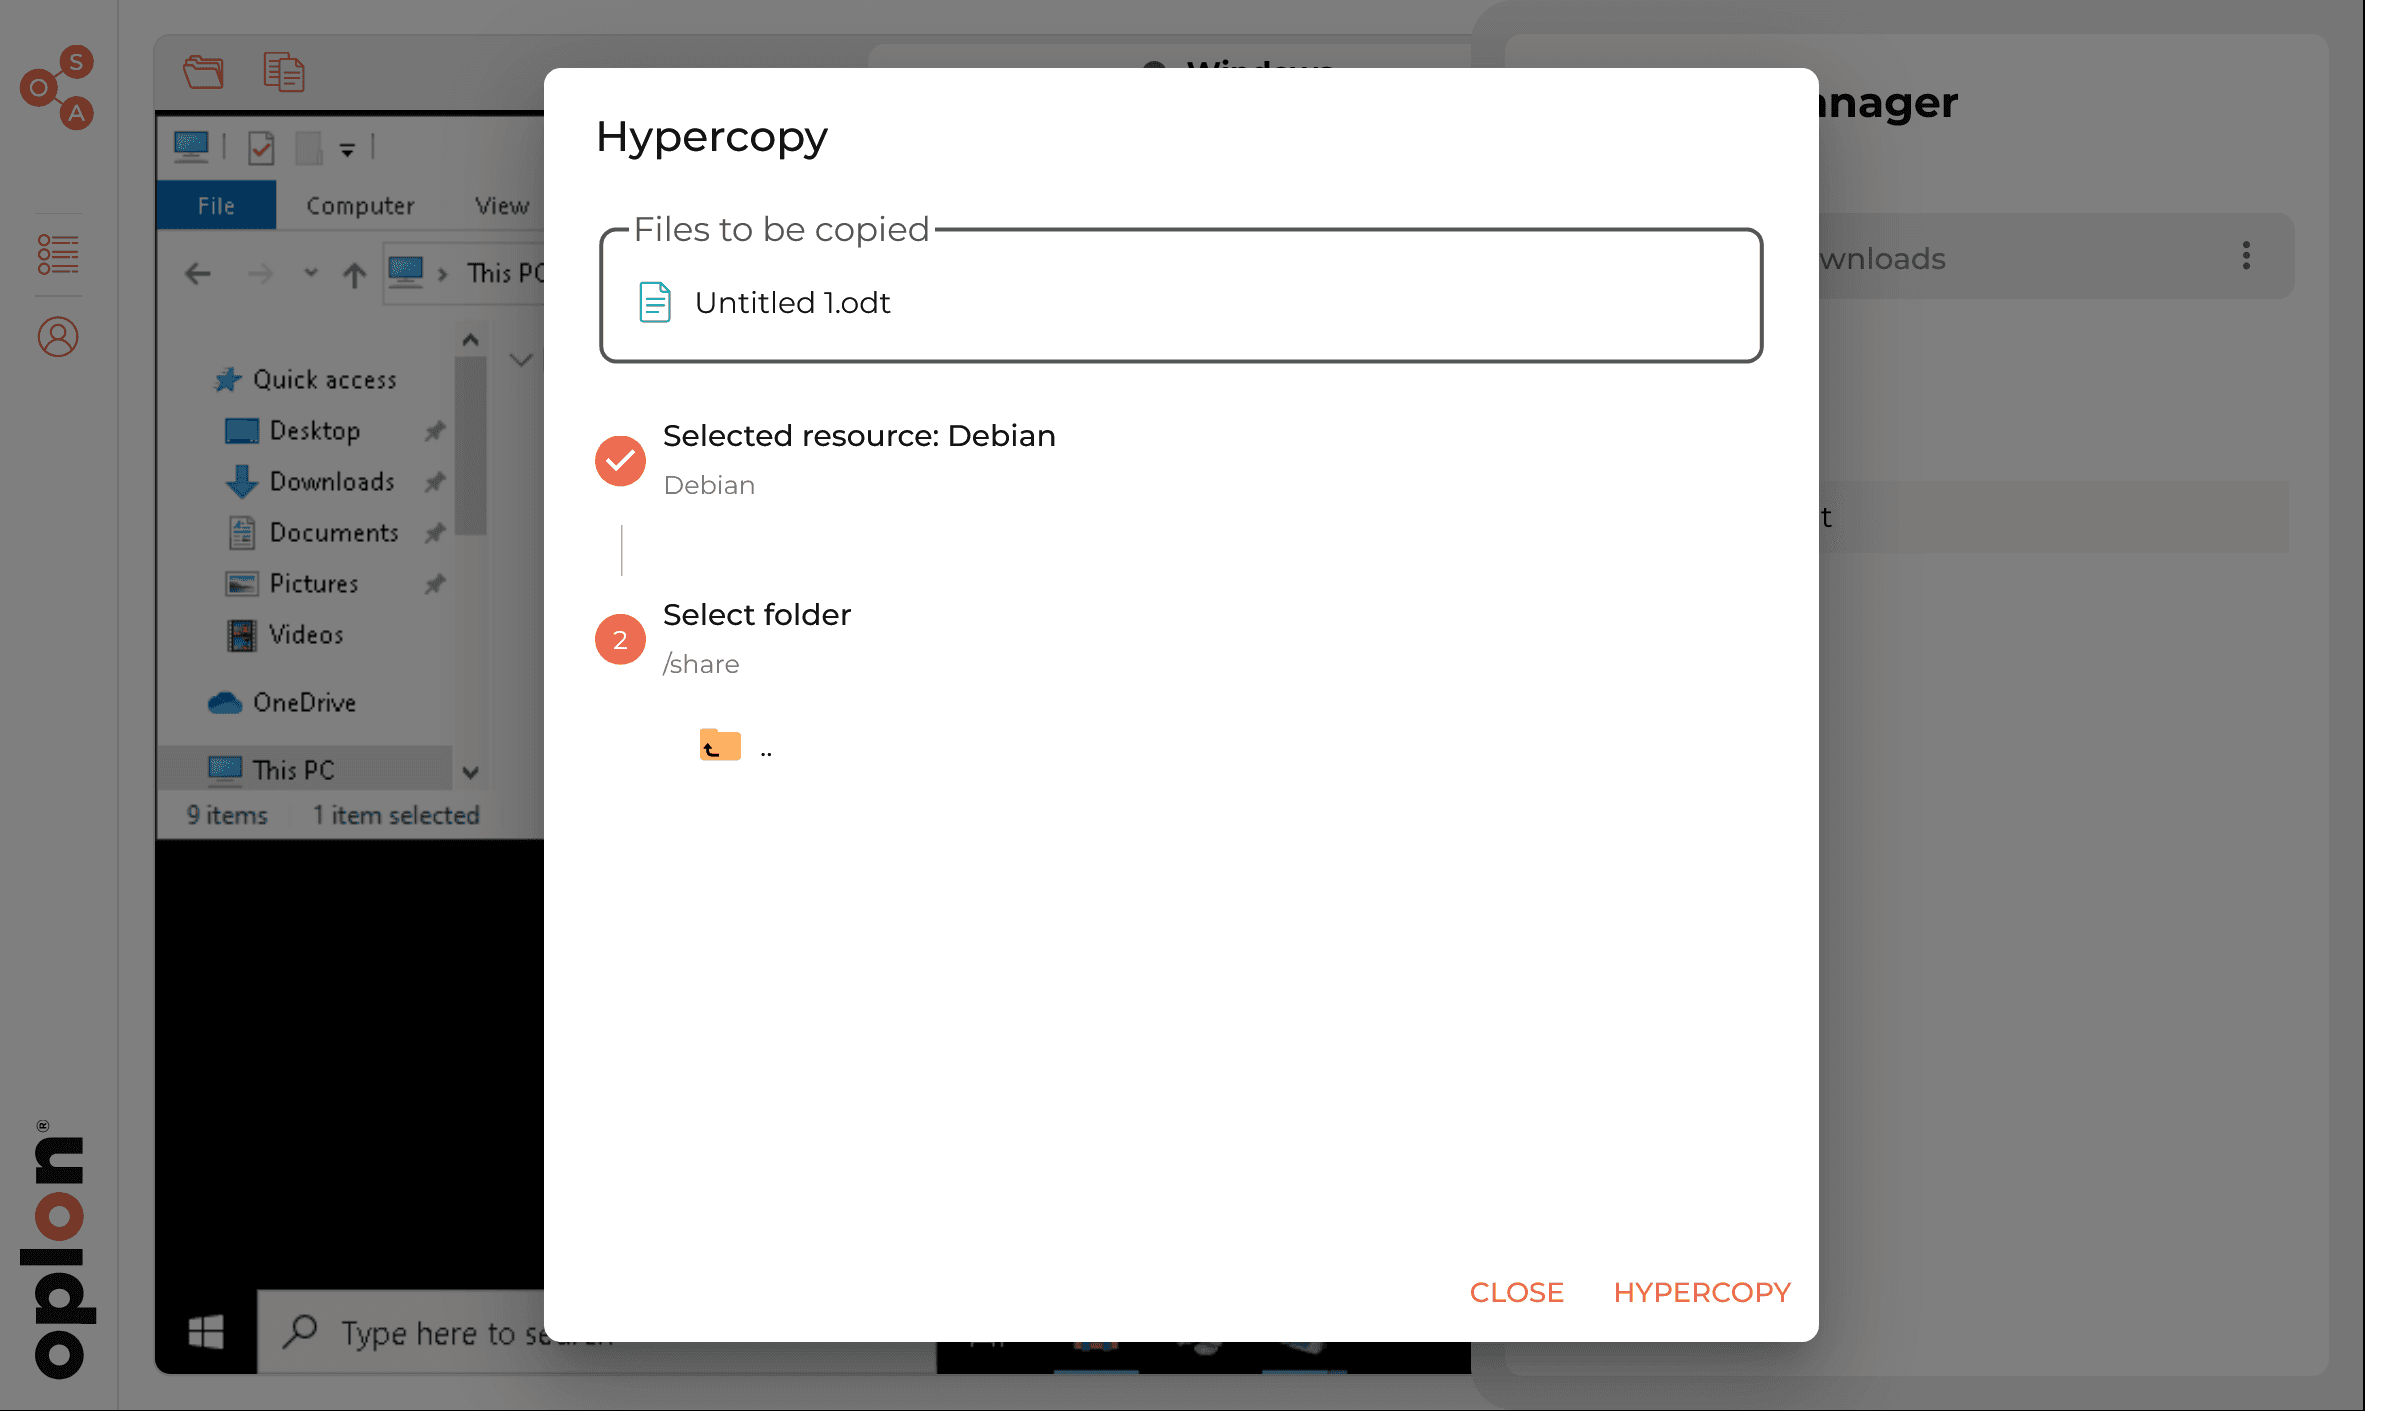
Hypercopy (File Transfer)
The Hypercopy operation, i.e. the transfer of files between machines, is achieved by opening the context menu from the file you want to transfer (right click) and click on “Hypercopy”.
This will show a dialog where, in order to successfully transfer the file, you will need to:
- Select the target machine (with the desired user if applicable):
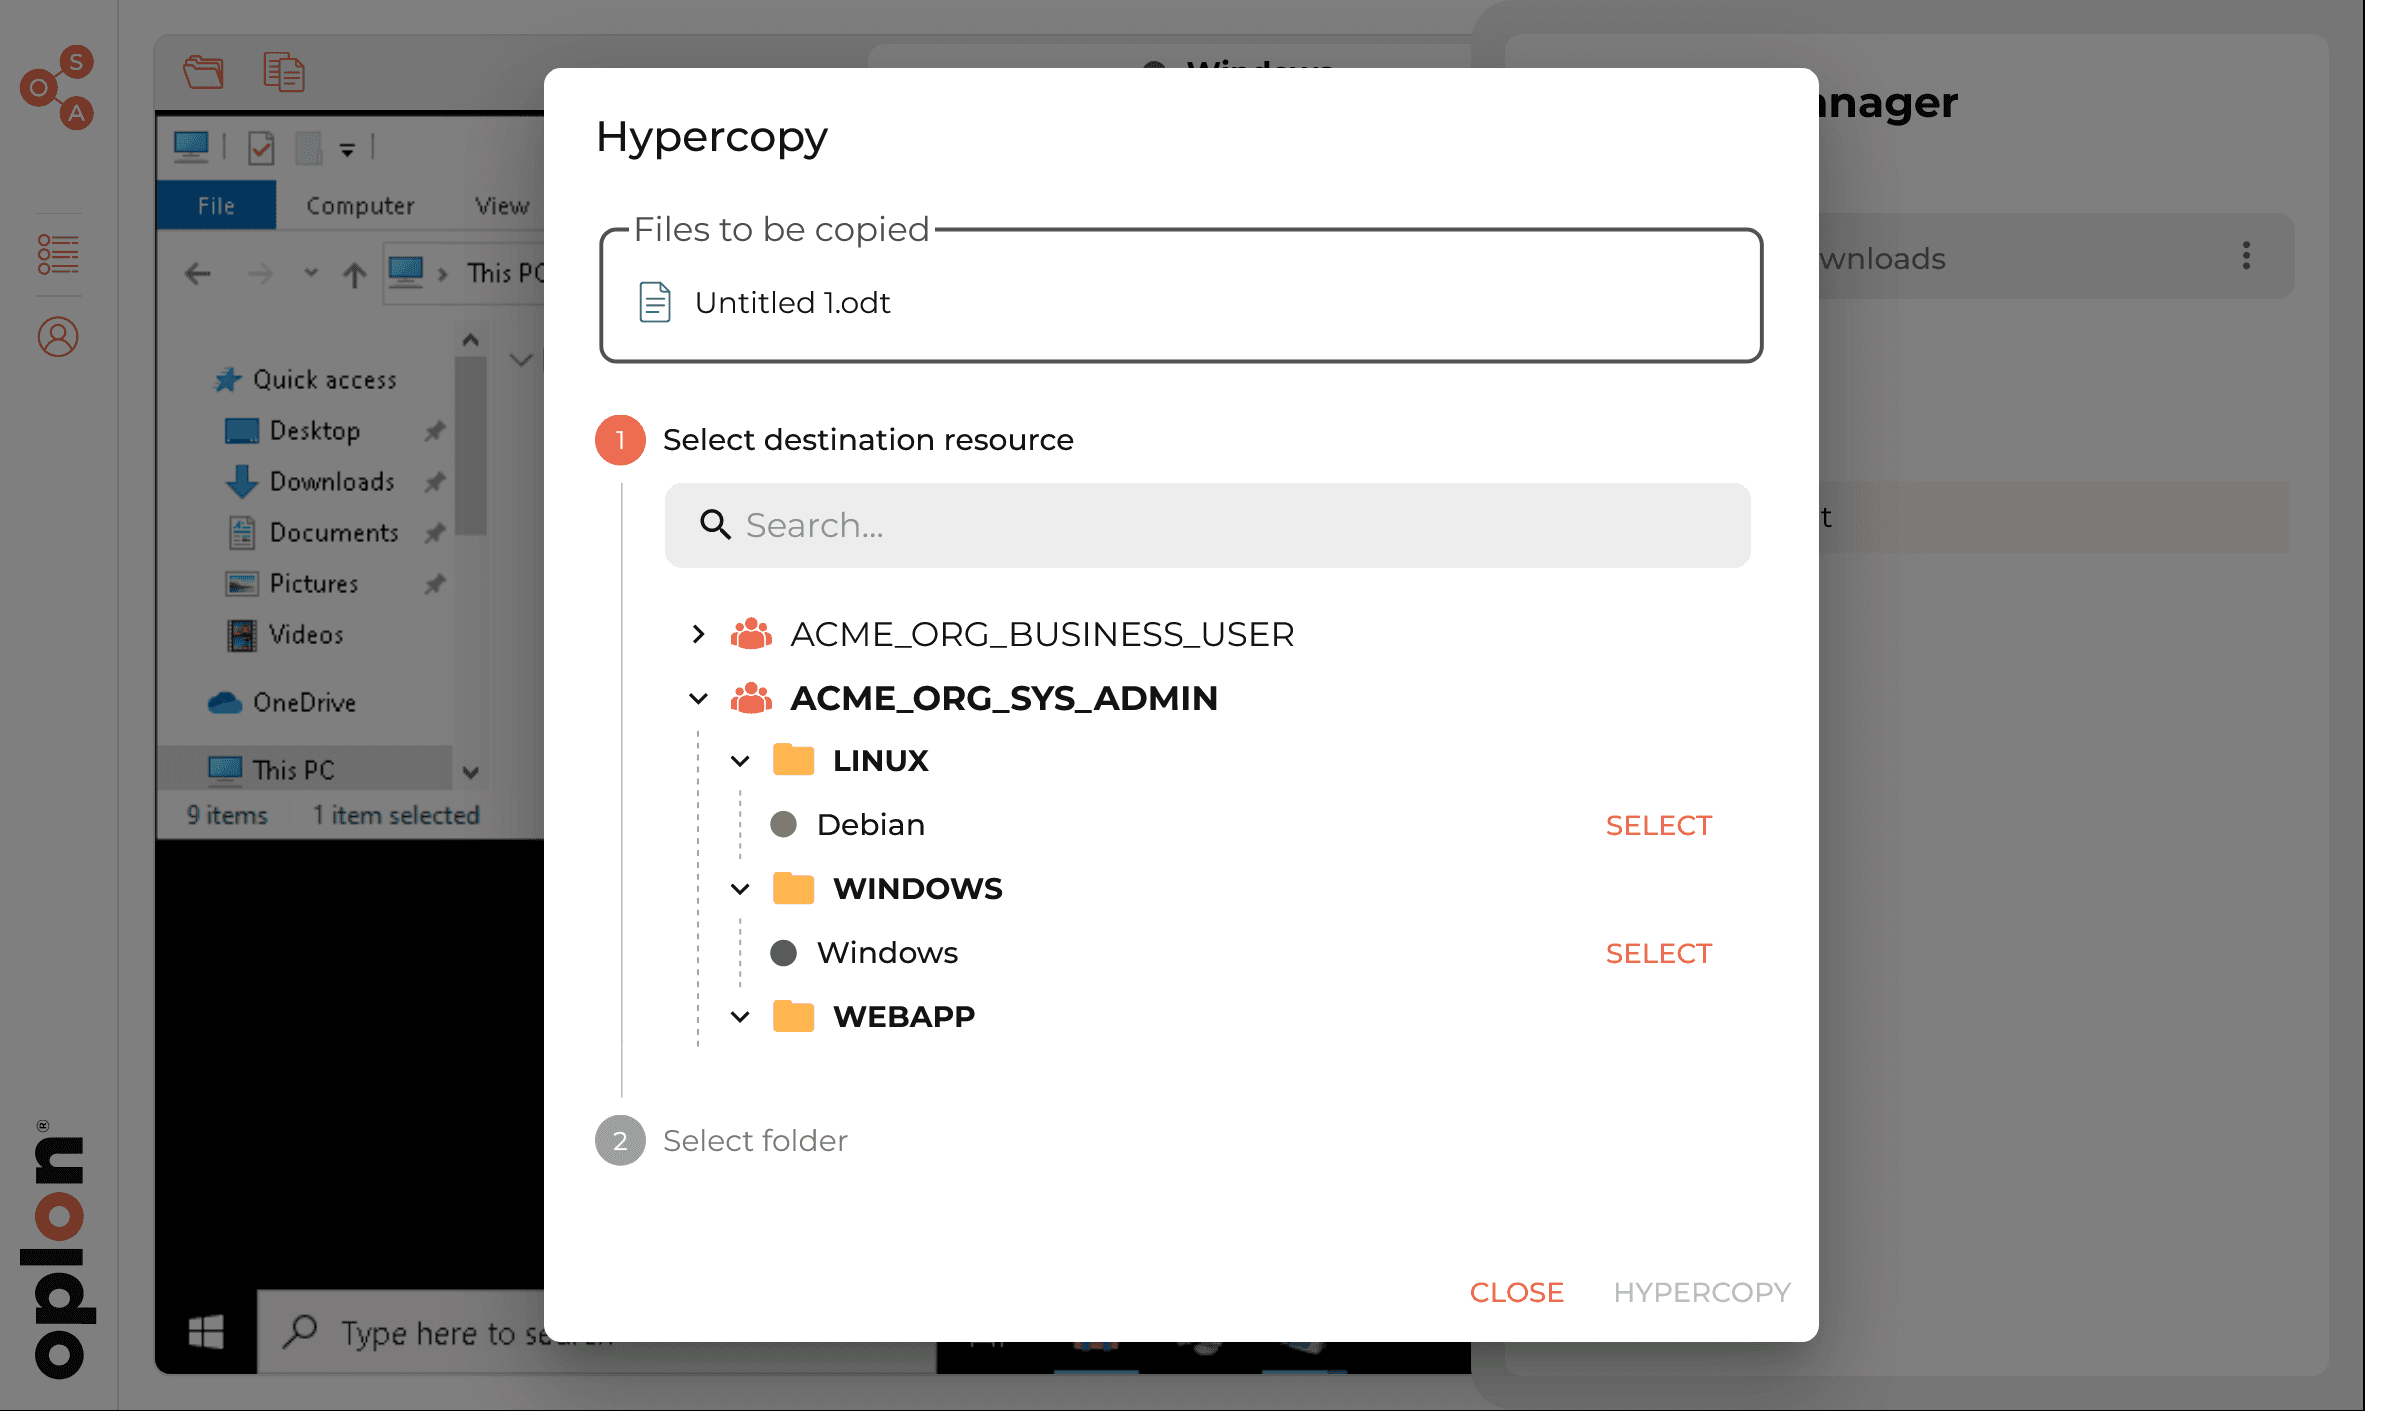
- Select the path where the file will be copied and click “Hypercopy”:
File Editor
Within Secure Access it is also possible to edit files within the browser itself. The functionality, accessible of course from the file manager it can be activated by right-clicking on the file you want to edit and > “Open in editor”.
This will cause the current window where the open machine resides to be replaced with the File Editor window.

From here it is possible to edit the file, possibly change the highlighting if you are editing a file with some source code, save or close.
Copy&Paste (Shared Clipboard)
Inside Secure Access every textual content copied from the remote resource via the usual methods CTRL+C, mouse right key>copy, text selection on ssh, etc… will be made available within the logged in user’s local clipboard, giving the possibility to access it outside the Secure Access platform (e.g. inside your notepad)
As far as the paste operation is concerned, due to the different nature of the browsers through which you connect to the platform, follows different specifications:
- Paste using the usual shortcuts CTRL+V, CMD+V, etc… is always available whatever the browser
- Paste it via all other methods e.g. “Right Click>Paste” (graphical sessions) or “Right Click” (on ssh), is available:
- on Chrome/Chromium/Edge/Opera by activating the relative setting Shared Clipboard from the settings menu
- on Firefox/Safari (or all the others if the Shared Clipboard is disabled) through the appropriate contextual menu at the top left next to the file managing icon (or by right-clicking on SSH), from here it is possible to do:
- Only send to remote clipboard (SEND)
- Send plus paste “simulated” via (SEND&PASTE)
Graphic Clipboard

The Graphic Clipboard can be activated by using the appropriate button at the top left of the current window or by right-clicking in the case of SSH sessions, it allows you to send text to the remote clipboard in graphical form.
There are two ways to send clipboard:
- [SEND TO CLIPBOARD]: Send only to the remote clipboard (in the memory area)
- [WRITE]: “simulation” of a writing keyboard
Furthermore, there is also a history that includes the last 6 pastes made by the user.
Modalità Broadcast (SSH Only)
In case of SSH access, Secure Access allows you to broadcast commands up to 4 resources. To enable the broadcast mode, once all the terminals where you want to broadcast commands have been opened, just click on the button to the right of the title, this will cause the selected terminal to be set as “primary”, while all others will be set as “secondary”
It is also possible to undock/dock the terminals on command in case you want to temporarily stop using the mode on one or more terminals, to do so just click on the padlock icon.
To close the broadcast mode instead, simply click again on the broadcast button of the primary terminal to go off-hook everyone else too.
Browser Isolation
Regarding Browser Isolation, opening a resource is very similar to opening an RDP/SSH/VNC. In fact, when it is opened it will show itself in a dedicated screen which will render a real browser ready to be sailed.
In fact, more or less the same features will apply such as Copy and Paste, File Manager to be able to upload/download files from web portals, etc…
Once you open a Web App under Browser Isolation, it will look like this:

Where:
- We have navigation controls: page forward, back, reload, and homepage
- We have the address bar
- File Manager to exchange files and signs with the isolated browser session
Browser Isolation File Manager
In fact, for browser isolation, being a completely isolated and virtualized environment, as far as it goes for all file management, you need to go through the file manager which will set up an exchange area made up of two folders:
- upload
- download
freely usable to upload/download files from the browser isolation session.

Settings

The features present are:
- Dark mode: change OSA theme between DARK and LIGHT
- Density: change window display mode between <Compact|Normal|Large>
- Full Screen mode: enable/disable full screen/kiosk mode
- Menu intellihide: serves to hide the left side menu of OSA. It will appear by hitting the mouse on the same edge.
- Tree Resource menu: enable opening tree resources
- Keyboard language: change the type of keyboard layout (remote desktop only)
- Keyboard layout: change keyboard layout type (remote desktop only)
- Shared Clipboard: Setting that allows you to enable/disable reading in the clipboard
- Editor theme: change the text editor theme.