ADC cluster setup
Notes before use
OPLON Virtual Appliance (VAPP from now on) is an OSI layer 2-3/4 and OSI Layer 7 HTTP/S DNS (ADC) layer data traffic balancing and routing tool.
OPLON ADC is a product intended for mission
critical environments, therefore only personnel who have carried out the
course and passed the exam are authorized to certify the cluster
installation
and process the products in operation. All certified persons are
equipped with a certificate of participation in the courses and passing
the
exam issued by OPLON NETWORKS SRL digitally signed.
Preparation for use
This specific manual creates a cluster of the OPLON
ADC module. The cluster allows you to use all the features in high
availability through the use of Virtual IP (VIP). In this case
you will consider a setup of two failed-over nodes between them.
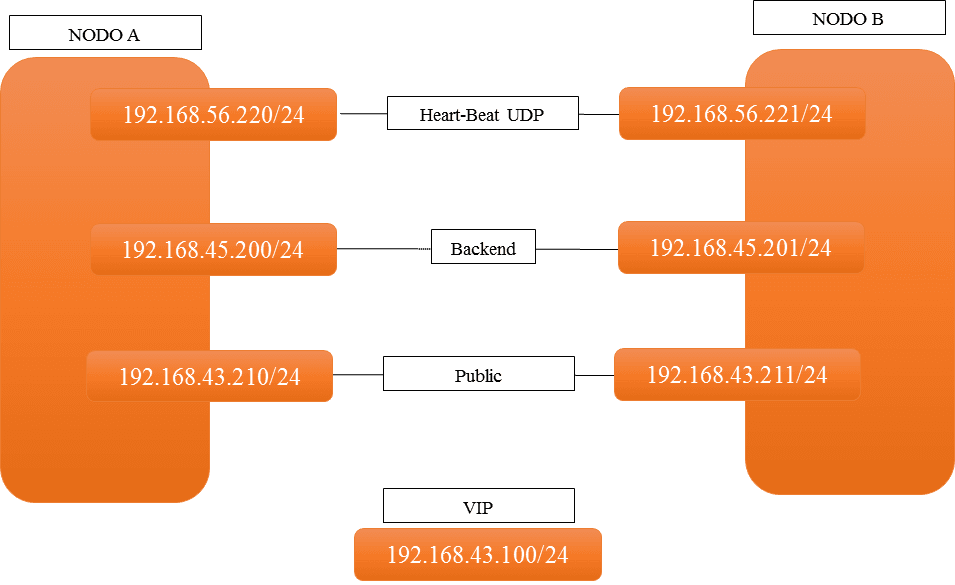
For the example, we’ll use the following IP addresses and networks to
simulate a real
situation:
-
Heart-Beat: Is a node activity status verification network
-
Backend: it is the network where the services are attested, it can usually
be reached through the gateway. In some realities it may reside
in a separate network/vlan -
Public: it’s the network where service requests come from
-
VIP: it is the address that is shared between the two nodes
OPLON VAPPs Static Address Settings
After importing VAPPs into the virtual environment, virtual NICs must
be
assigned to the two nodes. In this case,
2 VNICs will be assigned to each node:

The VIP will be assigned alternately to vNIC A1 and vNIC B1. The node
that
holds the VIP is called MASTER.
We will now assign static addresses to NetworkManager-based VAPPs
(where not present, use the typical deployment tools).
To determine the assignment of virtual environment vNICs with
the internal interfaces of the VAPP, it is good to note the MAC
addresses of the individual
interfaces because this will facilitate the assignment of static
addresses.
In Network Manager-based systems, static addresses will be assigned
through the
”nmtui” interface, while the dynamic address (VIP) will be assigned
directly by OPLON®ADC.
The following are the static address setup steps of one VAPP,
which are used to do the same for the other VAPP:
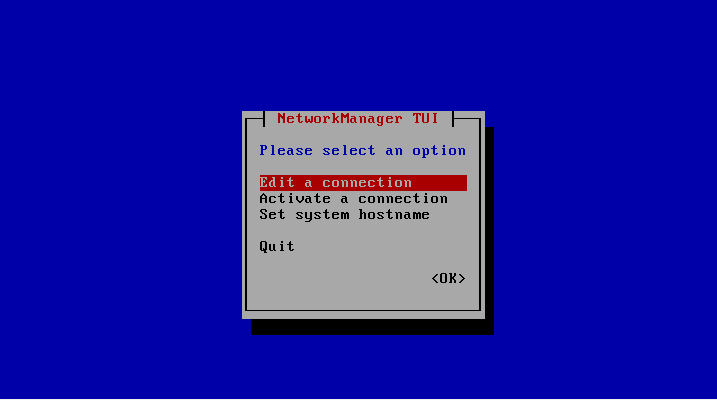
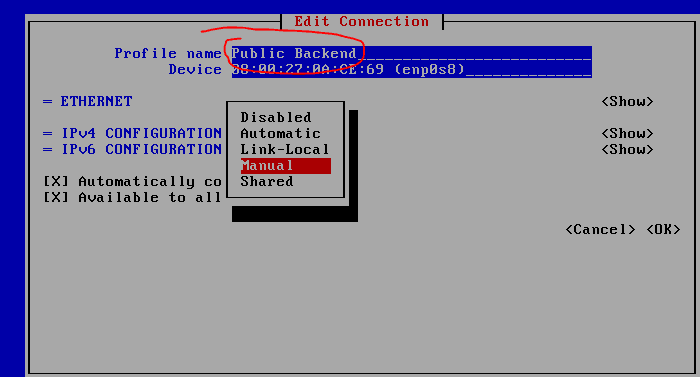
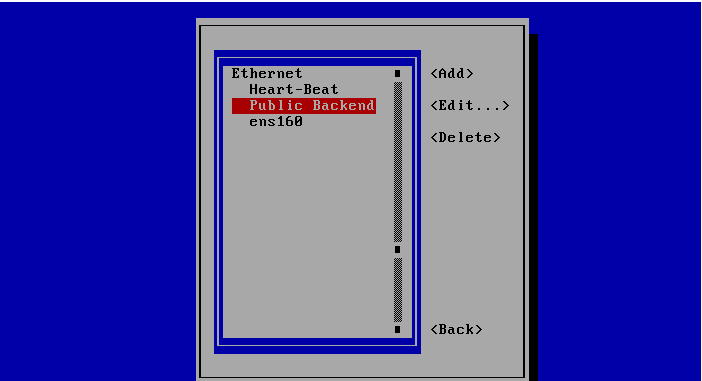
With the arrows position yourself on the first element
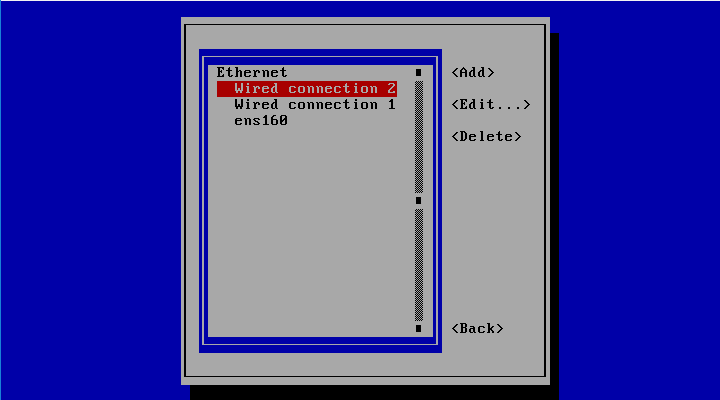
Check the Mac Address and report it to its function
(Public, Heart-Beat etc..). We recommend that you change the
interface description so that you can quickly identify it
later.
Go with the cursor to [Automatic] and change it to Manual:

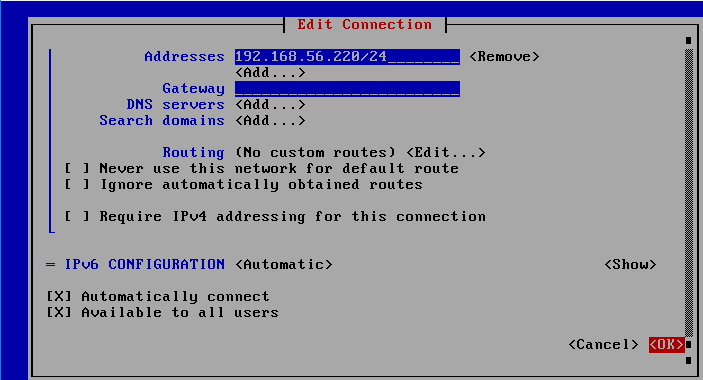
With the cursor go to [Show], you’ll show you how to manually set
up addresses in the interface. [Add] inserts
the address for the interface, in this case the address designated for
the
Heart-Beat **(NB:**remember to also set
the netmask with /XXat the end
of the
address):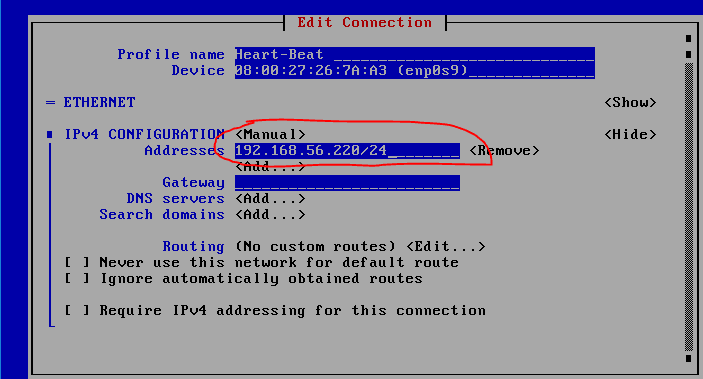
after you finish typing the address with the arrows
position yourself at [ok] and then confirm with the [enter] key
The interface will be repositioned in the choice of interfaces to
be set, con the arrows position themselves on the second interface…
Also change the description of the interface according to its
function by identifying it through the Mac Address. then
go to the choice of the [automatic] address type and change
it to manual
as follows
Add the address/addresses related to the interface
function, which in this case are the audience and the backend. (NB:
Usually,
the backend can not be directly routed to the interface but can
be reached through
a gateway, in this case adjust the setup to the specific
operating environment by adding the Gateway)
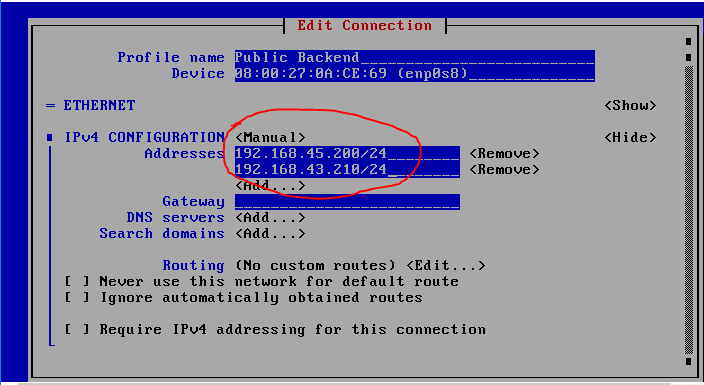
with the arrows go to the confirmation of the [ok] setup and then
confirm with the [enter] button
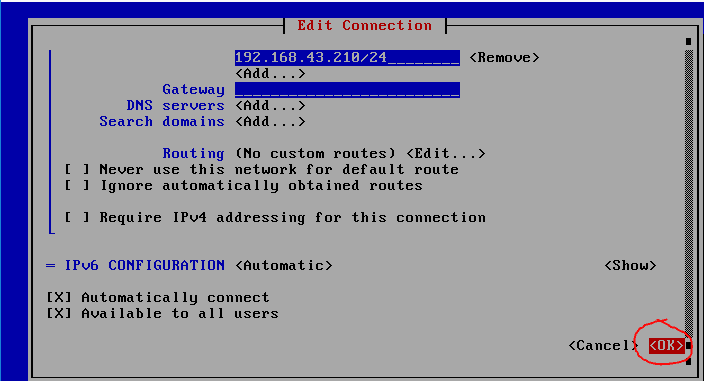
After confirmation, the result will be similar to this
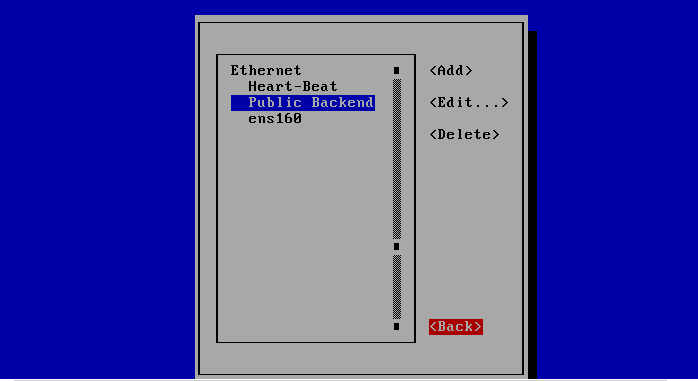
With the help of the arrows, position yourself on [Back] and confirm
with
the [enter] button.
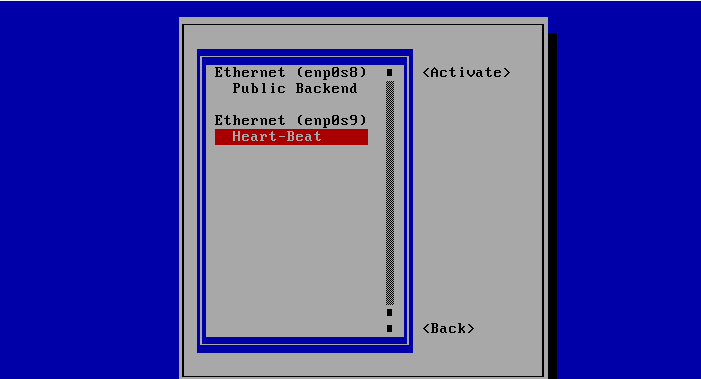
At this point we will activate the interfaces with the new addresses.
(NB: If you are doing this from SSH with the initial DHCP dynamic
addresses on the same
interfaces to which the new addresses will be assigned, you
will be disconnected during the assignment
operation)

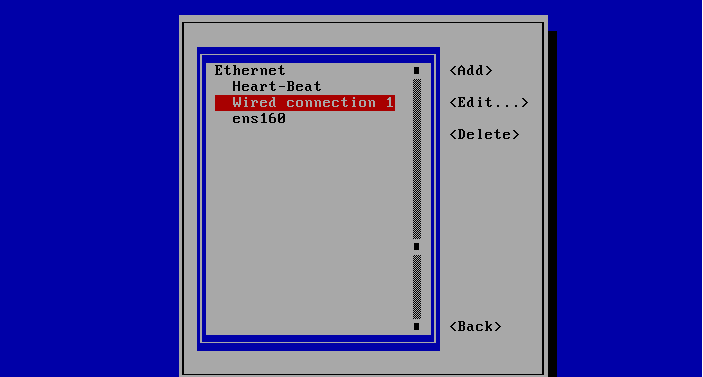
To enable new addresses, you must first disable the
previous assignments, and then turn on the new assignments. The
symbol ”*” identifies that the interface is active. With the
[enter] key it is possible to disable the selected interface and
with another
[enter] you can reactivate it.
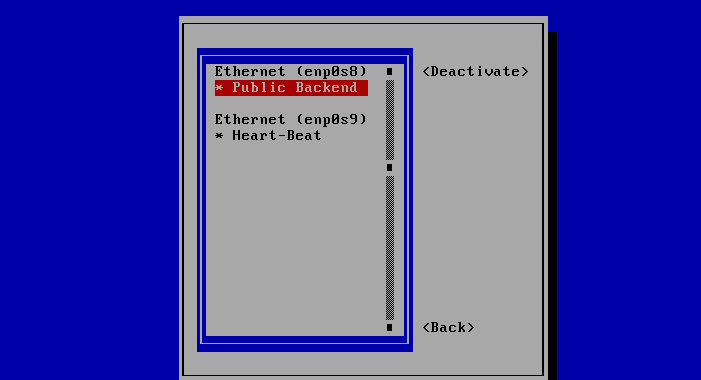
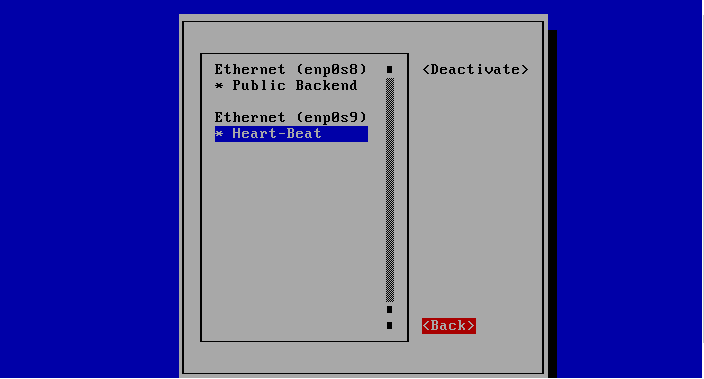
In this case, both interfaces were first disabled and then
with the [enter] button and positioning arrows
reactivated both interfaces…
Once the interfaces on the left are reactivated, the symbol
”*” will appear again.
With the arrows, position yourself on [Back], and then confirm with [enter]
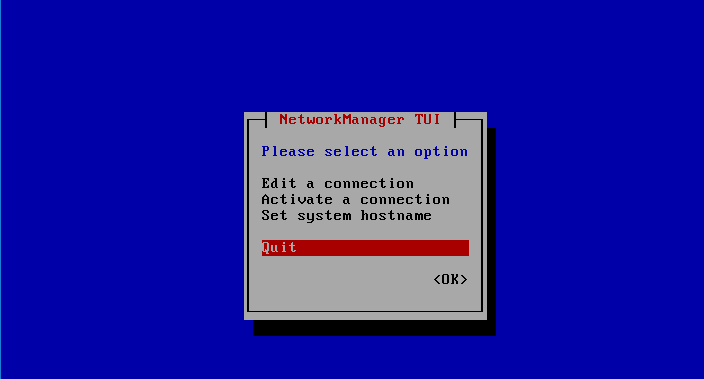
With the arrows, position yourself on Quit, and then confirm with [enter]
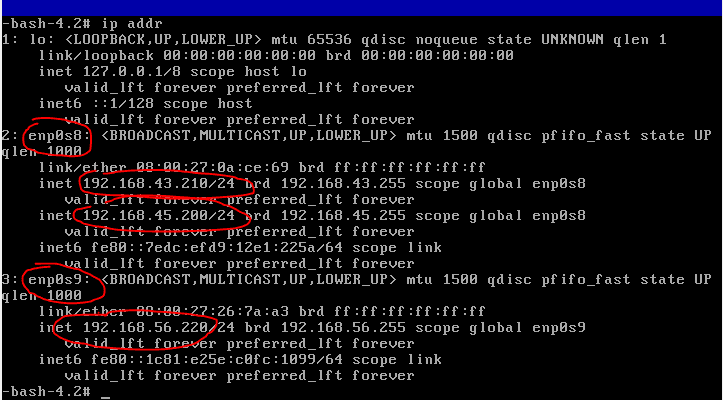
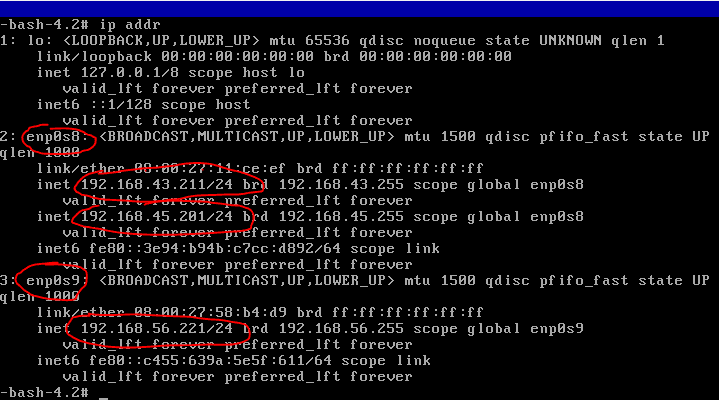
to verify that the addresses were set correctly run the command ”# ip addr”

If the setting was successful, the interfaces must
report the static addresses corresponding to the initial network
schema. Conveniently annotate interface names.
NODE A:
Return the same operations in the other VAPP, the end result
should be similar to the following and in any case in line with your
network
addressing scheme.
NODE B:
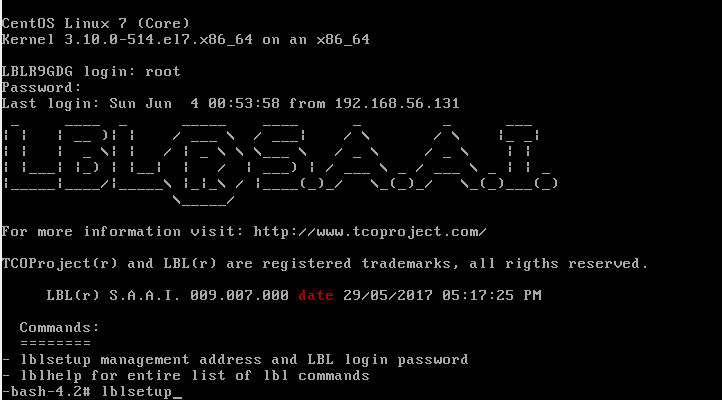
OPLON VAPP Management Addresses Setting
From command line of the NODE VAPP To run ”# oplonsetup”
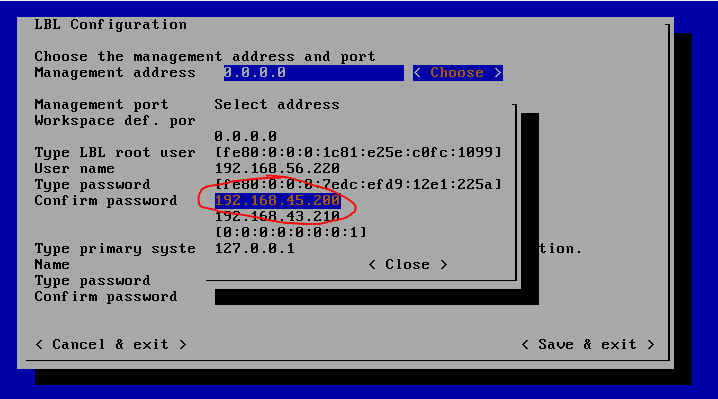
With the [enter] position yourself on [Choose] and choose the
management address, in this case we will
set the network 192.168.45.xx as
management…
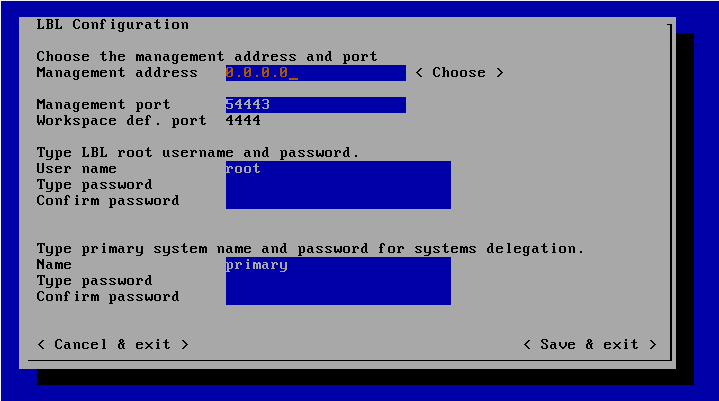
Then place yourself on the password of the user “root” to set the
password. In this case, for example, we will indicate “AdminAdmin1!”.
NB: For security reasons,
do not set “AdminAdmin1!” in production.
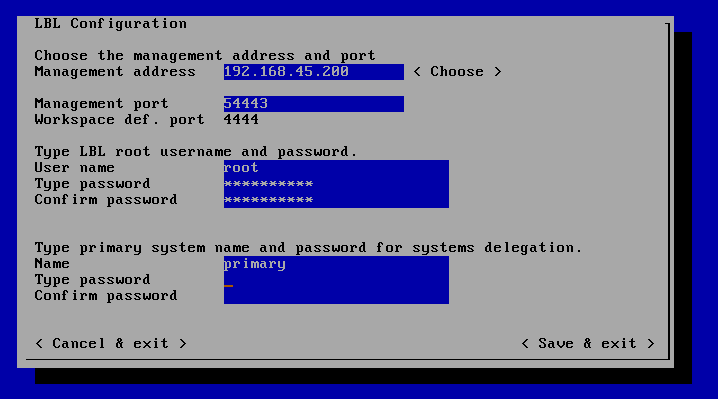
Setting delegation passwords allows you to use VAPP inHybrid
environments
by allowing for administrative hierarchies.
This feature allows you to assign groups of VAPP in complete
self-management while maintaining overall control of the
infrastructure. See the”Autonomous
Delegated Authentication” manual for this purpose.
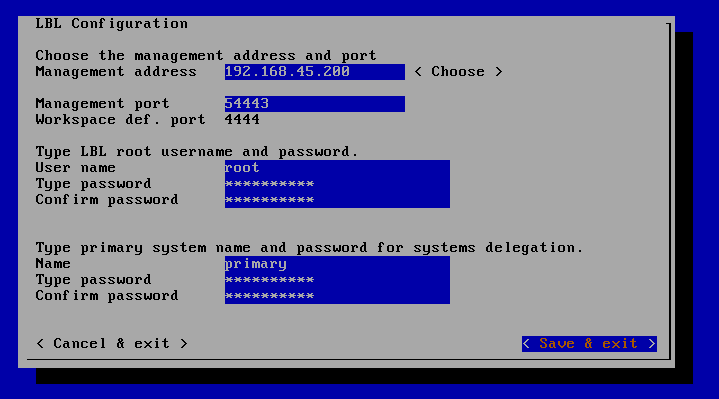
After you set administrative and delegation logins and passwords,
go to < Save & Exit > to save the settings.
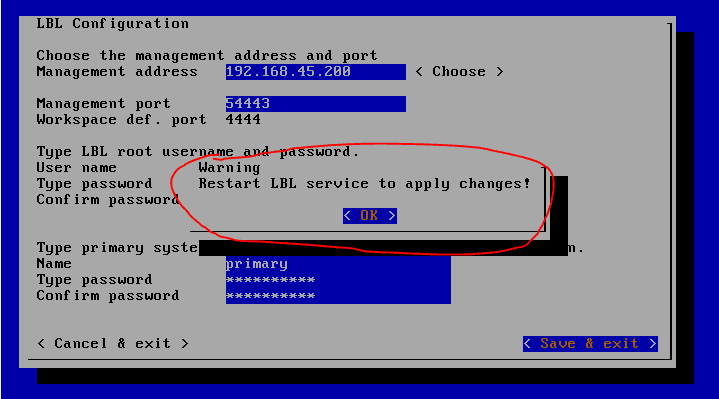
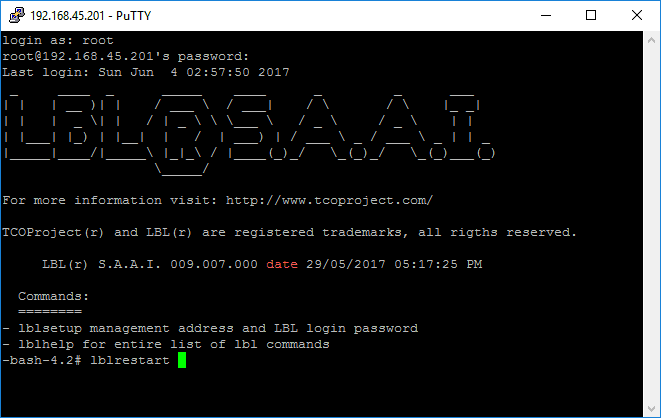
to make the settings effective you must restart
the services by using the # oplonrestart command
Executing the command # oplonrestart

The command takes about 1 minute at the end of which the VAPP
will be configured with the management addresses where the WEB services
and the
Management Console will respond.
You can verify that management listeners actually match
through commands:
# ss –ln|grep 4444
And
# ss –ln|grep 54443

N.B.: Do the same in THE NODE B VAPP, the result
should be similar to the previous command

Set hostname on OPLON VAPP powered by CentOS
Run from root
# hostnamectl set-hostname OPLON10GDG001
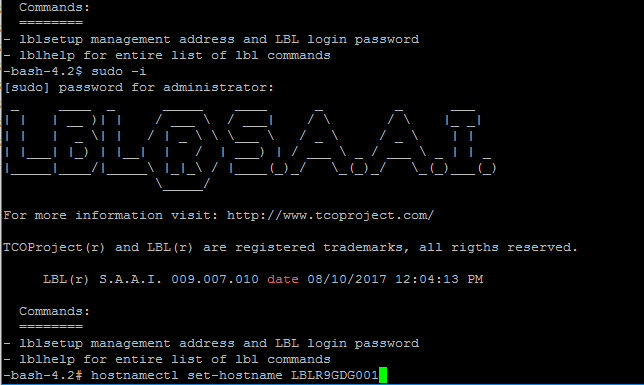
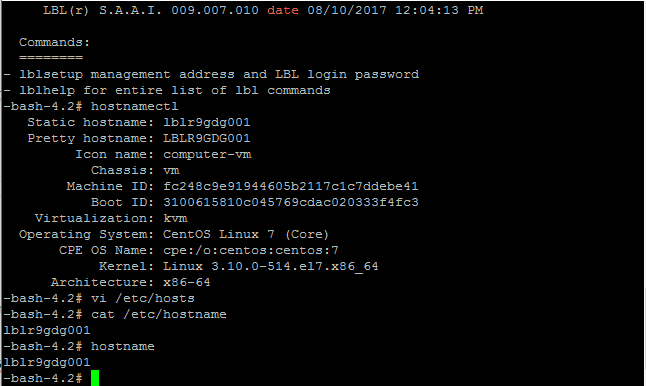
# hostnamectl
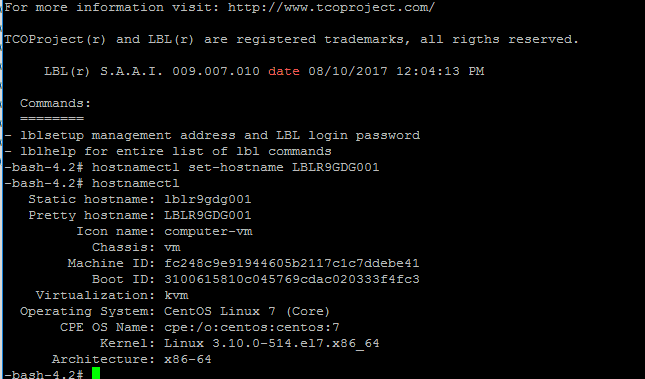
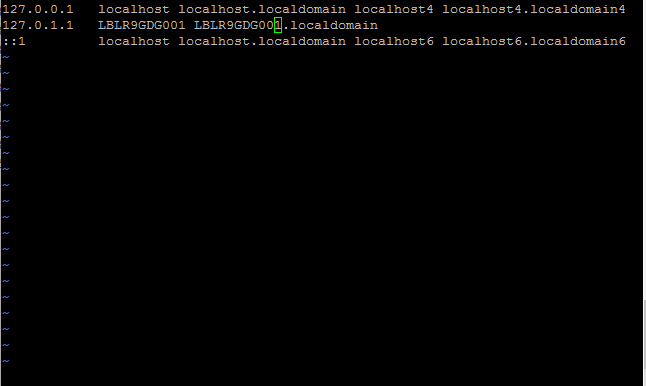
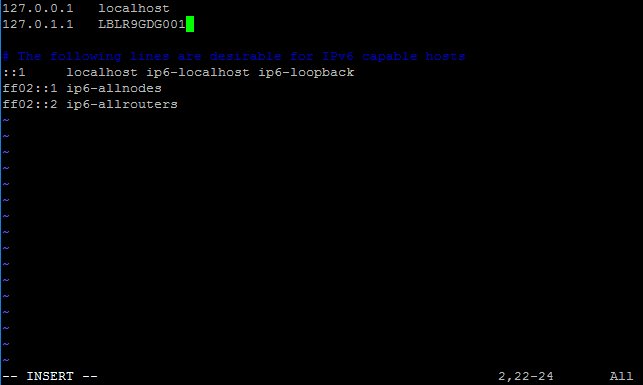
# vi /etc/hosts
Change the address 127.0.1.1 to the new VAPP name
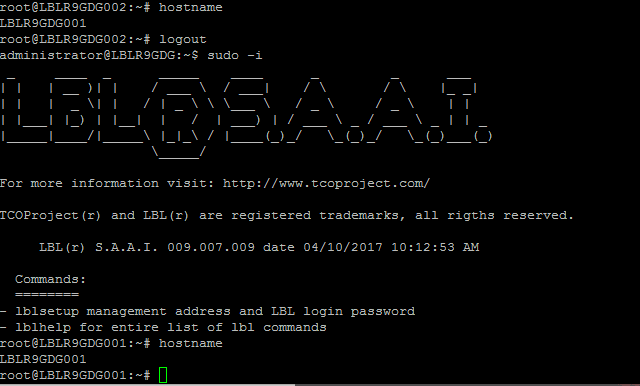
# hostname
# reboot
It is necessary to run a reboot so that applications or
services are also running under the new name.
Set hostname on OPLON GDG powered by Ubuntu
Run from root
# hostnamectl set-hostname OPLON10GDG001
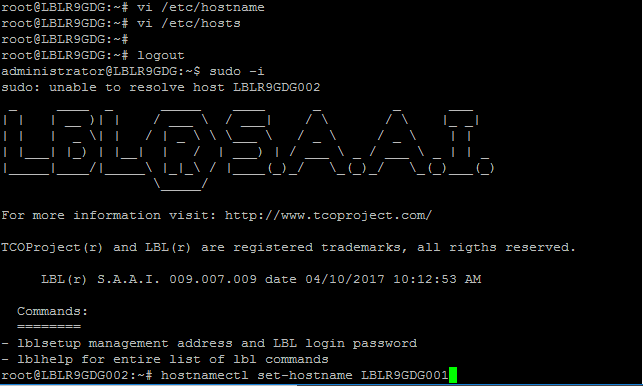
# vi /etc/hosts
Change the address 127.0.1.1 to the new VAPP name
# hostname
# reboot q
It is necessary to perform a reboot so that applications
or services are also in executor one with the new name.
Disabling OPLON Platform Demo/Test Services
Before proceeding with the cluster setup, you must set
the licenses on both nodes and disable unnecessary modules that start
automatically to provide a fast-to-use platform
for
demo/test/prototype purposes. To do this, we will turn off the OPLON
Platform modules on both nodes and then enter the licenses or licenses
necessary for the cluster to
operate.
To disable the OPLON Platform module, simply type on a
browser:
(NB: The service has a self-signed digital certificate, and therefore you
will need
to indicated to the browser to continue. You can still
enter a new digital certificate that identifies the service).
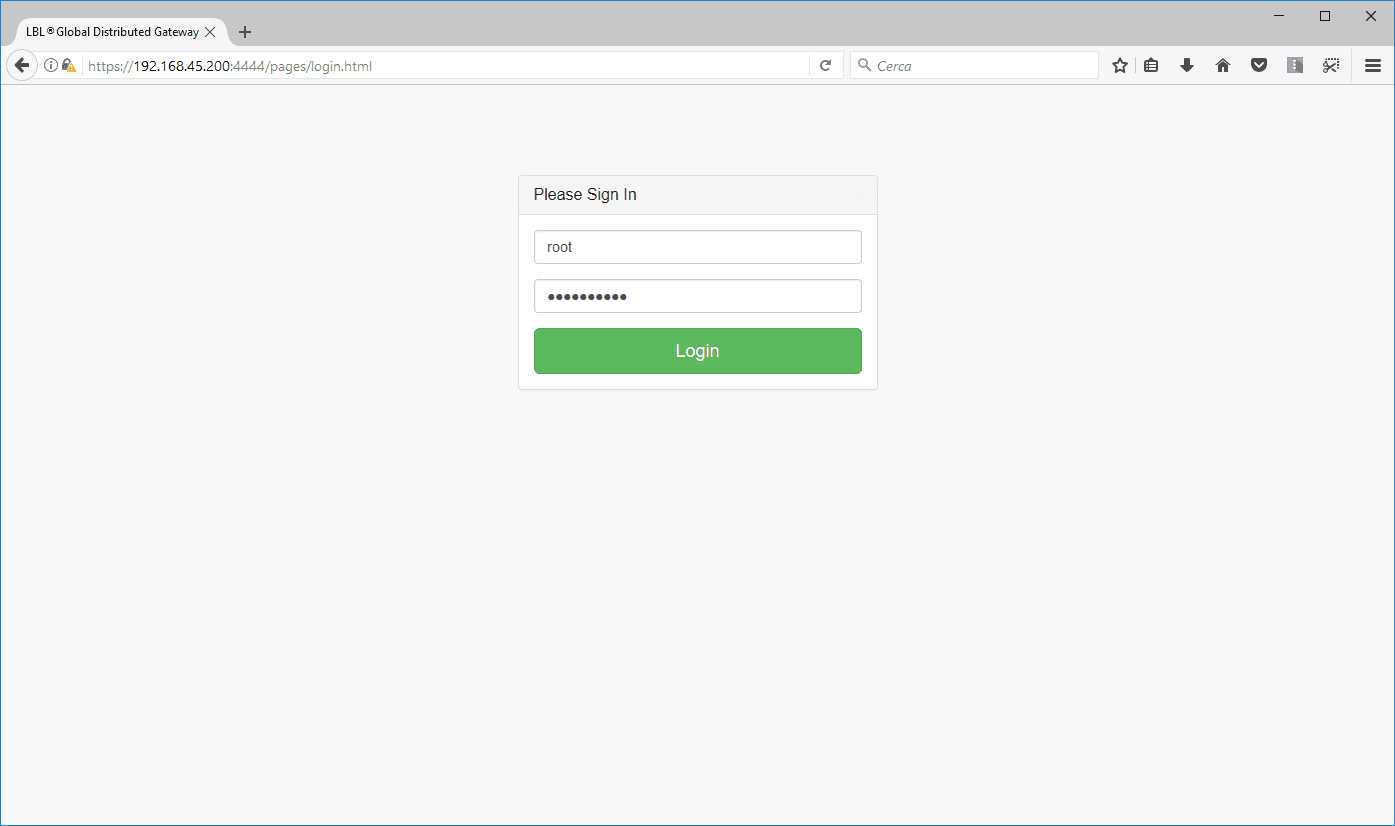
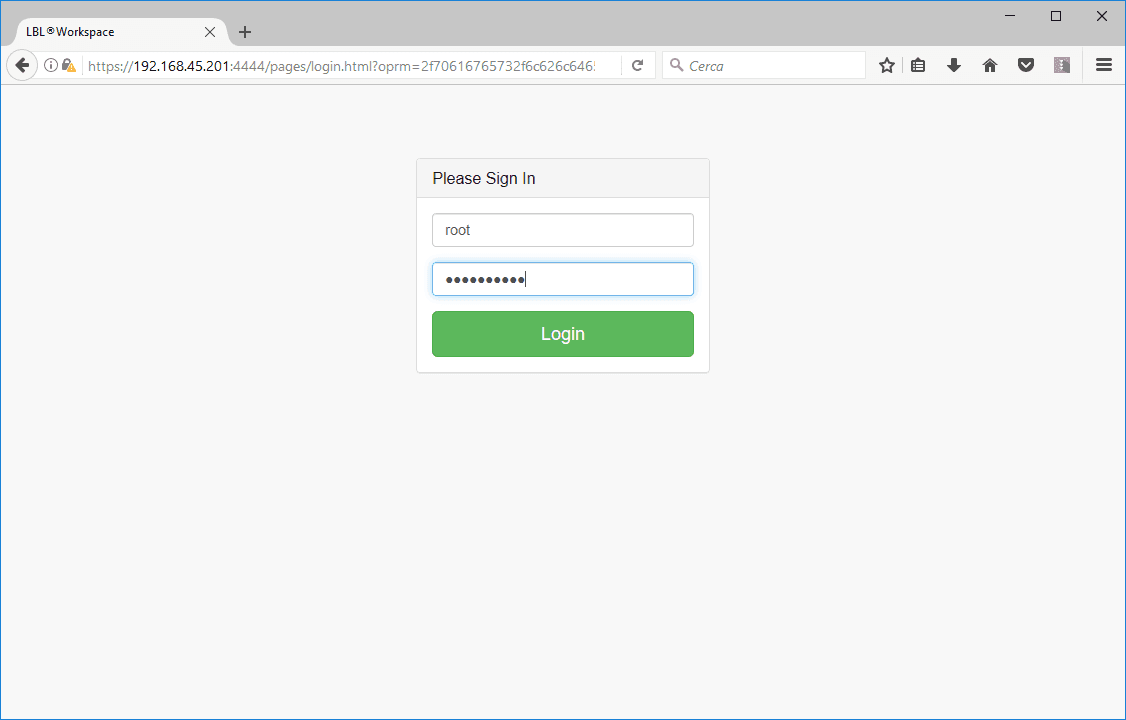
When prompted for login and password, indicate the login and password
set in the console initially, in this case: Login root,
Password AdminAdmin1!
Once the login is confirmed, the Global Distributed Gateway
of global control will appear from which we will sequentially
disable the demo/test modules and set up licenses before setting up
the
cluster
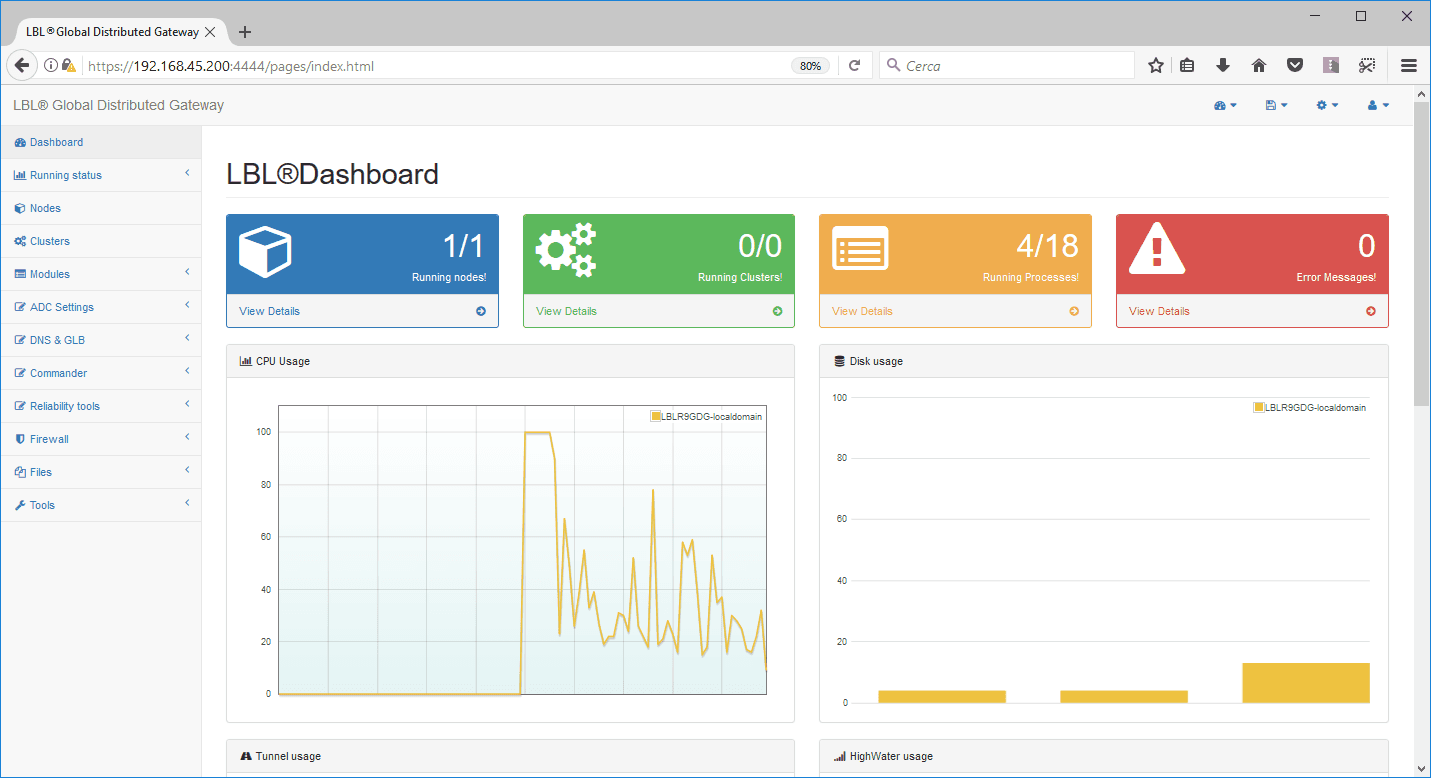
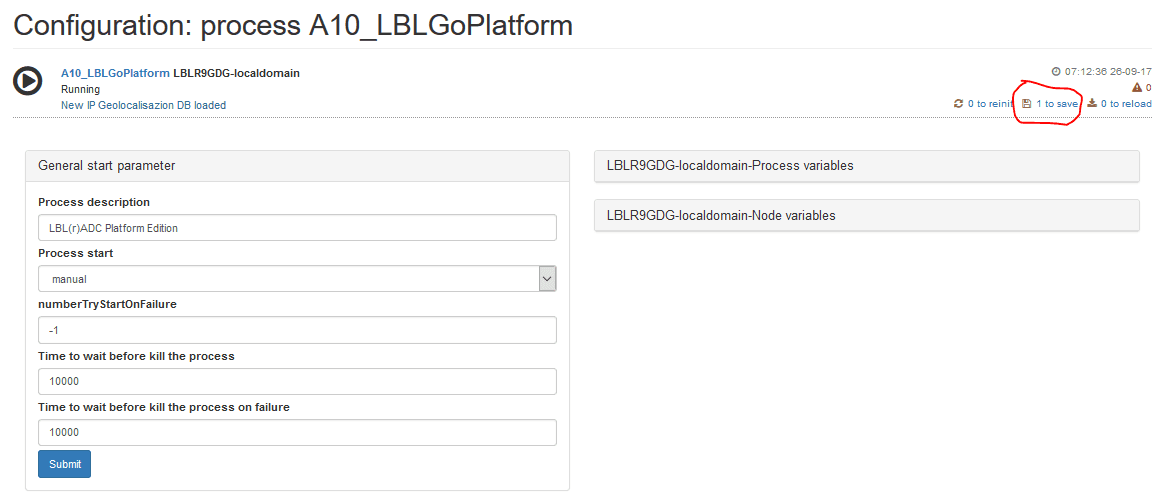
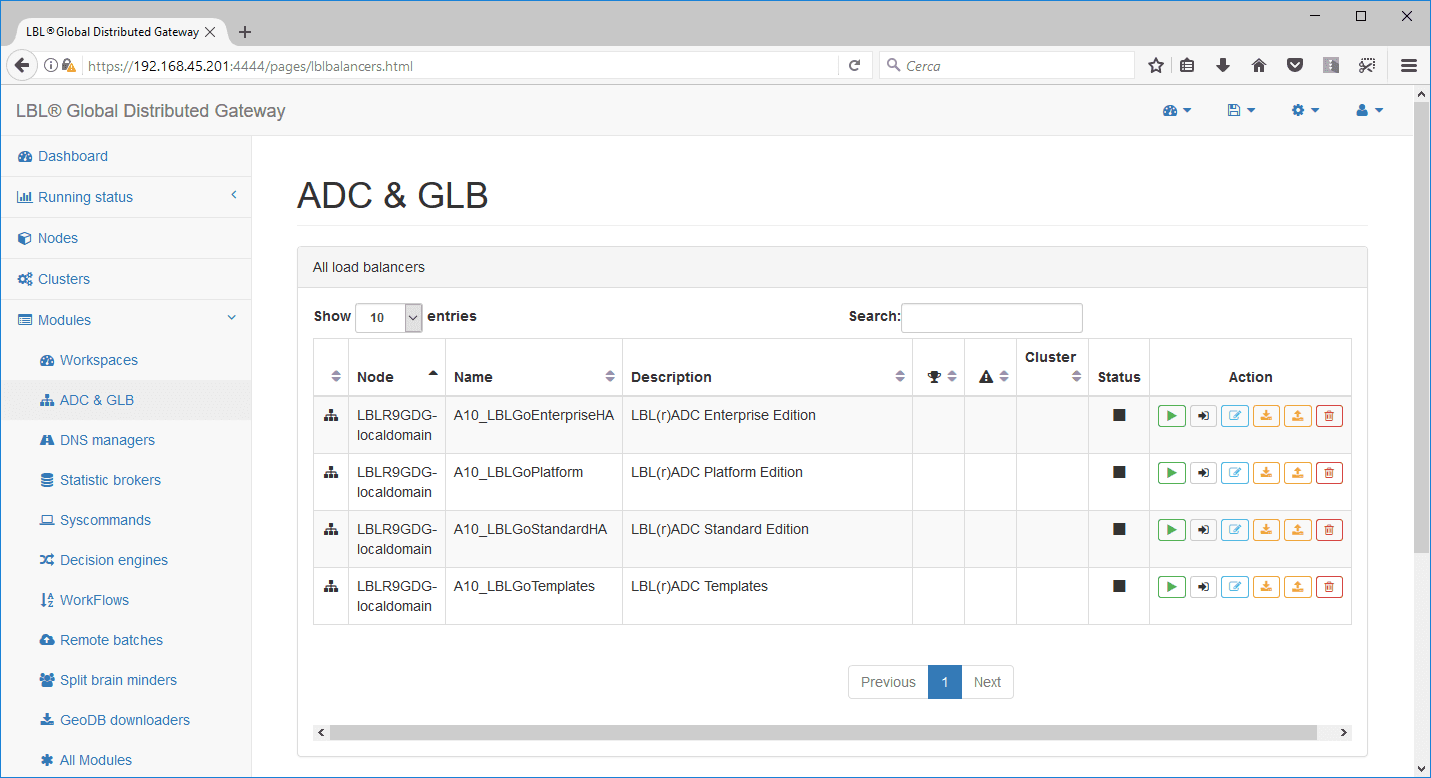
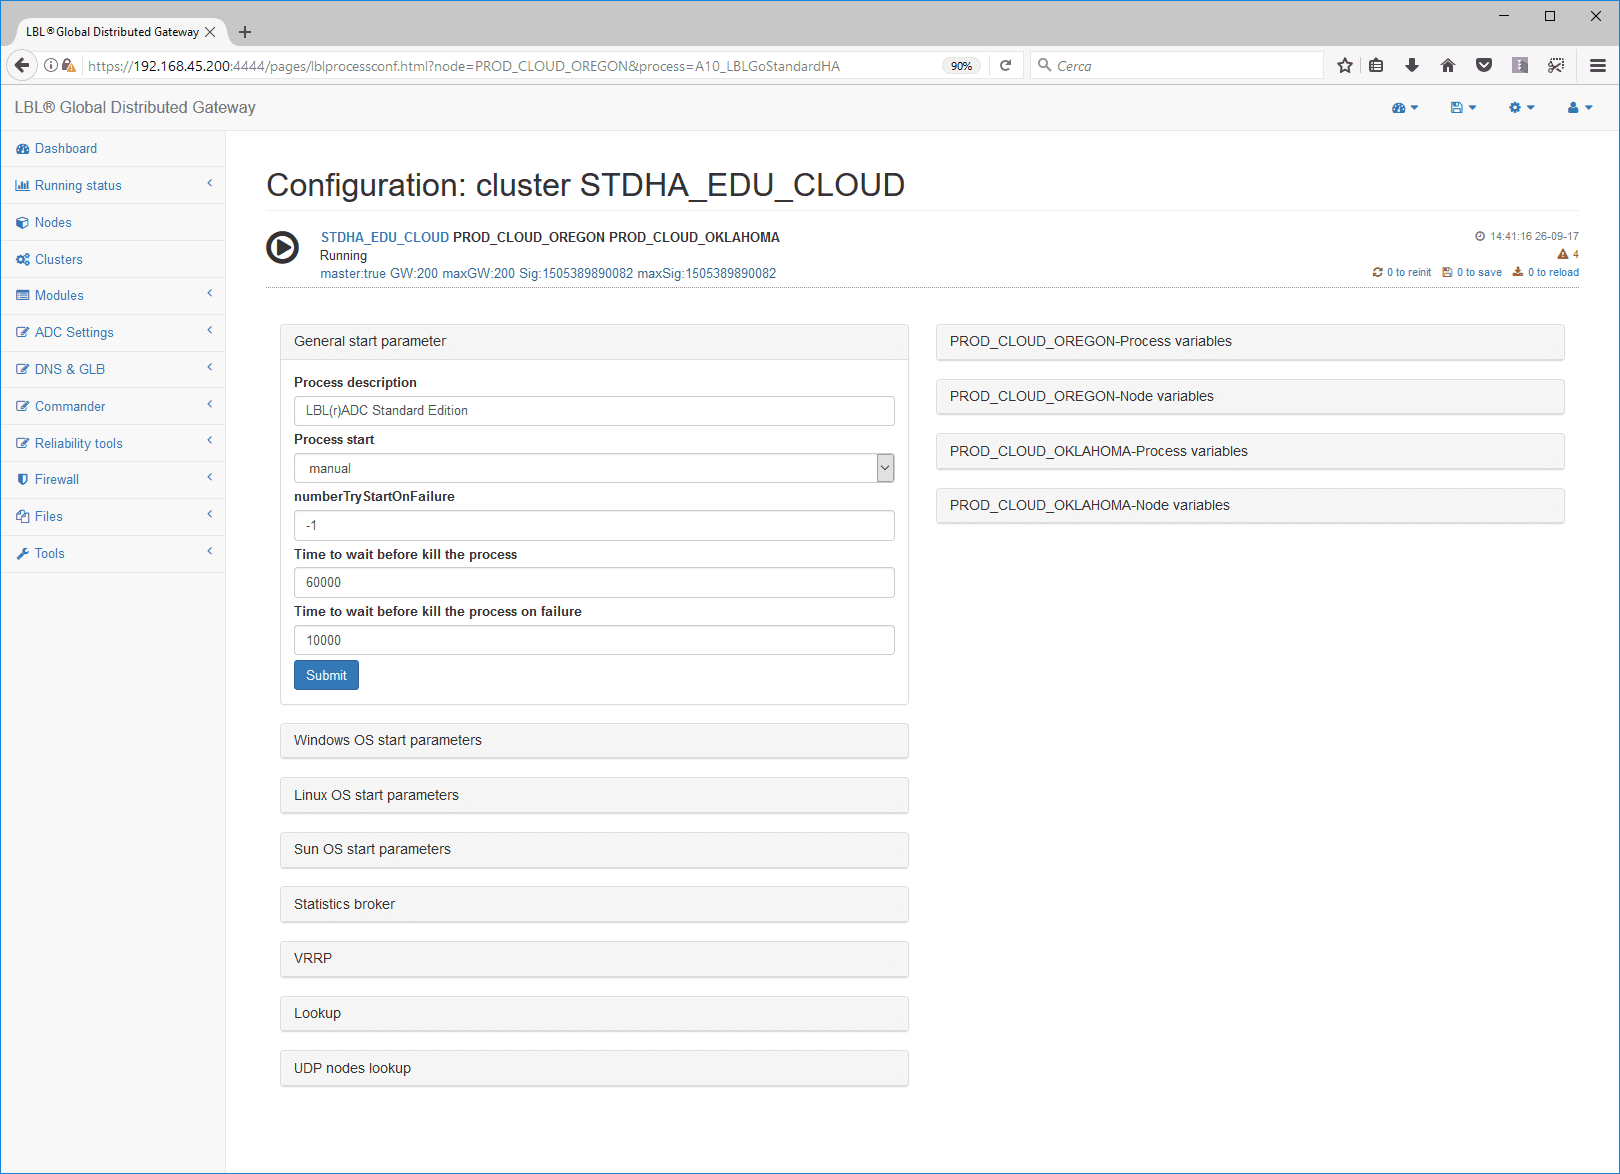
To disable the OPLON Platform module, expand the “Modules” menu and
select “ADC & GLB” and then click “Edit”:

expand the “general start parameters” parameters and change the
parameter from “process start” from “automatic” to “manual”

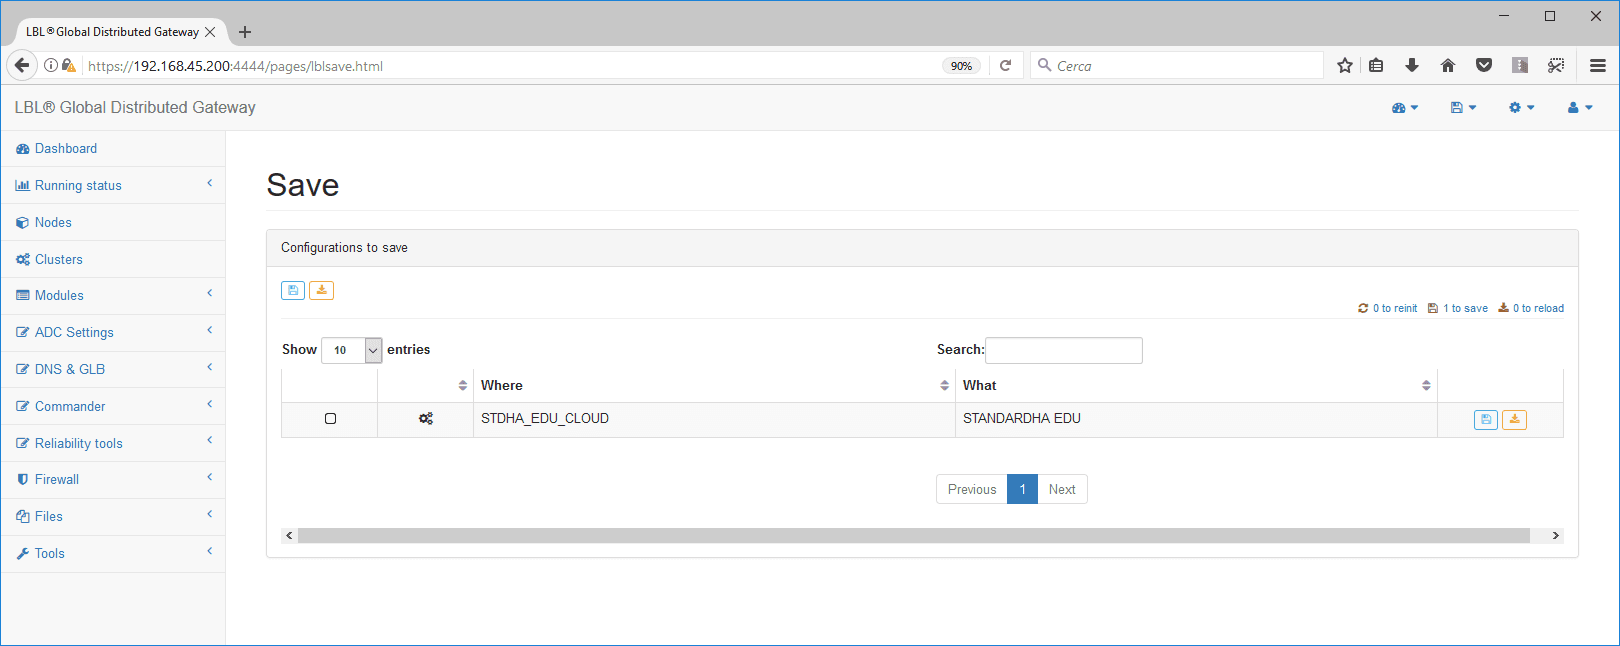
Once the parameter is changed, a “1to save” indicator will appear at the
top right to save the
configuration.
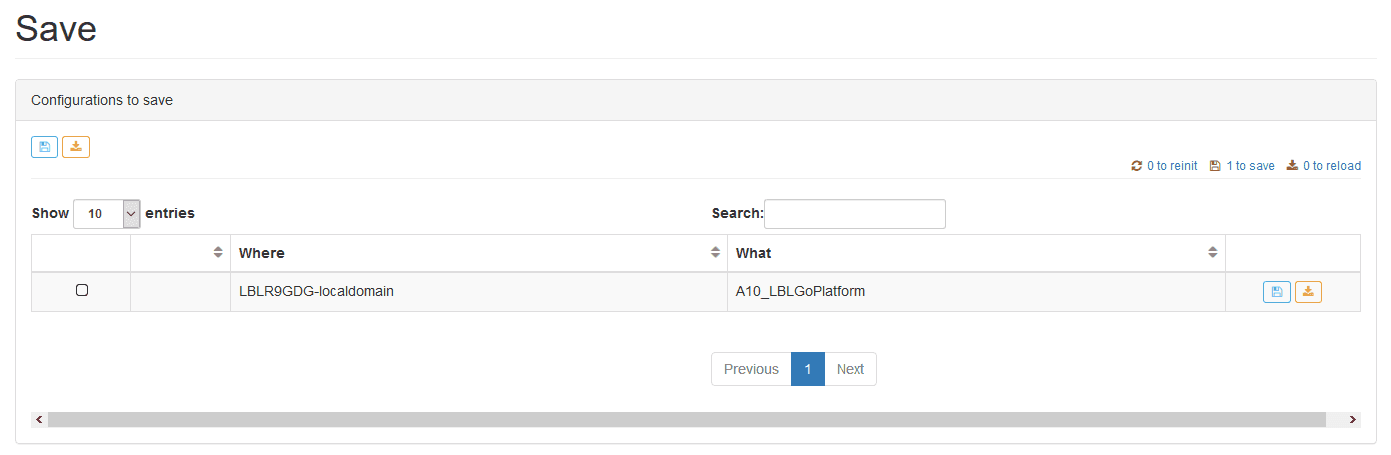
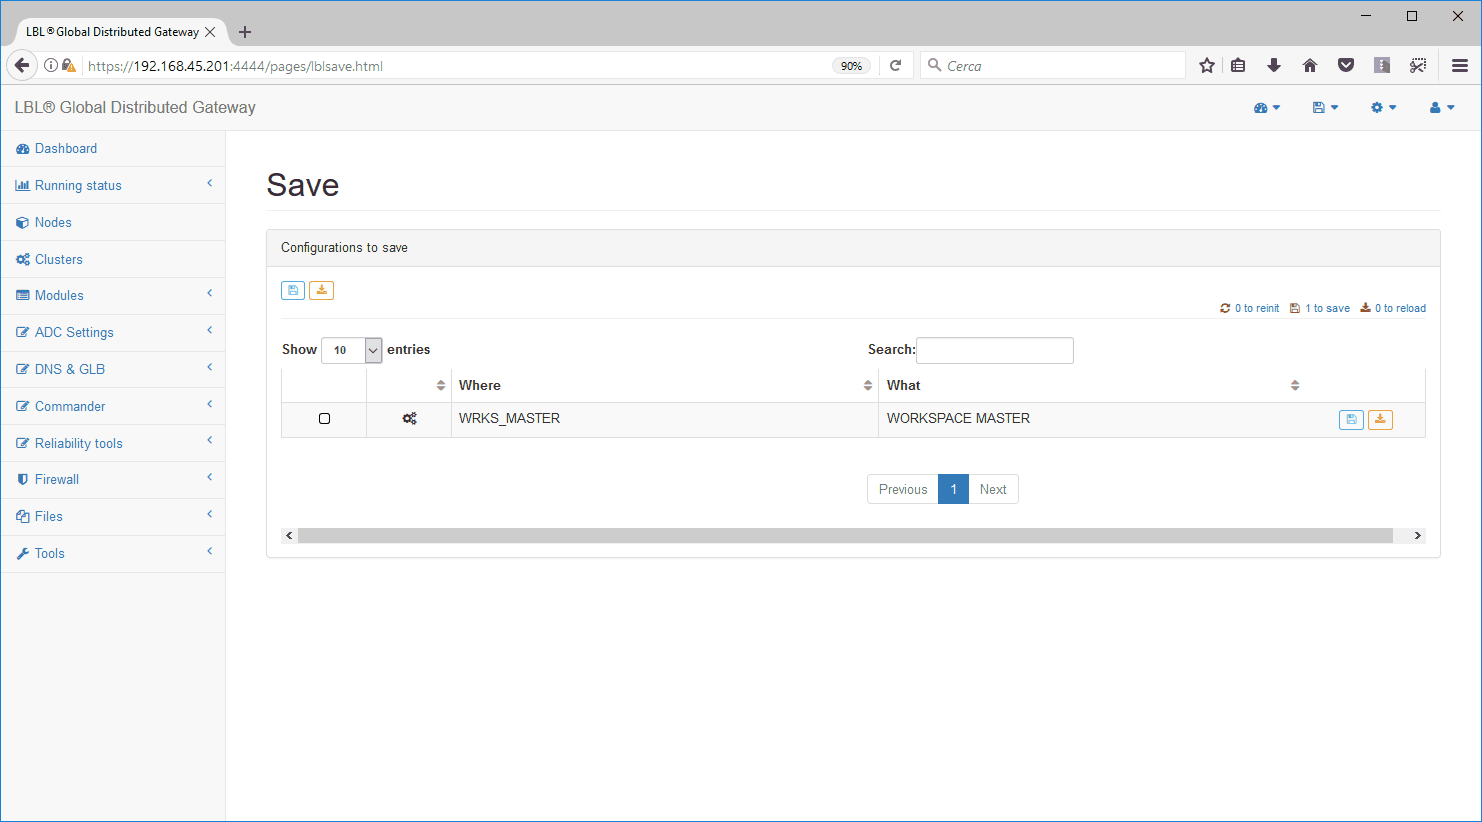
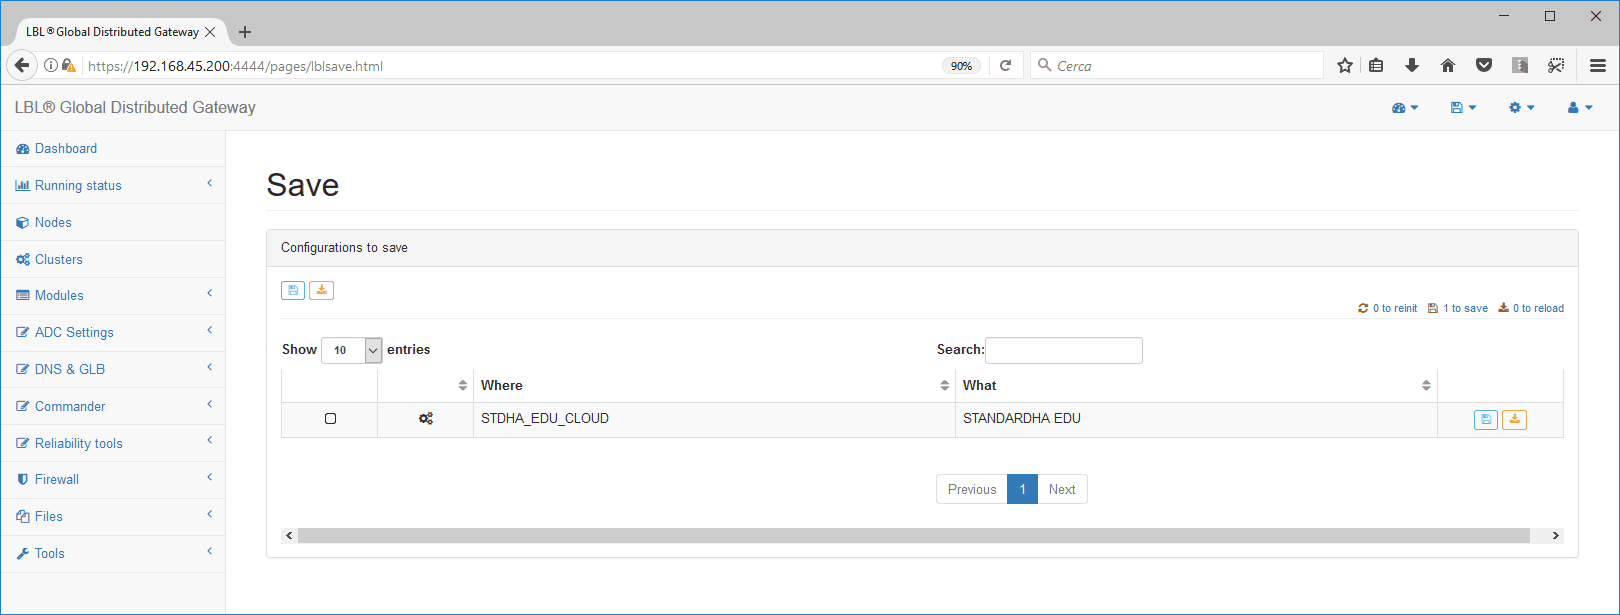
By following the link “1 to save” it will be possible to apply the
changes. To
do this, press the save button. (NB: in this case the modification
and application will be immediate and will result in the
shutdown of
the OPLON Platform module)
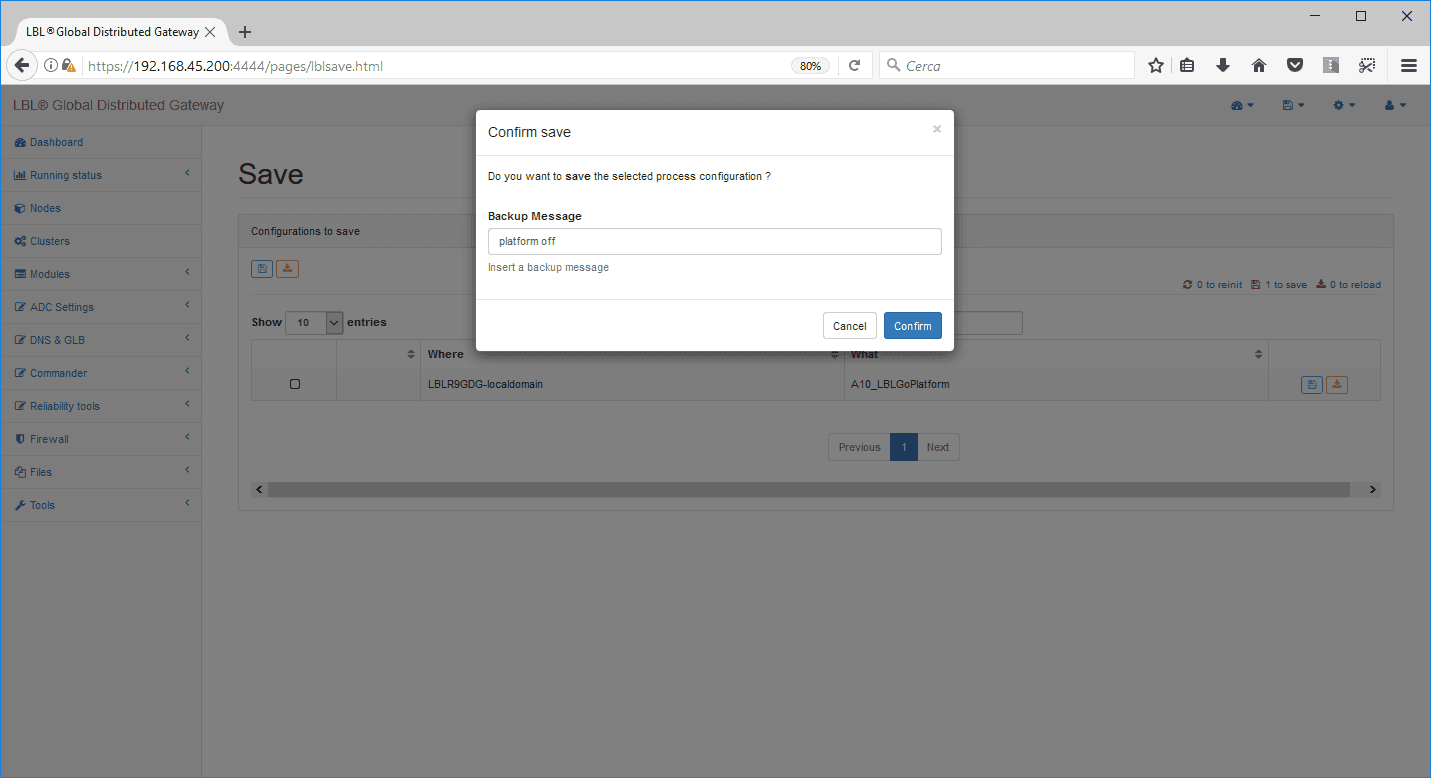
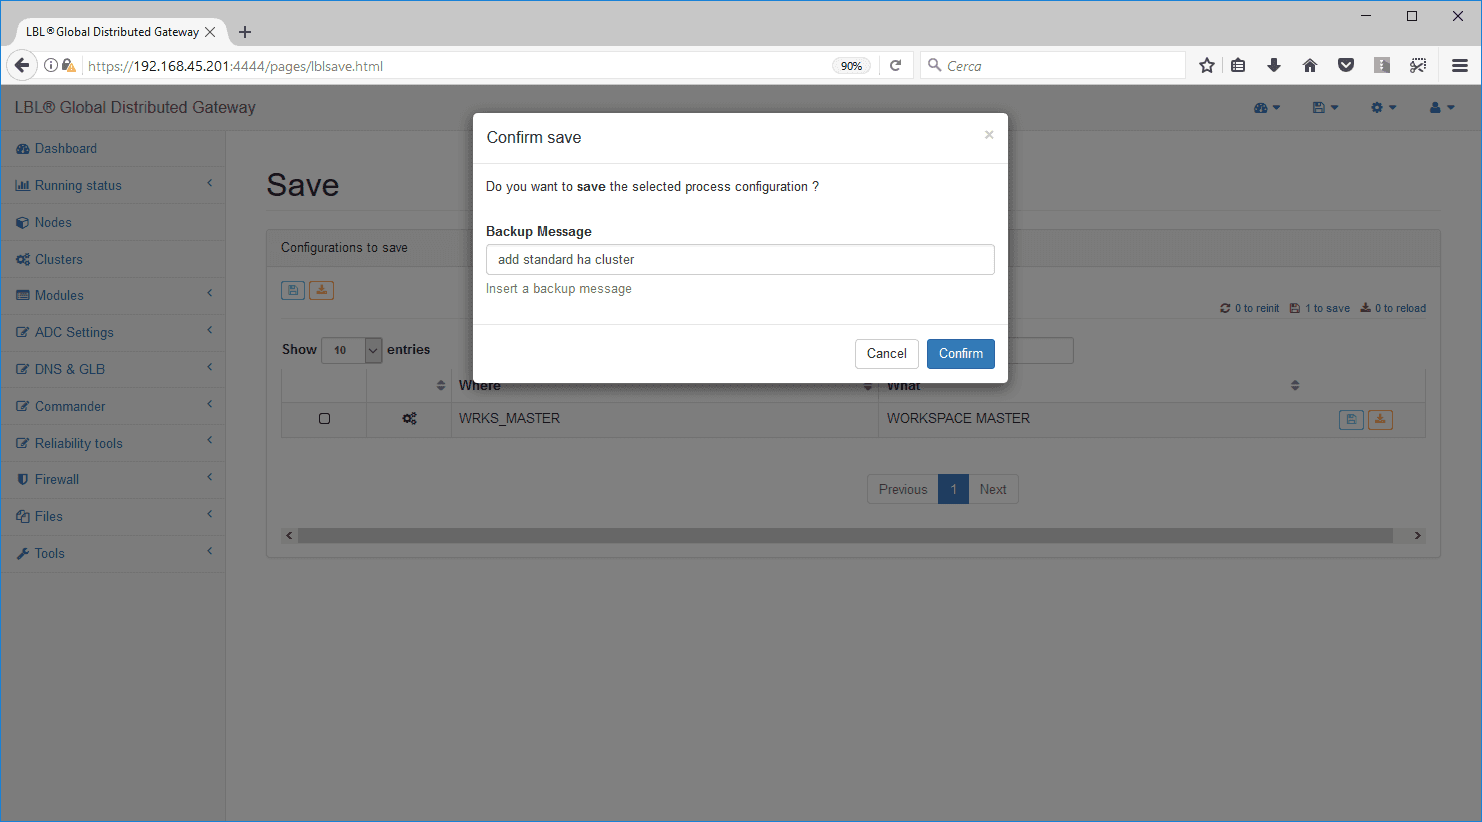
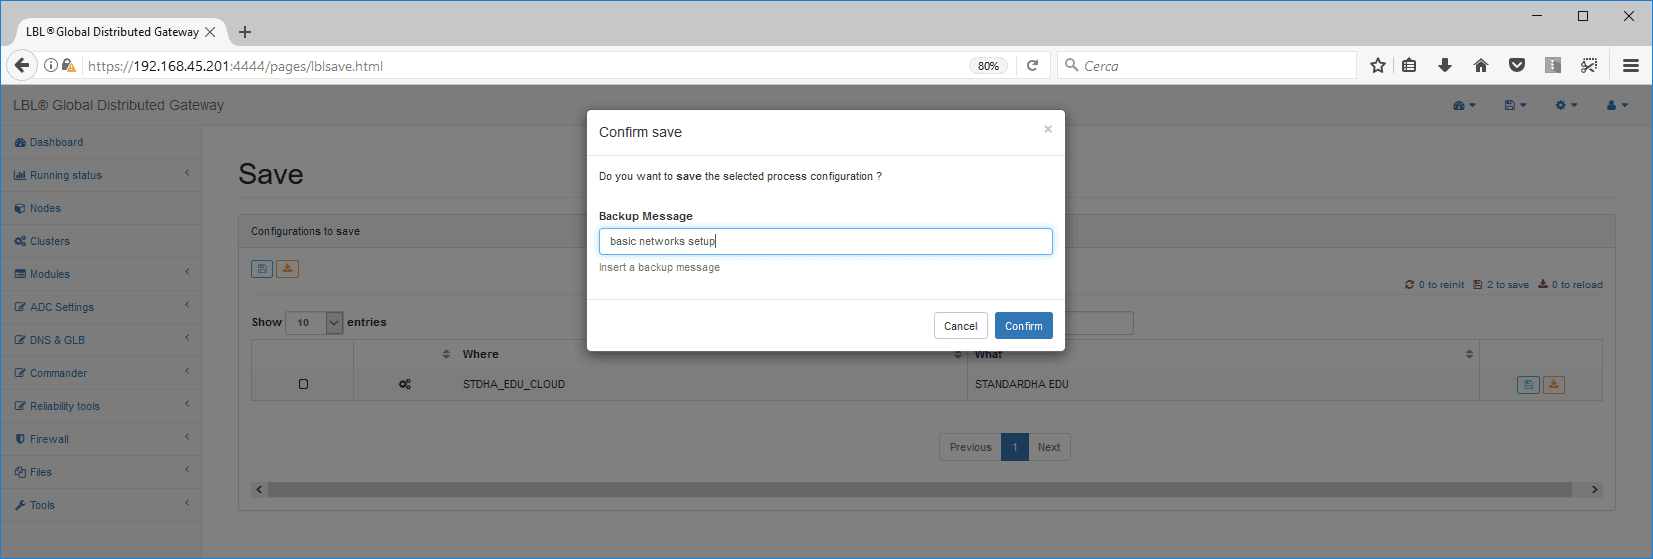
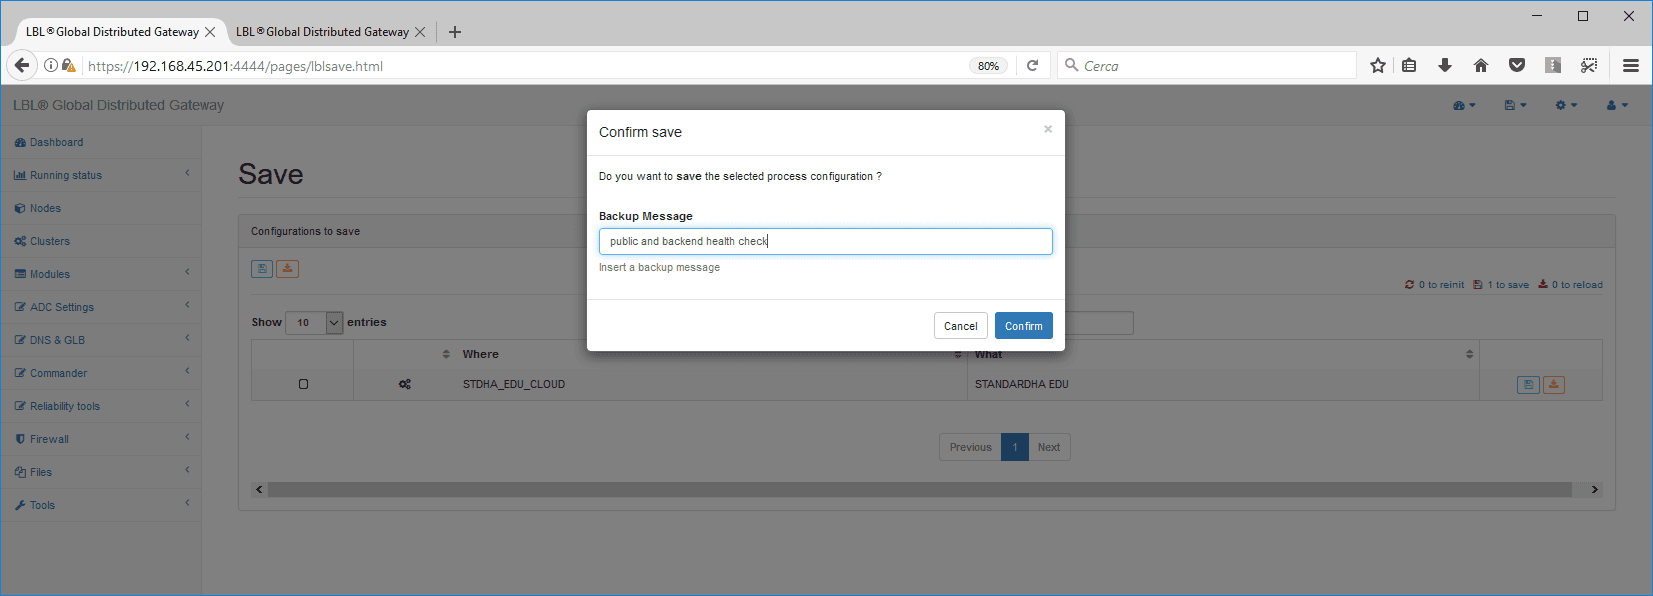
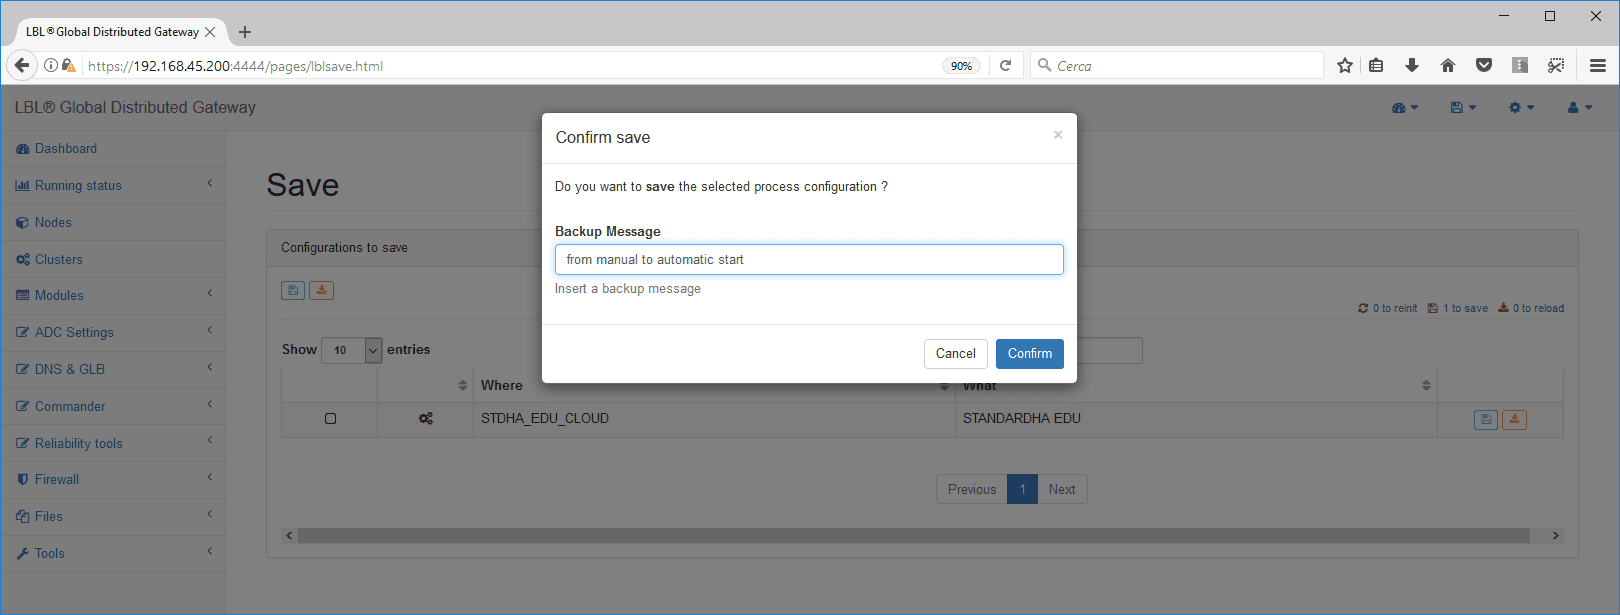
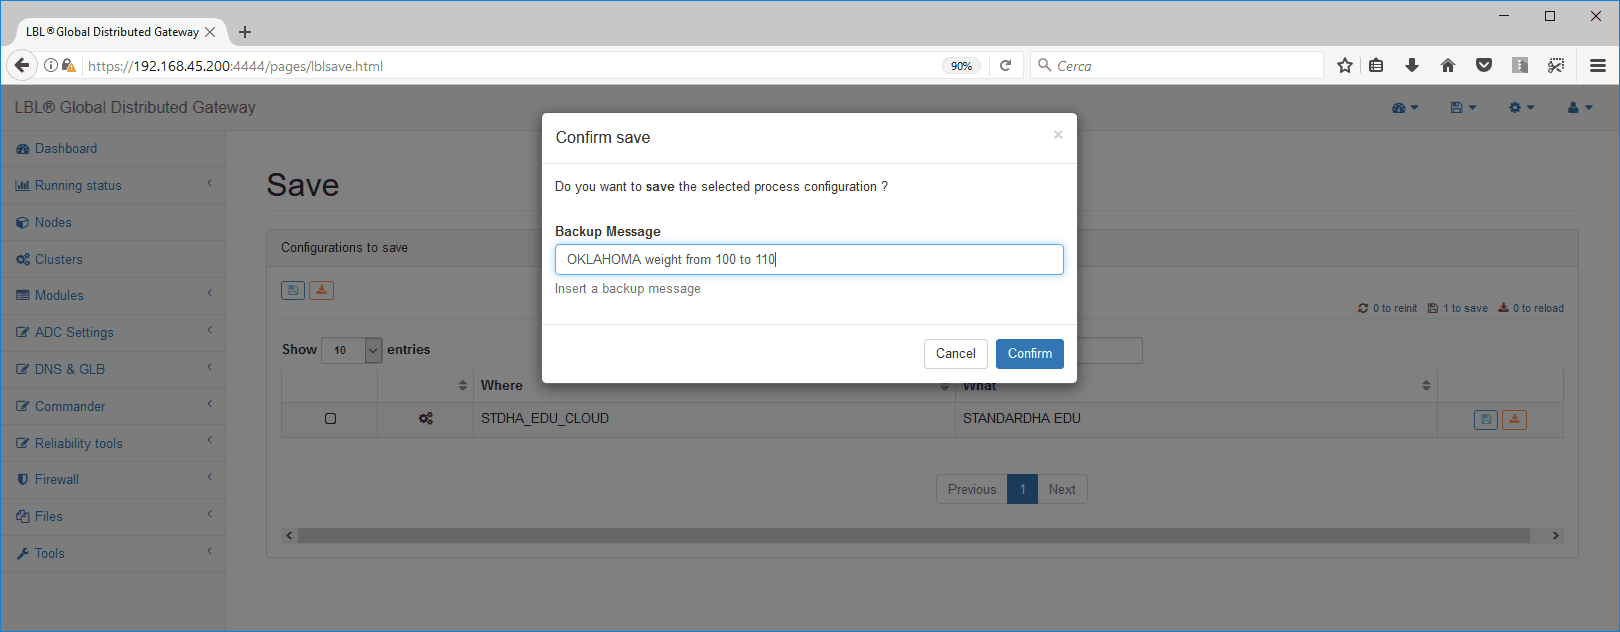
As soon as you press the “save” button you can describe the operation
because all changes are
”recorded” both to
perform rollbacks and for “audit” procedures
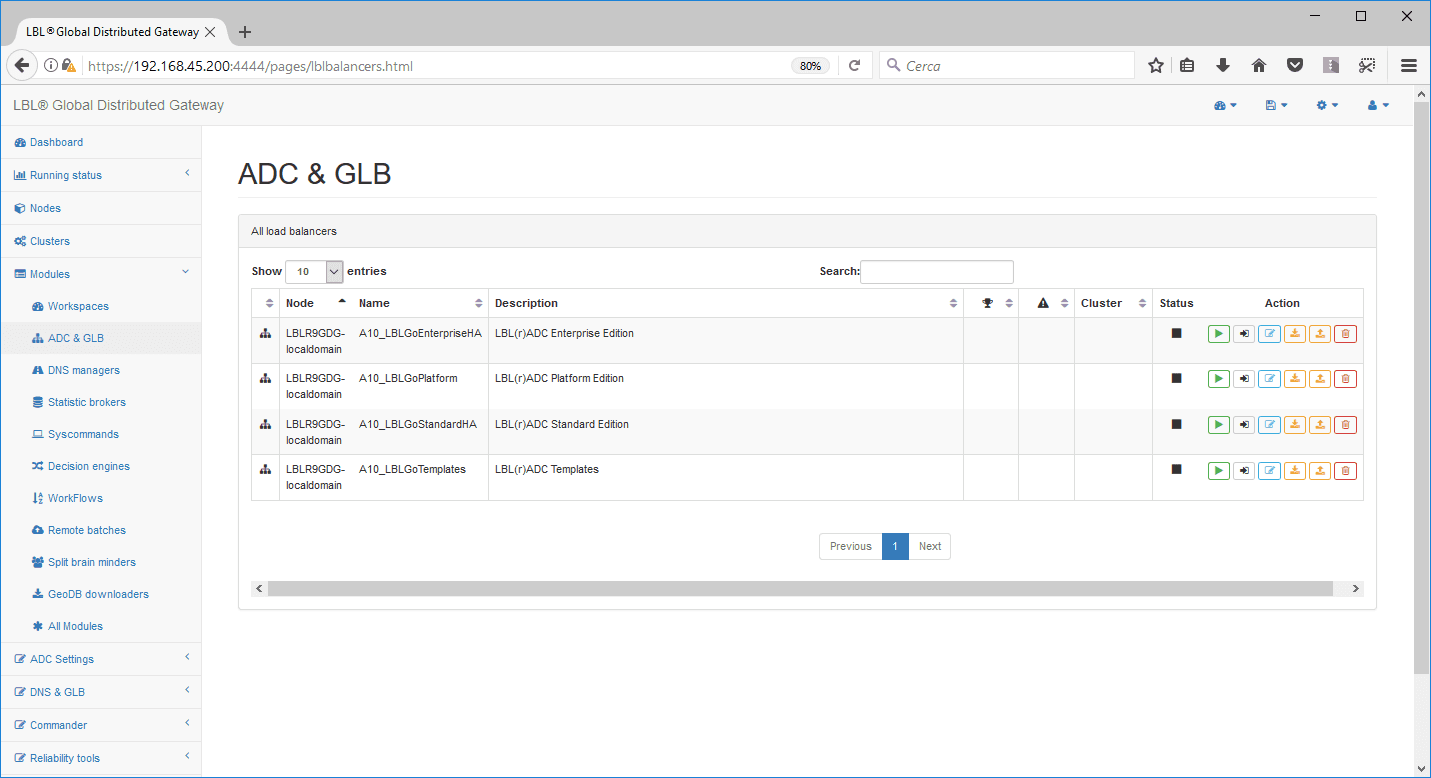
If you return to the “Modules” -> “ADC & GLB” selection, you will
notice a rotating gear symbol

… until the module is completely shut down
NB: Do the same on NODE B
Setting up licenses
To enter form activation licenses, do the
following.
-
Get licenses
-
Install licenses
When obtained licenses you can install them depending on their
function. First of all we are going to install the “Catalog”
license that serves to populate the local and/or global inventory
depending on the
license. In this case we need to have Catalog
licenses, for global control, and Standard HA licenses that can also
have the
DoS/DDoS Attack Prevention & Mitigation extension as
below. Licenses must be present in a directory on your
system.
Example:

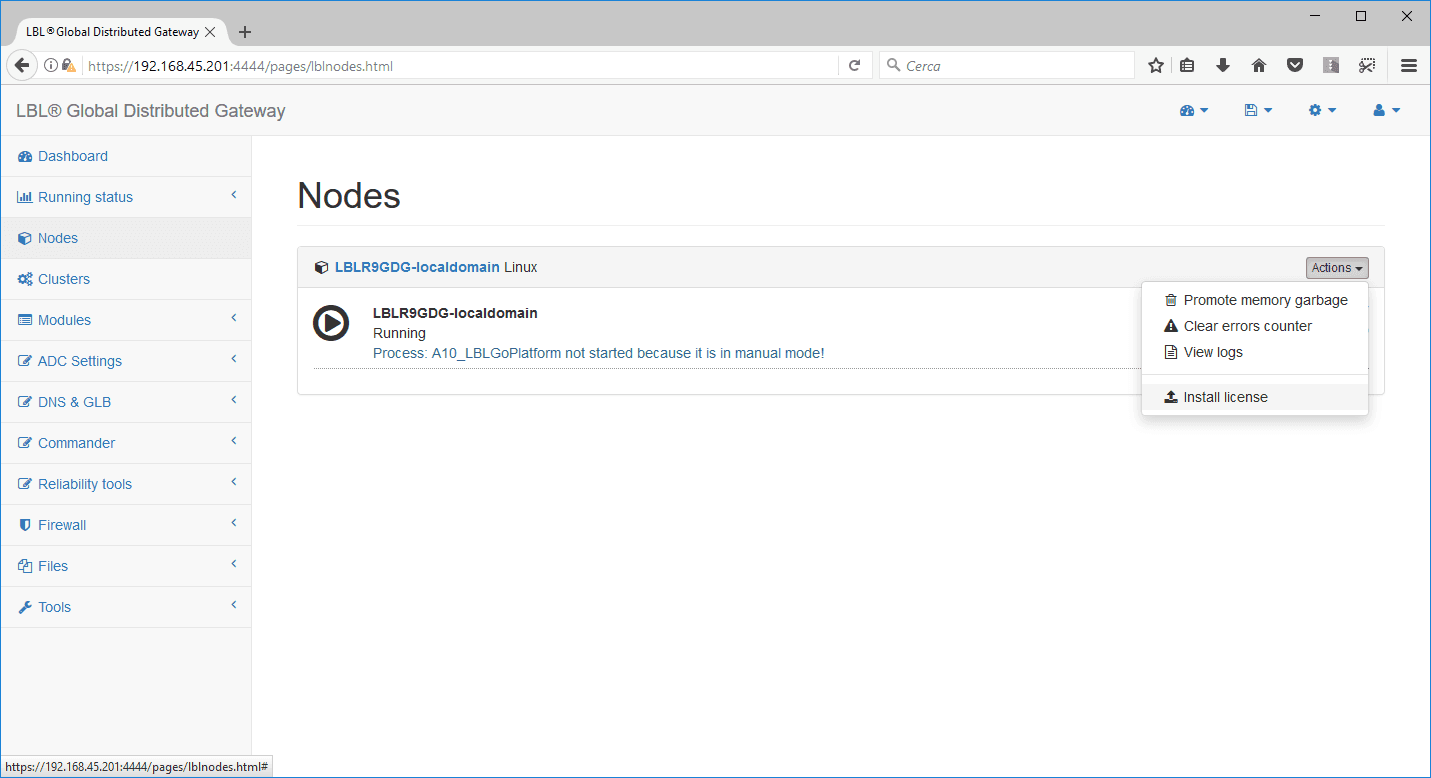
in the web interface select “nodes” and then press “actions”
on which you access the “install license” menu
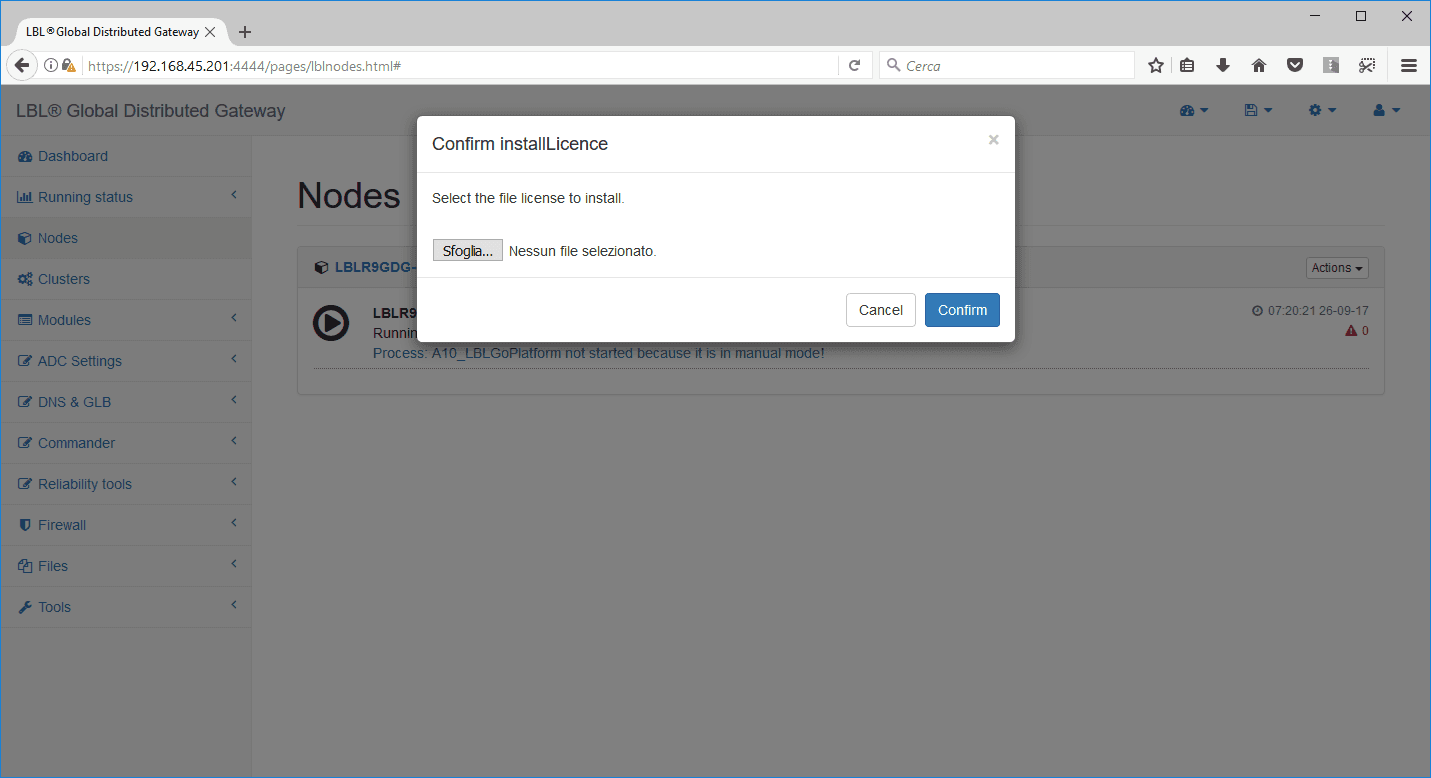
after you select the “catalog” license press “confirm”
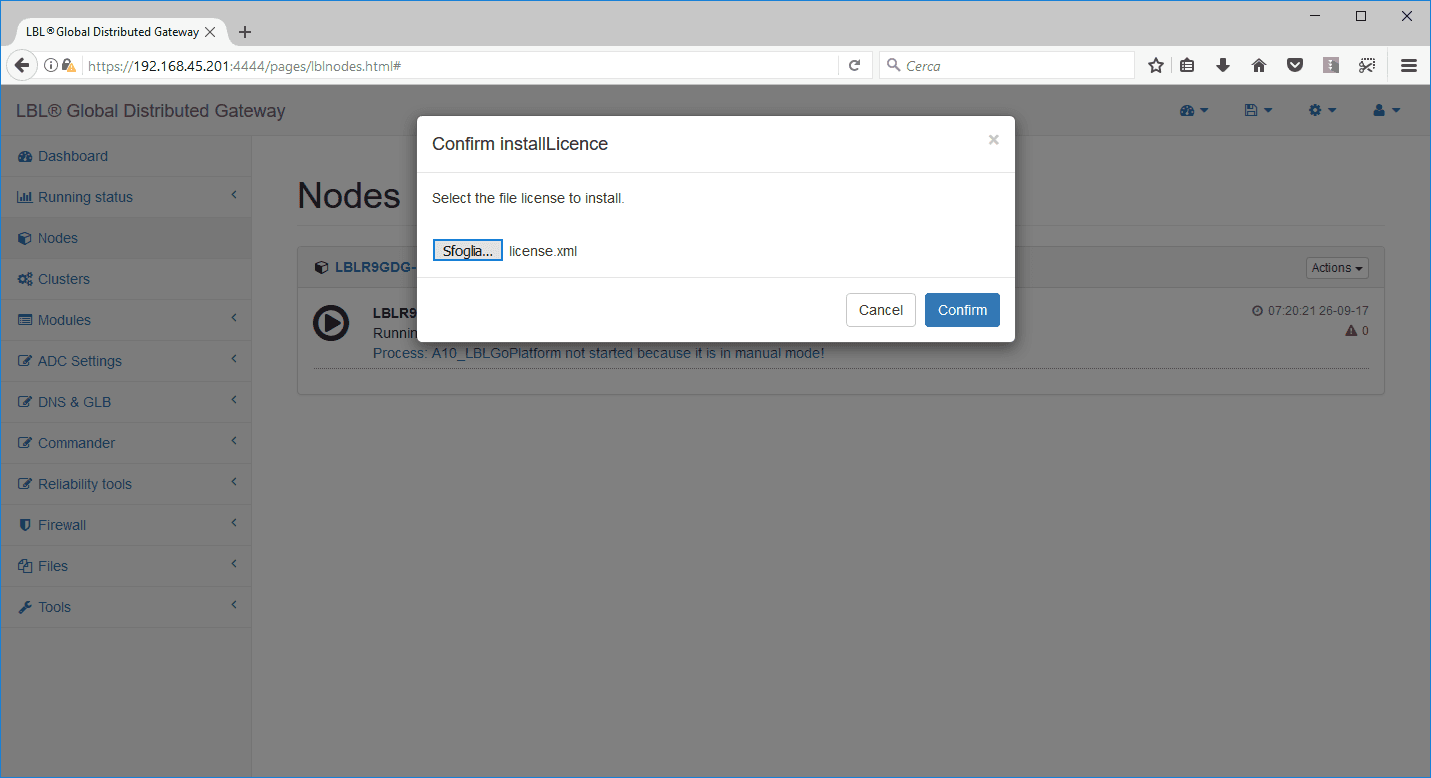
The operation confirmation message appears:

You must set up the license for the “OPLON ADC Standard
HA” module, which in this example also contains the DoS/DDoS
AttackPrevention
& Mitigation extension, DNS Global Load Balancinf, and Web
ApplicationFirewall
(WAF). To be able to set the license to the module “OPLON ADC
Standard HA” select “Modules” -> “ADC & GLB” and then go to
”See details” of the module.
Again, select “Actions” and “Install license” in the
previous modes.
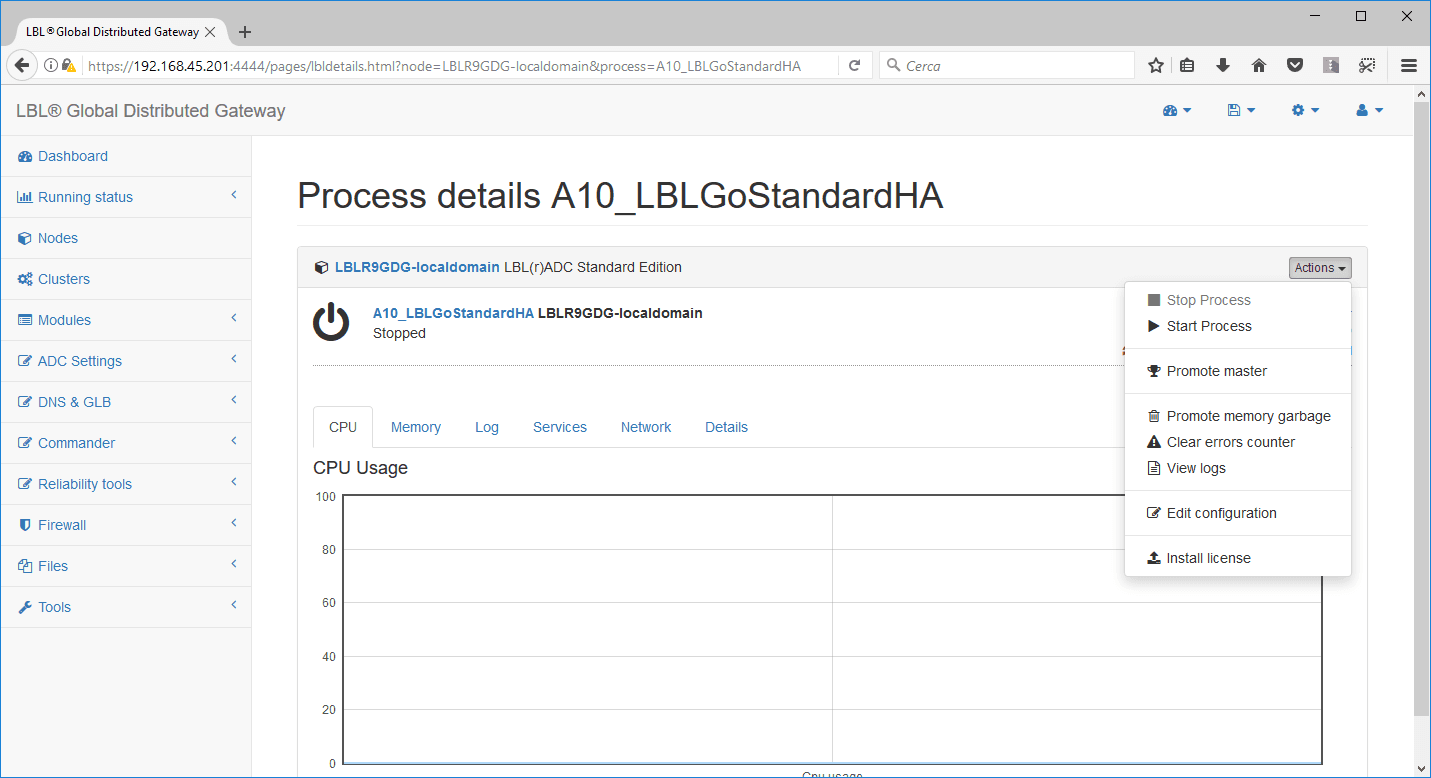

select the “standardhadosddosWAF_DNSGLB” license and then
confirm
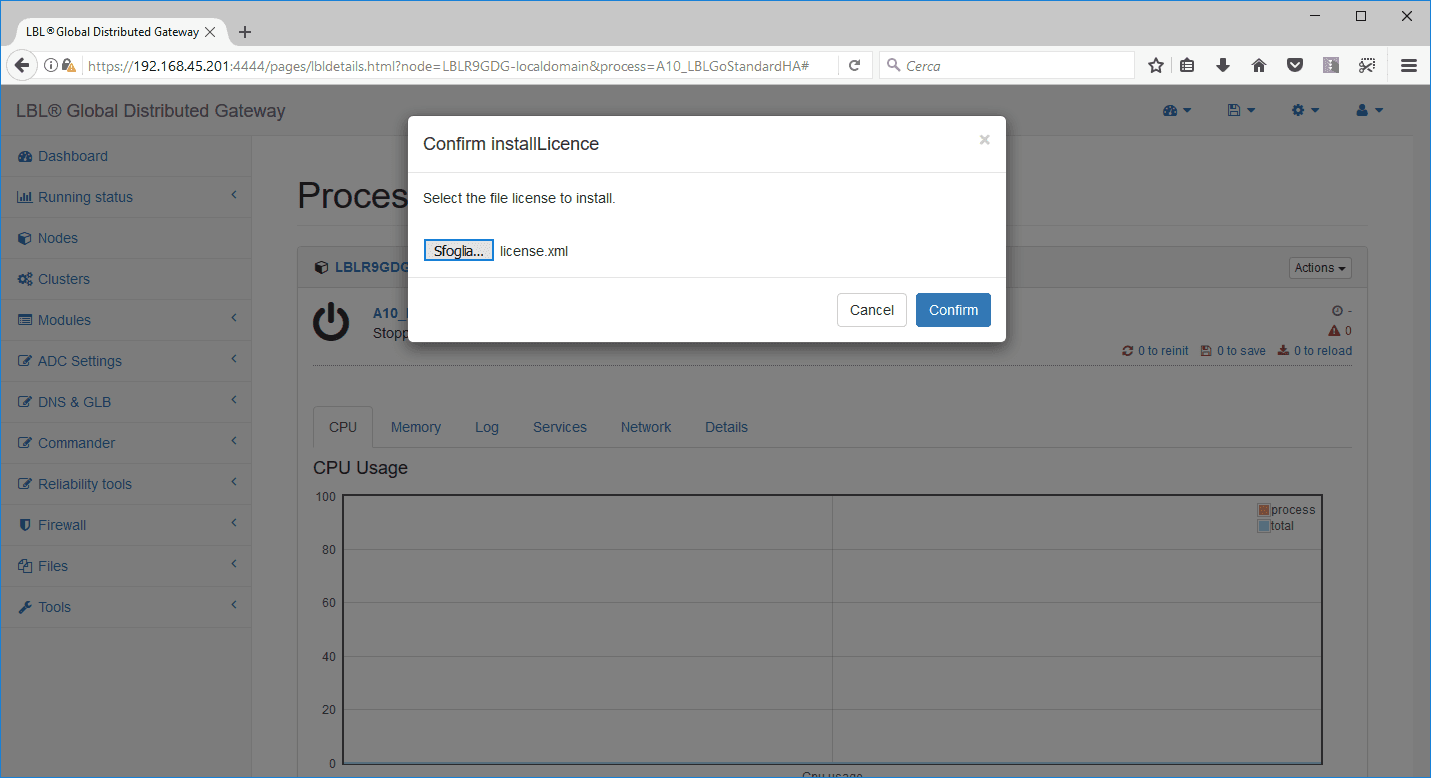
The operation confirmation message appears:
NB: Repeat licensing setup operations in NODE
B as well
To apply the “Catalog” licenses, you must restart the main module
through the console or
SSH.
NODE A:

NODE B:
During these restart operations, the Web console may
report errors due to the restart of services similar to this:

As soon as the service is restored, the browser will return to ask for login.
Populating the node inventory catalog (Inventory)
To add nodes, you must have “Catalog” licenses and
”root” rights. Before creating a Cluster, you must indicate to OPLON
Workspace the nodes to administer. To do this,
you must use the Settings menu -> Nodes from the System Bar.
To add or remove nodes you must have “root” rights.
Other users, even if declared administrators, will not be able to add or
delete
nodes to administer.
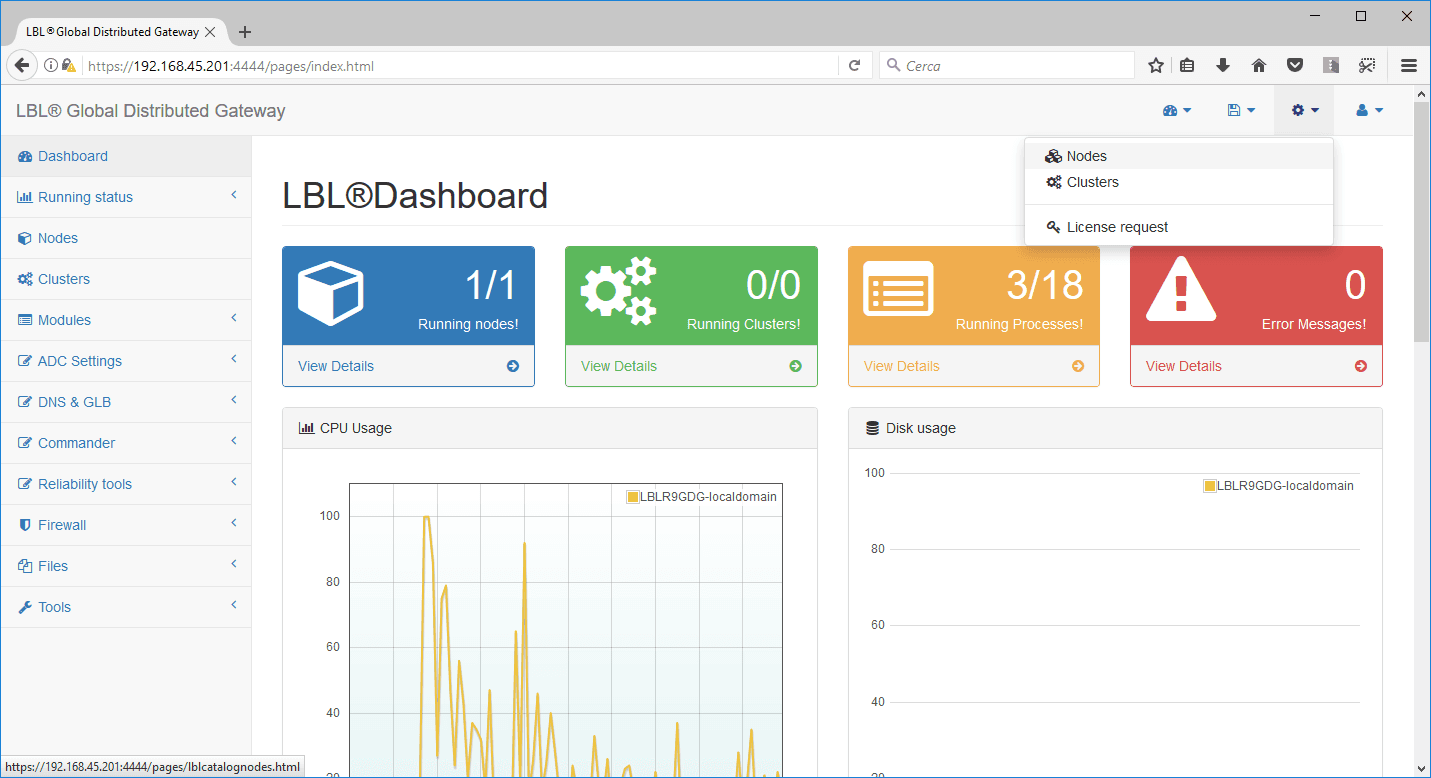
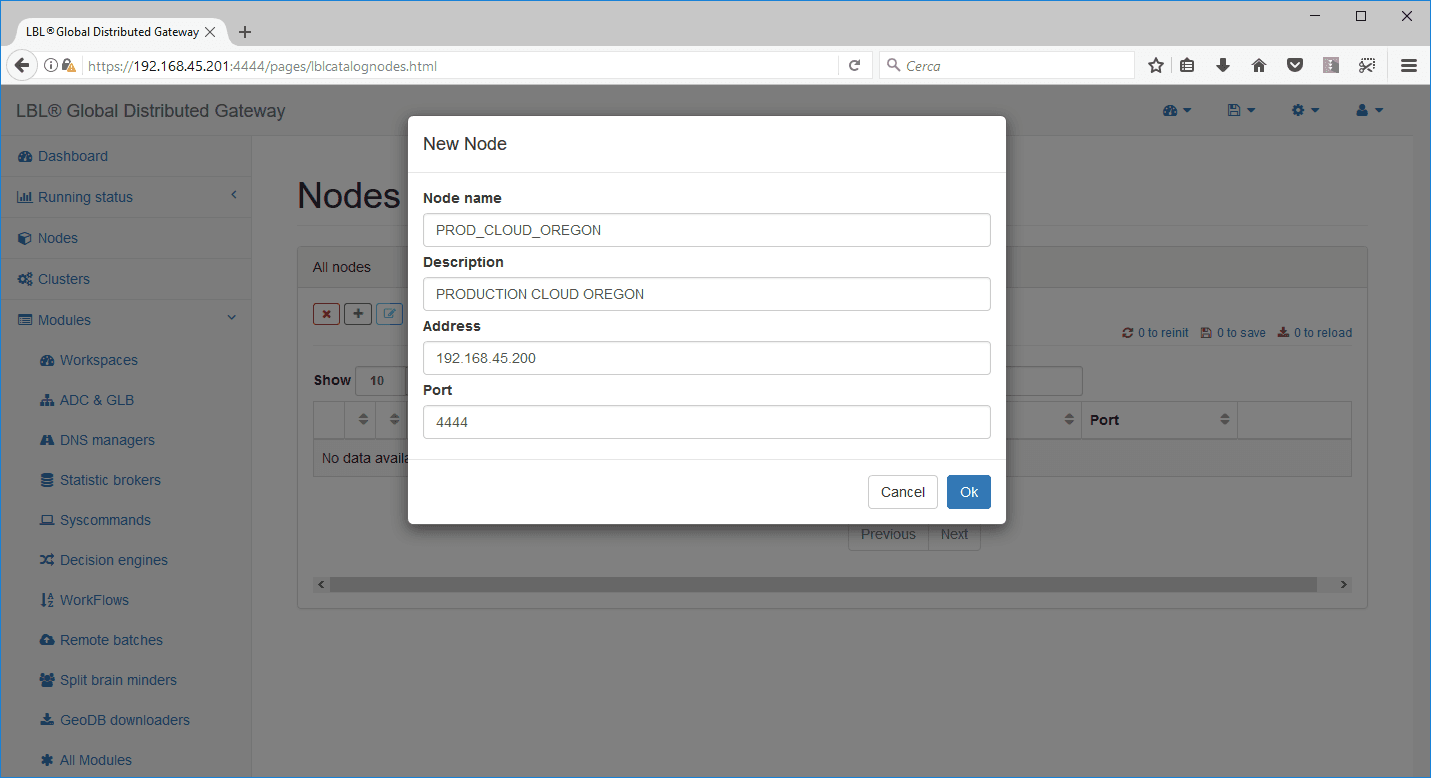
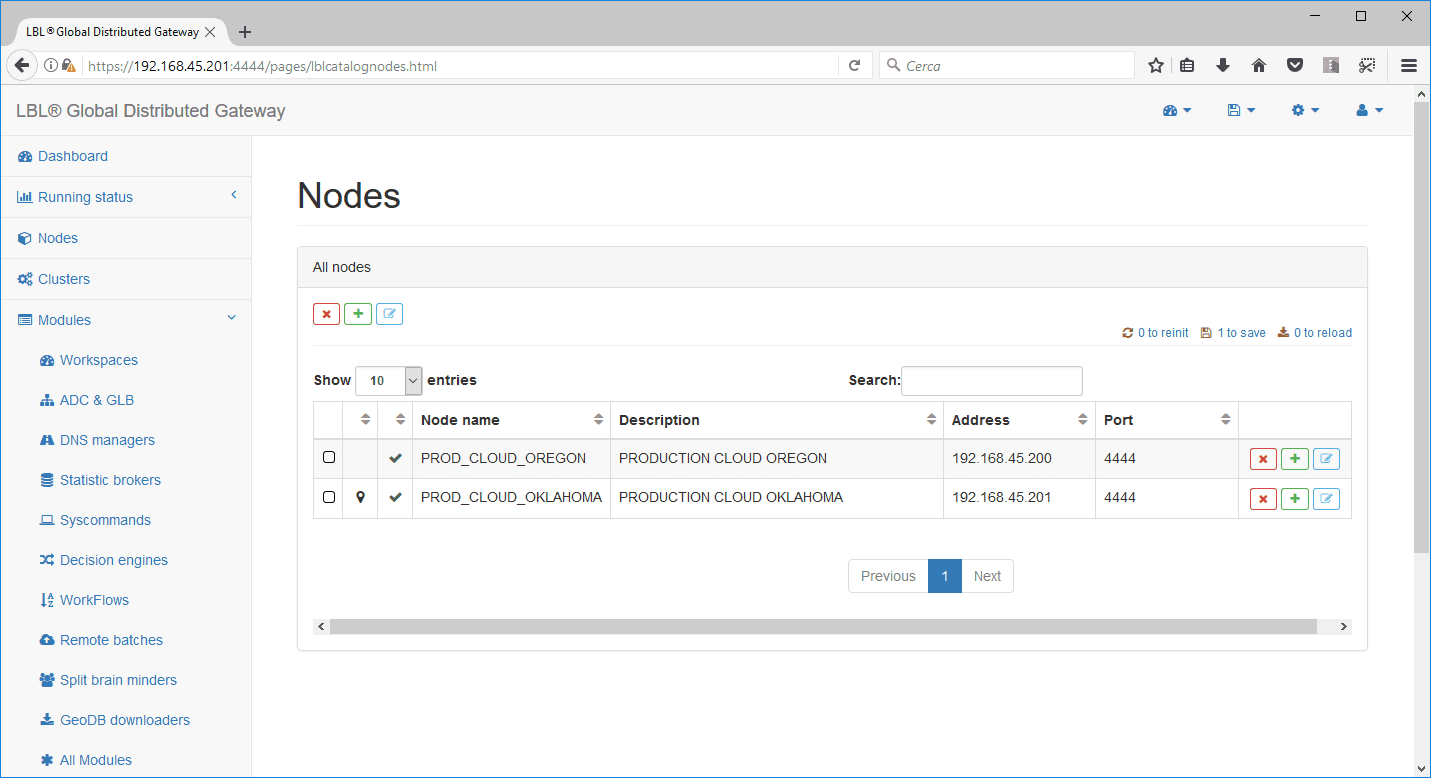
![]() from
the nodes menu you can clear add and parameterize nodes
from
the nodes menu you can clear add and parameterize nodes
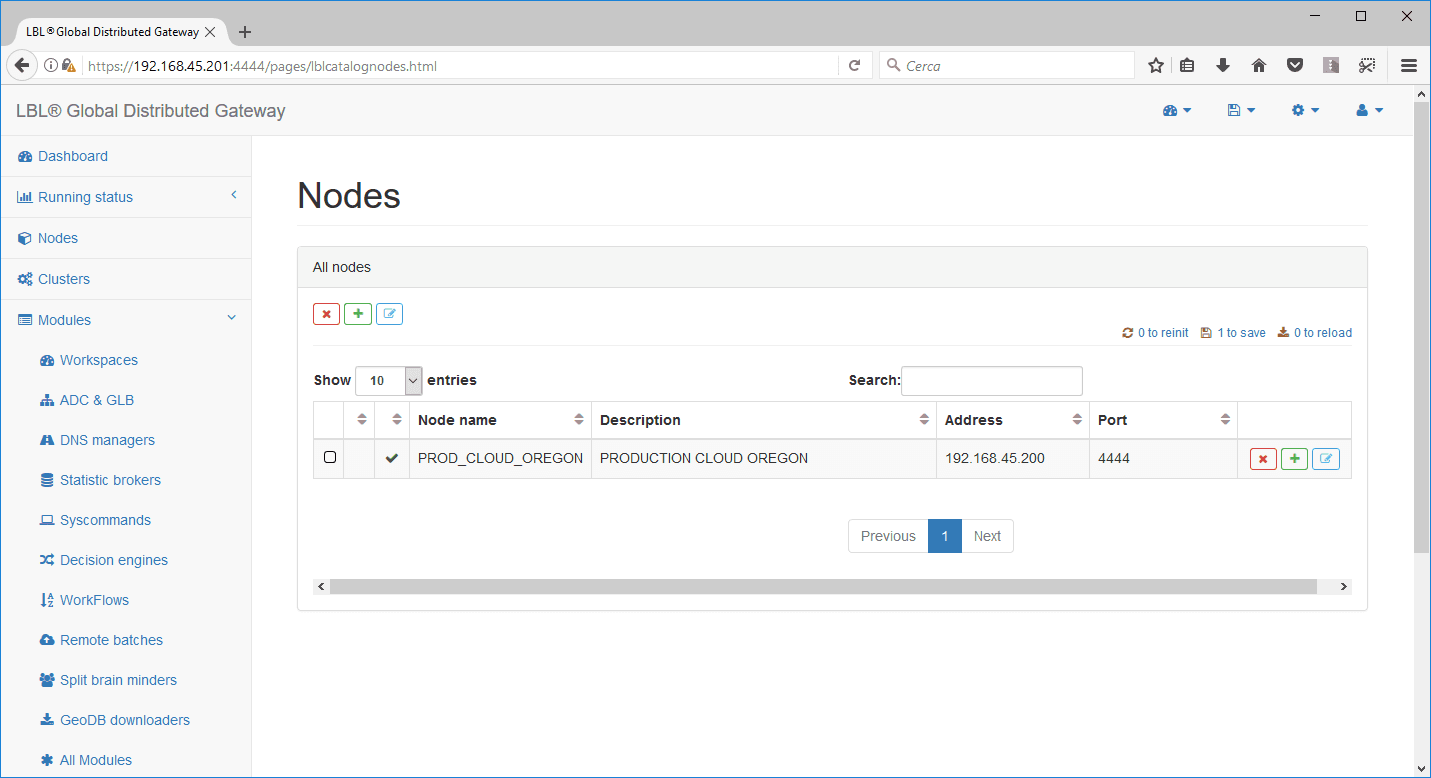
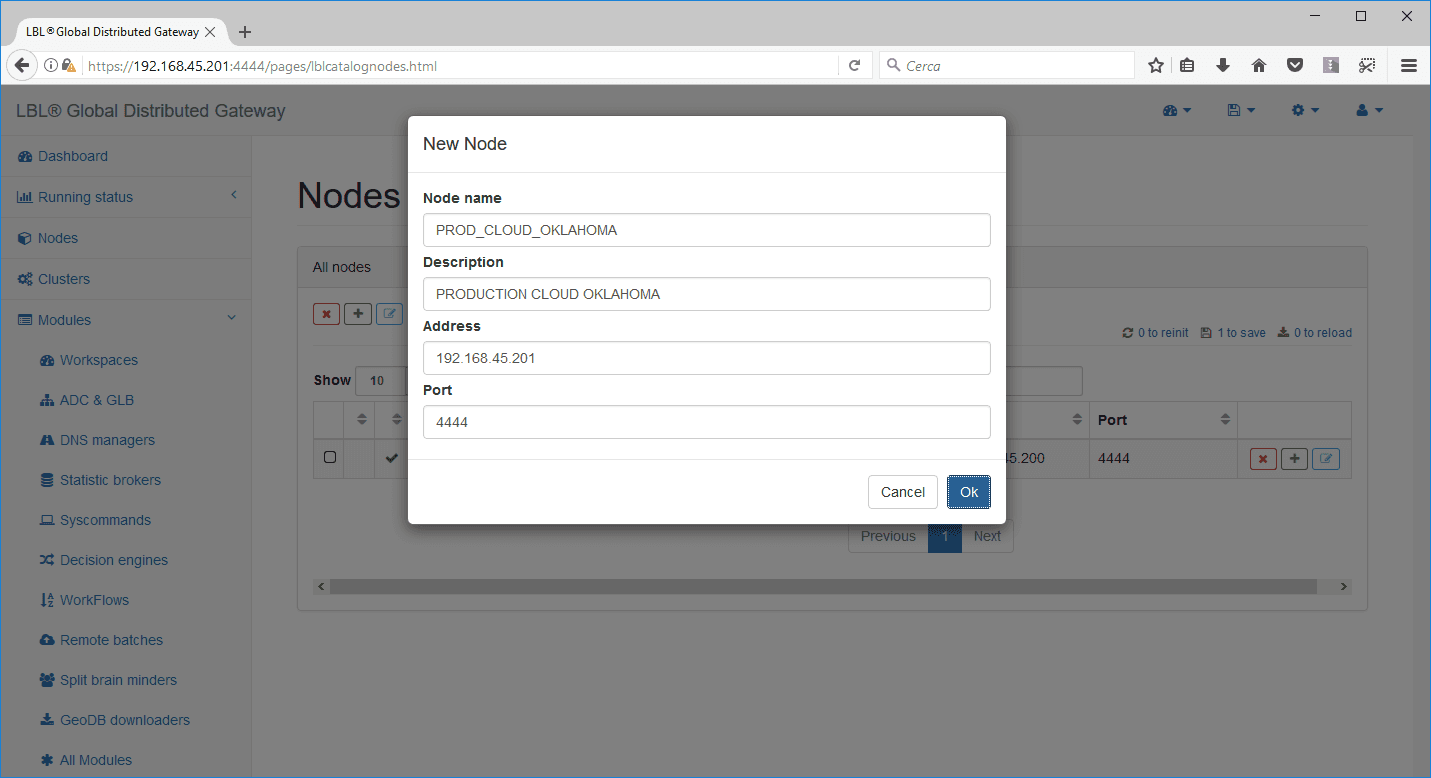
Then also proceed with the addition of the second node:
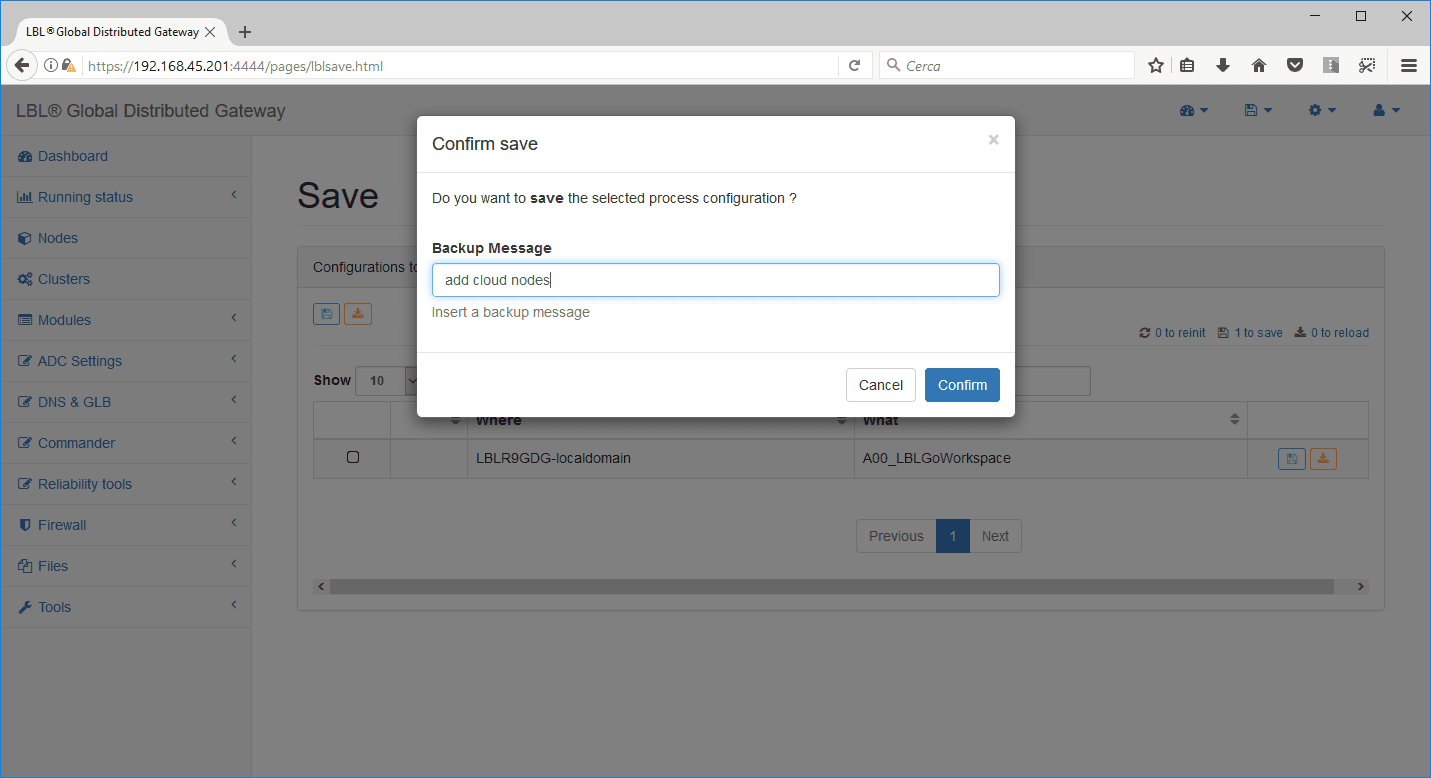
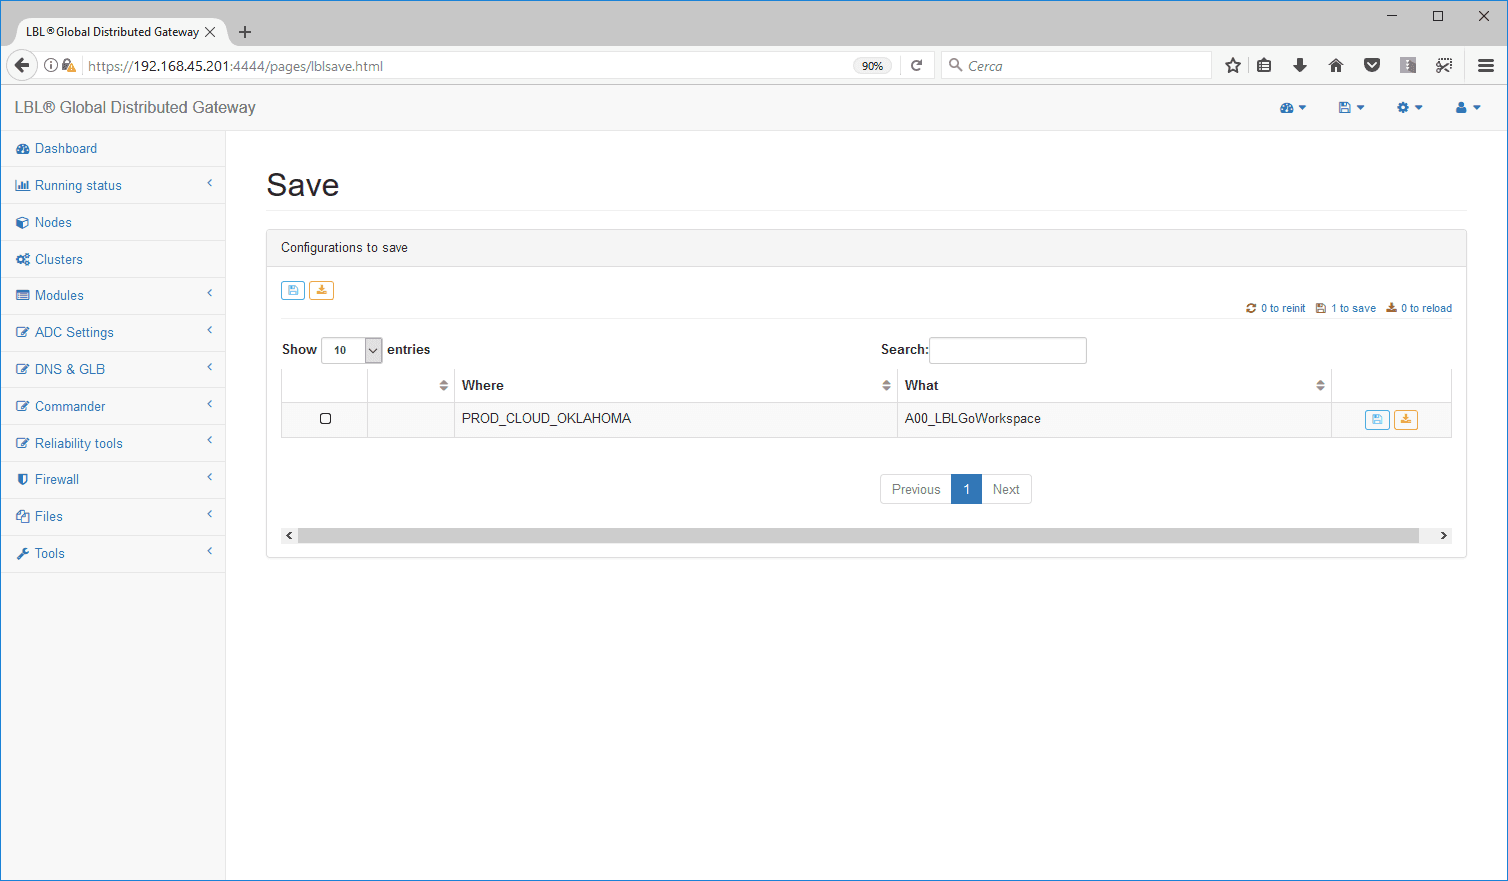
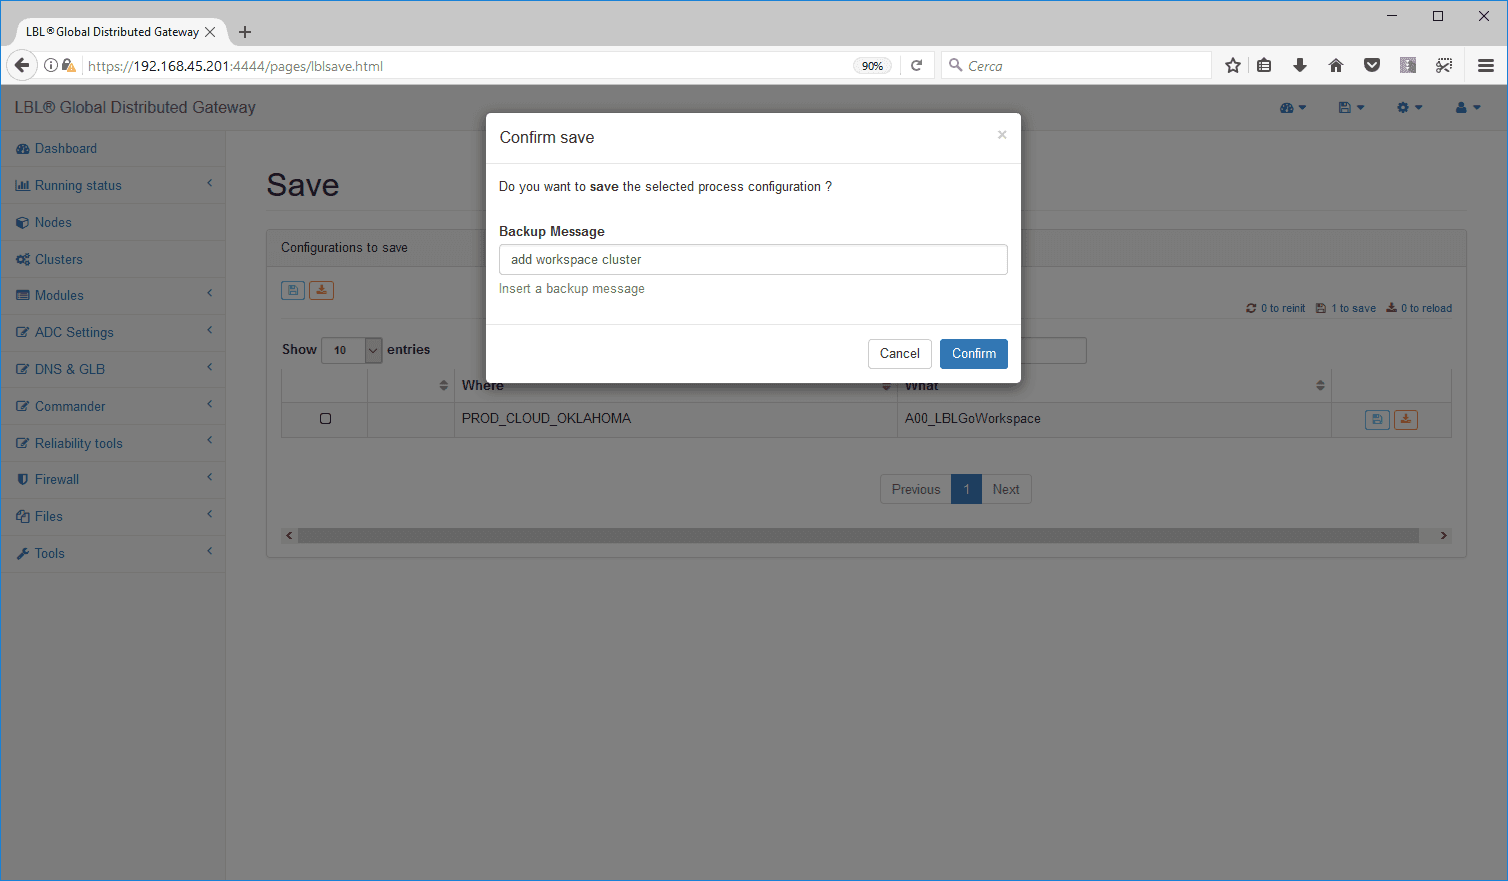
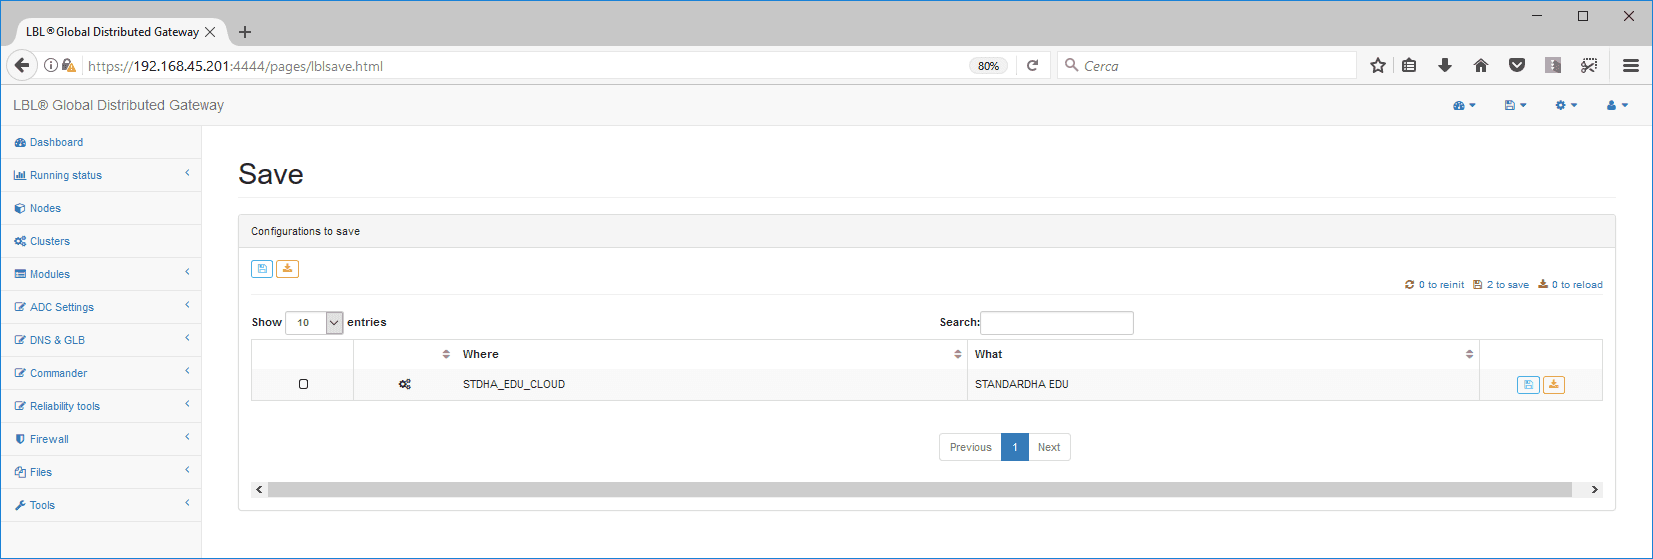
Once the two nodes are added, we save the configuration
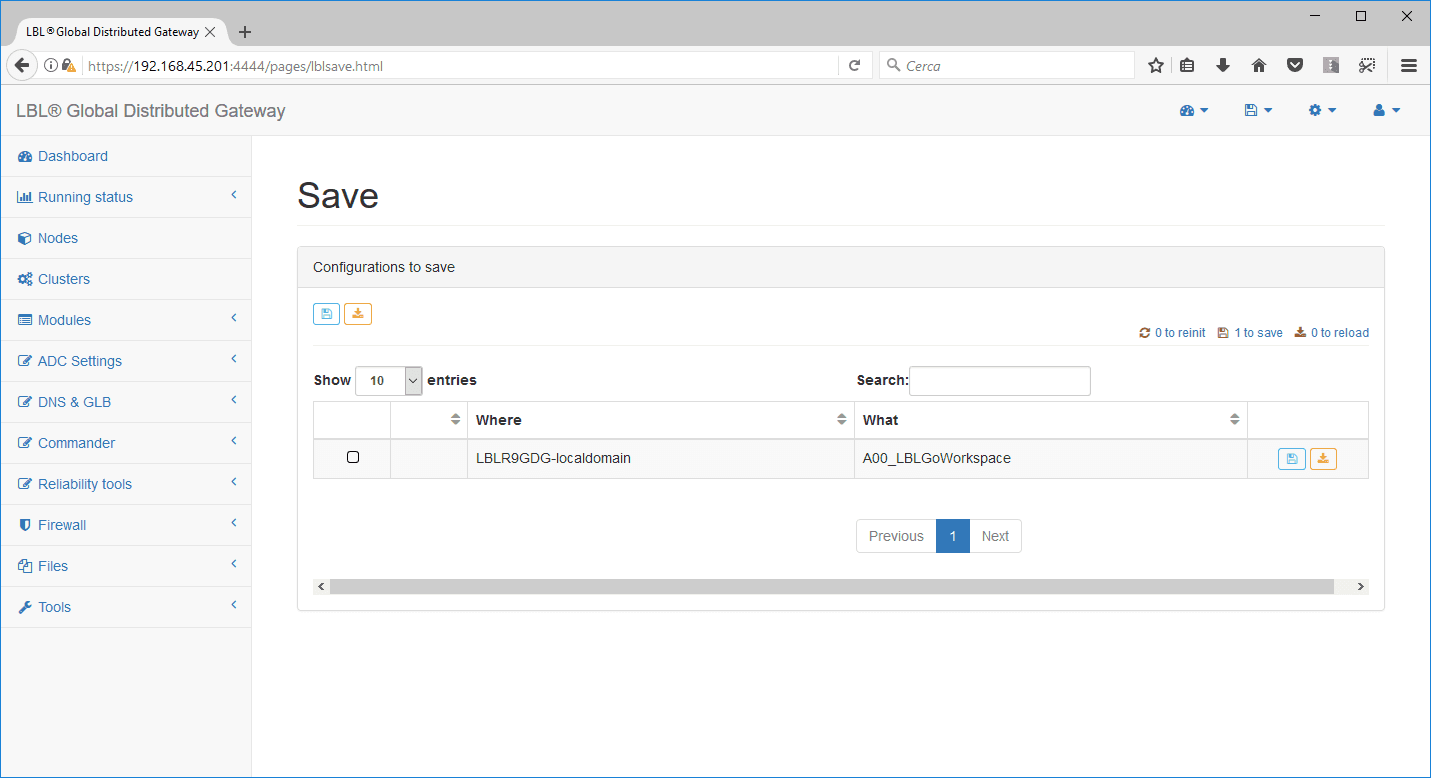
We indicate the reason for the change to the configuration
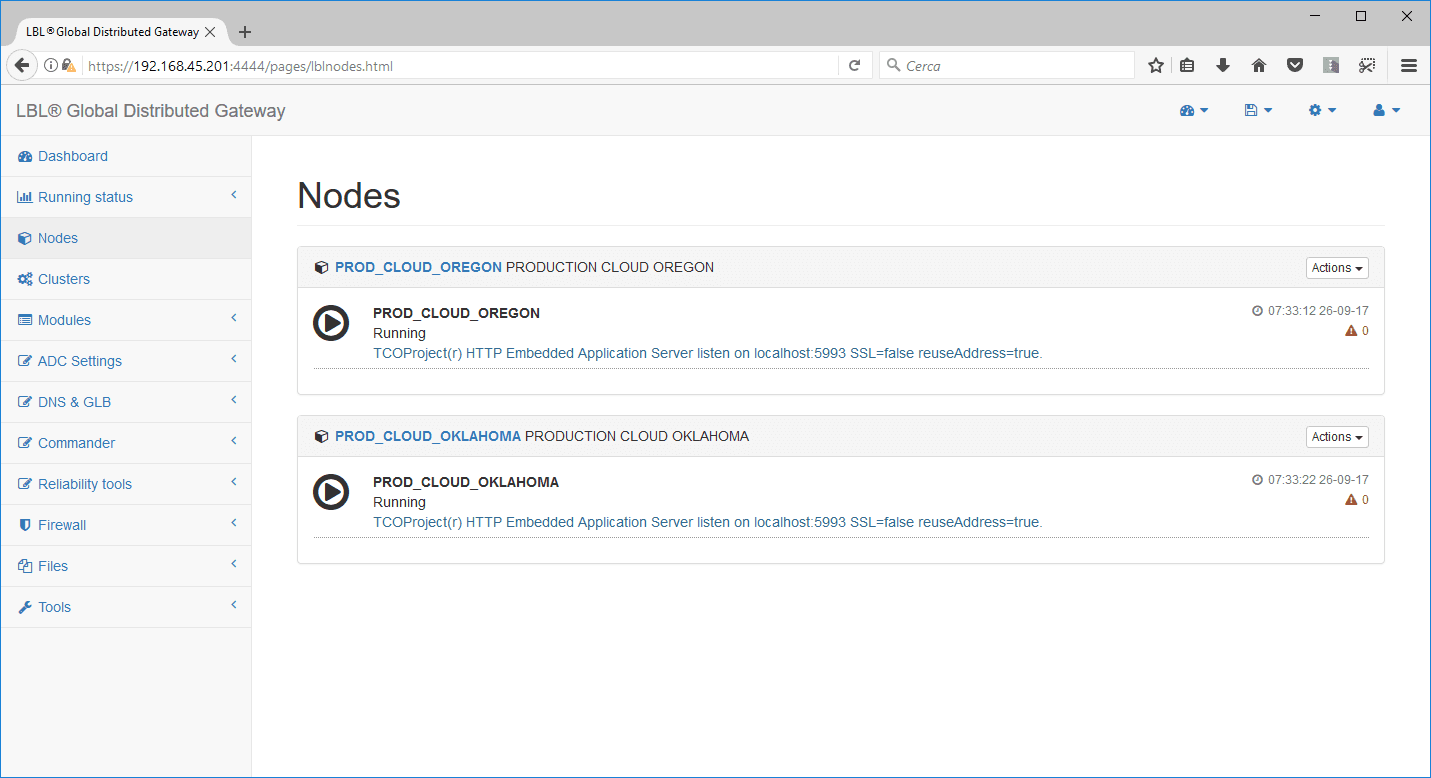
You can now select the Nodes menu to view the status of the
nodes.
Creating the OPLON Workspace Cluster
To create the Cluster, you must have “Catalog” licenses and
”root” rights. Other users, even if declared administrators, will not be
able to create or destroy
Clusters.
For all general parameterizations to be redundant, the first
Cluster we are going to create is the OPLON Workspace Cluster. This
will
allow us to propagate the general parameters in at least one other no
dead in case of
need, accessing the second node, you will have the same configuration
automatically
replicated by the Cluster.
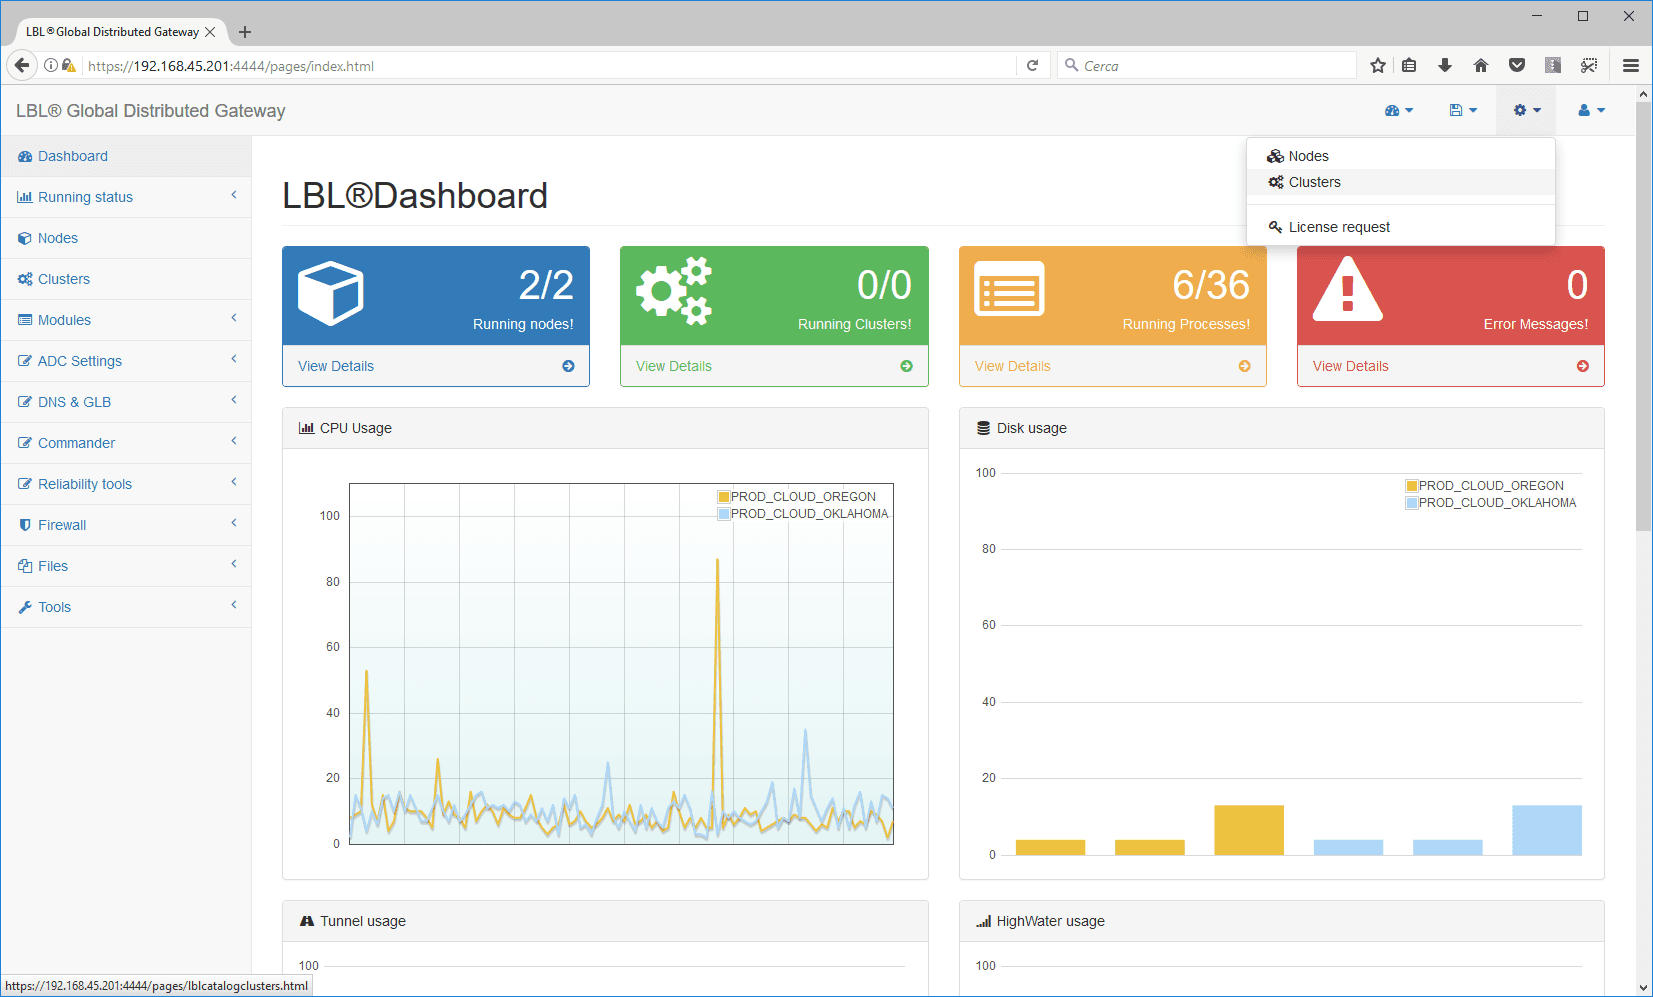
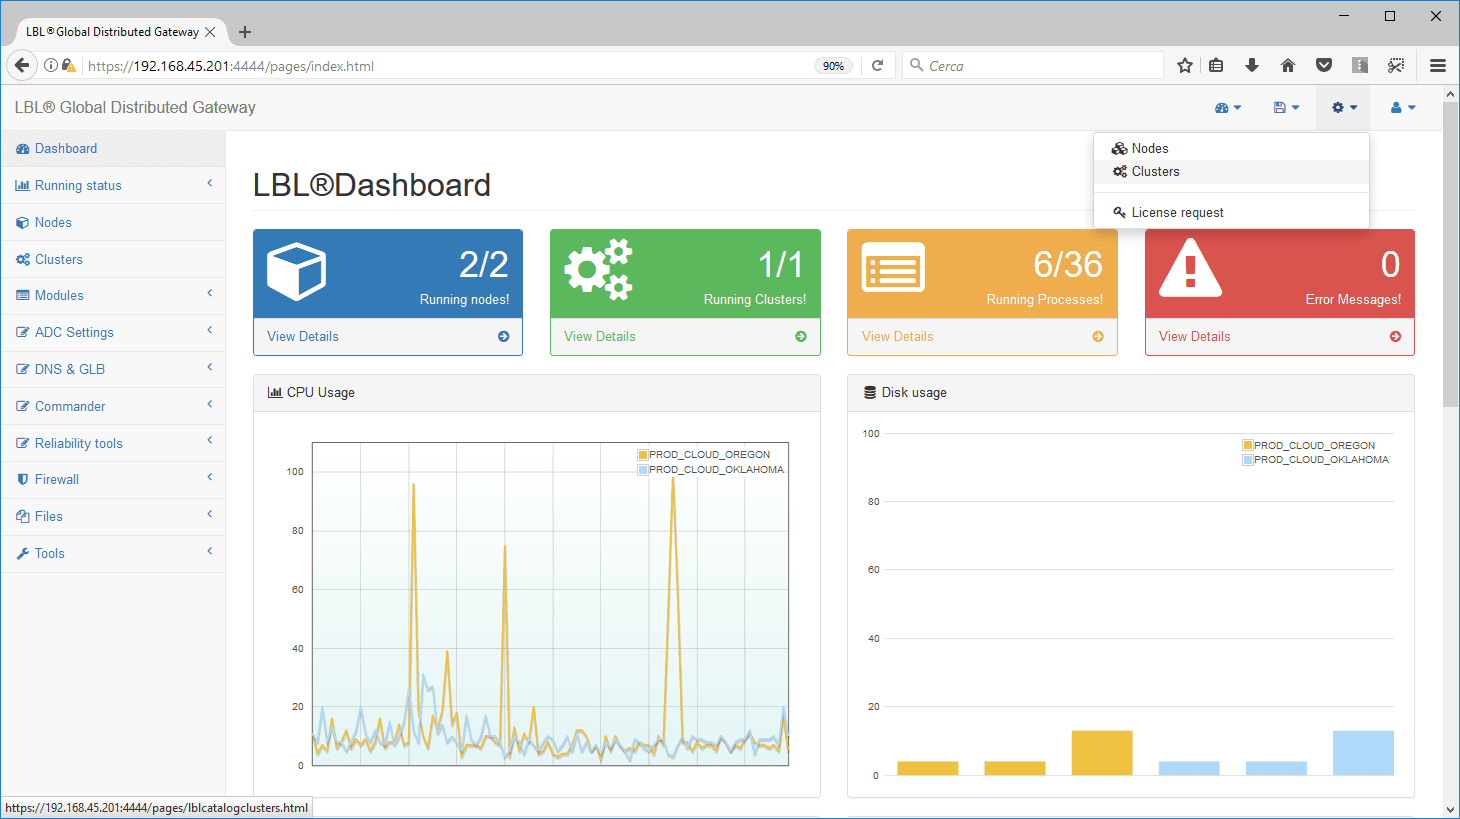
You access the creation/destruction of a cluster through the menus
placed in the System bar of which on the browser appear in the upper
right.
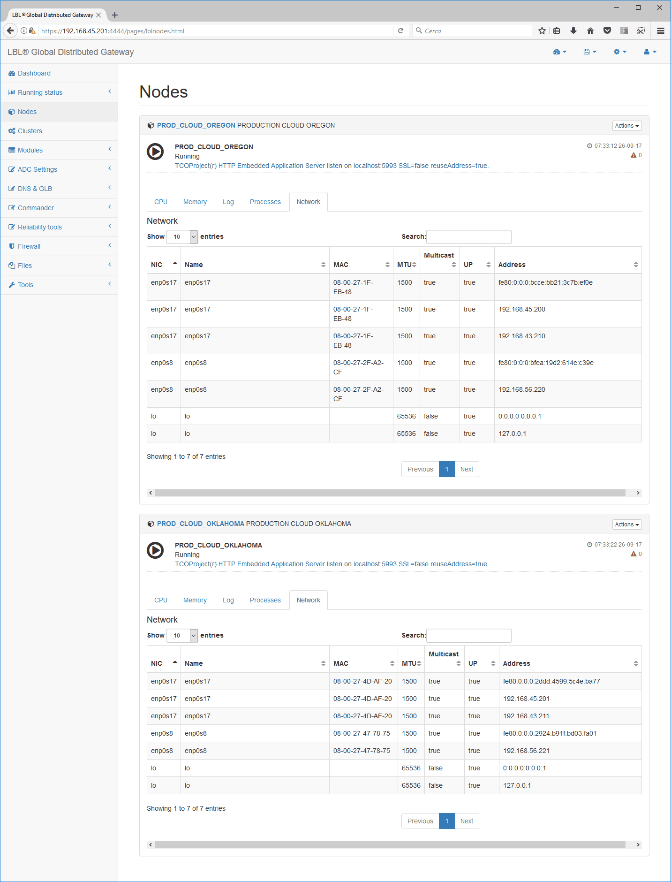
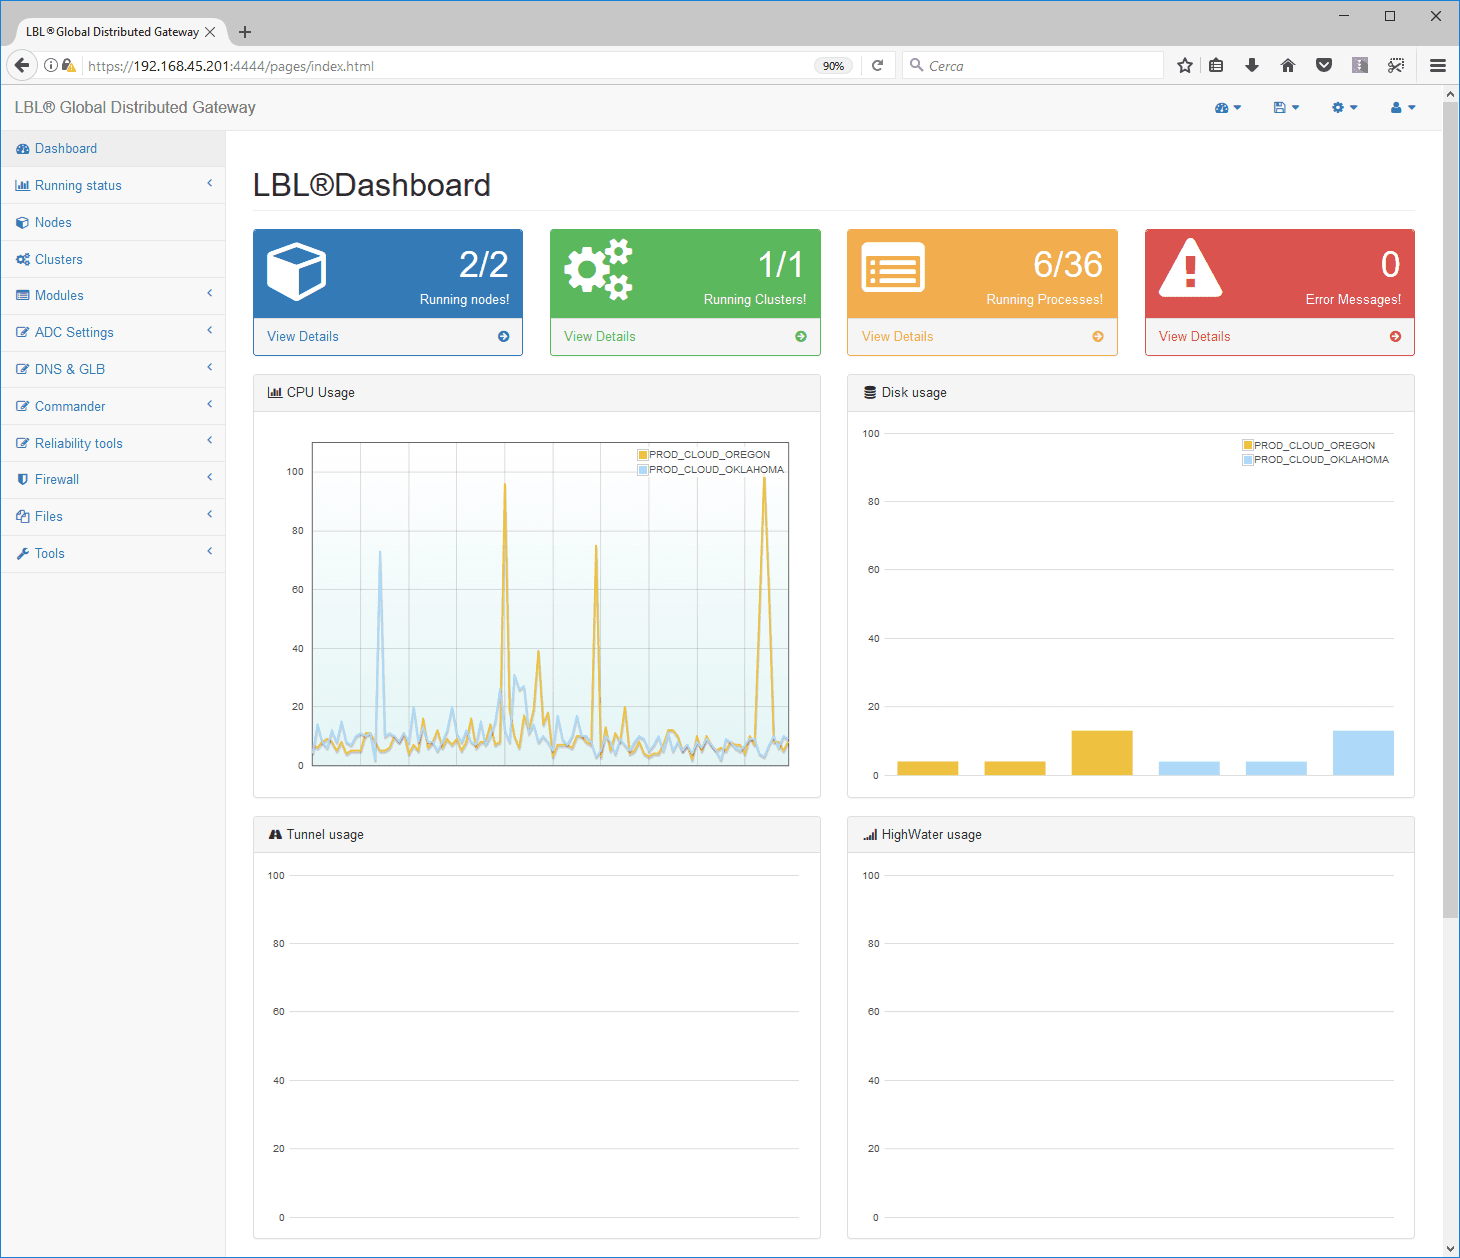
You can already see that the dashboard’s synthetic
view displays the status of the two nodes for key
values: CPU, disk space, ADC tunnels, and Highwater, Memory usage Swap
area.
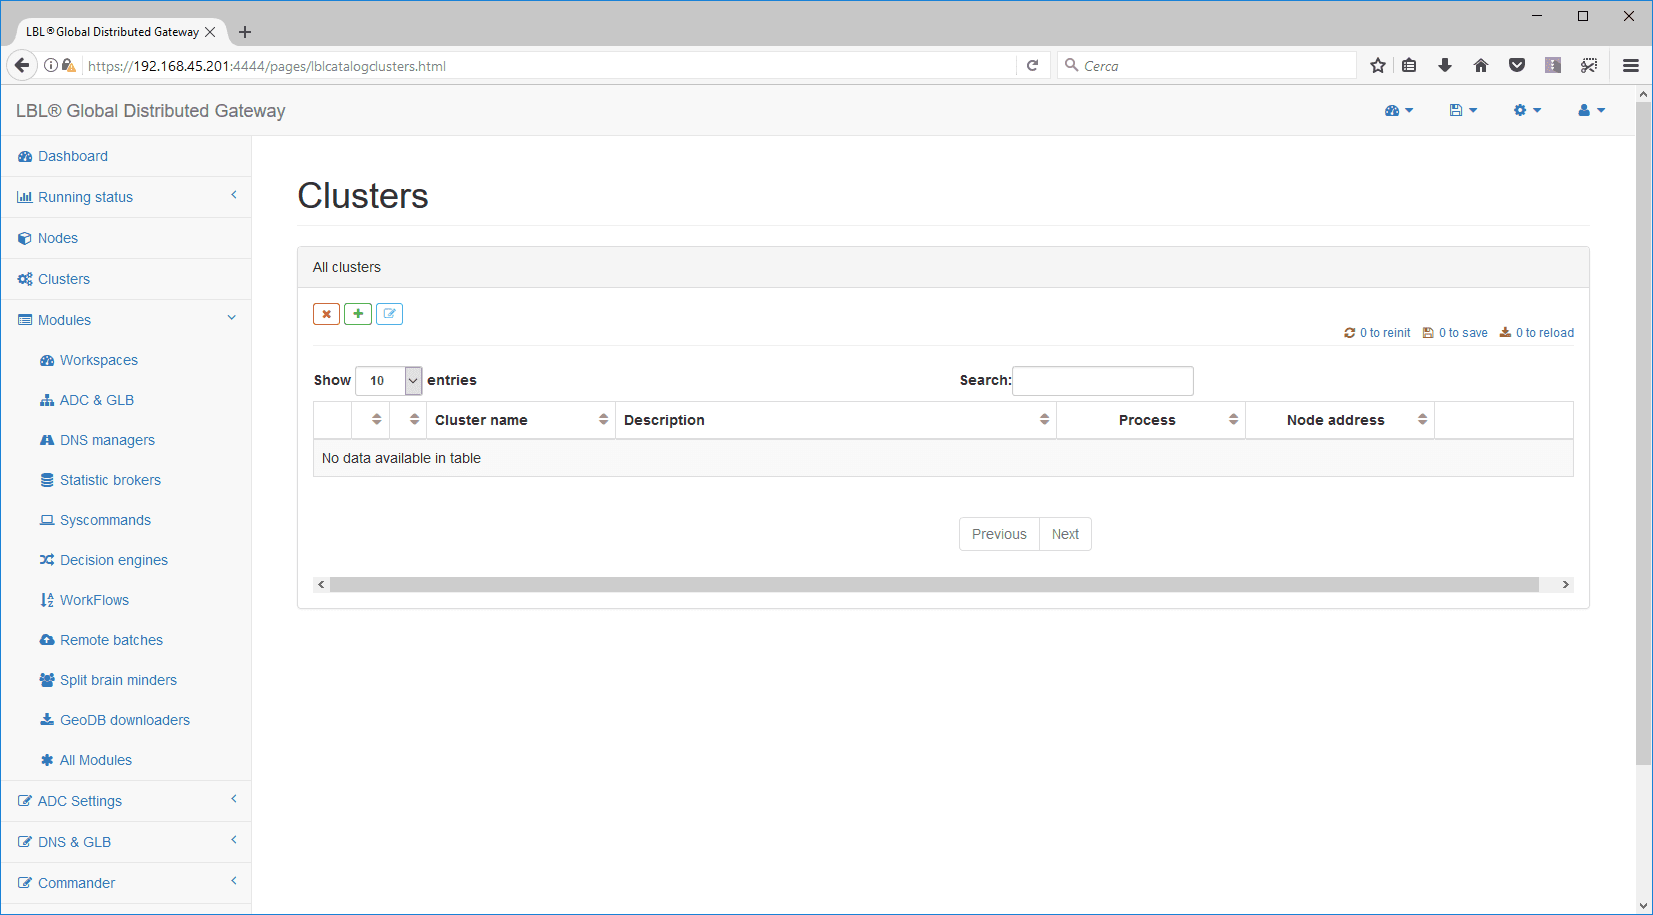
![]() From
From
the Cluster menu you can clear, create and parameterize clusters …
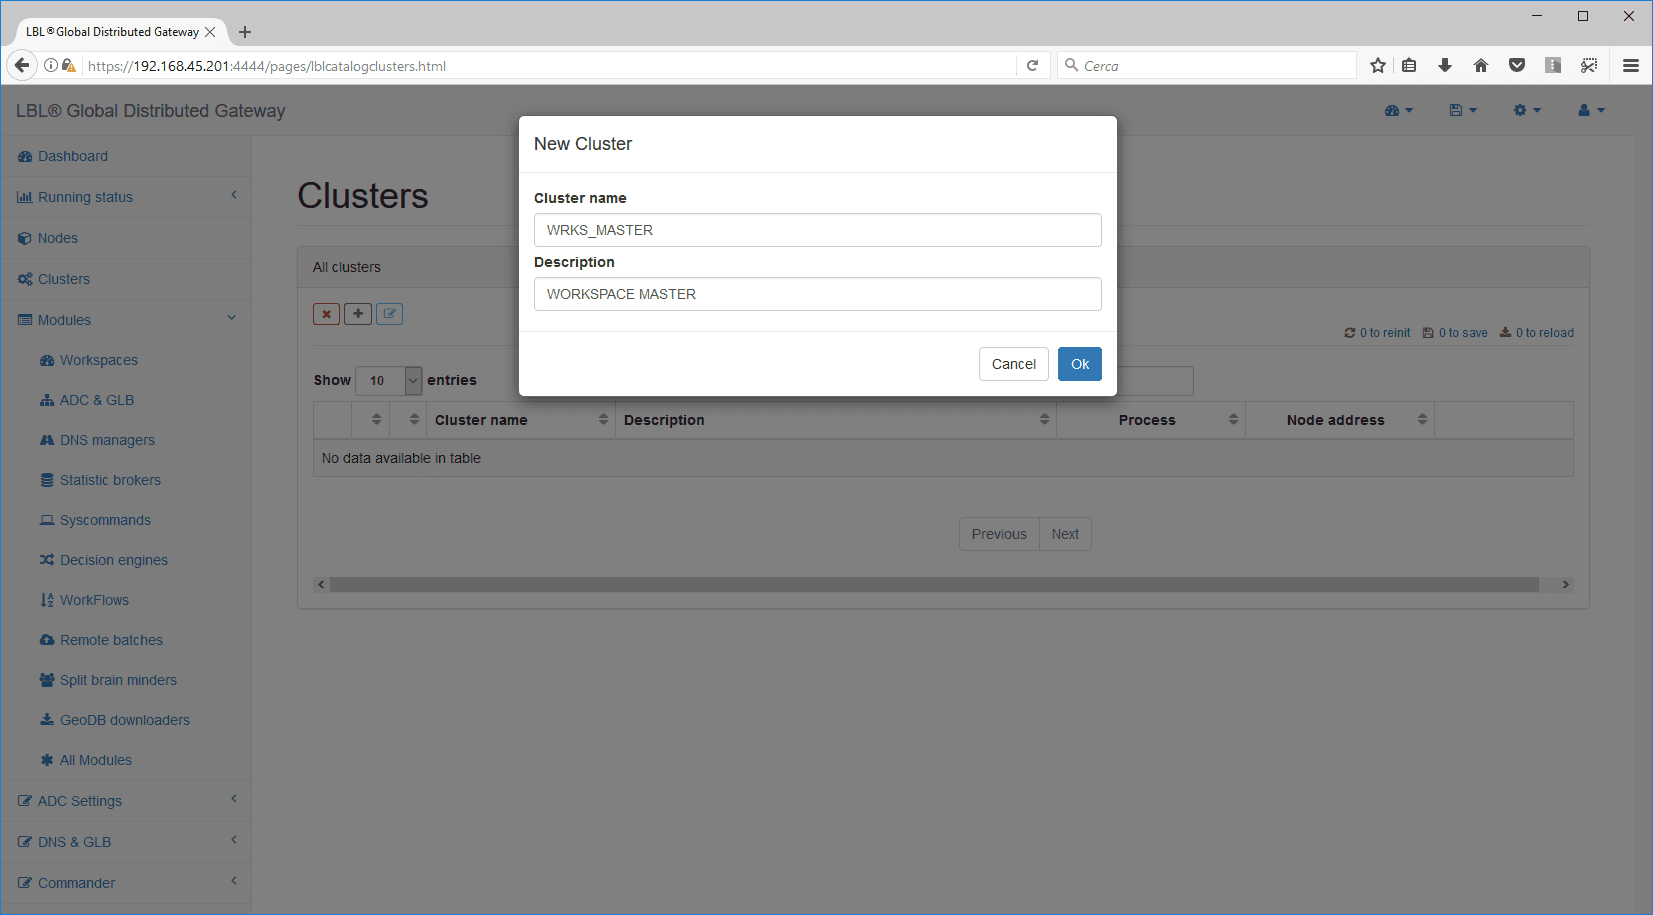
![]()
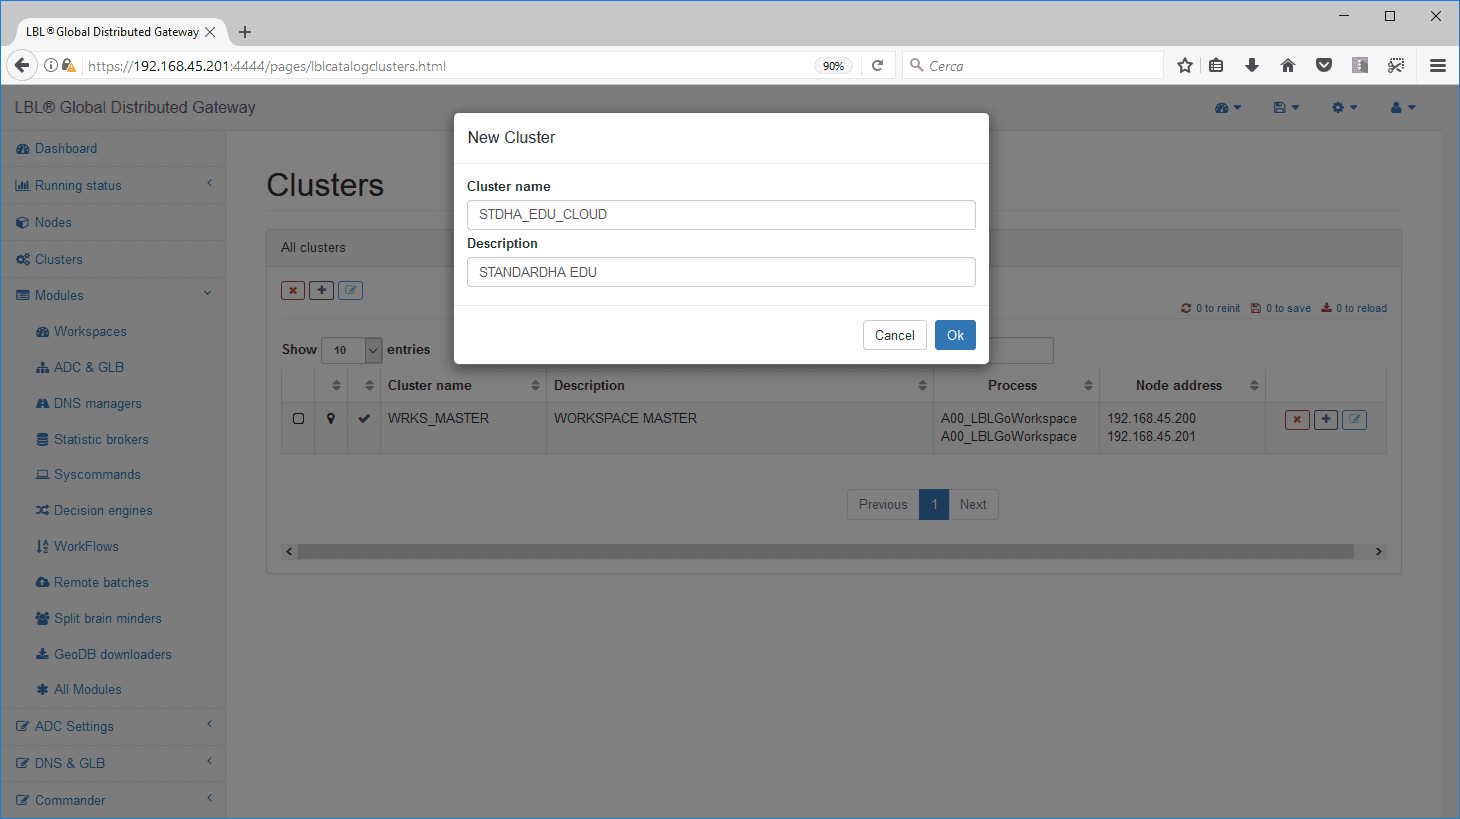
When you click add Cluster, you will be prompted to indicate a name
and
description of the Cluster that you want to create.
As soon as it is confirmed with OK, you can set the Cluster through
the [edit] button.
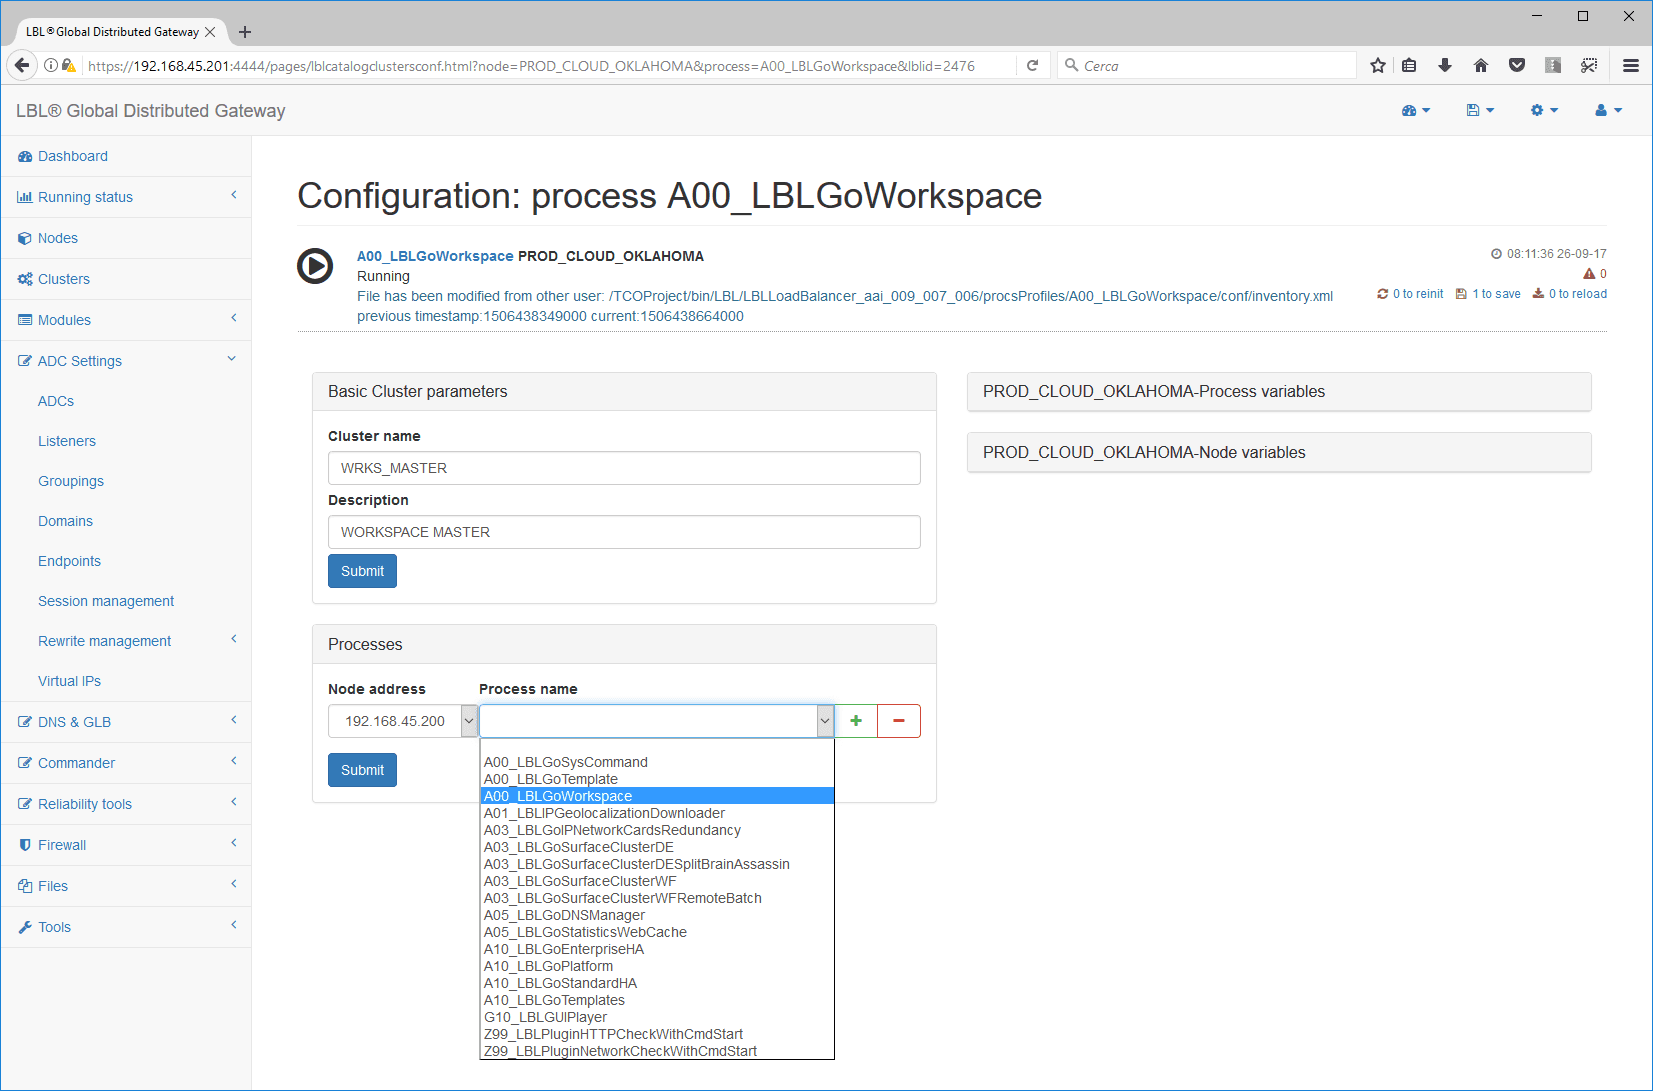
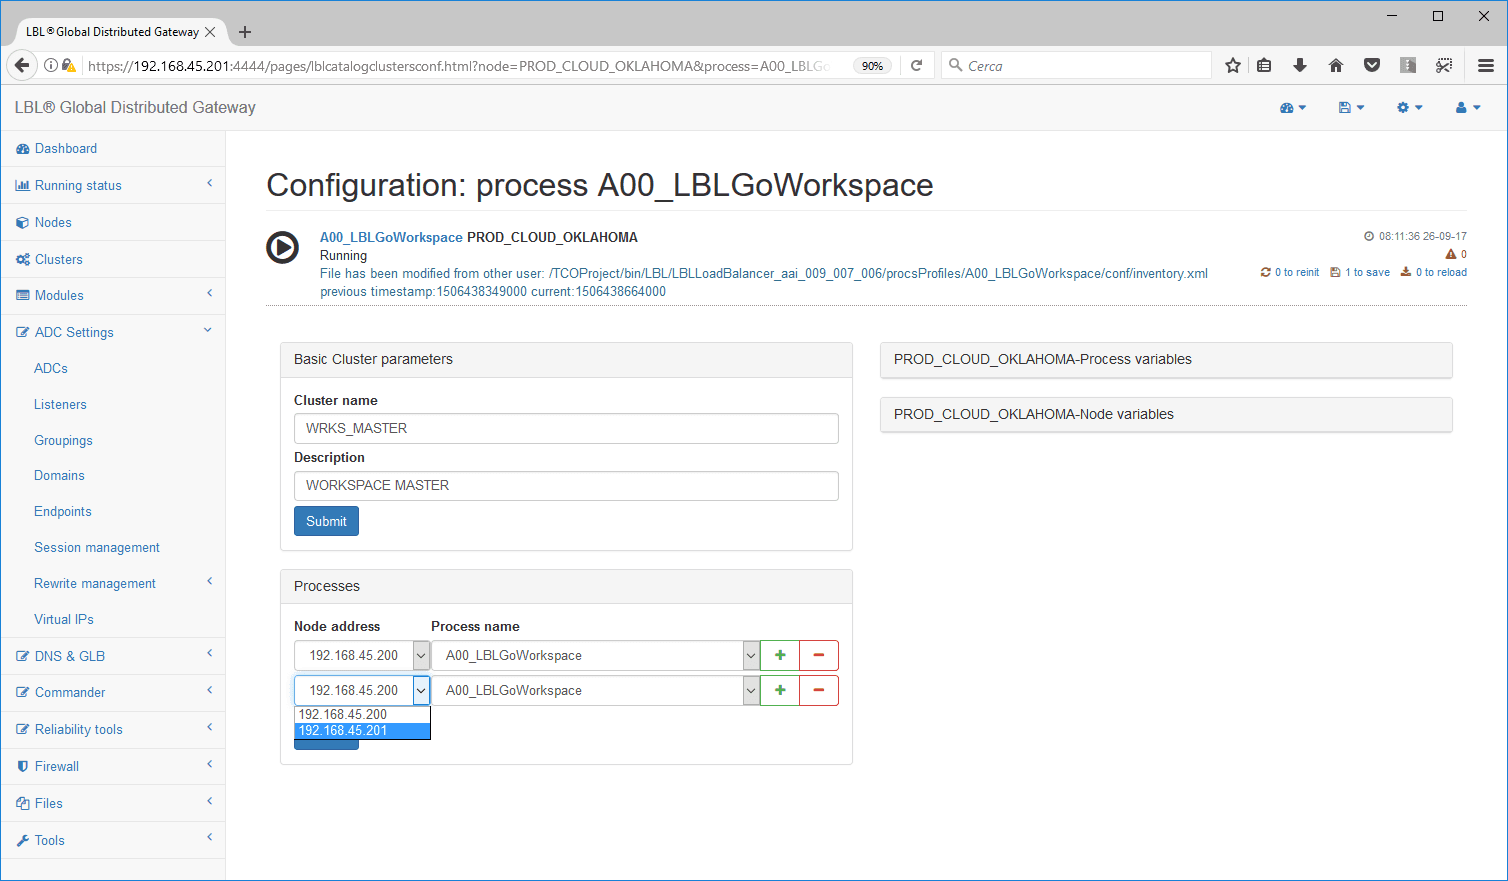
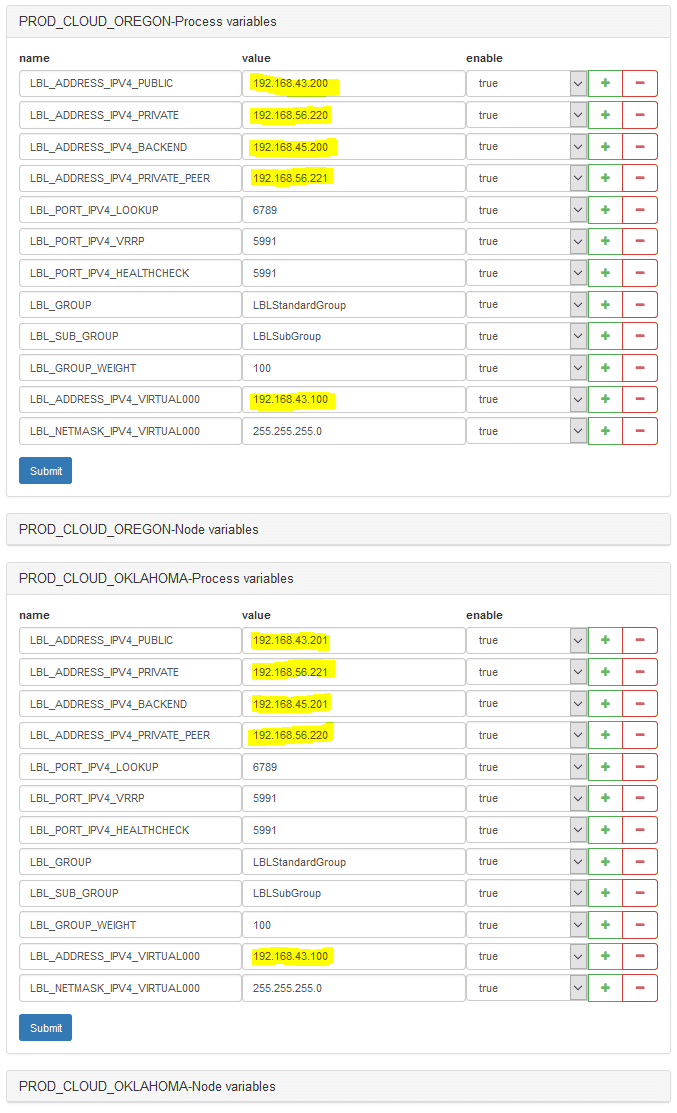
after you select [edit] and expand the “processes” parameters you
can associate the processes in this “cluster”
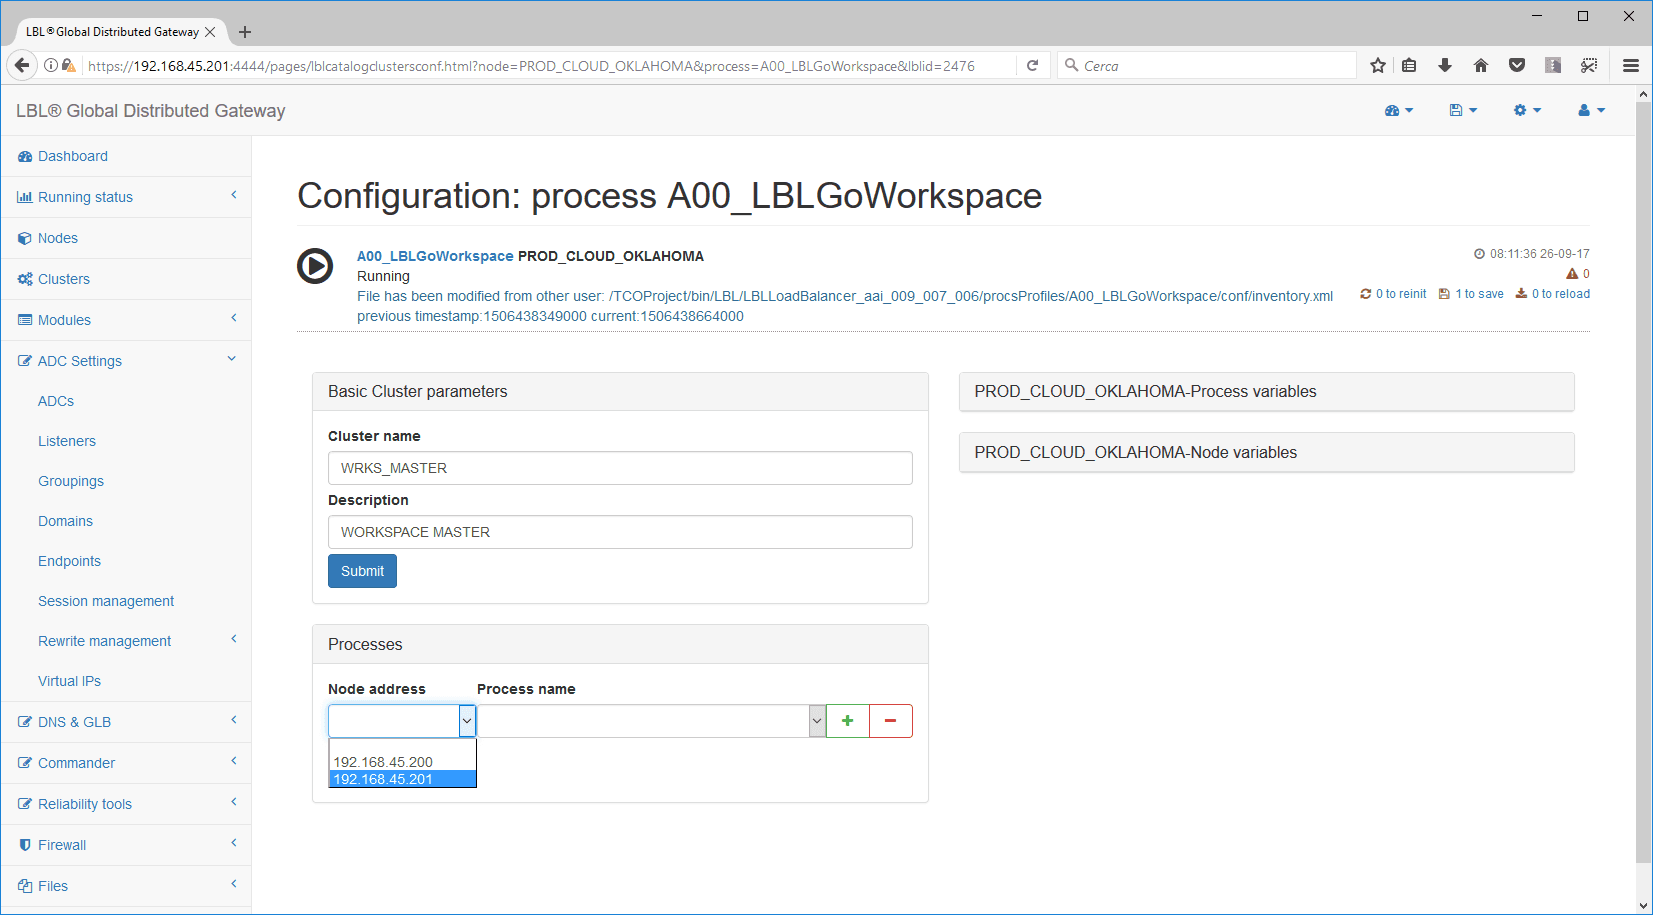
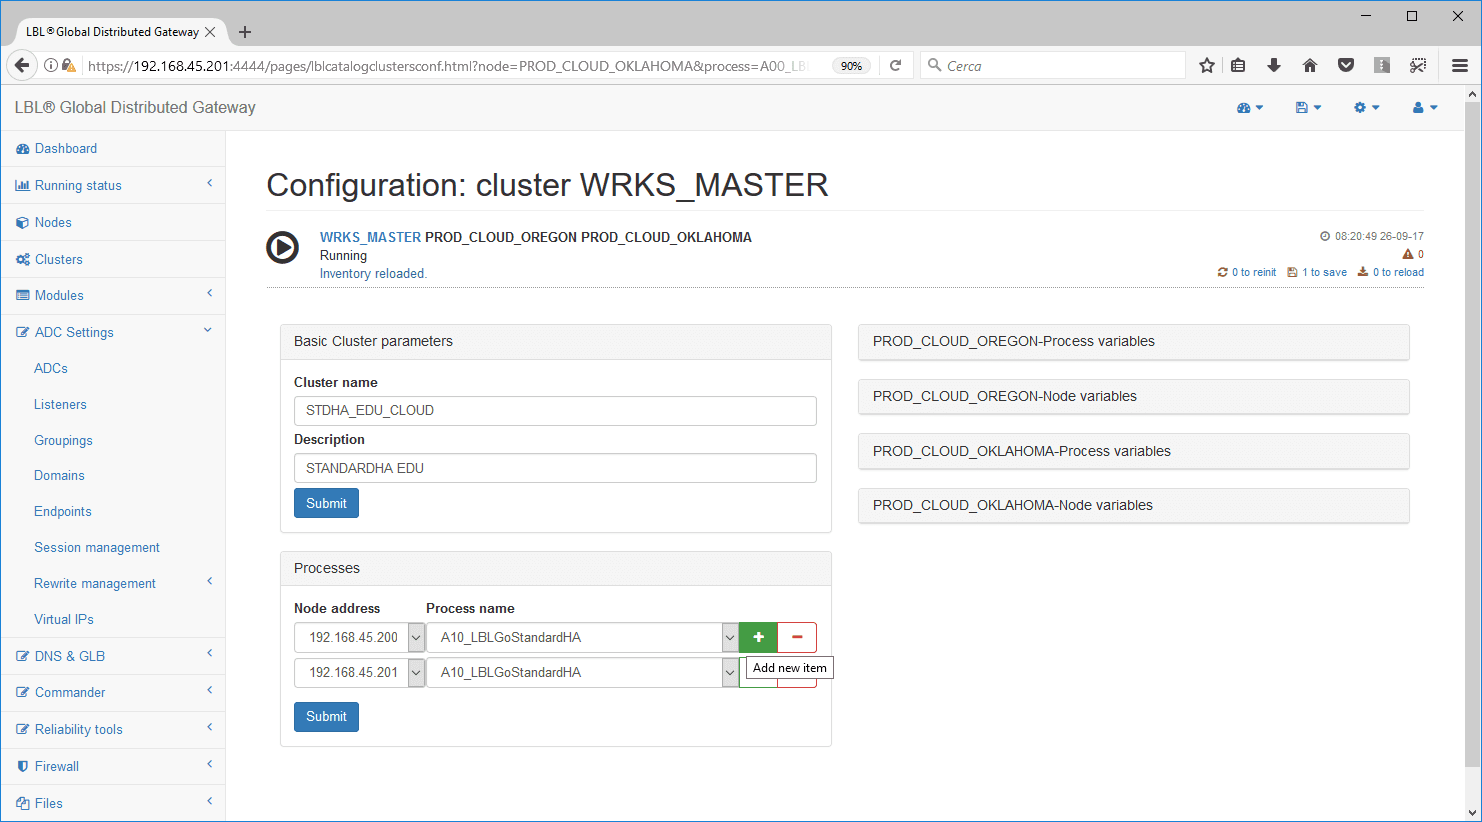
With the [+] button we are going to associate and the second process
that constitutes the
”Cluster”
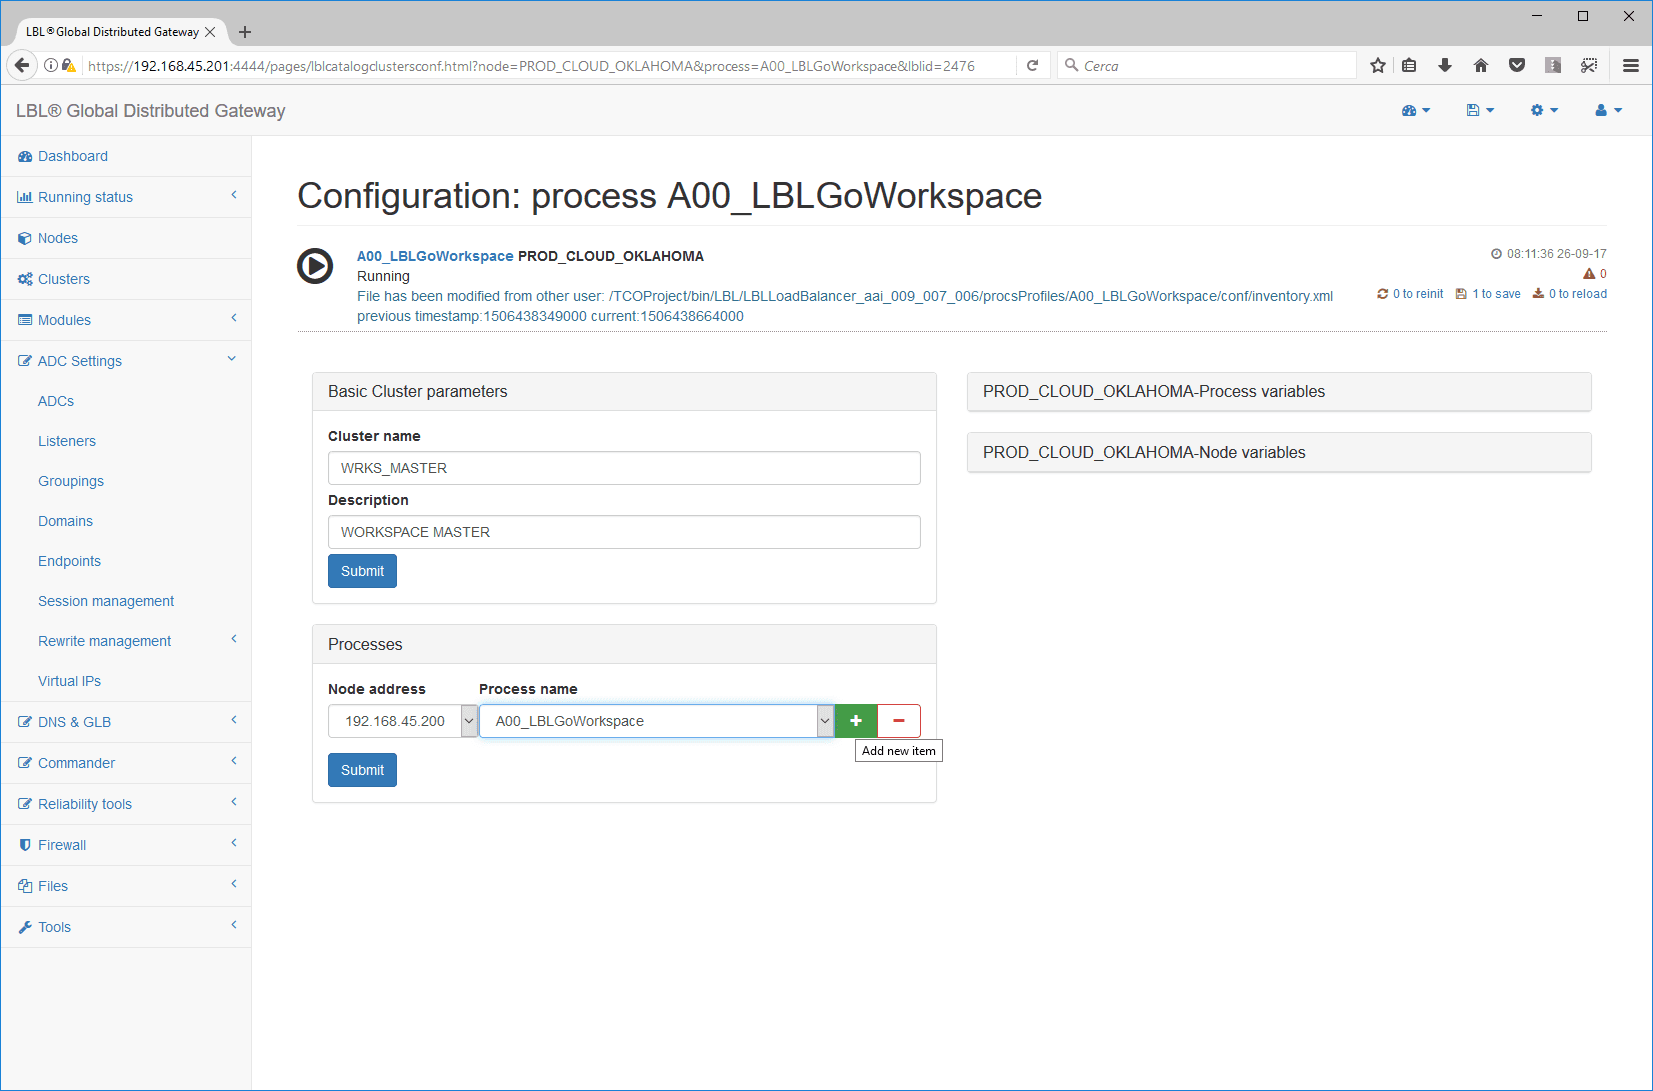
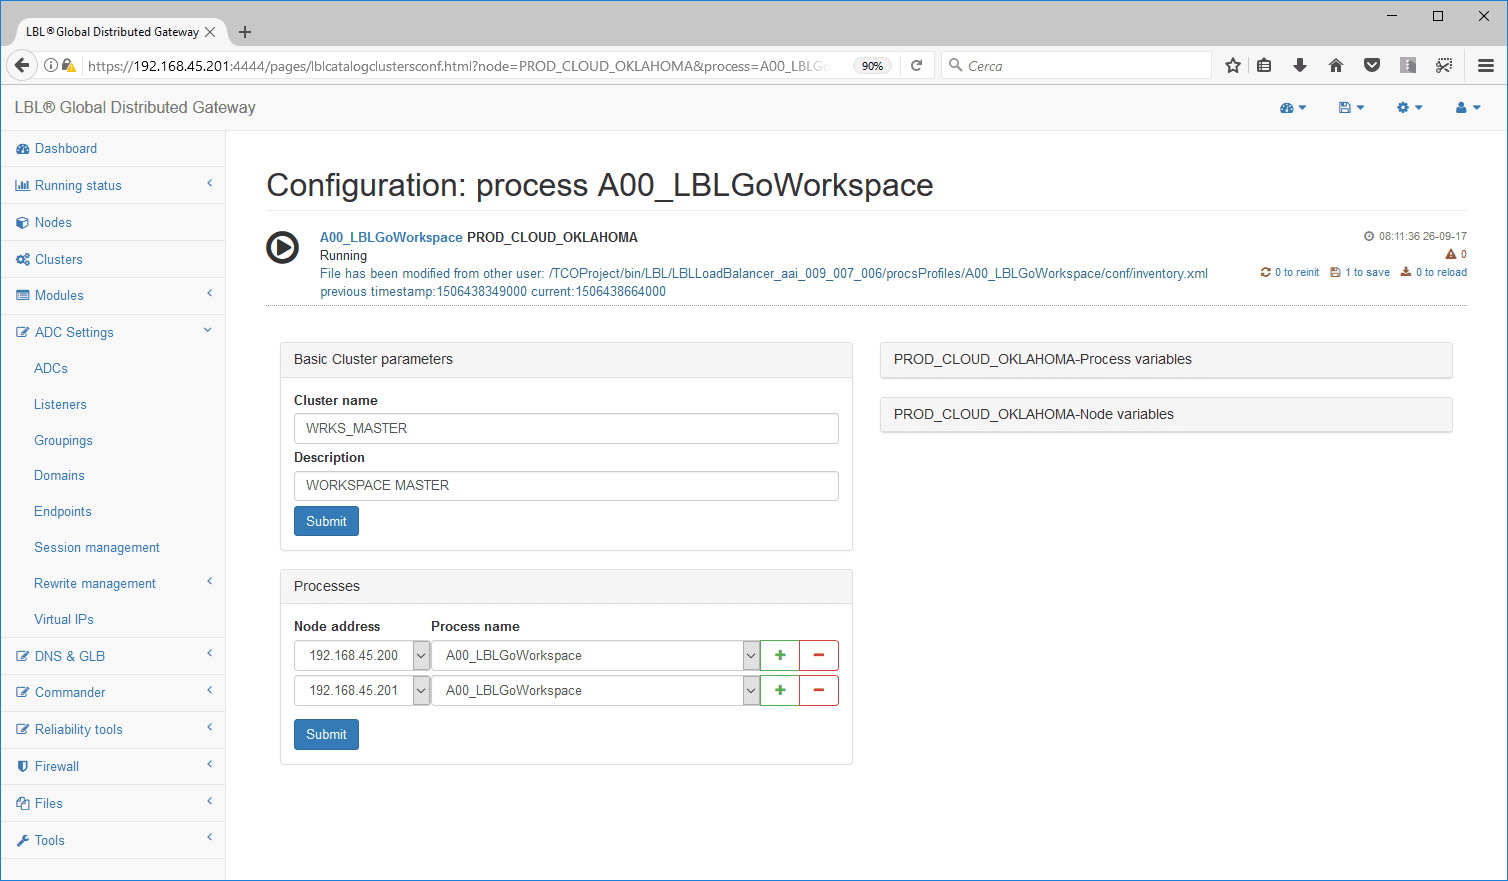
For convenience, the [+] key copies the characteristics of the source
where it
is pressed. Therefore, it will be enough to change the necessary values,
in
this case only the “Node Address”
All you need to do is save and configure to activate the cluster…
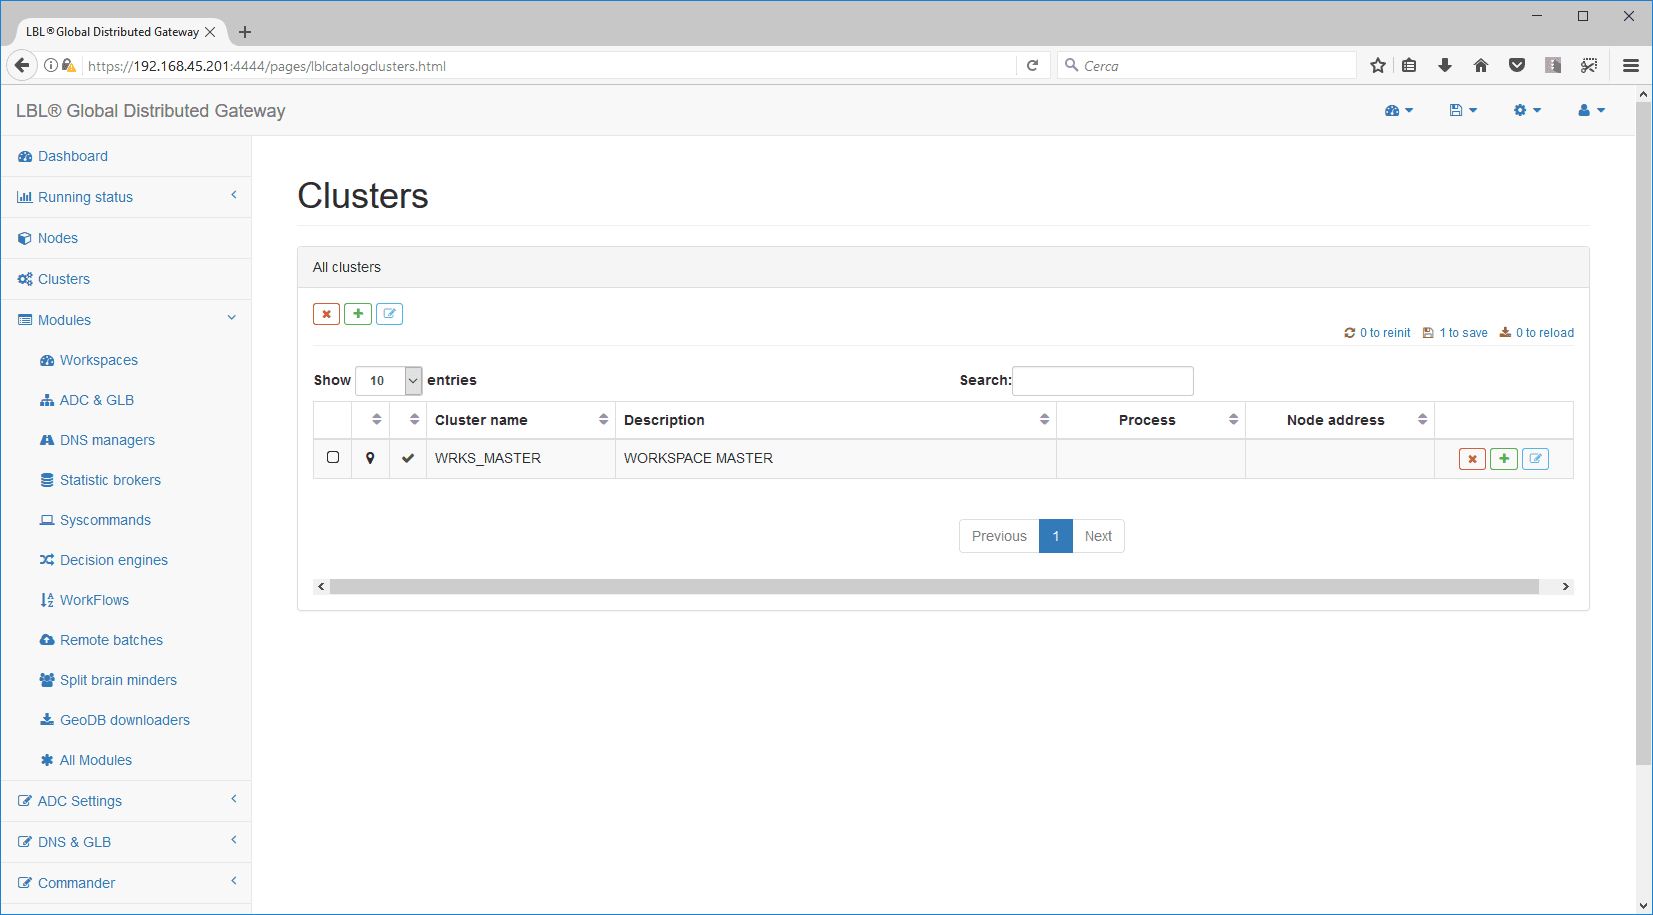
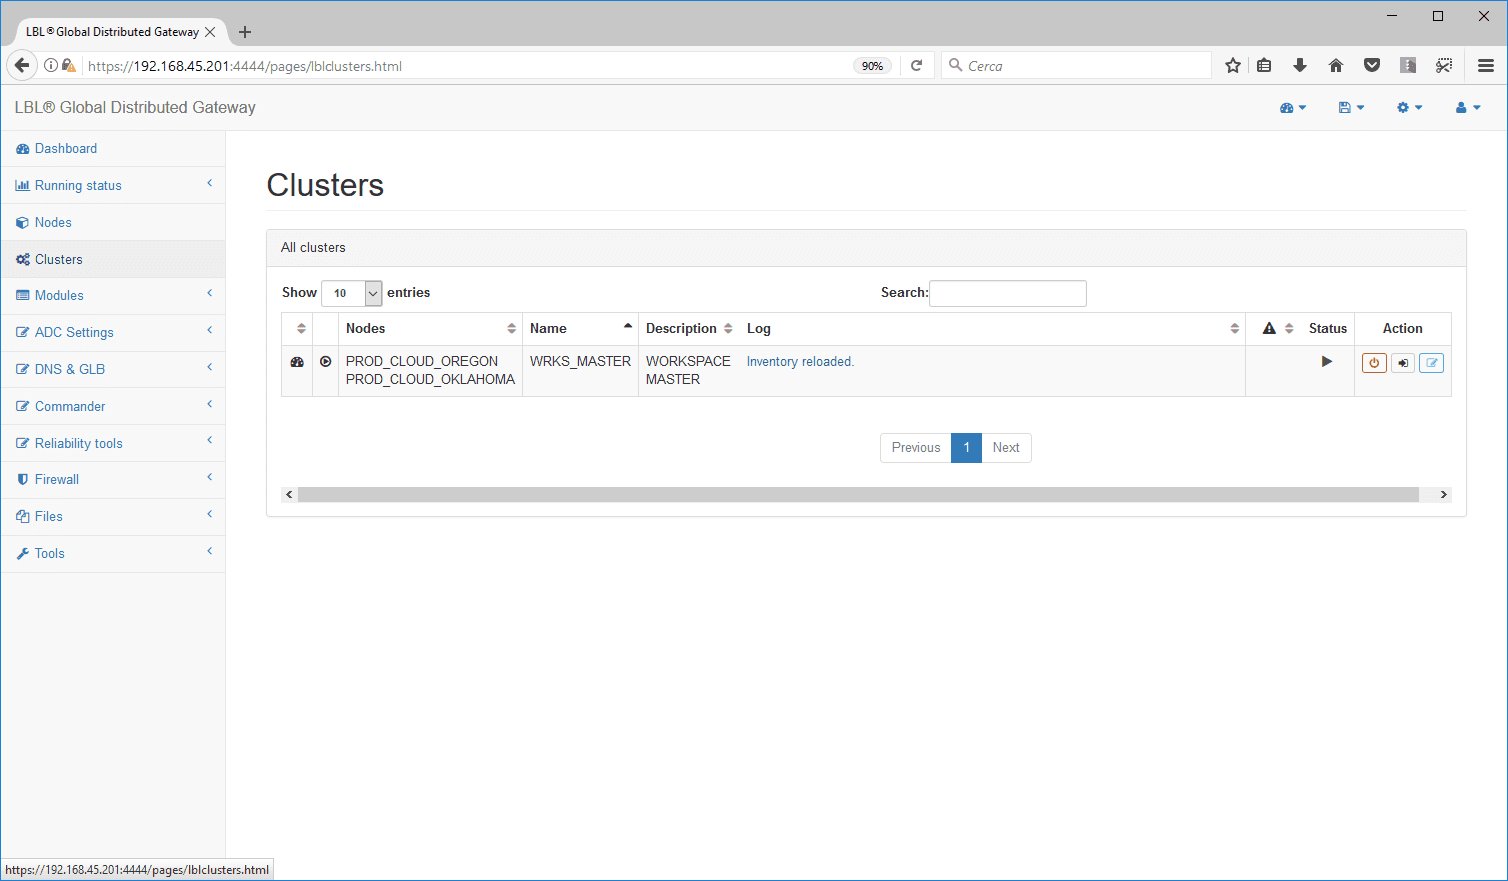
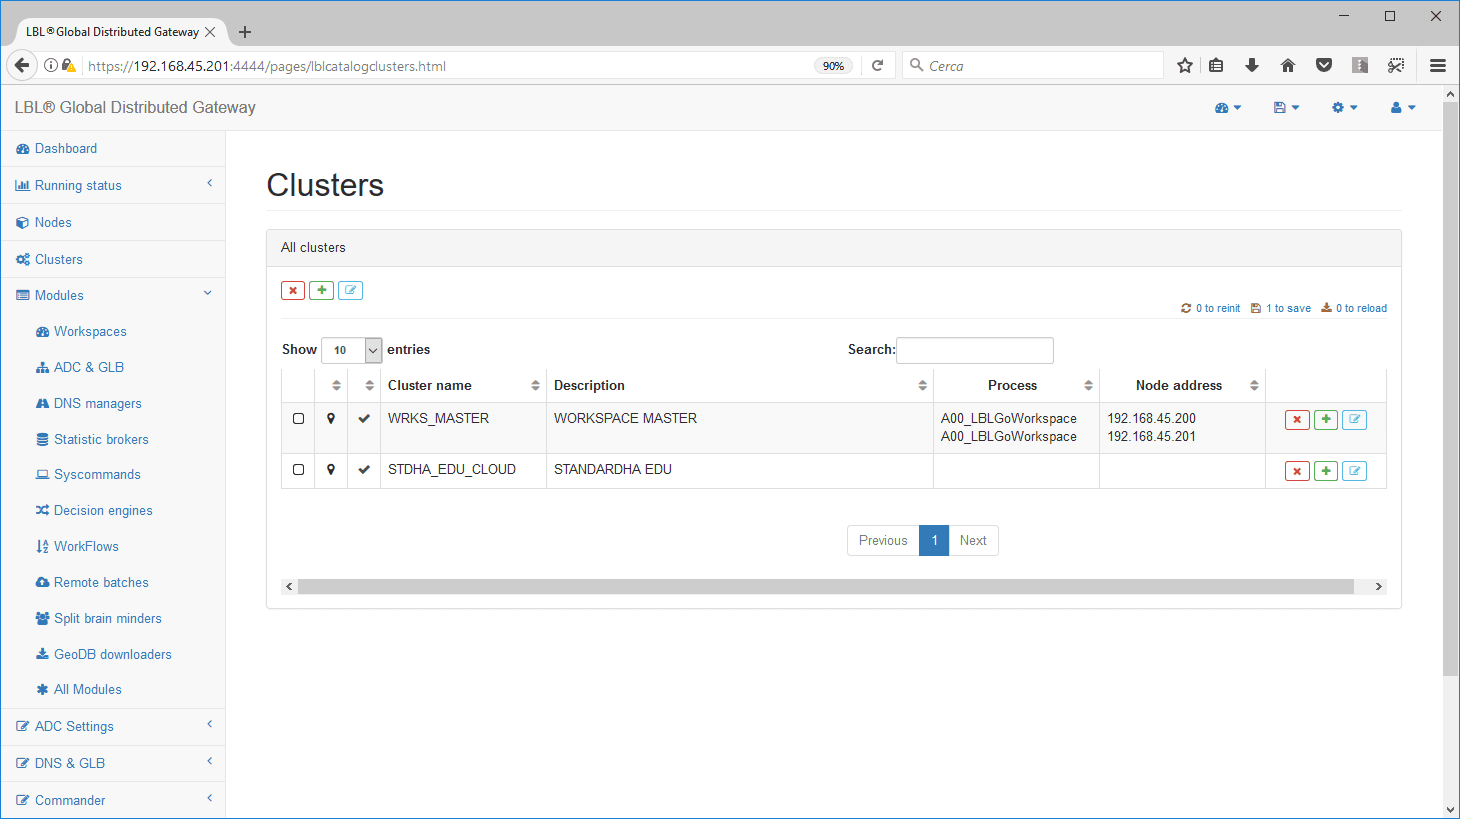
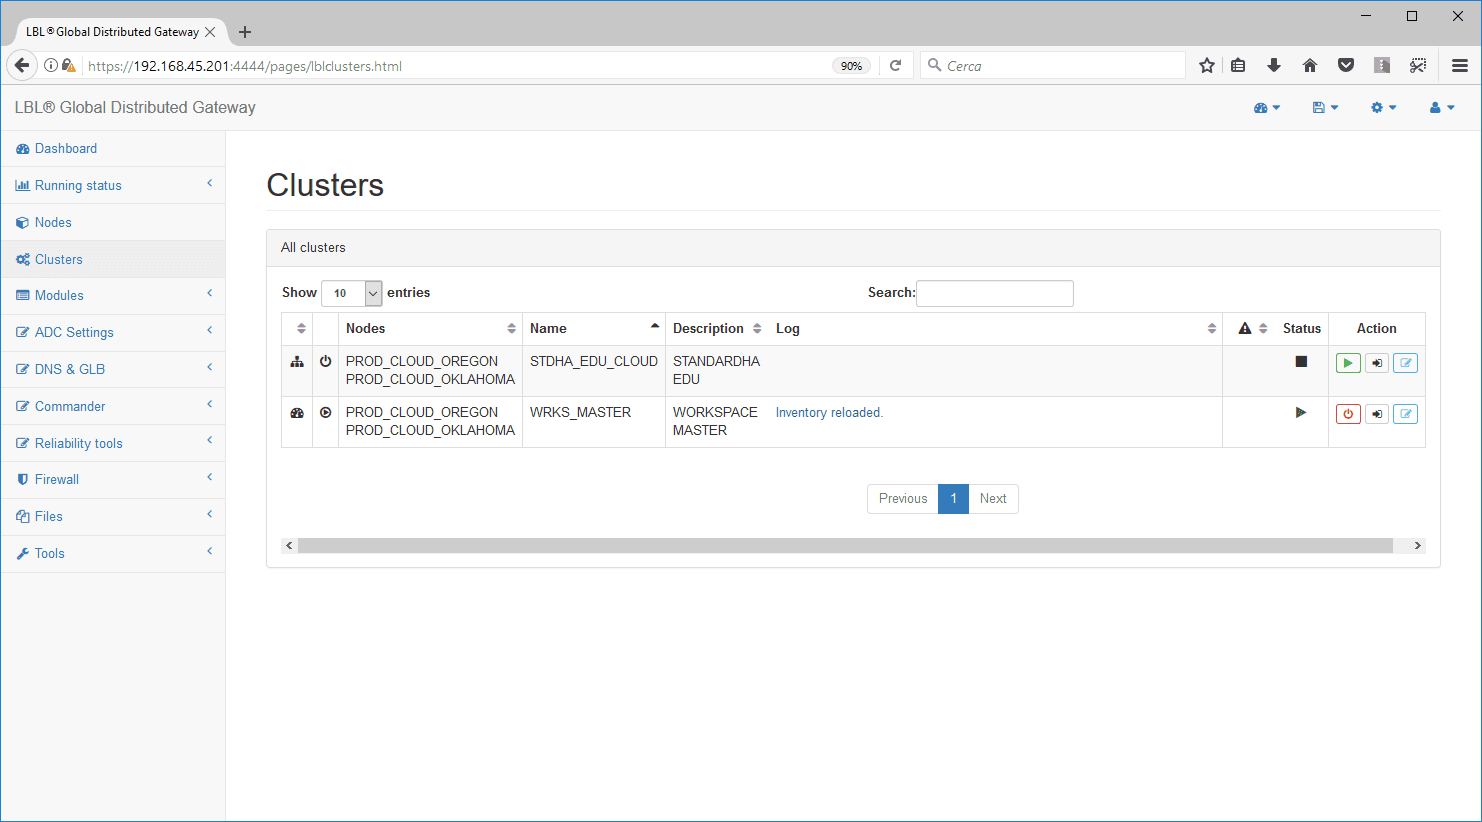
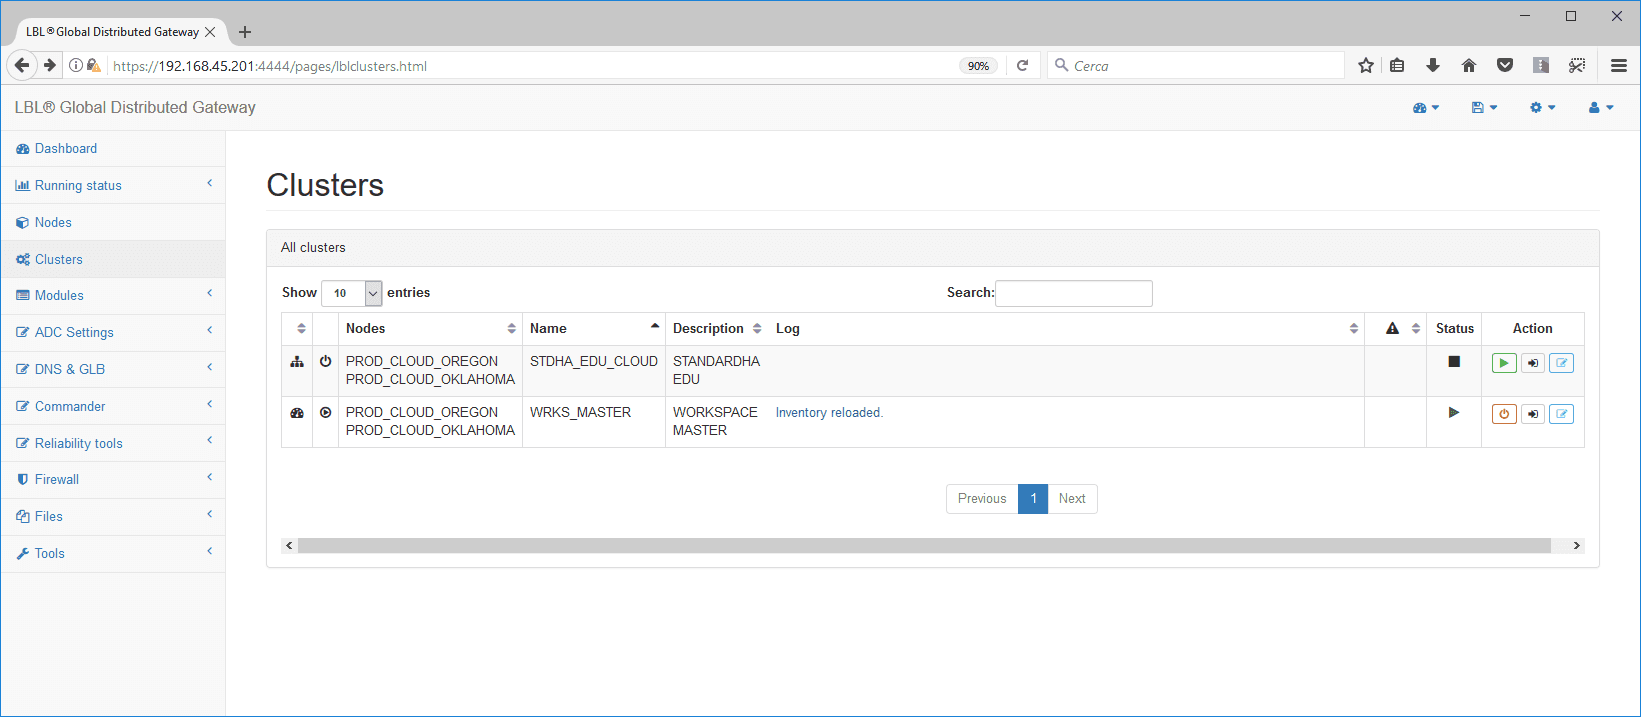
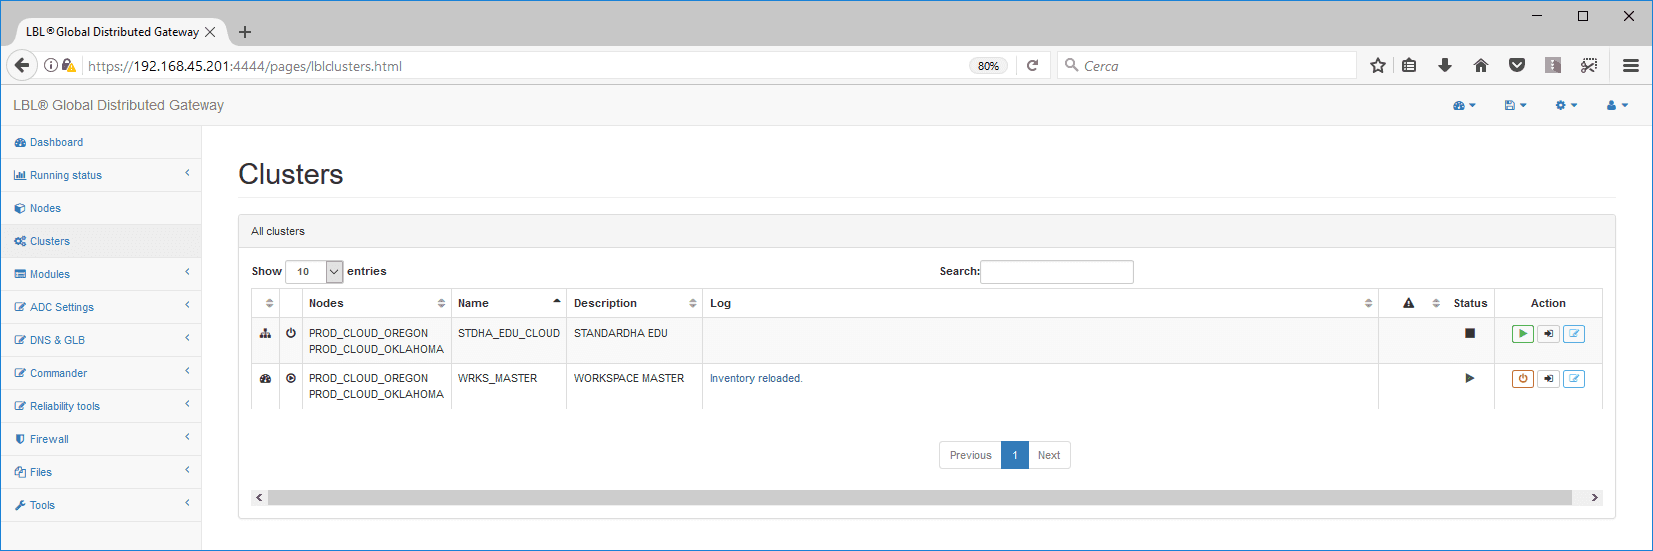
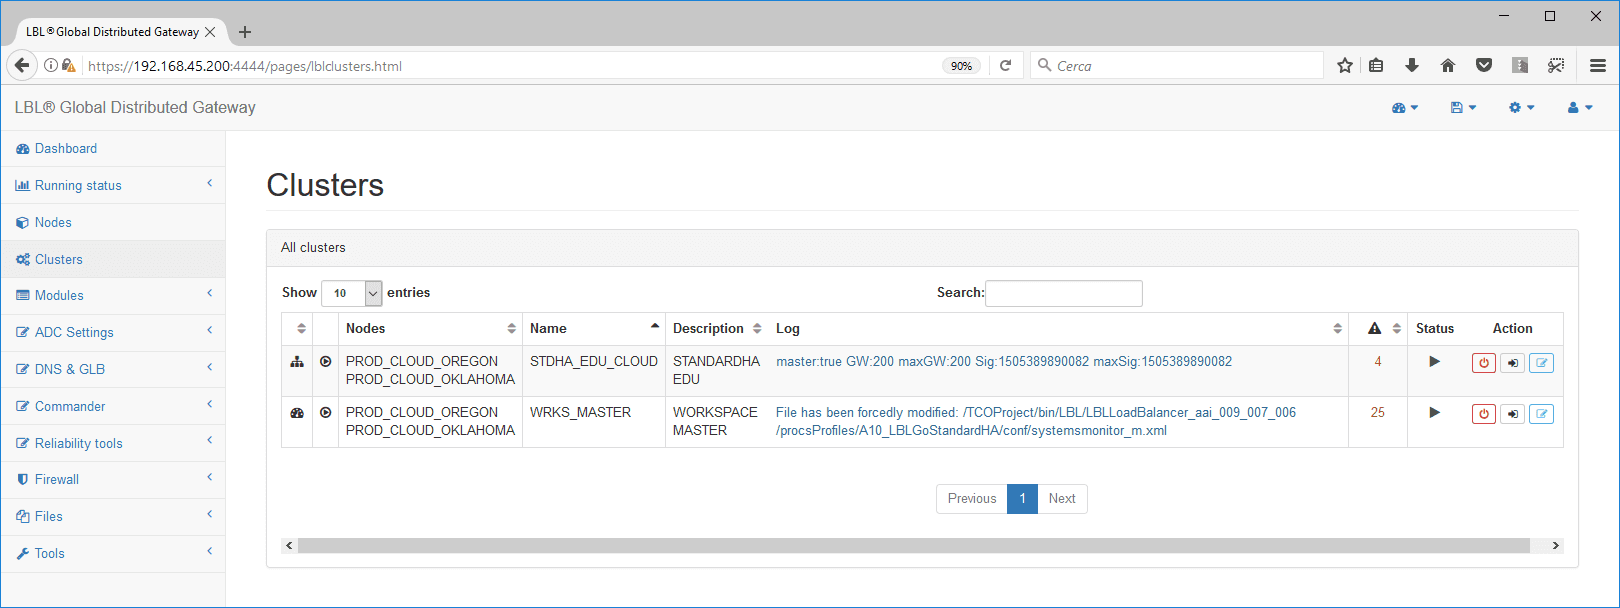
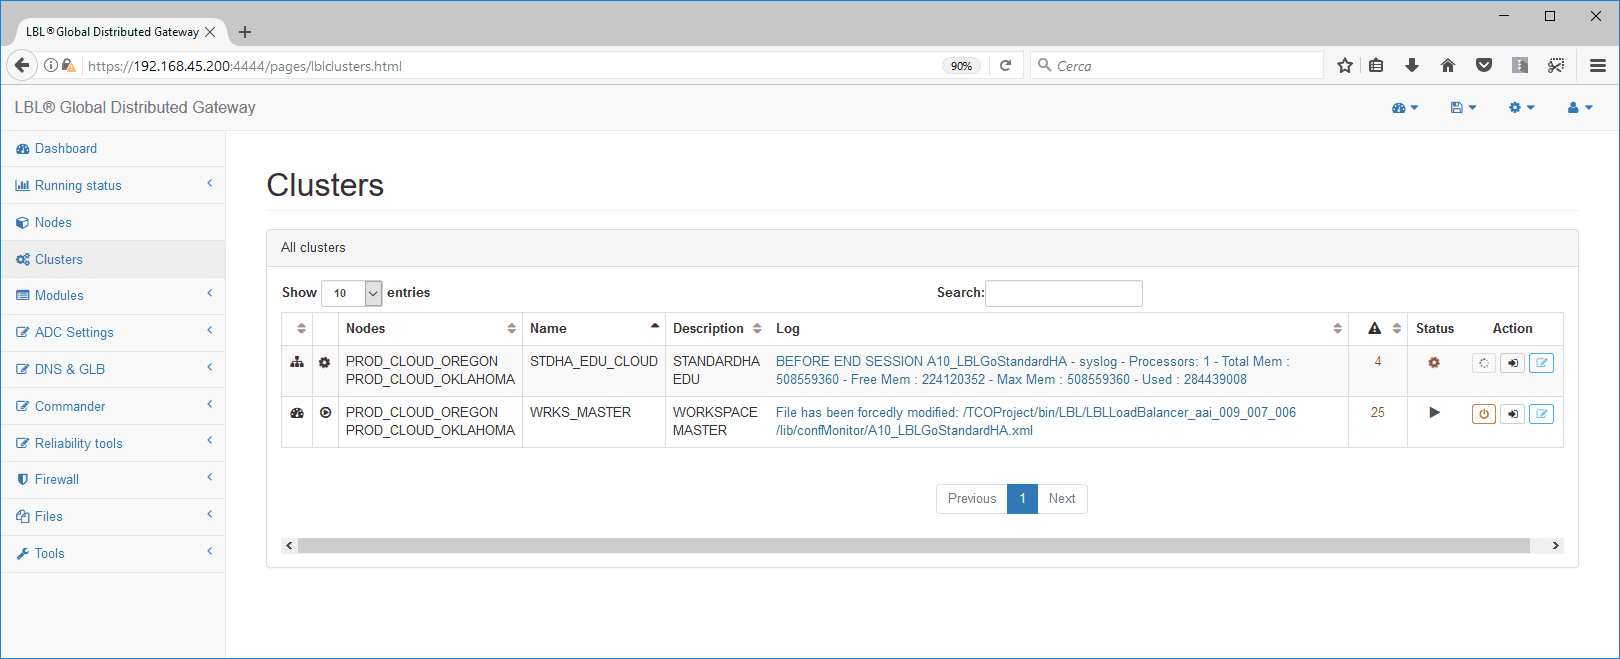
Selecting Clusters will show us the composition of the newly
created cluster…
Returning to the OPLON Dashboard view
we will notice that the system detects a configuration misalignment.
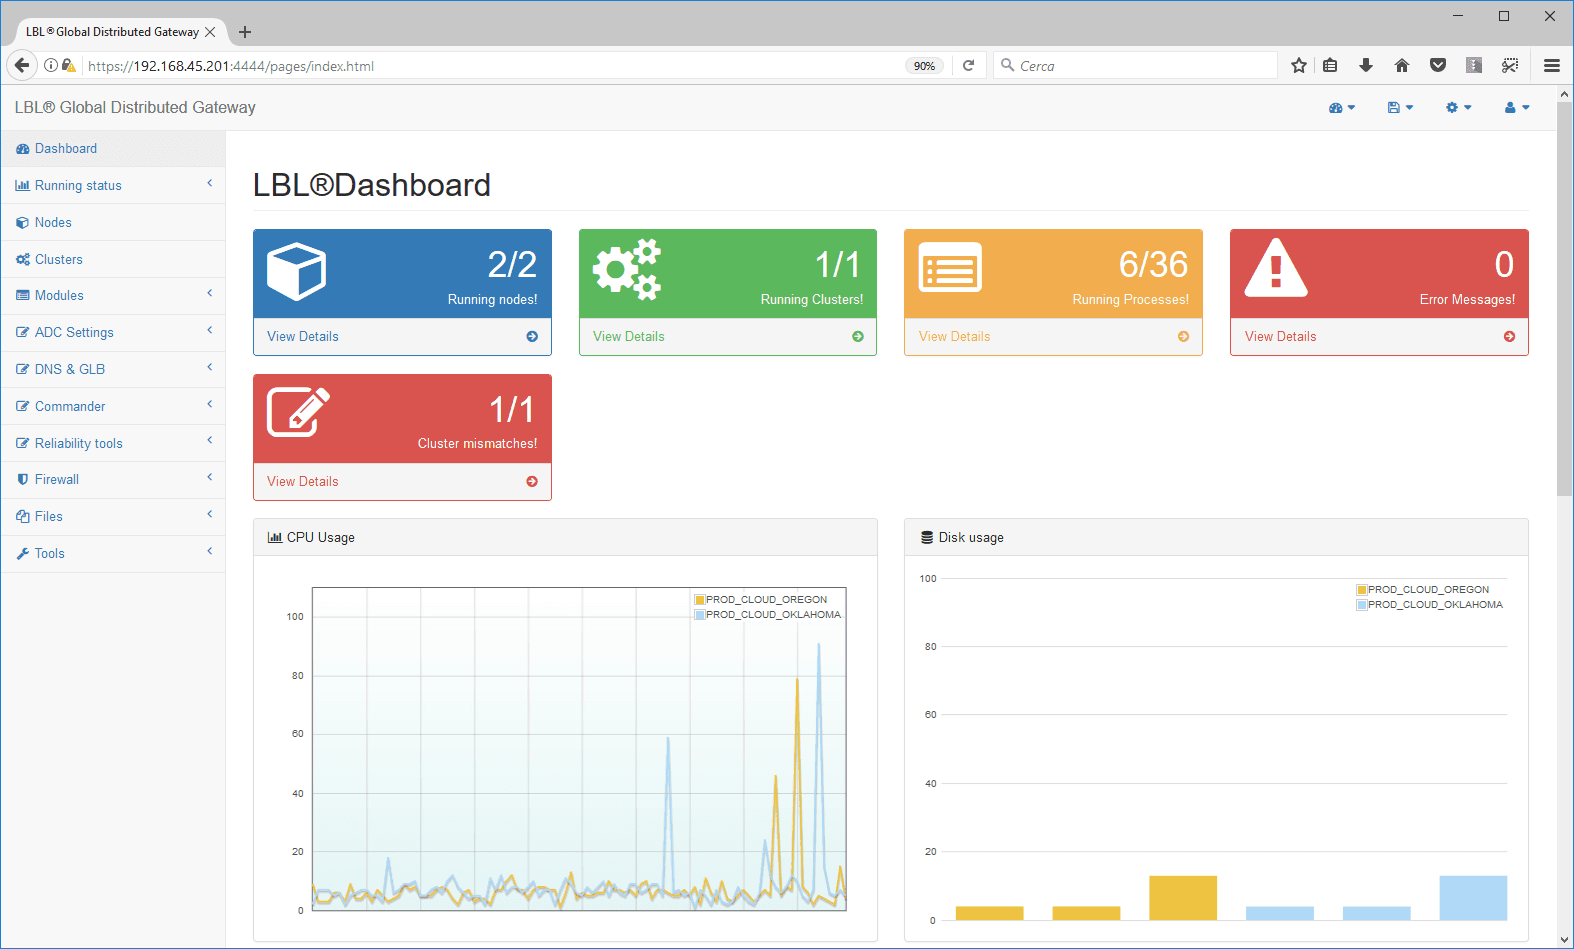
This is due to the fact that the Cluster node, on which we have made the
configurations, is not aligned with the
configurations of the node that,only now, is in Cluster and must
therefore be
riallineated. OPLON is
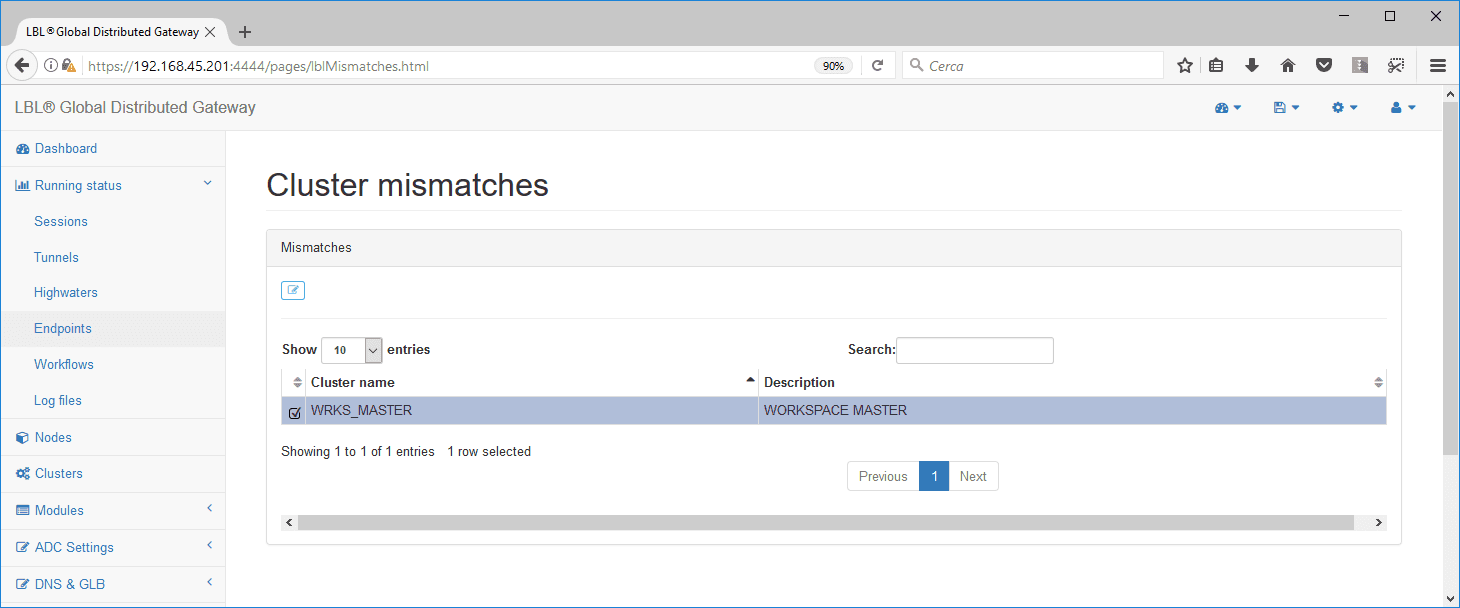
equipped with a powerful engine to check the consistency of cluster
node configurations and if they are misalignment it proposes
an error message and therefore the possibility of reconciling
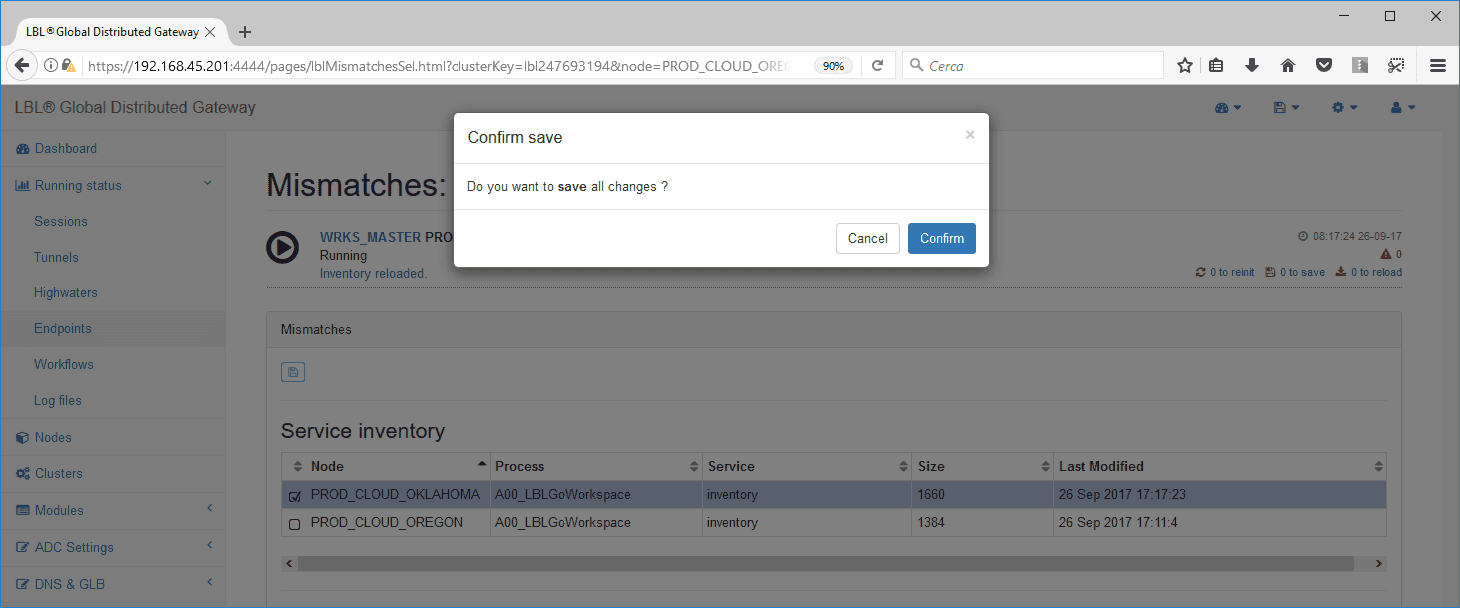
the configurations. Select the configuration that you want to reconcile
and press
edit
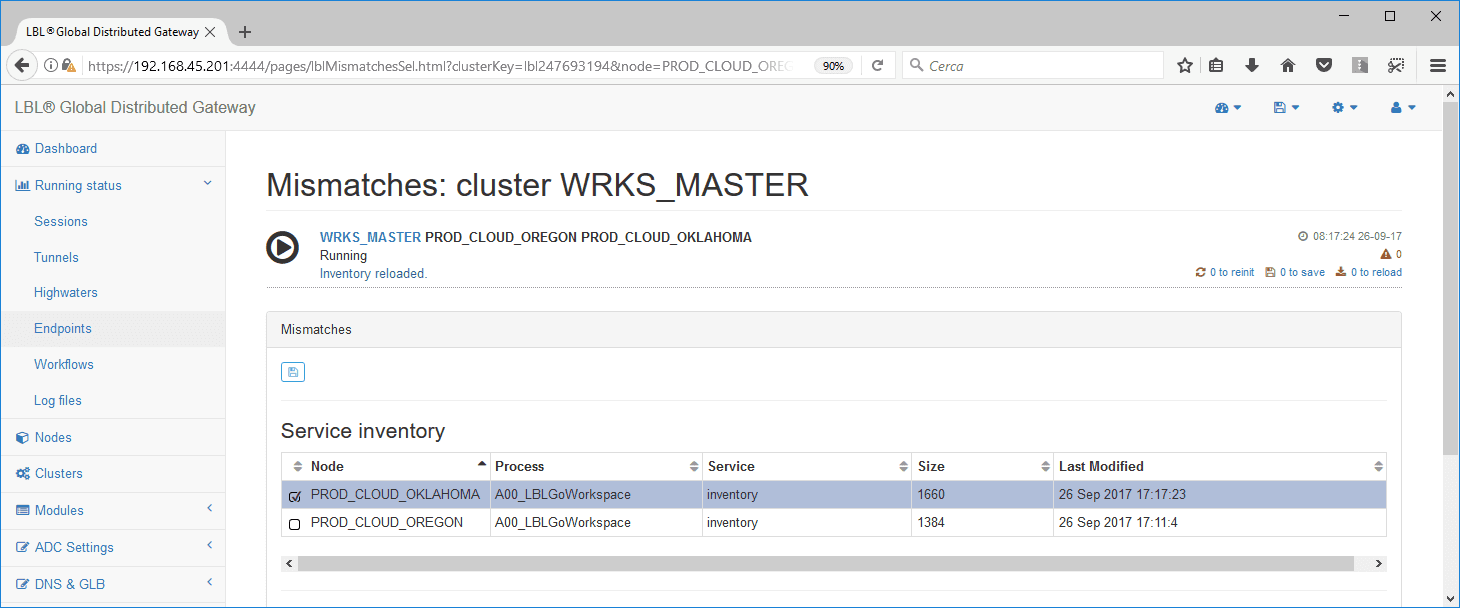
The system will propose configurations misalignment with their
characteristics. The operator is asked to select the configuration from
which to start to align the other
nodes in the Cluster.
In this case we will start from Oklahoma which has the highest last
modified date and also the highest configuration compared to
Oregon.
After confirmation, the system re-checks the consistency
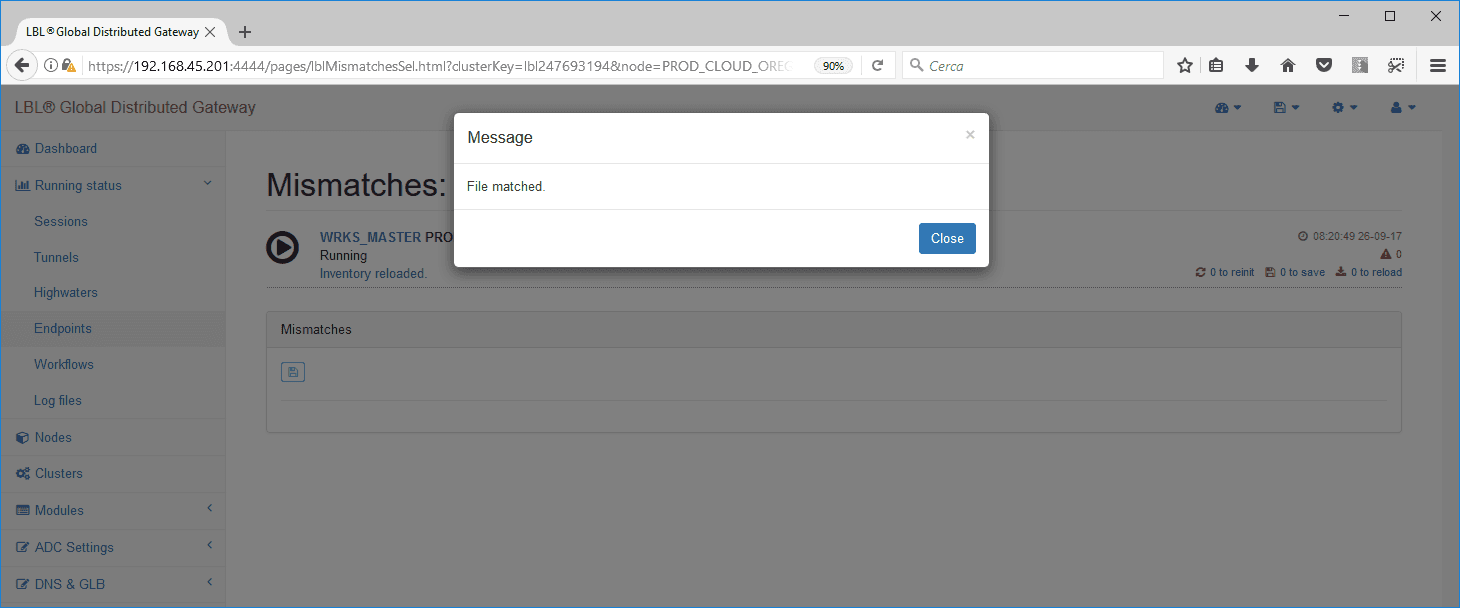
Returning to the Dashboard, reports
of inconsistency will have disappeared.
Creating the OPLON ADC Standard HA Cluster
as for creating the first cluster select settings and clusters
Select add Cluster

Set cluster name and description
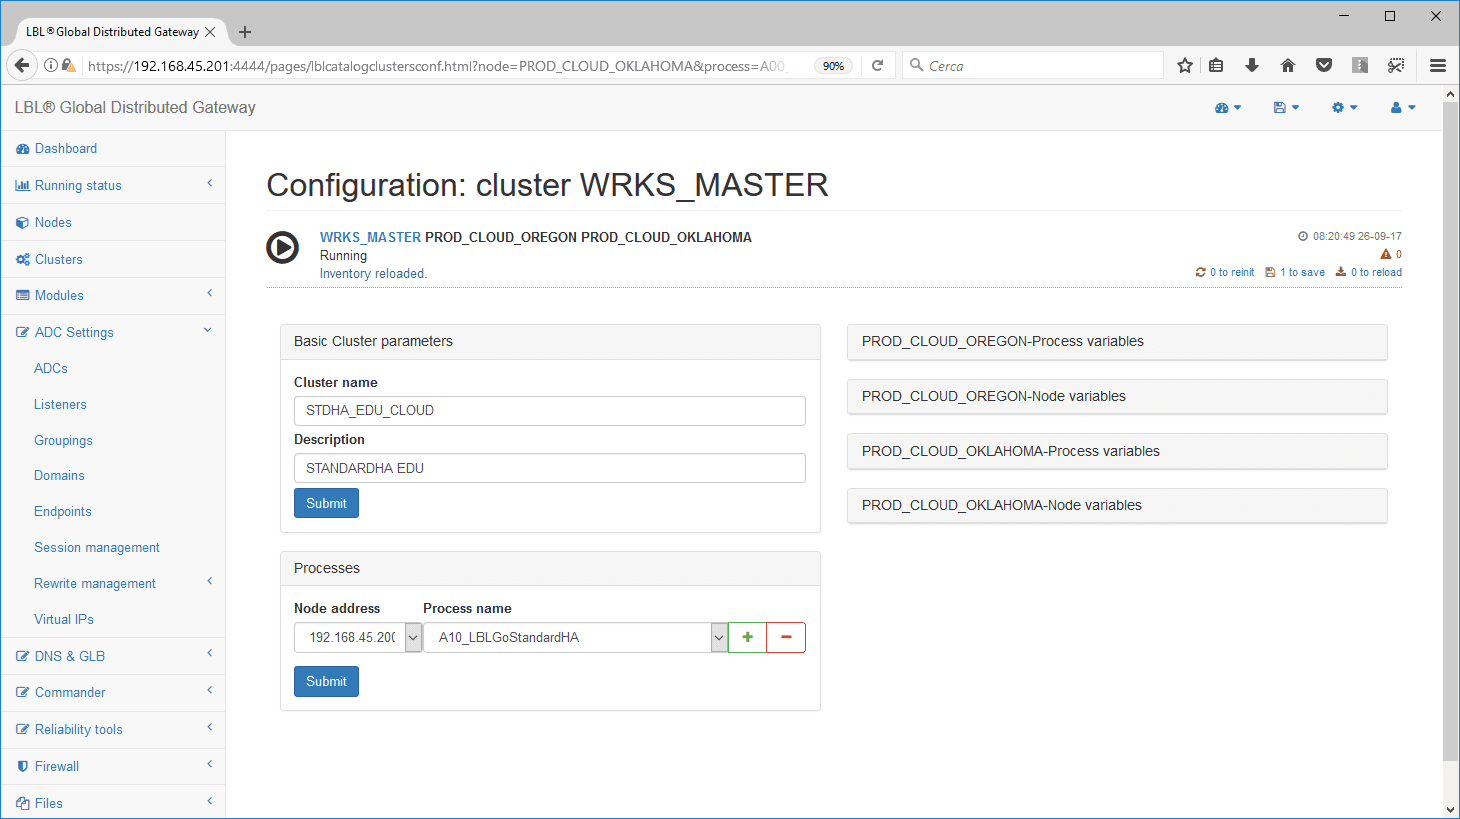
Go to [Edit] to complete cluster configuration
set the address of the node on which to create the cluster and then
the process (form) to place in cluster
Press Add new item and then change the address of the second node, and
then go to link 1 to
save…
[save] the configuration
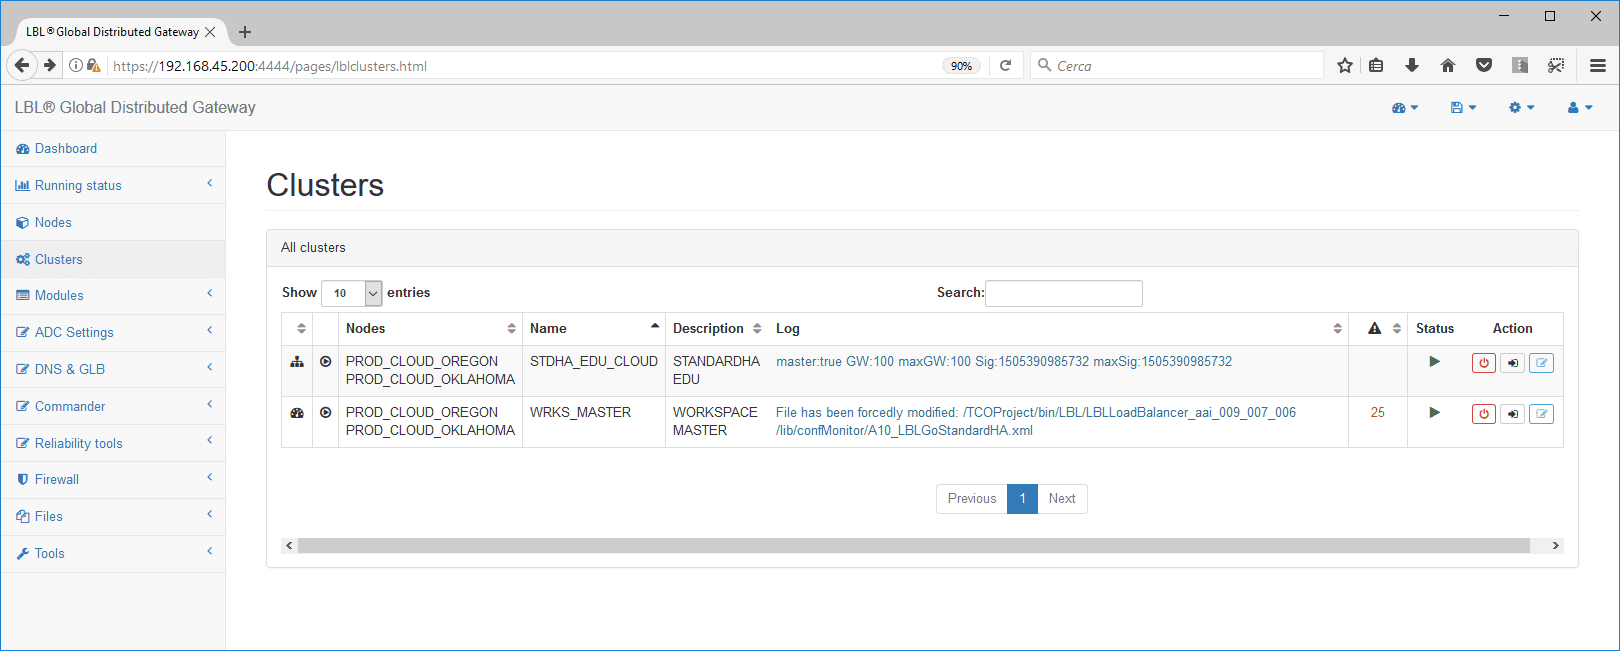
Selecting Clusters will result in 2 Clusters, one for
Workspace configurations and one for the OPLON ADC StandardHA
cluster.
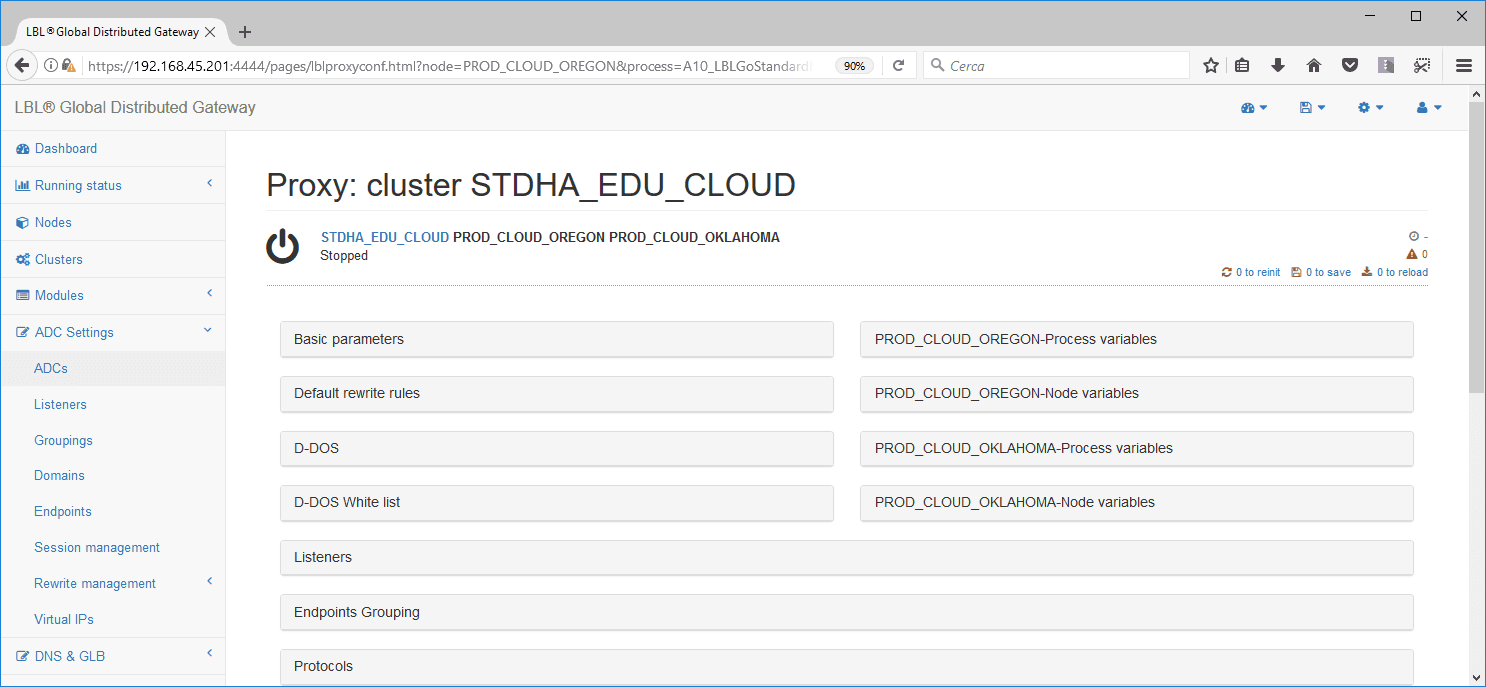
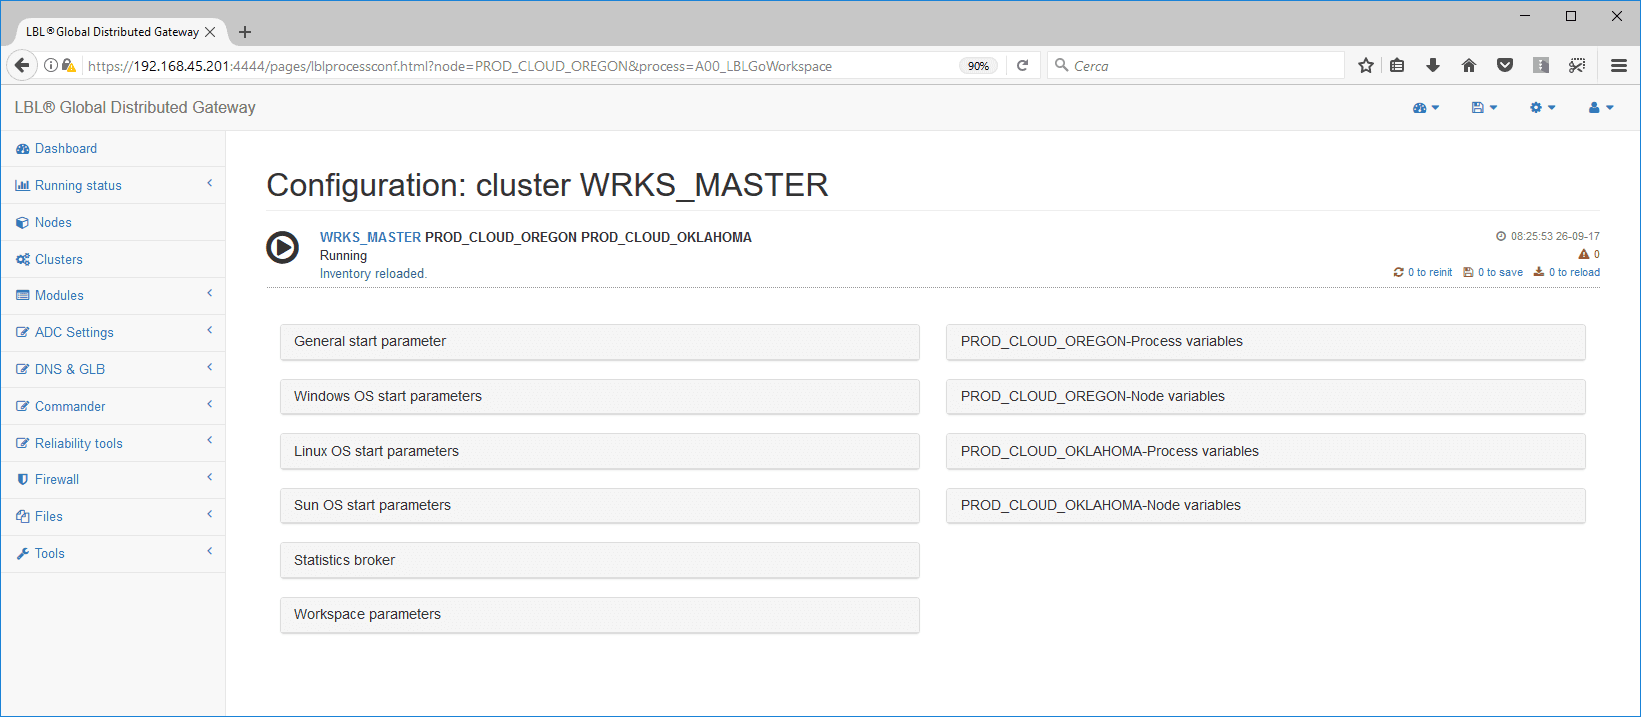
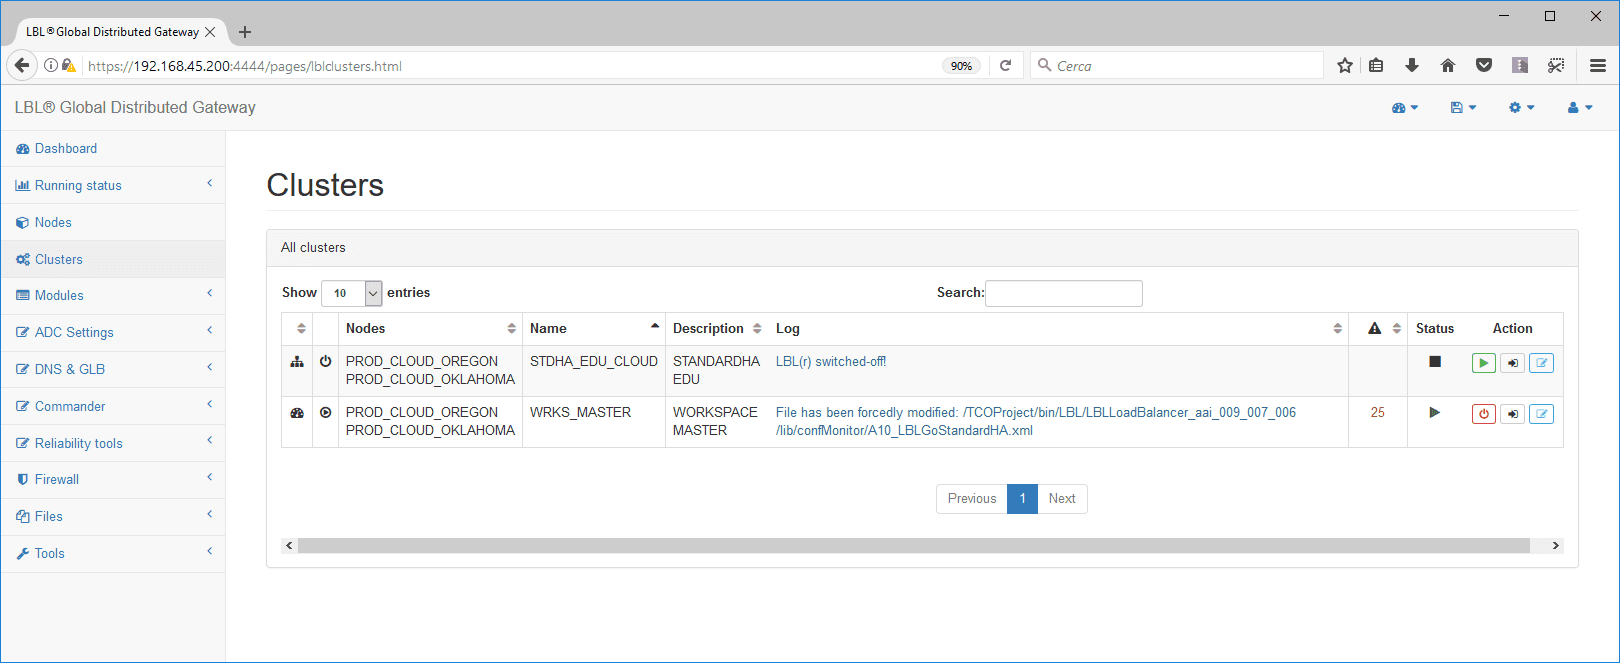
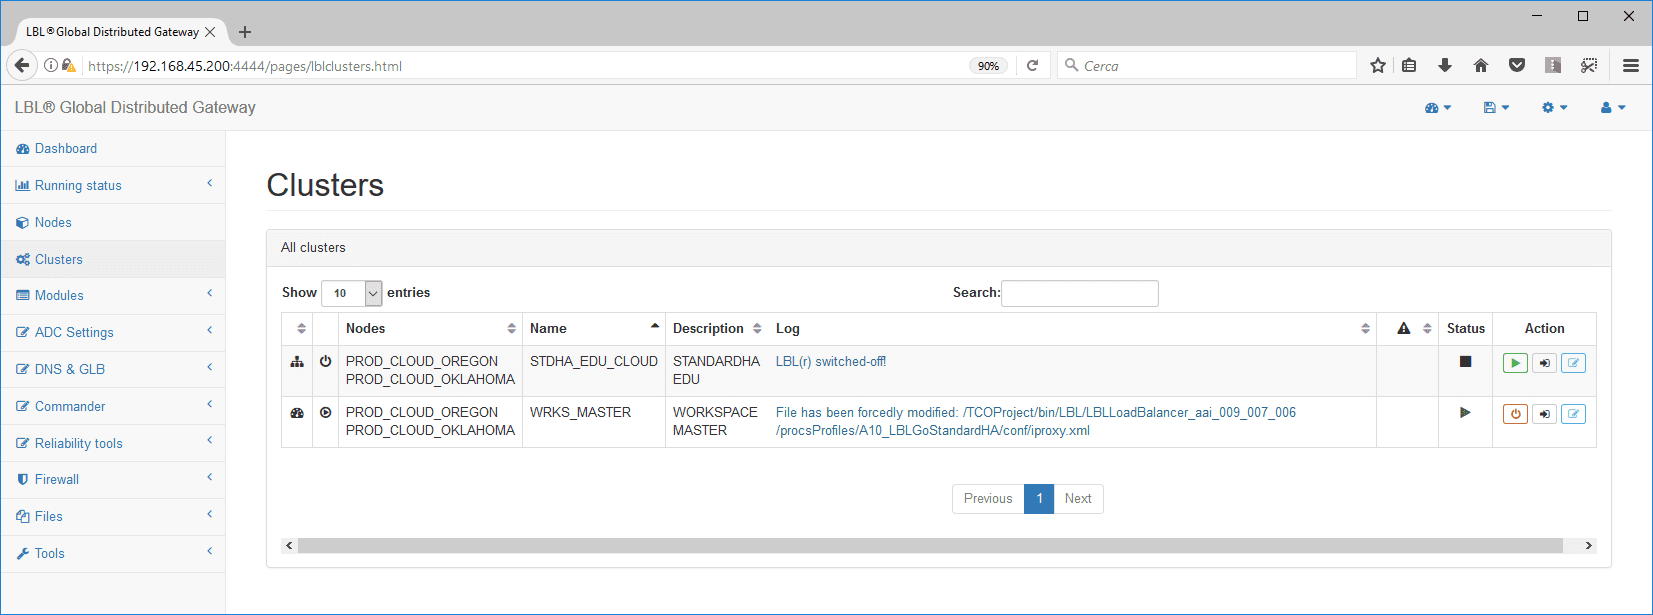
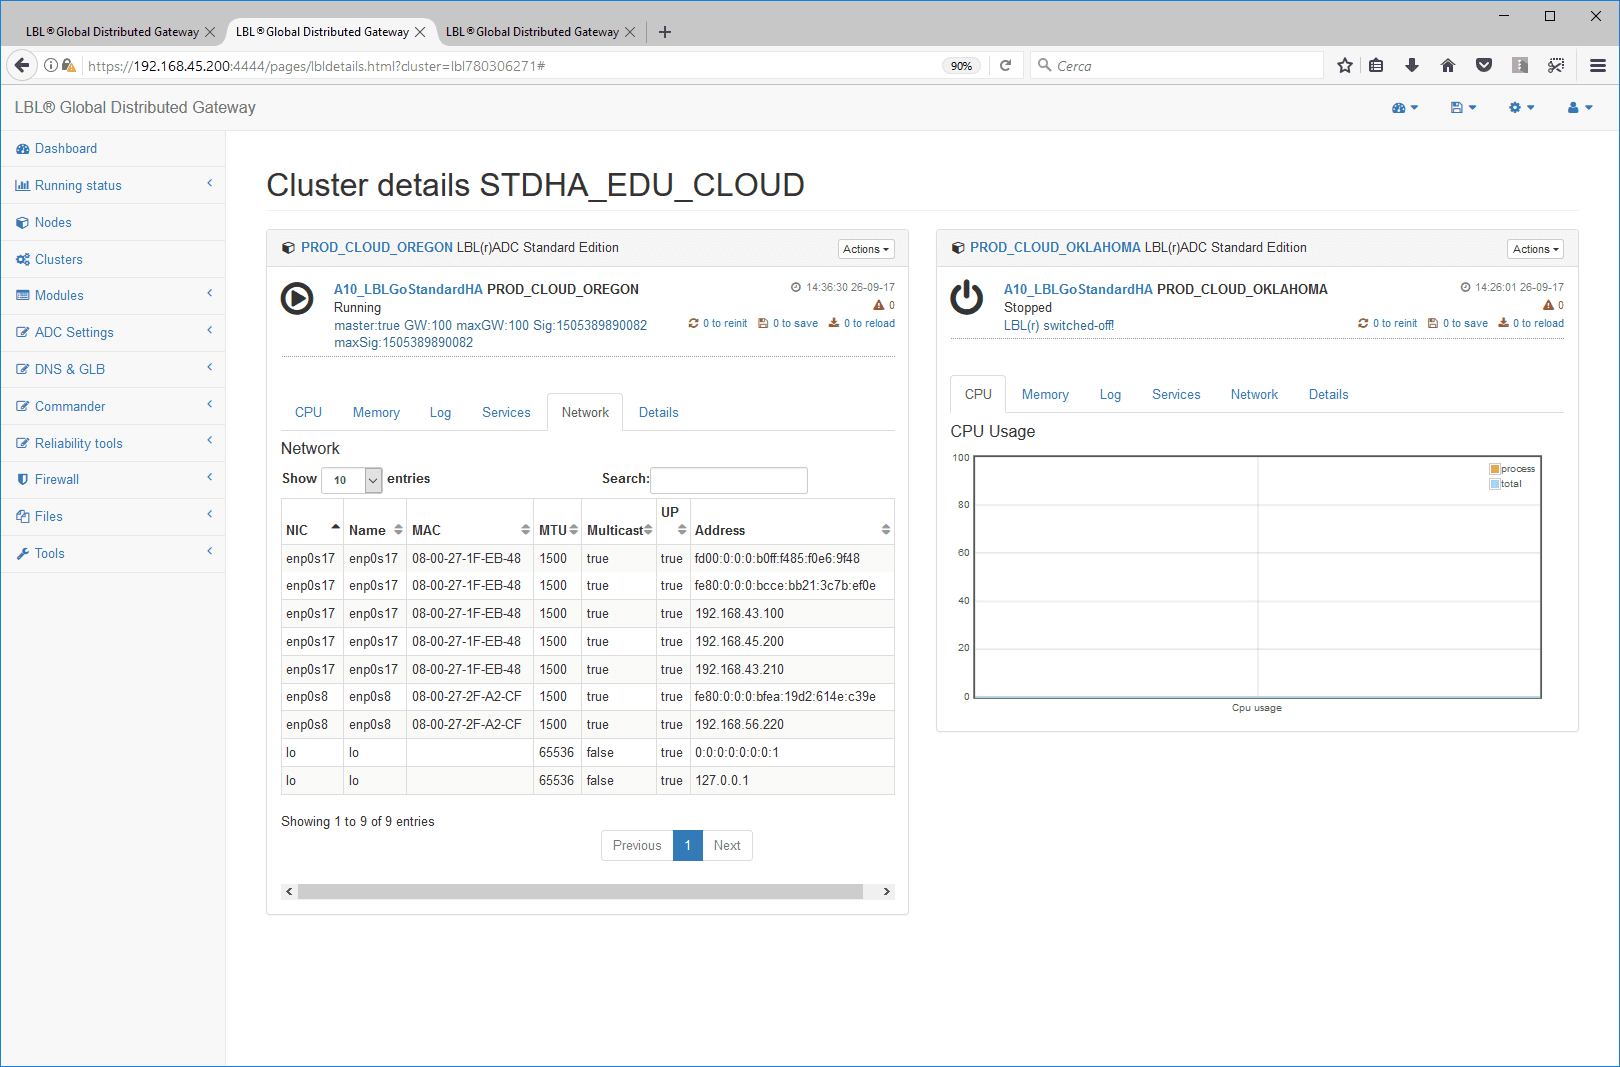
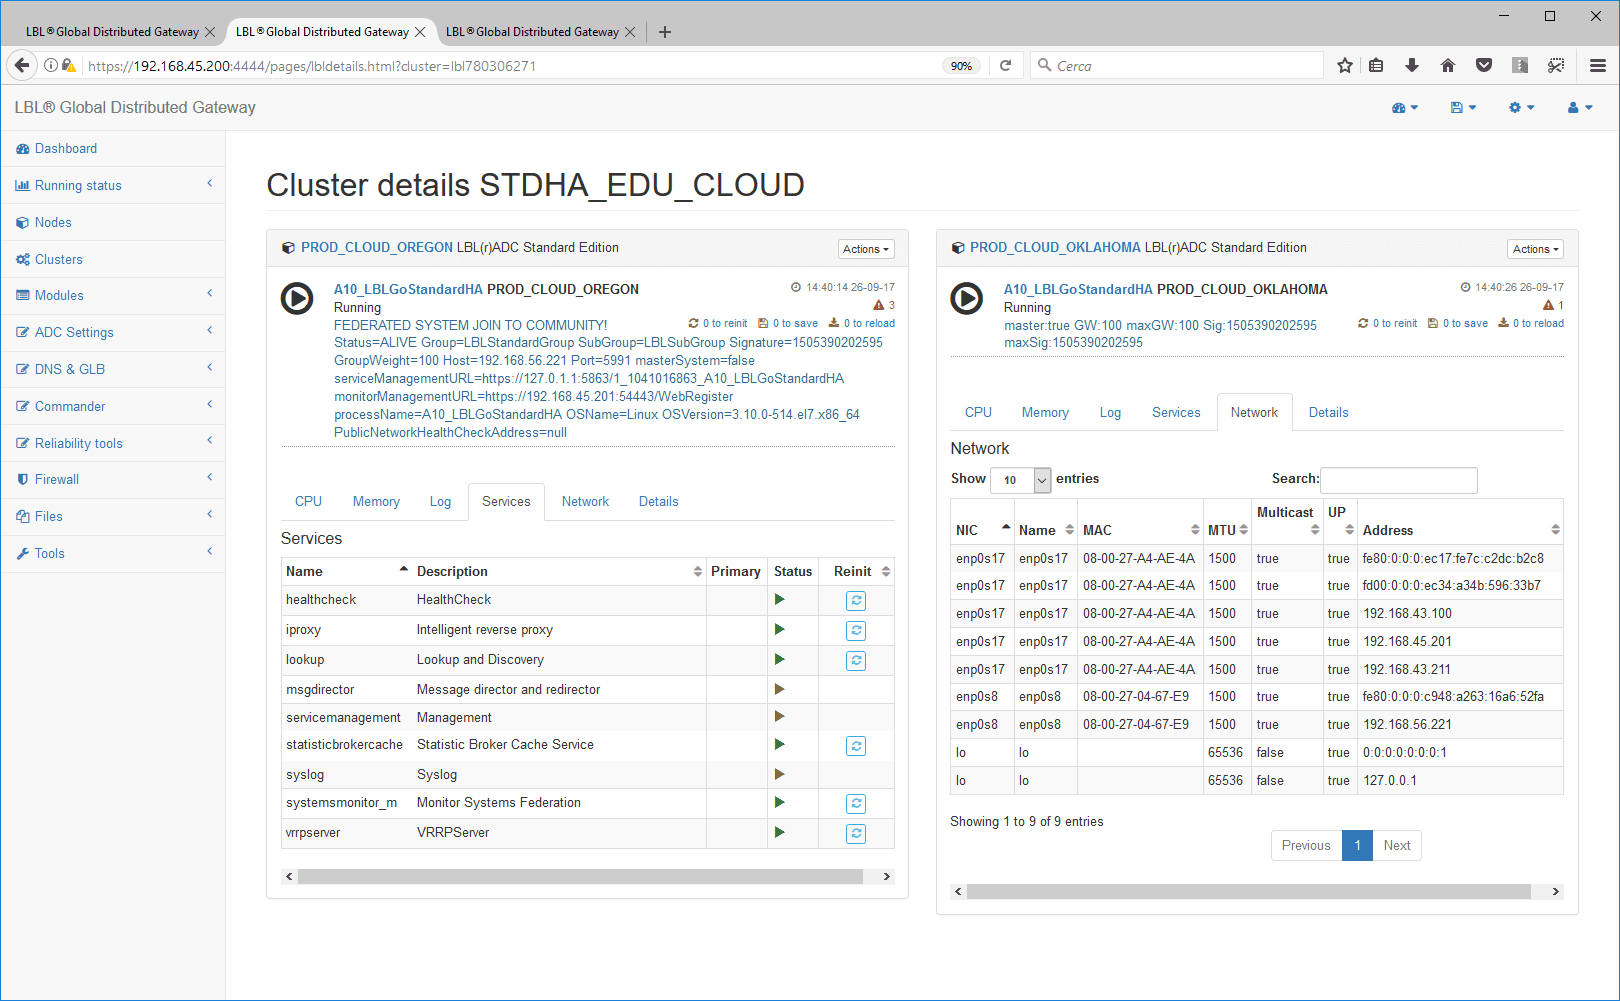
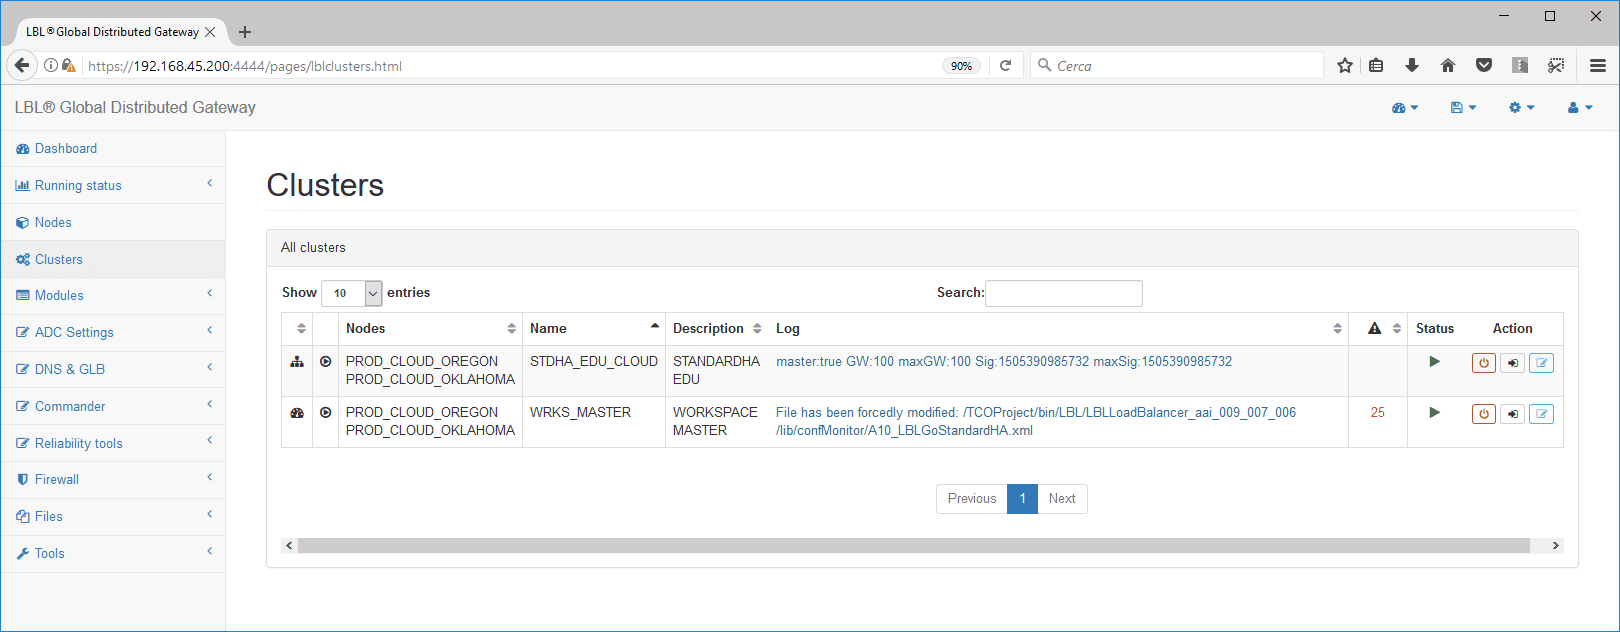
Overview cluster management
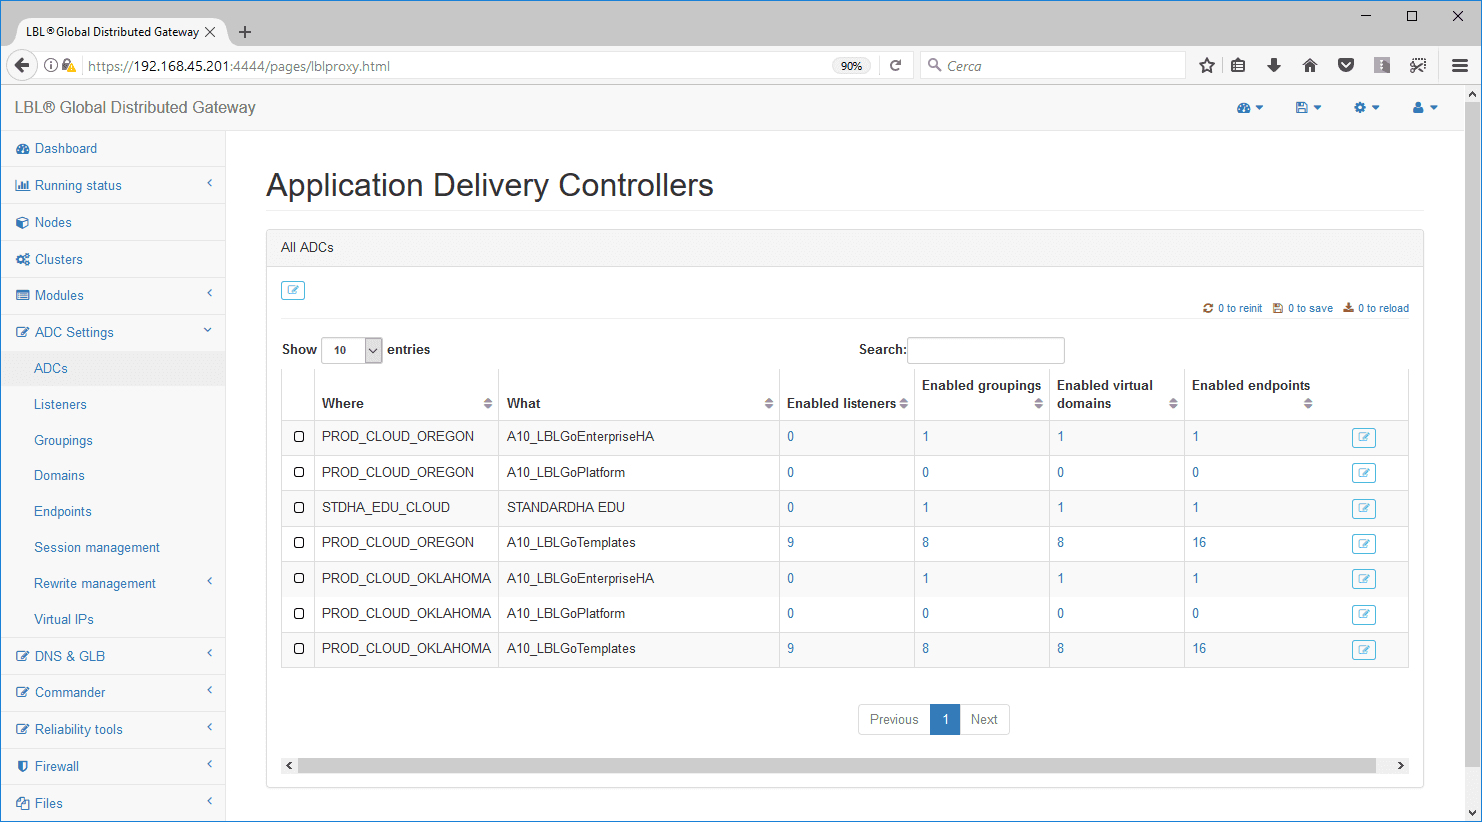
Selecting “ADC Settings” -> “ADCs” will present the
synthetic situation of all ADC modules under management at the Global
Distributed
Gateway. In this case, the “ADC” named STDHAEDUCLOUD is highlighted,
which is displayed as a single “Cluster” object consisting of multiple
processes that must be managed
simultaneously. For this reason, the
system exposes a single element.
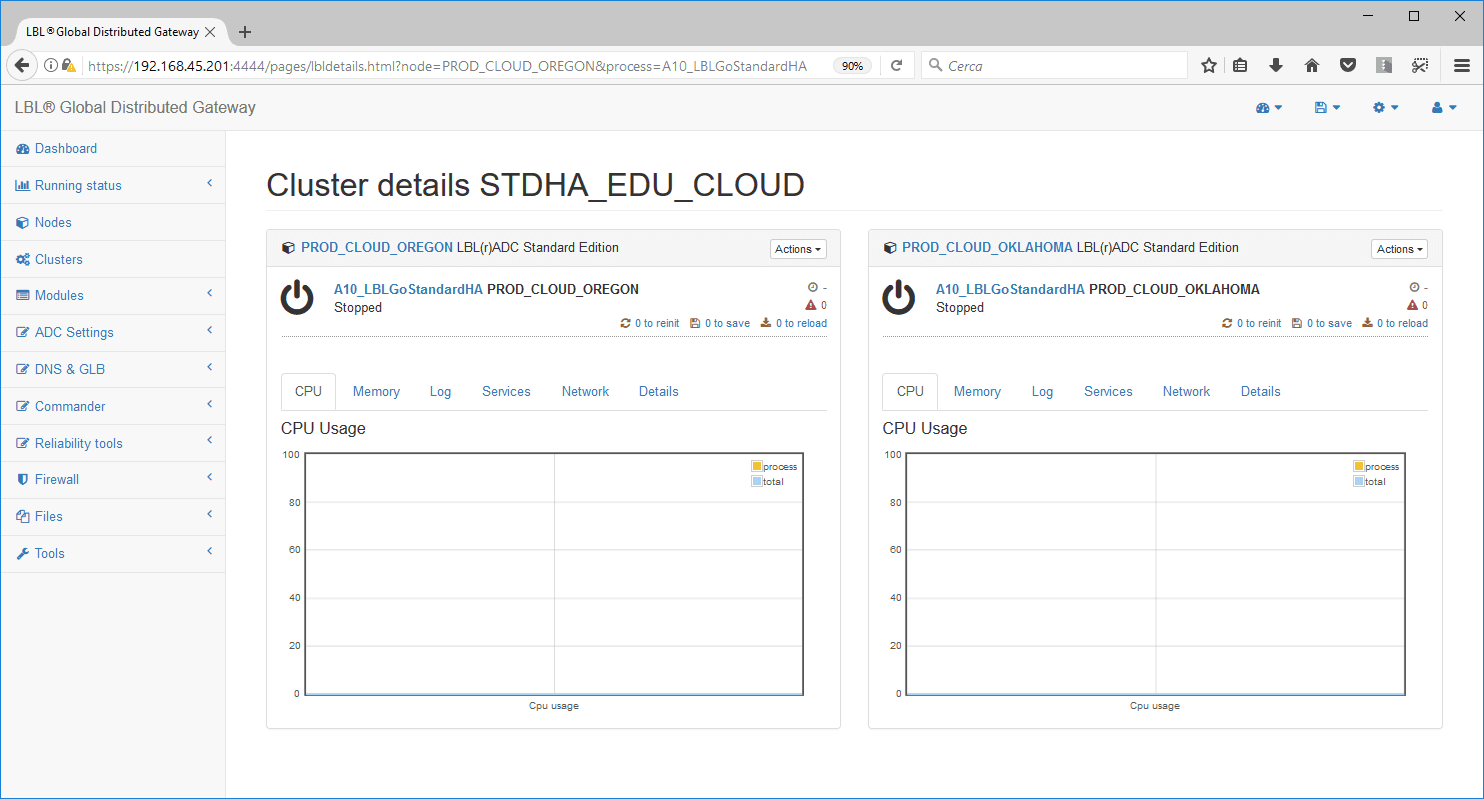
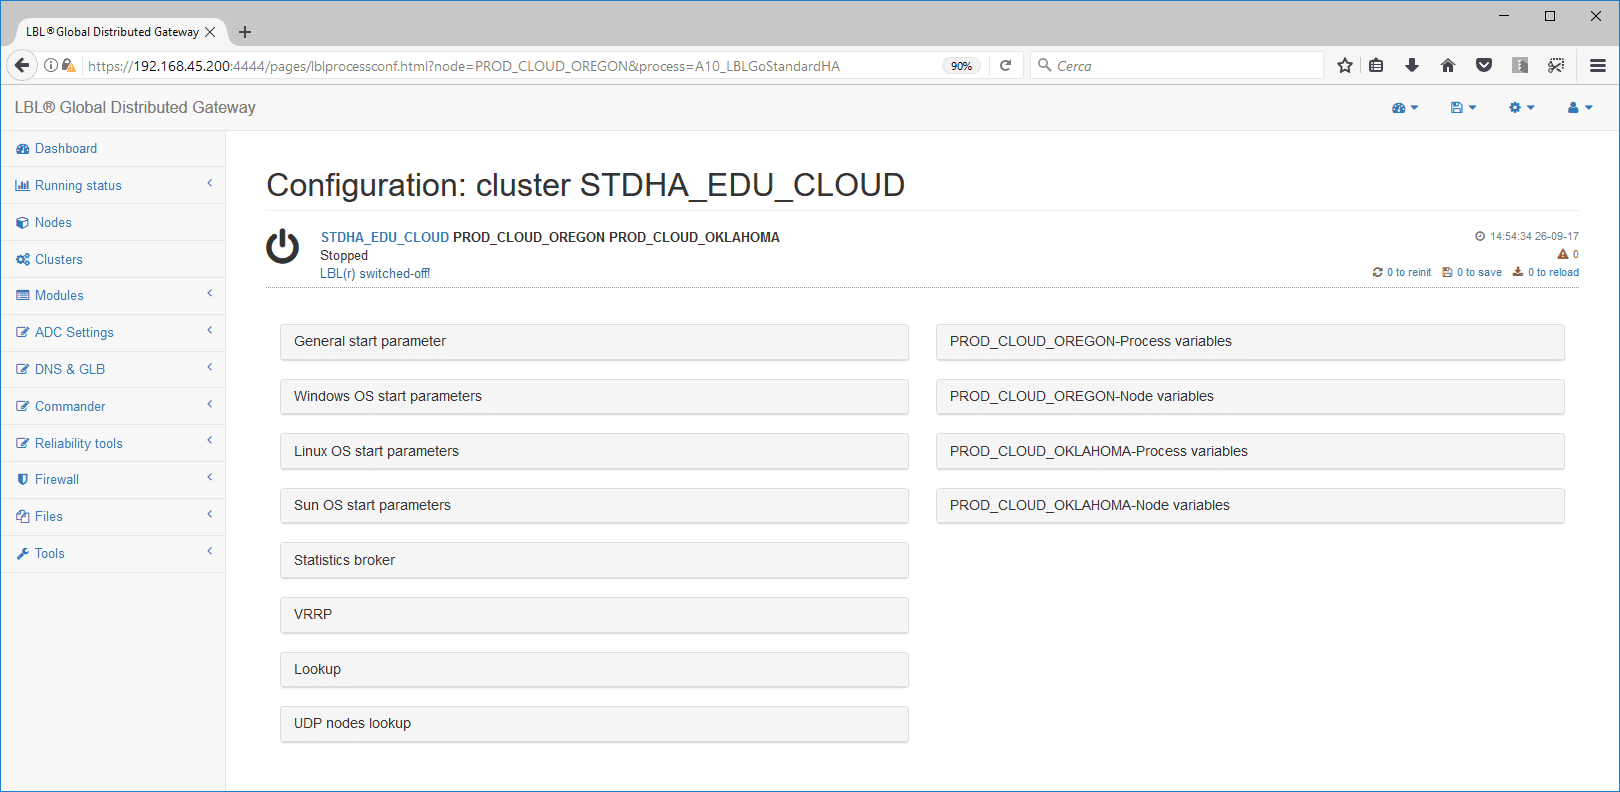
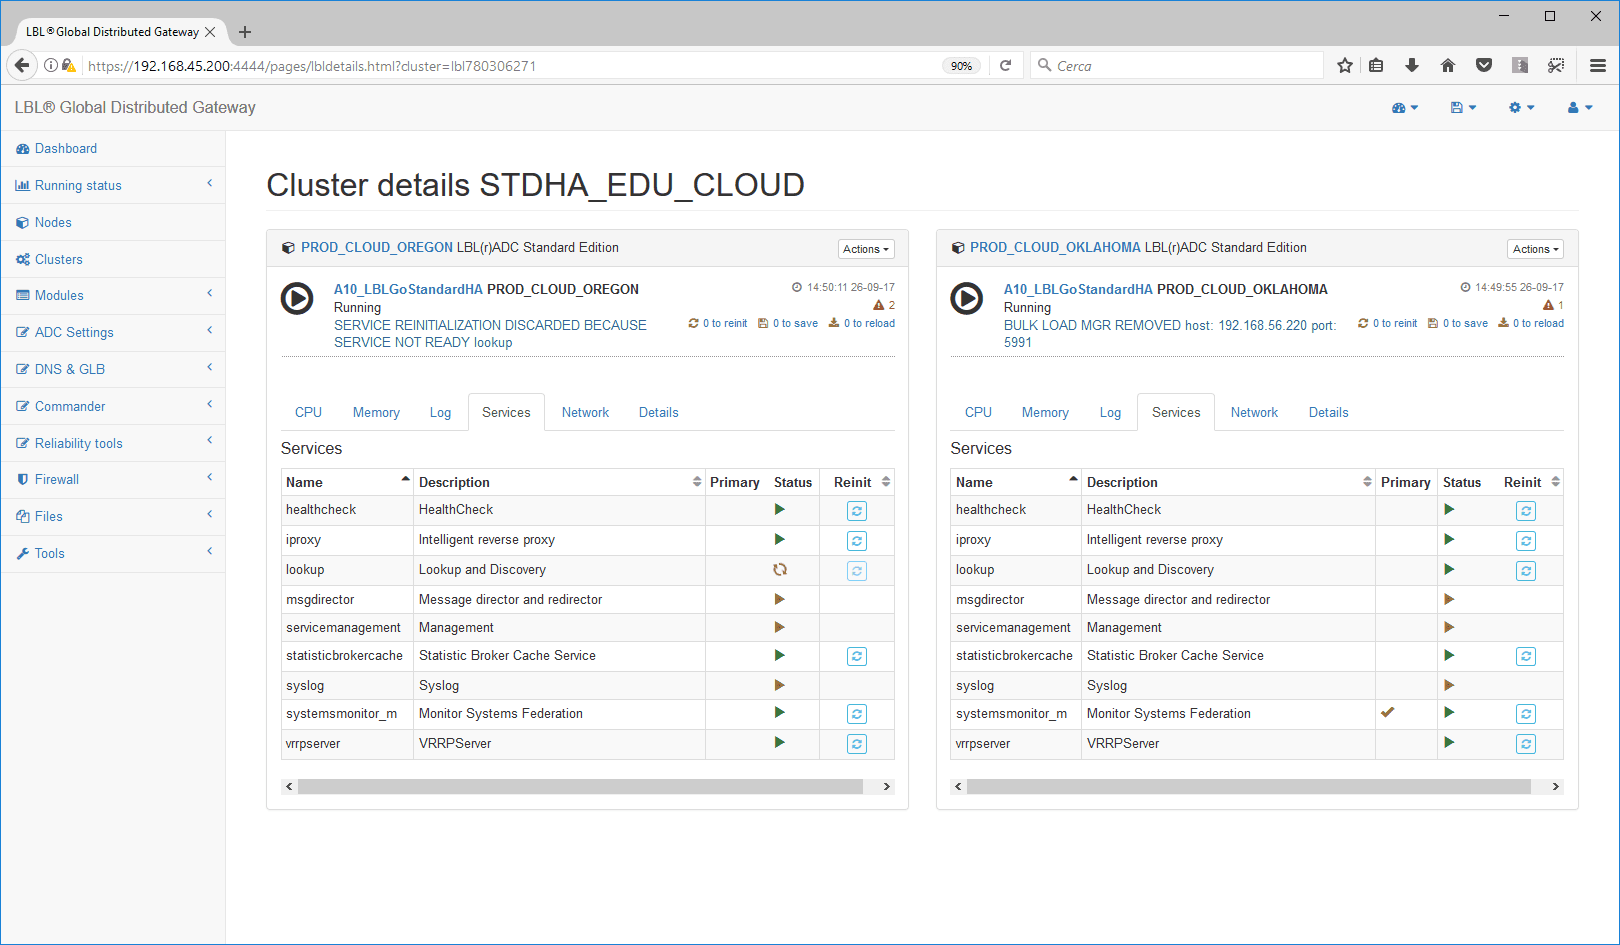
If we go to edit and then select the Cluster
The system will highlight the nodes that make up the Cluster in a
concise
way giving the possibility to navigate the specific sections to verify
the
characteristics. If the cluster nodes is running, you can fully explore
all the details.
When you run settings in a Cluster, all operations you
do are replicated to all modules that make up the
Cluster.
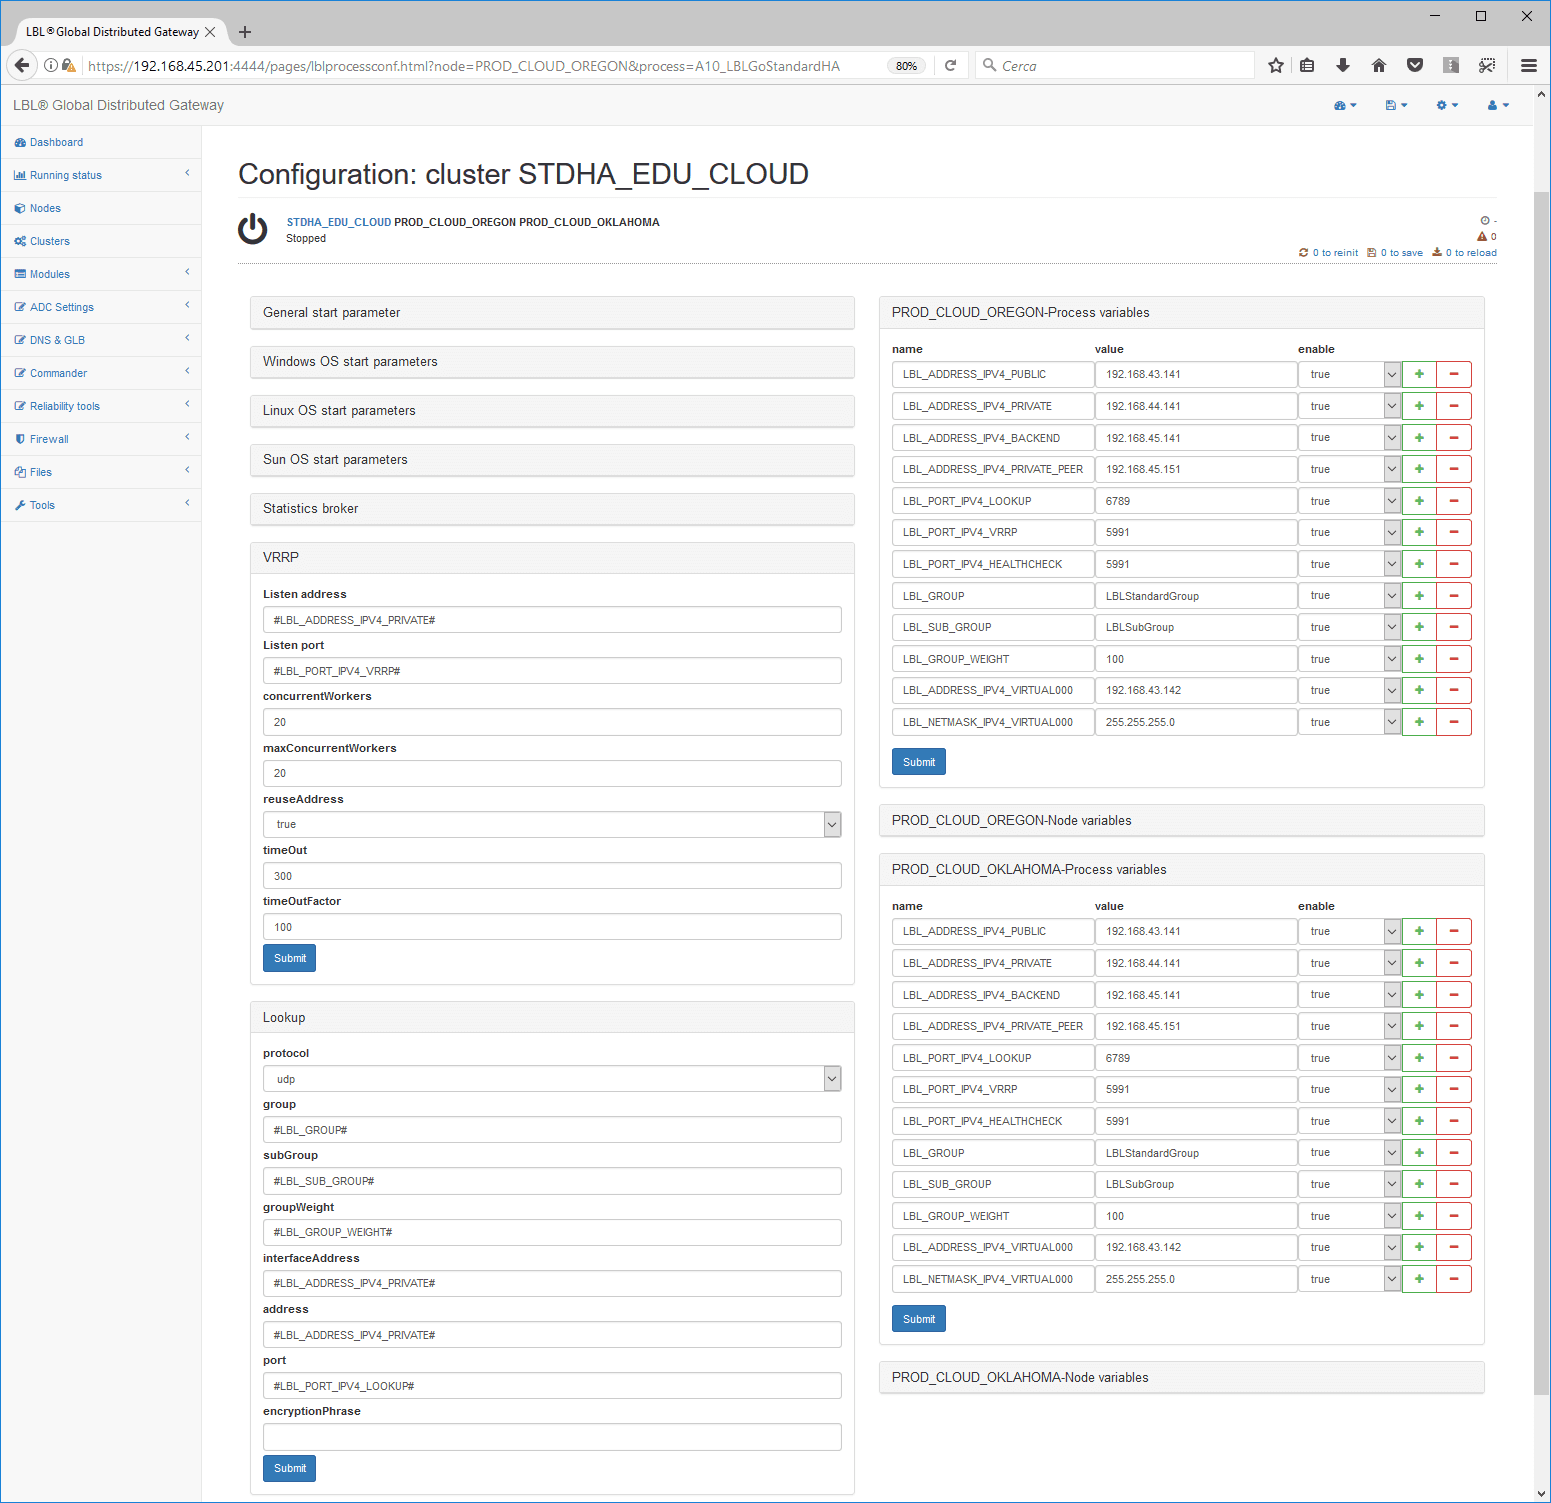
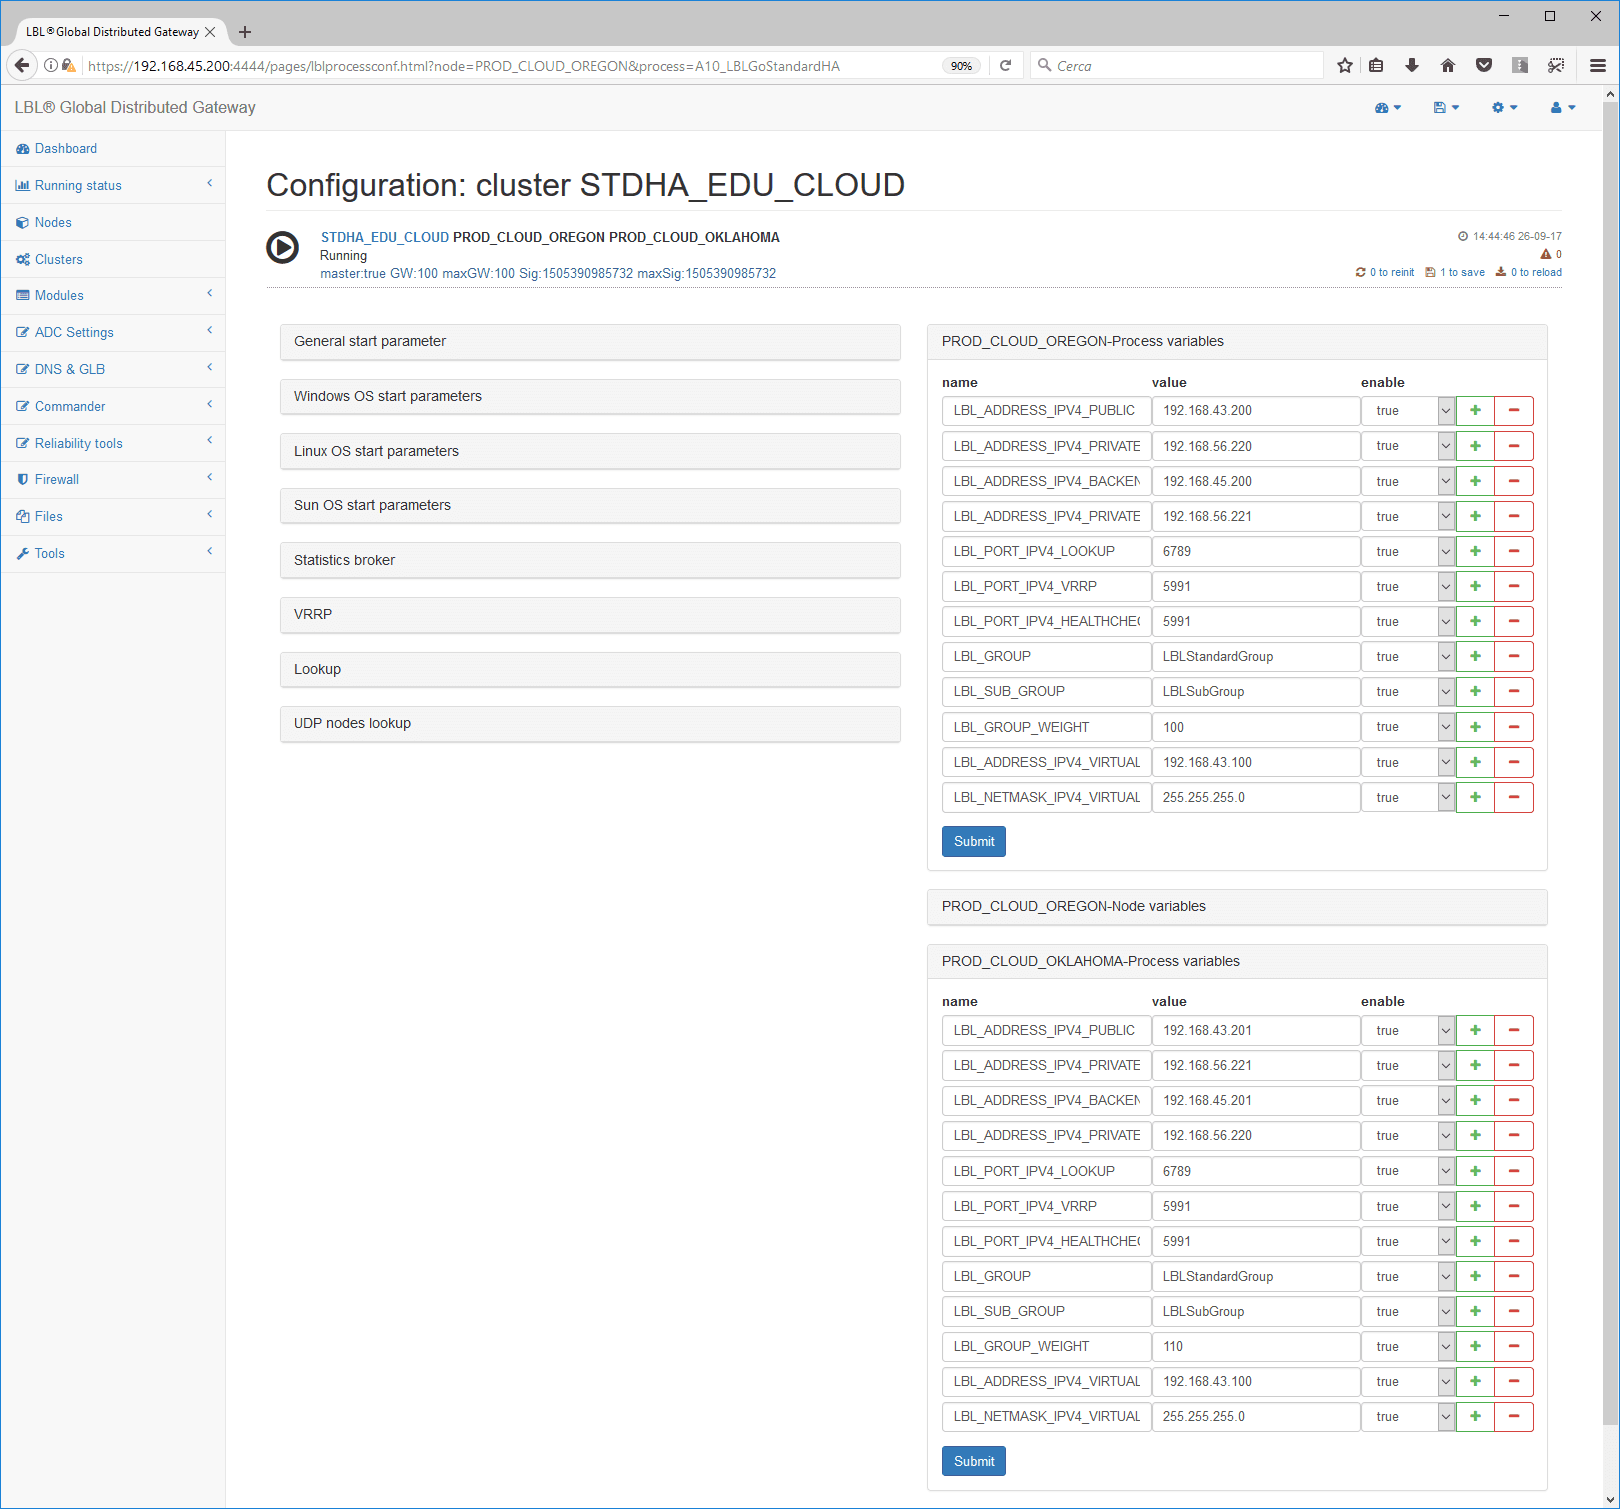
Impostazione networks OPLON ADC Standard HA
The configurations are therefore kept constantly aligned transparently
to the operator. to set the cluster “oplon adc
standard ha” go to [edit]
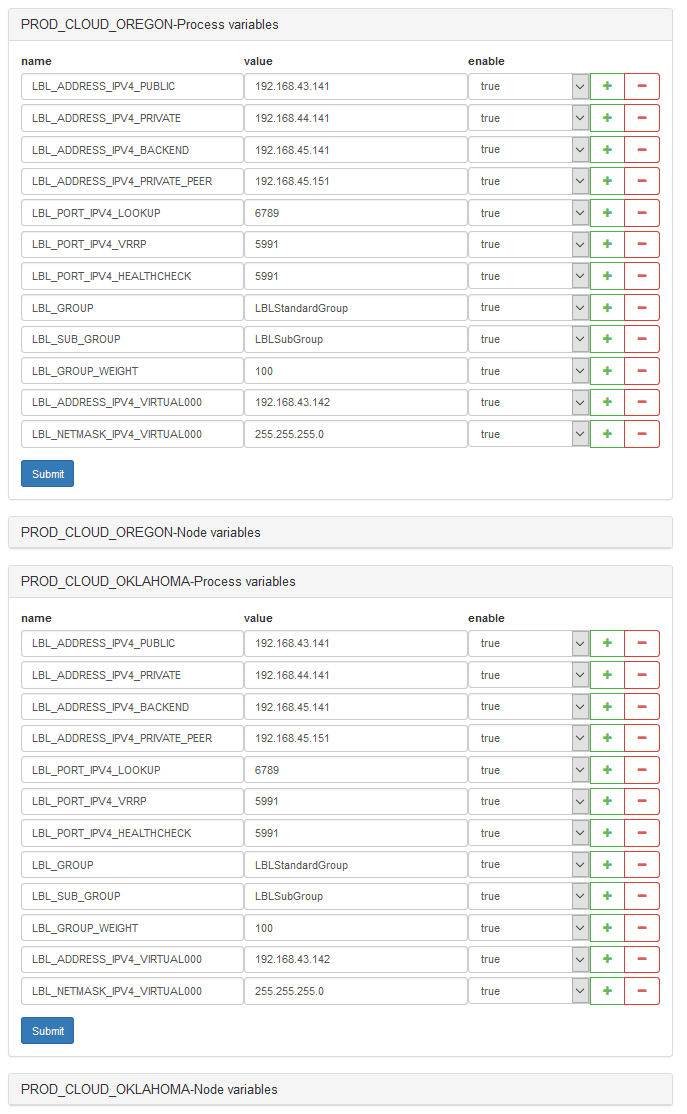
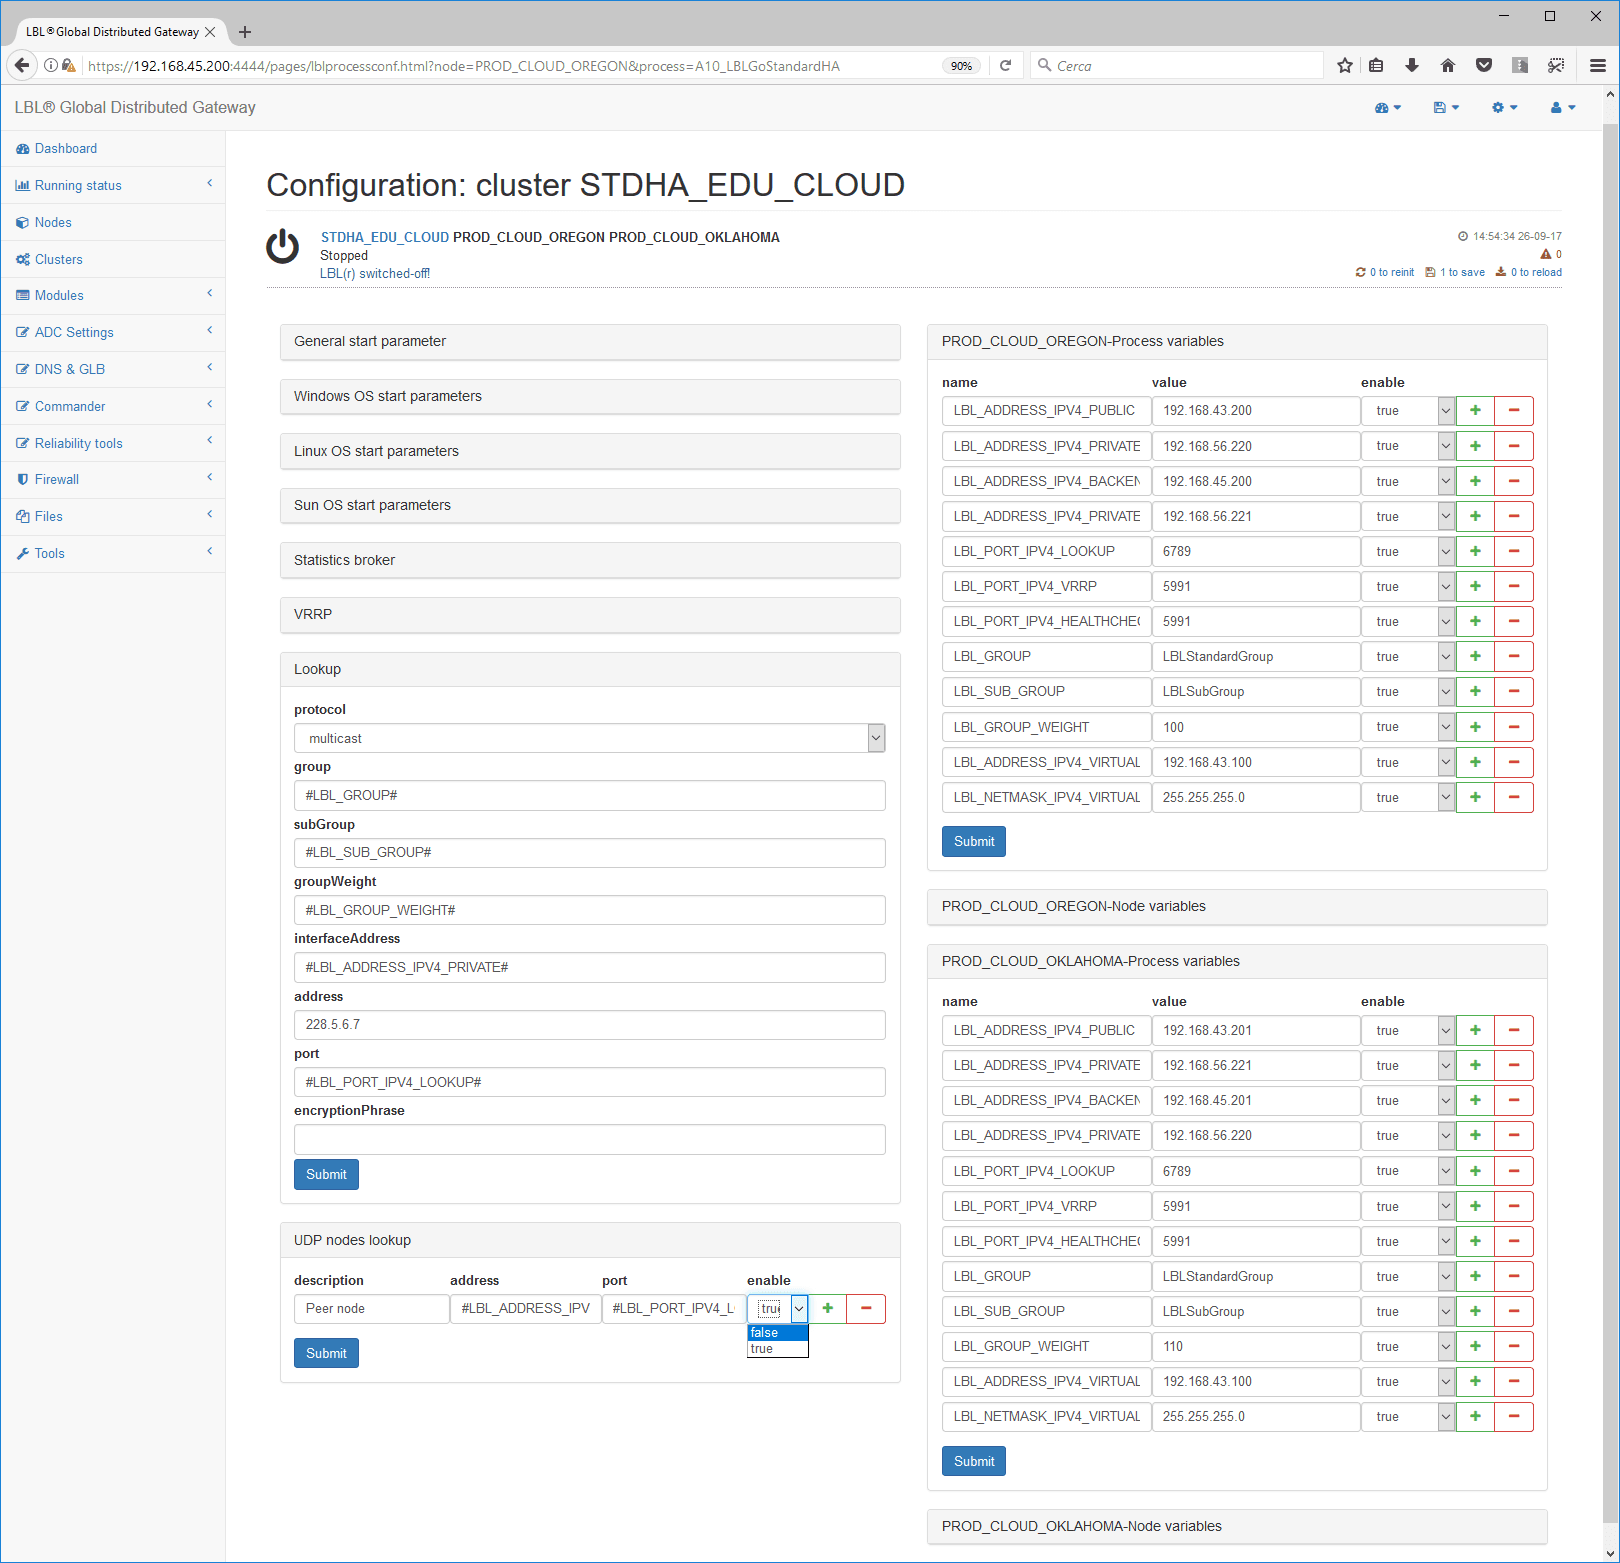
In order to use the same configurations on multiple
nodes with different parameters, such as local IP addresses to the node,
you can use variables that associate a name with a
value locally
to a node or process and that are always available during setup.
Variables can be of two types, either associated with the node or
associated with the process/module. In this case, variables associated
with
the process/module have been set up that describe the public
network, private network, and backend network. They also report the
value of a virtual address and its netmask.
Variables can be used in the setup, thus maintaining
different values for each process or node but equal configurations. To
use a variable, simply indicate the name of the variable between two
#.
Es.: #OPLONADDRESSIPV4_PRIVATE#
OPLON ADC Standard HA Heart-Beat Setting
To keep the application cluster consistent during run-time
it is necessary to maintain a constant interview of verification between
the nodes
that compose it for the determination of the status of “Master”. The
Heart-Beat network serves this purpose, and OPLON ADC Standard HA uses
the
Heart-Beat network to exchange information about the state of activity
of individual
nodes.
The Heart-Beat network can be set in two modes, Multicast
or UDP, and both can be used in encrypted mode.

Multicast mode is very convenient where this protocol is allowed as
it allows the
look-up discovery of the nodes belonging to the
Cluster. To use this mode, you must
check during installation whether the protocol is enabled in the
datacenter. If
this is the case, use the UDP protocol, which is always enabled.
UDP mode is essential on geographic networks or on-premises
or cloud installations where multicast is not
enabled. The strength of this protocol is that it is a protocol that is
always enabled in all
circumstances.
UDP OPLON ADC Standard HA Heart-Beat Setting
Setting the Heart-Beat through UDP is as an
alternative to setting the Heart-Beat through Multicast. If you have
already
set the Heat-Beat through Multicast skip this paragraph.
Heart-Beat setting through UDP is required in cases of installation
in geographic environments or where the
Multicast protocol is not available.

Change values by network schema…
The Heart-Beat protocol in UDP in the Lookup panel is set as
the default. All other parameters have already been set in variables and
therefore there are no other operations to be done.
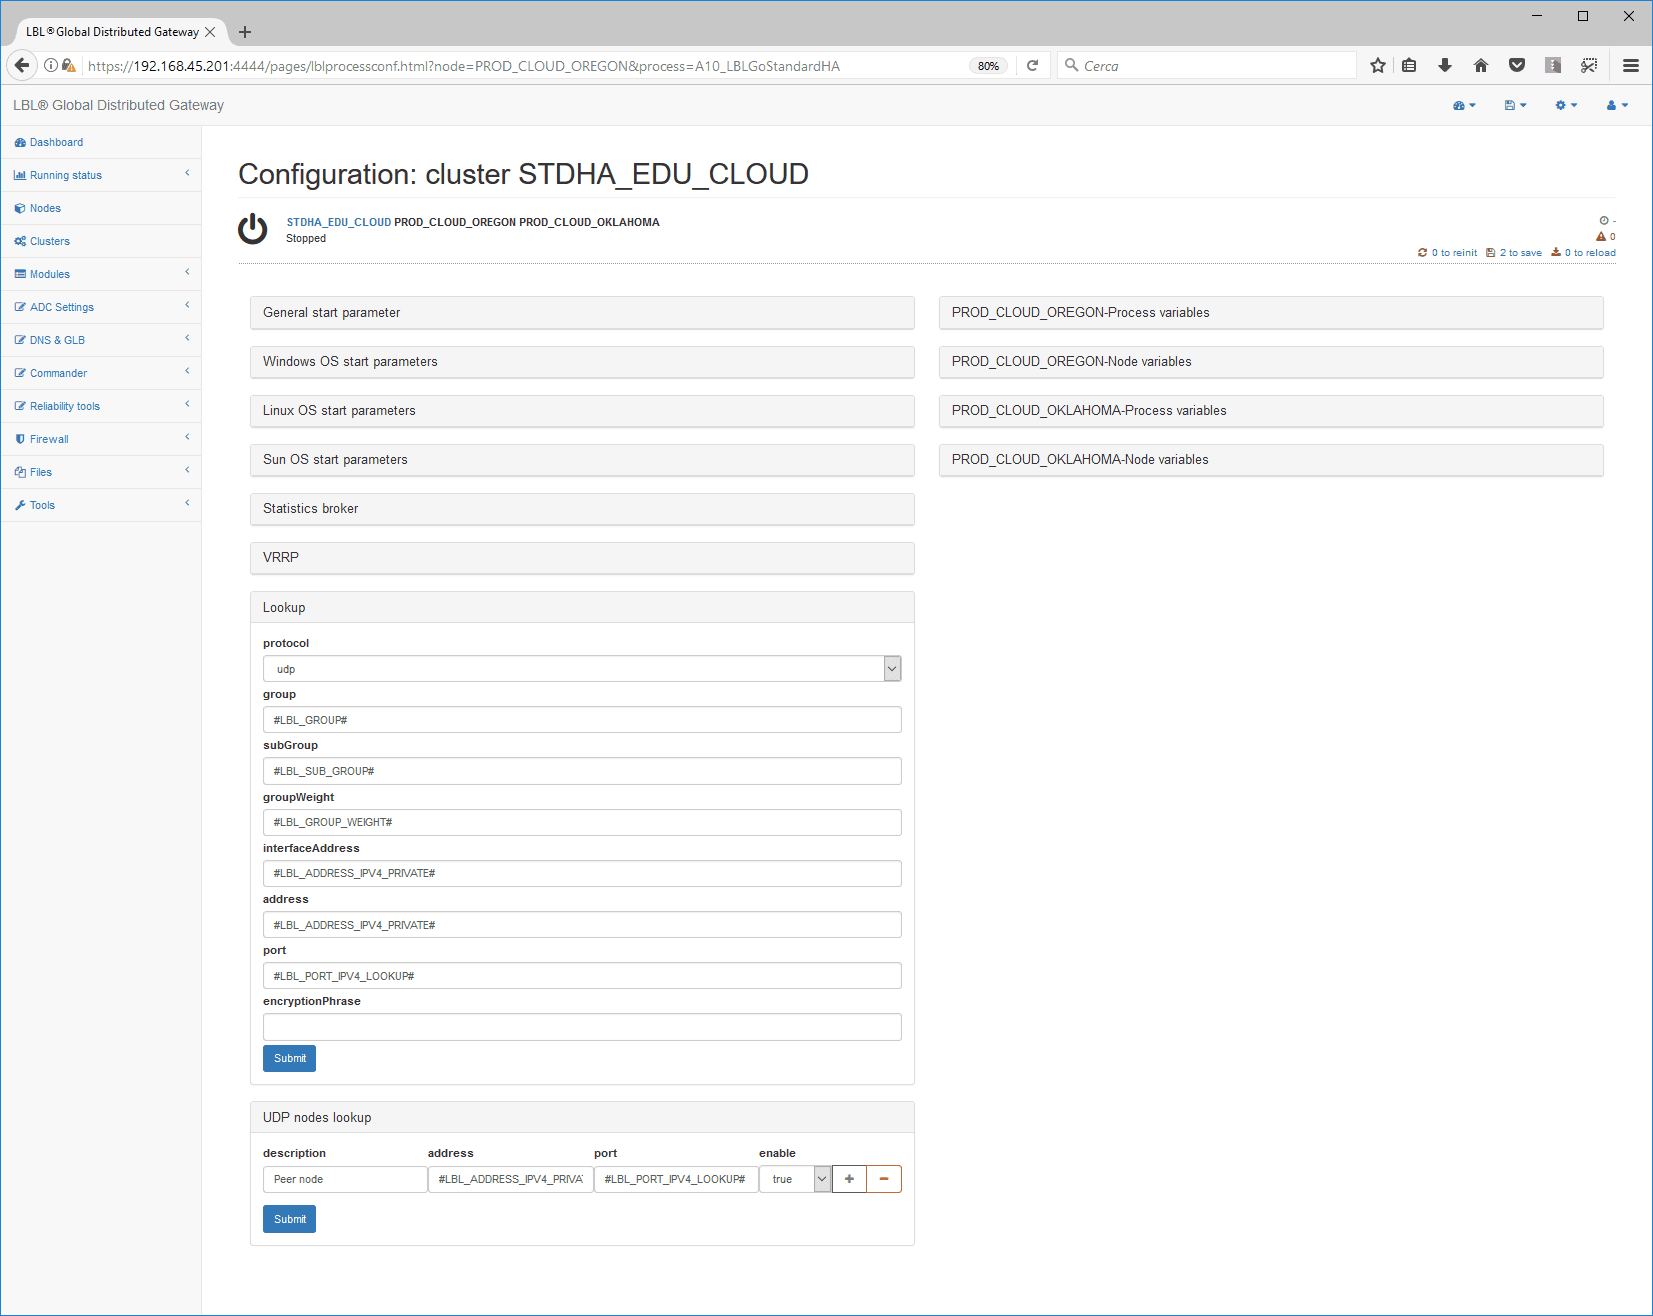
Unlike Multicast, which manages to perform an automatic
lookup-discovery,
with the UDP it is necessary to indicate the peer nodes that make up
the
Cluster. Since these parameters are different from node to node, there
is already a
variable ,previously set in
process/module variables, which parameter the address of
the joint clustered node “OPLONADDRESSIPV4PRIVATEPEER”.
when clustering on more than two nodes add variables in
quantities equal to the additional nodes in the cluster and then add
them to
the “udp nodes lookup” panel
Save the configuration…

Impostazione heart-beat MULTICAST OPLON ADC Standard HA
Setting the Heart-Beat through Multicast is as an
alternative to setting the Heart-Beat through UDP. Sand you have
already setthe
Heat-Beat through UDP skip this paragraph.
To set the Heart-Beat through Multicast, simply
change the process variable values to their network schema values and
change from
UDP to MULTICAST.
Change values by network schema…
… and save…
Describe the reason for changing the parameters…

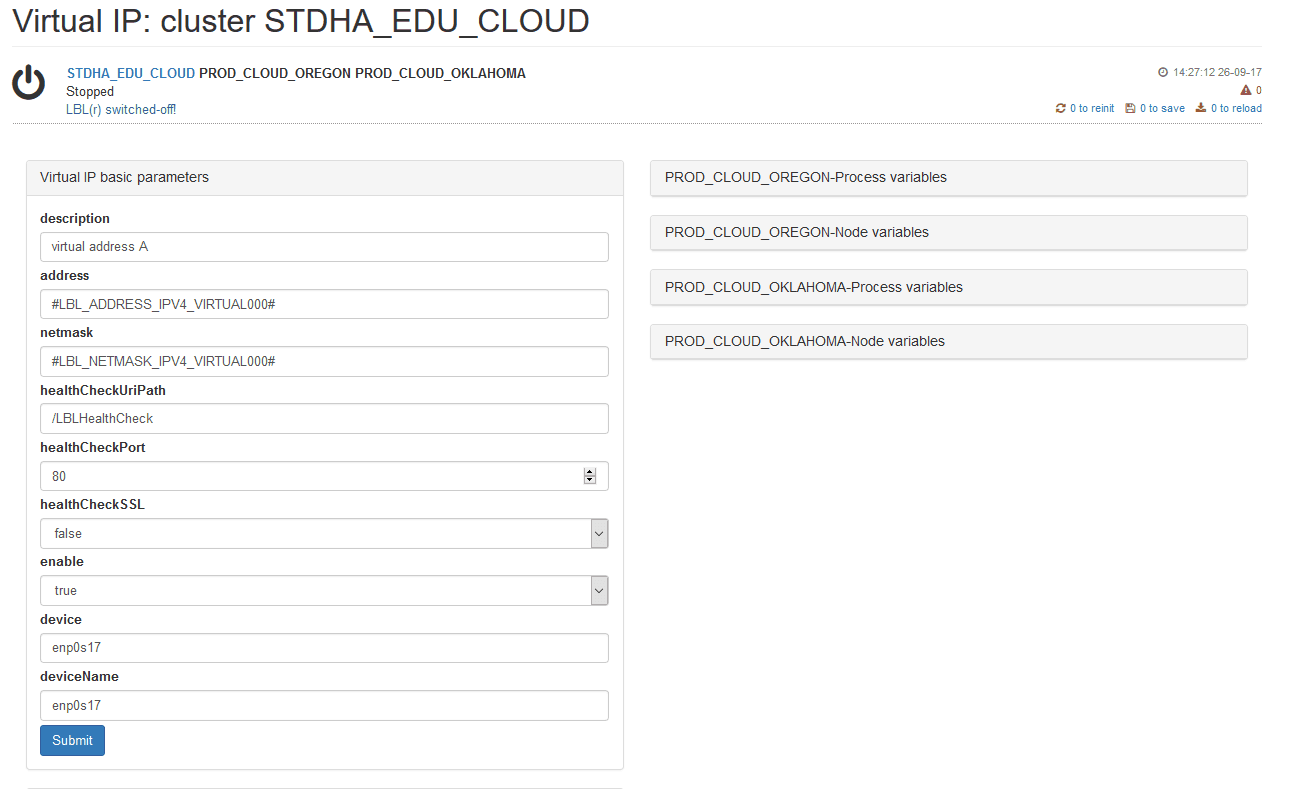
OPLON ADC Standard HA Virtual IPs (VIP) Setting
To set a VIP (Virtual IPs) select ADC Settings -> Virtual
IPs
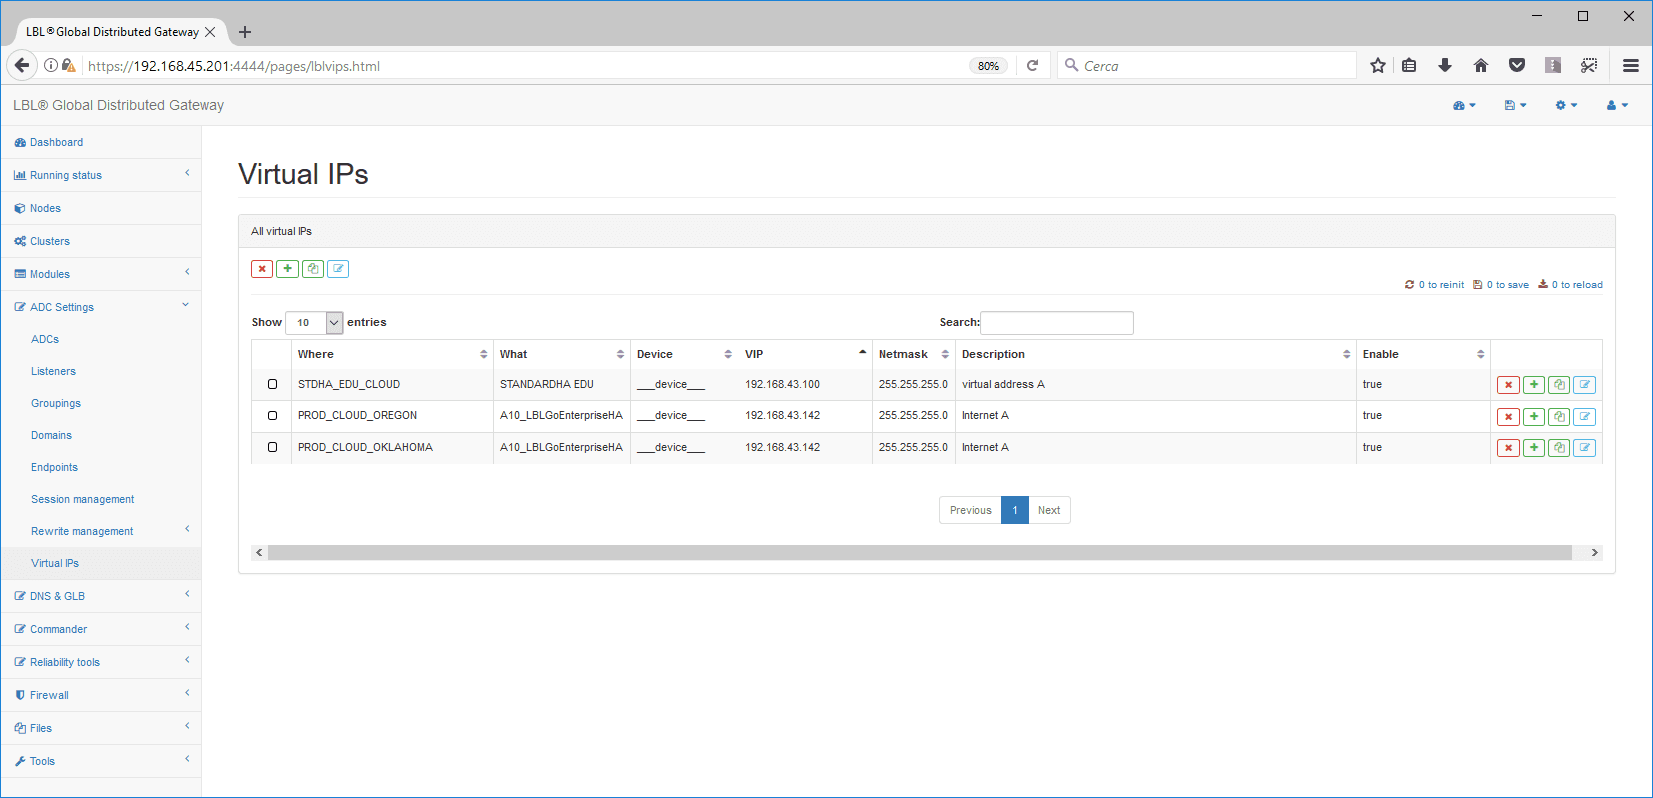
You will see the processes and clusters that can manage
virtual addresses. In this case we will choose our Cluster.
A VIP basically consists of three panels:
-
Basic parameters
-
Public network health check
-
Health check della rete di backend
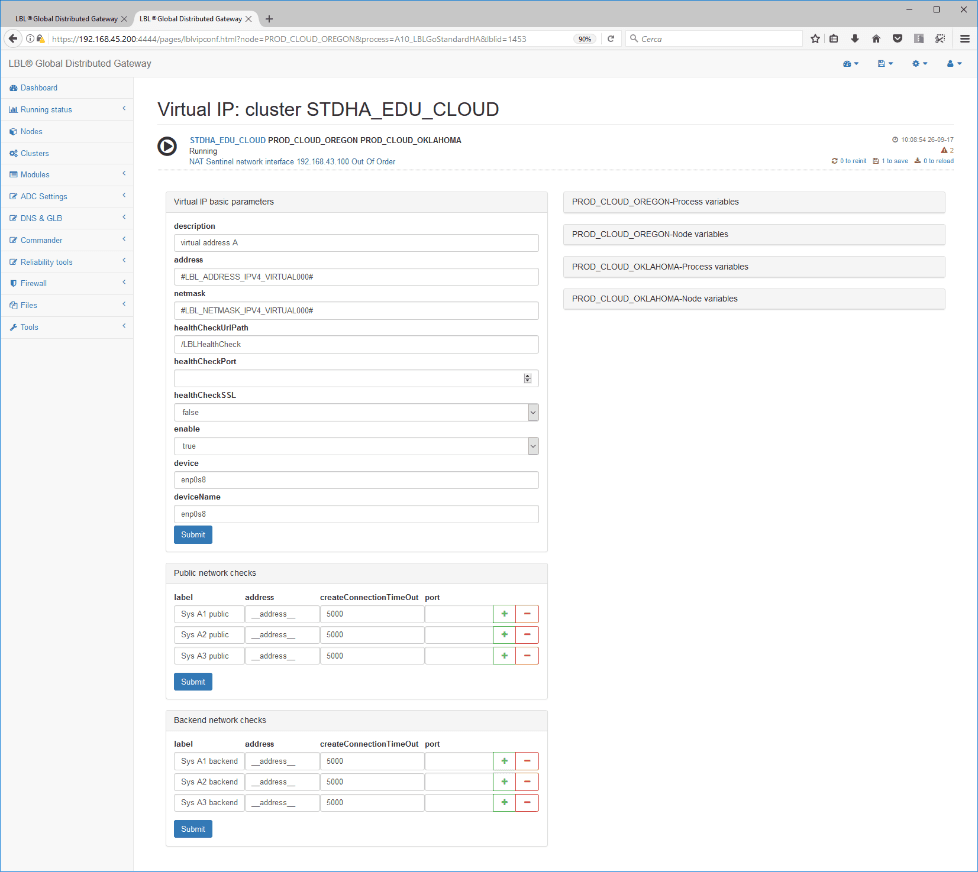
Basic Parameters panel:
enable=:valore di default=”true”
Enable disabling virtual address
description=:default value=""
Describes the virtual address
address=:default value=""
It is the virtual address in digits (e.g. 192,168.43.10).
For IPv6, representation must be made in square
brackets [fdd4:3c3f:aaaa::99].
netmask=:default=“255.255.255. 0”
It is the netmask in digits (e.g. 255,255,255.0) of the virtual address
If the address refers to the IPv6 protocol, the value is determined by
the precision that
you want to obtain e.g. for 64 the address setting will be
fdd4:3c3f:aaaa::99/64
healthCheckPort=:default=""
It is the port on which to perform the healthCheck test. If "" the
health check
is not performed. This value is very important because it determines the
activity status not only of the IP address but also of
the
balancing or routing system. IT MUST BE SET, usually 80 or
443, if the port is in SSL set healthCheckSSL to true! .
healthCheckSSL=:default value=“false”
If set to true, healt check HTTP by establishing an encrypted connection.
healthCheckUriPath=:default value=“/OPLONHealthCheck”
It is the healthcheck path of activity of the balancing system.
This value is normally never changed unless it is already inuse in
other
applications. If this value is changed,
it is also necessary to change it to”systemsmonitor_m.xml”,
“iproxy.xml”,and
”healthcheck.xml”.
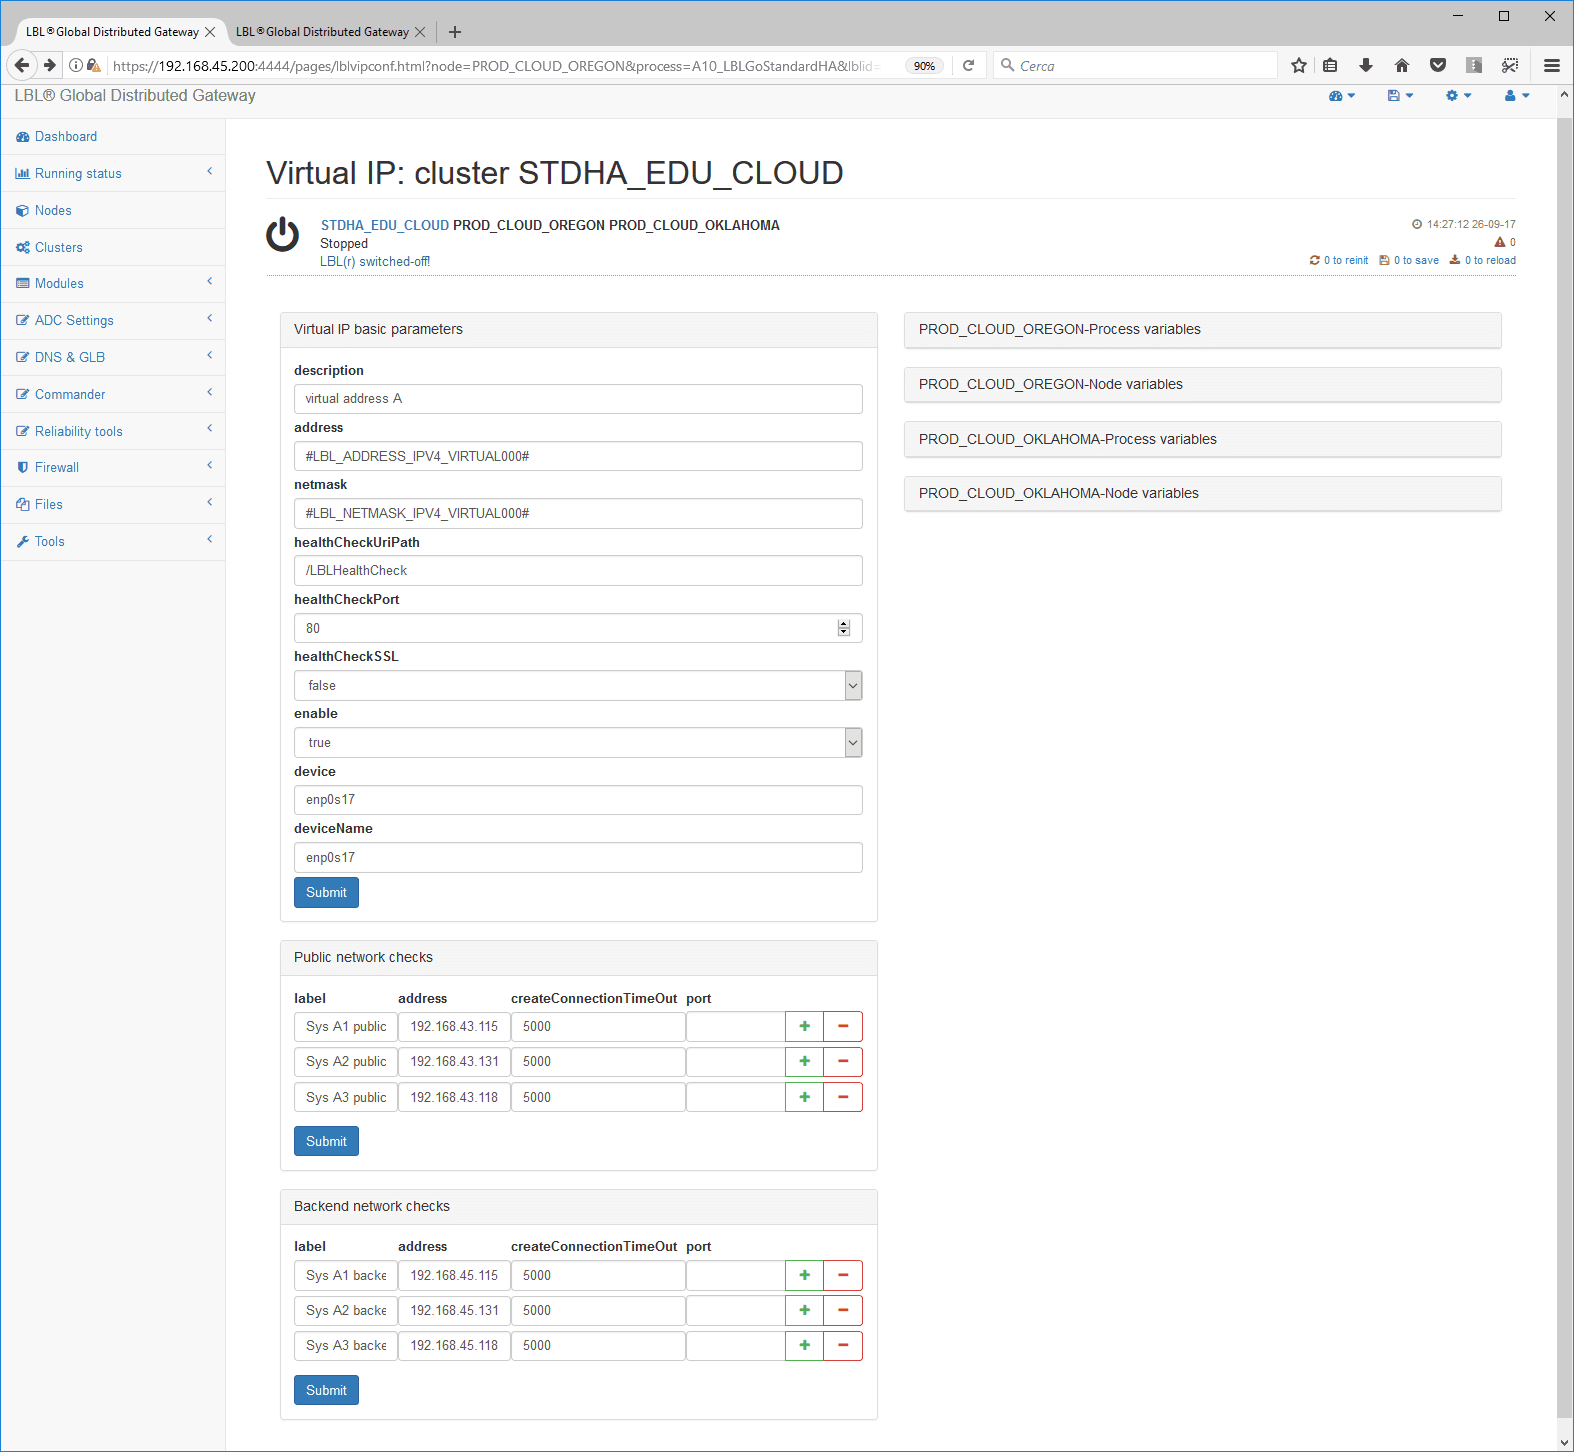
The minimum values to be entered are:
-
healthCheckPort
-
Device and deviceName network adapter
-
at least 3 public addresses (for certification)
-
at least 3 backend addresses (for certification)
For our VIP Cluster we will parameterize the basic
parameter panel by identifying network adapters by simply exploring
cluster
nodes
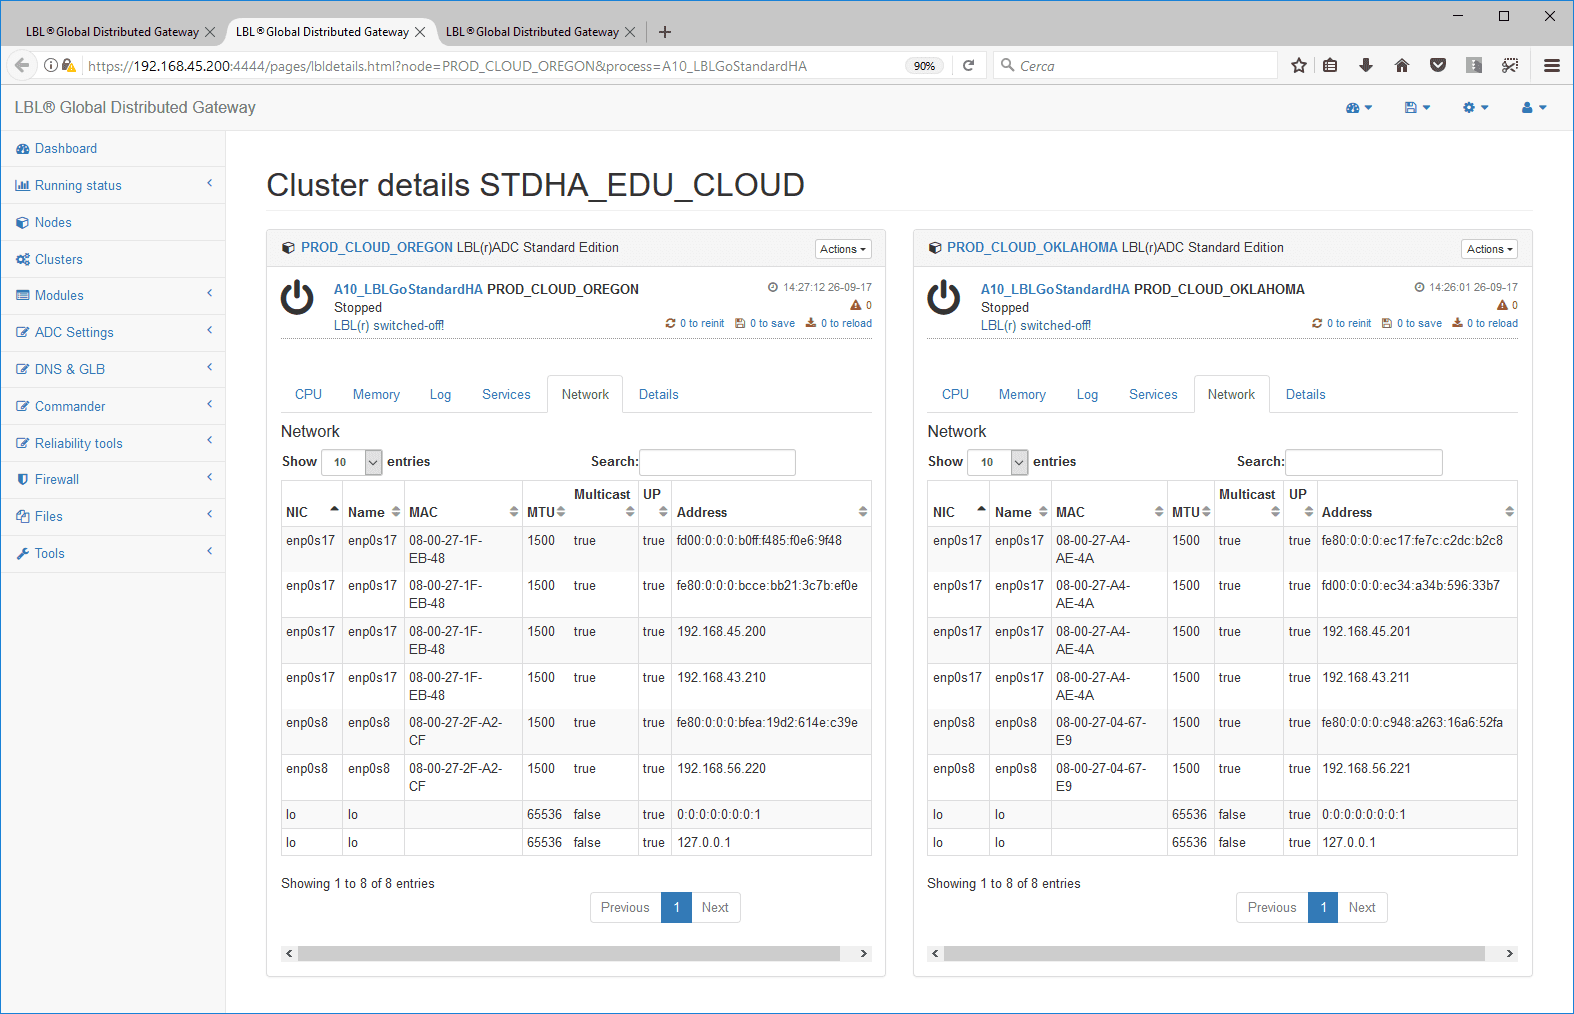
To browse network adapters, simply go to the link
that will display the cluster nodes from which to derive the names of
the network
interfaces.
If the names of the devices were different, as in the case
of hybrid installations, it is possible to impose a local variable on the
processor
node, with the value corresponding to the local interface and indicate
on “device” and “deviceName” the name of the variable.
The “Public network health checks” and “Backend network health
checks”panels serve to check the real operation of the networks. In
fact,
it is not enough to check if the link is UP as usually the connection to
a switch will always be UP even if
the
services are unattainable.
To do this, you must identify 3 public network
services and at least 3 backend network services to verify
reachability.
You can use both ICMP
(ping) and connectivity services (TCP connect) on which no operation
is
performed.
You can pre-run tests through the
Network checks utility that can be reached from navigation bar.

In this case, the public addresses 192.168.43.131, 192.168.43.115,
192.168.43.118 can be reached from ICMP.
The backend can be reached via ICMP at 192.168.45.131
and addresses 192.168.45.115 and 192.168.45.118 can bereached via
connect to port
22 (ssh).
The parameters will then turn out to be:
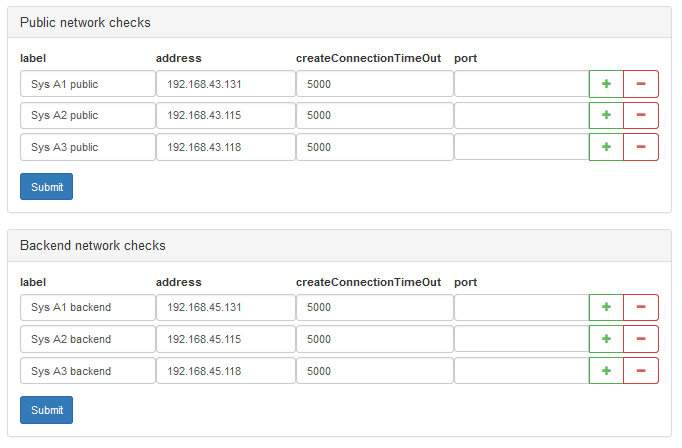
Once the parameterization is completed, save the configuration…
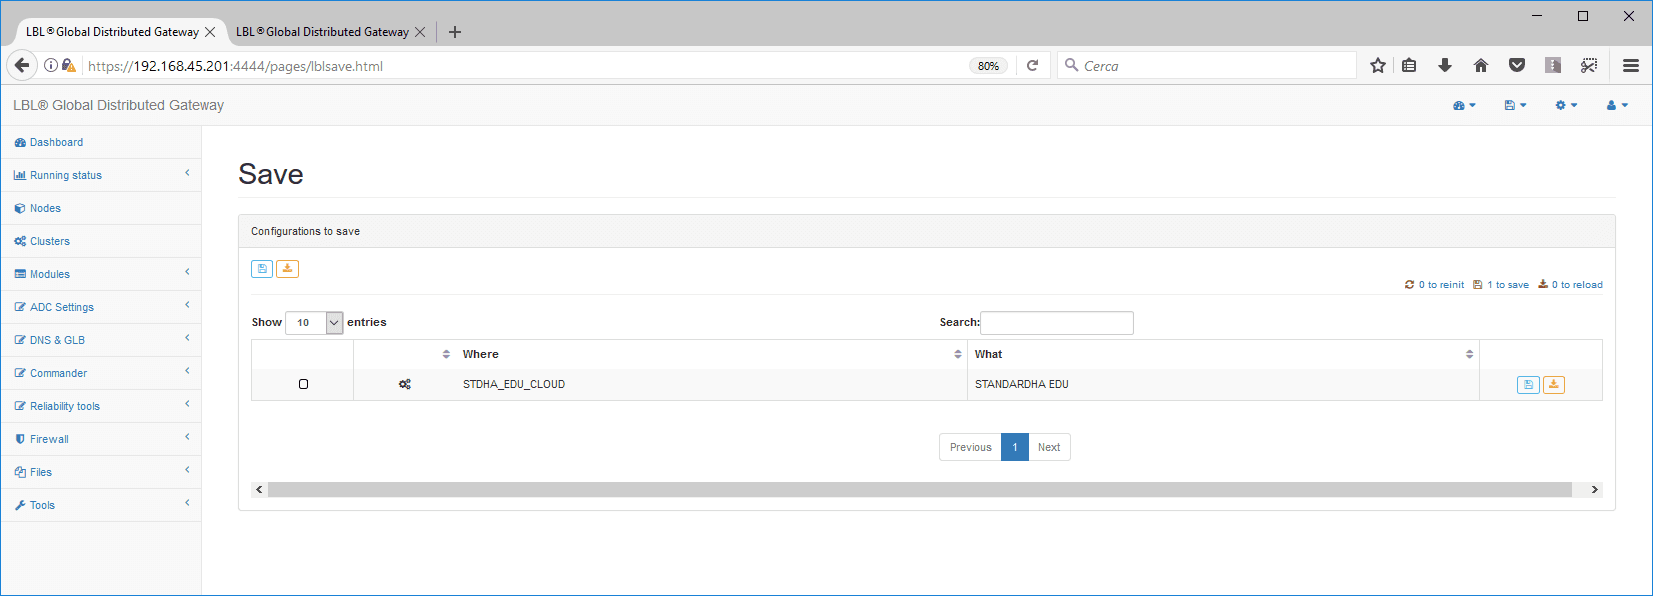
Describe the reason for the change in parameters and confirm…
Start of THE OPLON ADC Standard HA Cluster Nodes
Once you have set the heart-beat parameters and set the first VIP
with you can start the Cluster processes. We’re
going to do this from Cluster Panel…
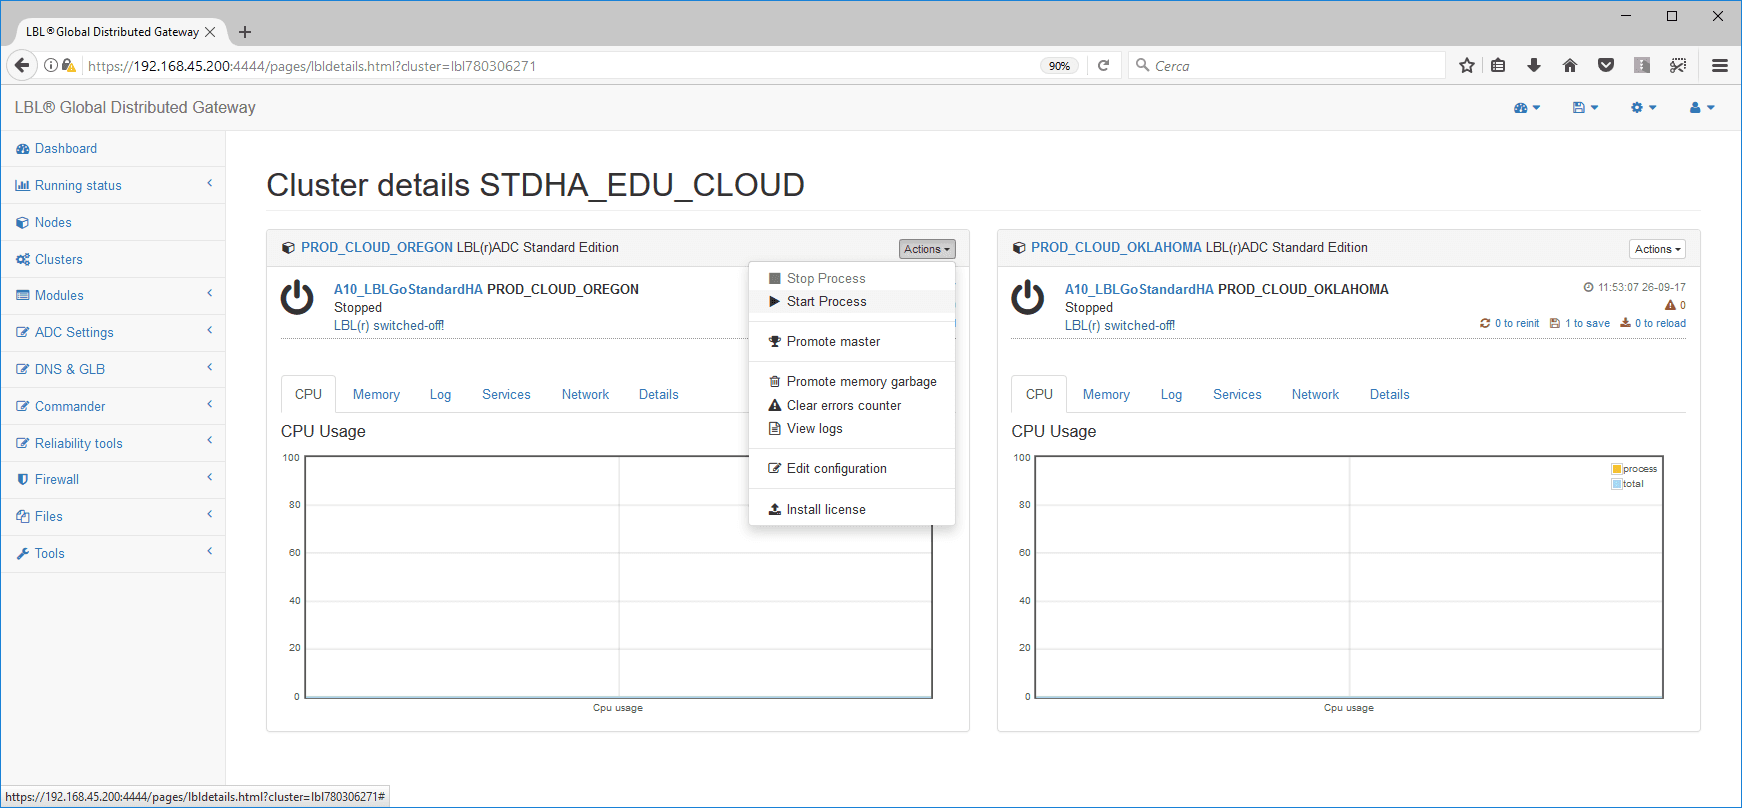
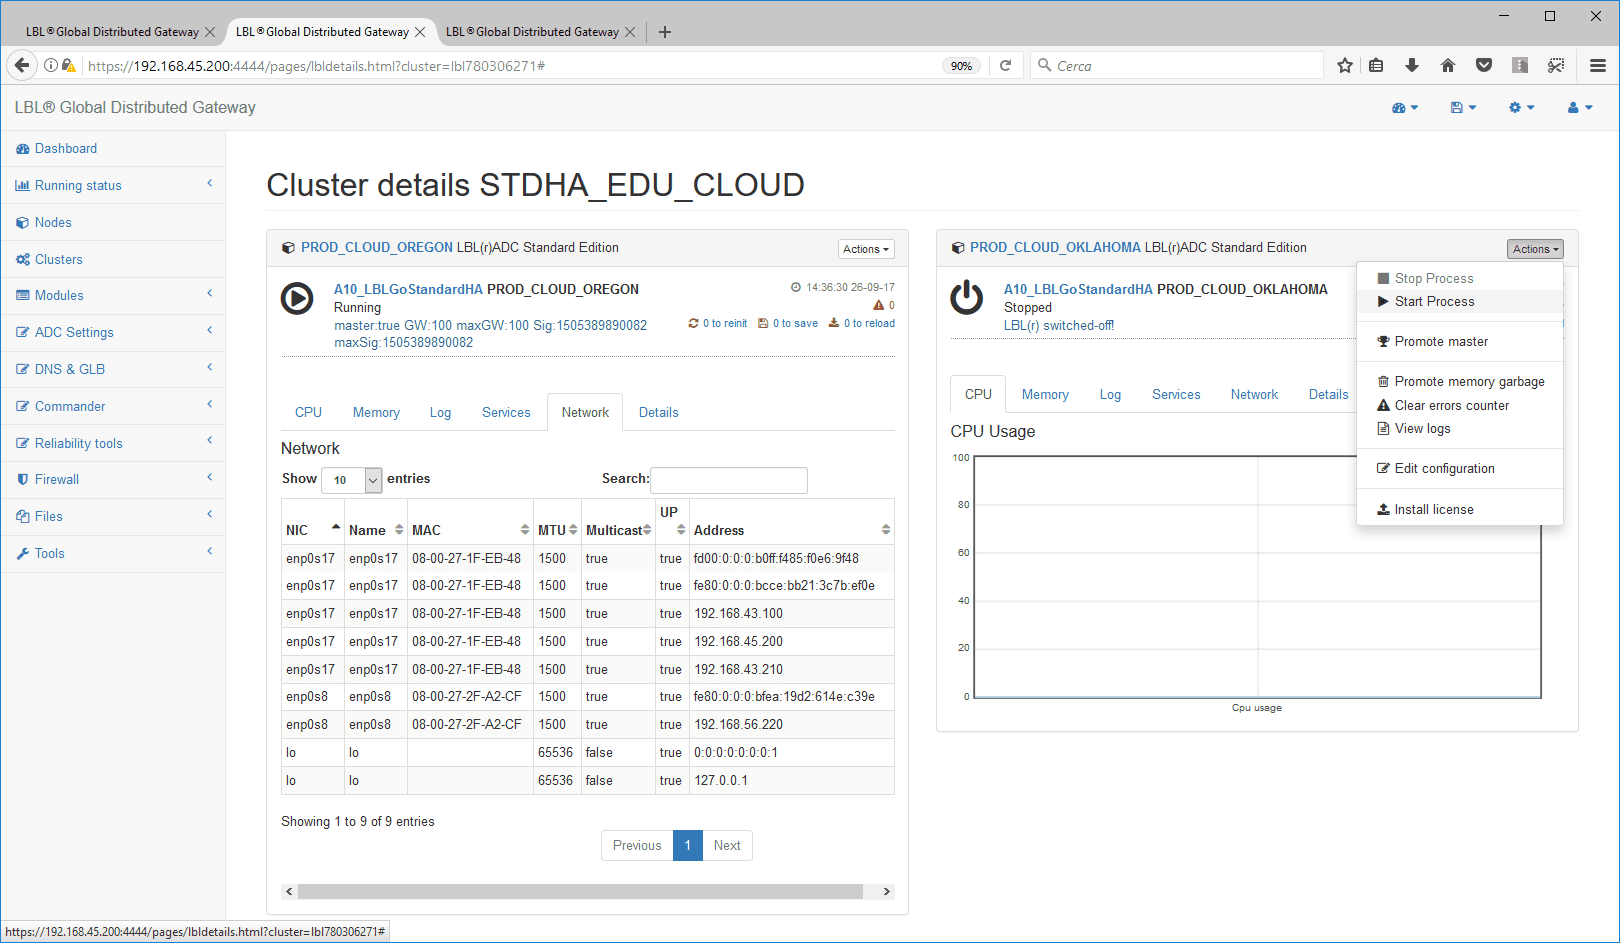
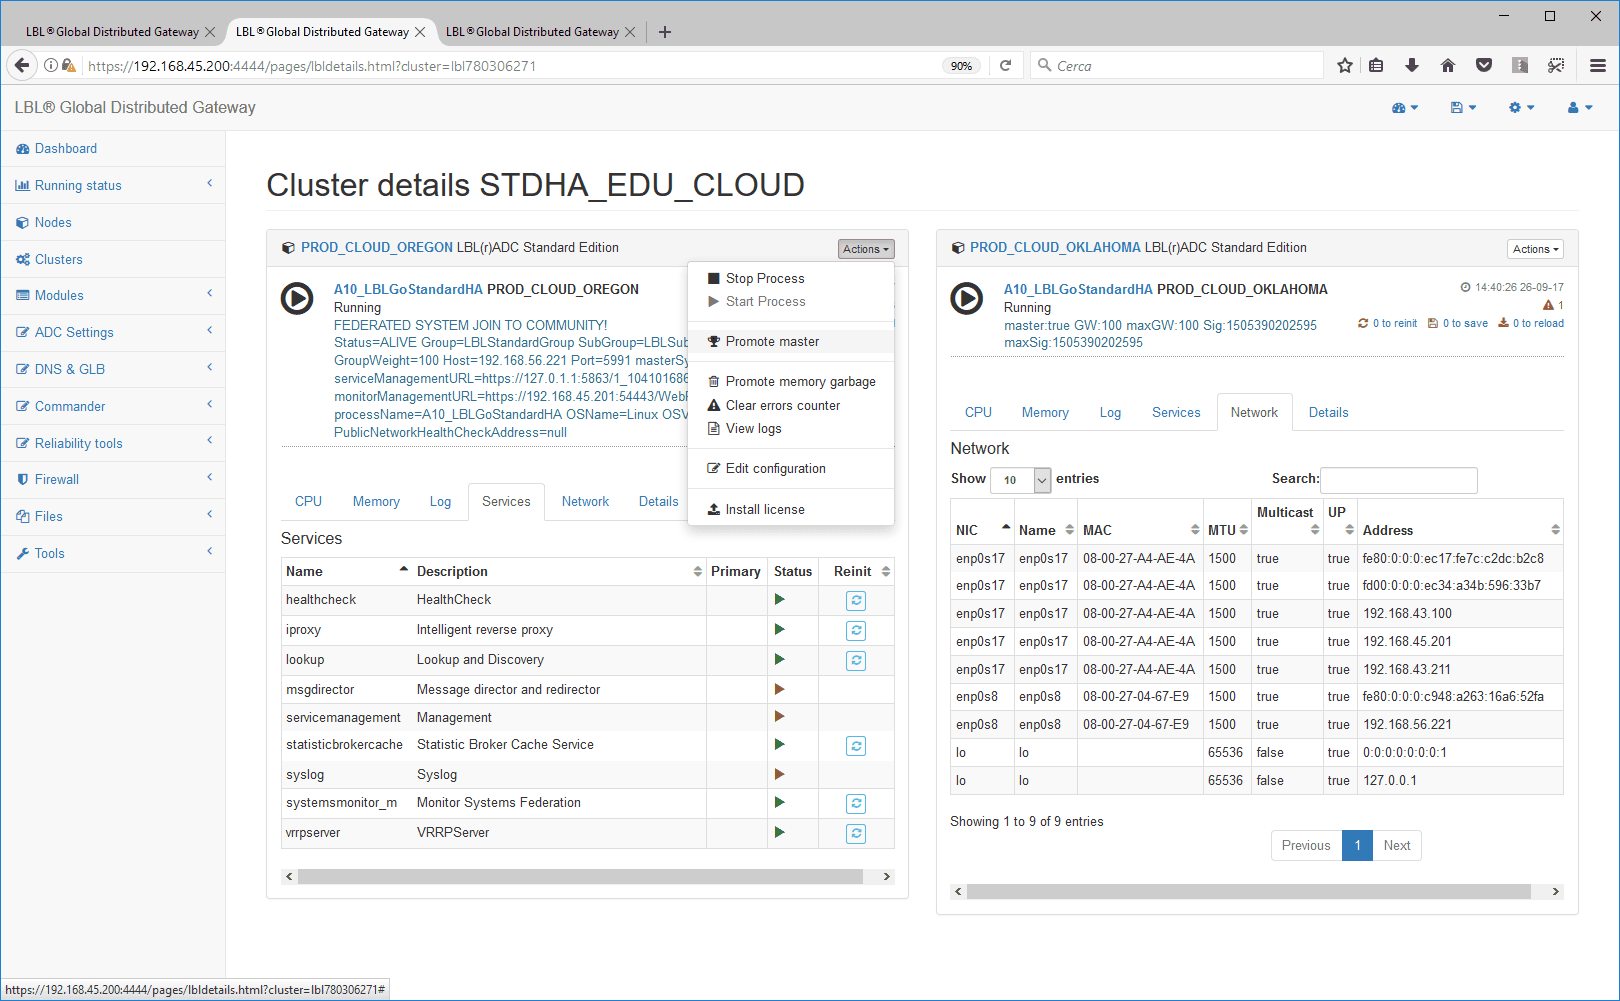
Select one of the Cluster nodes, and then press Actions and Start
Process…
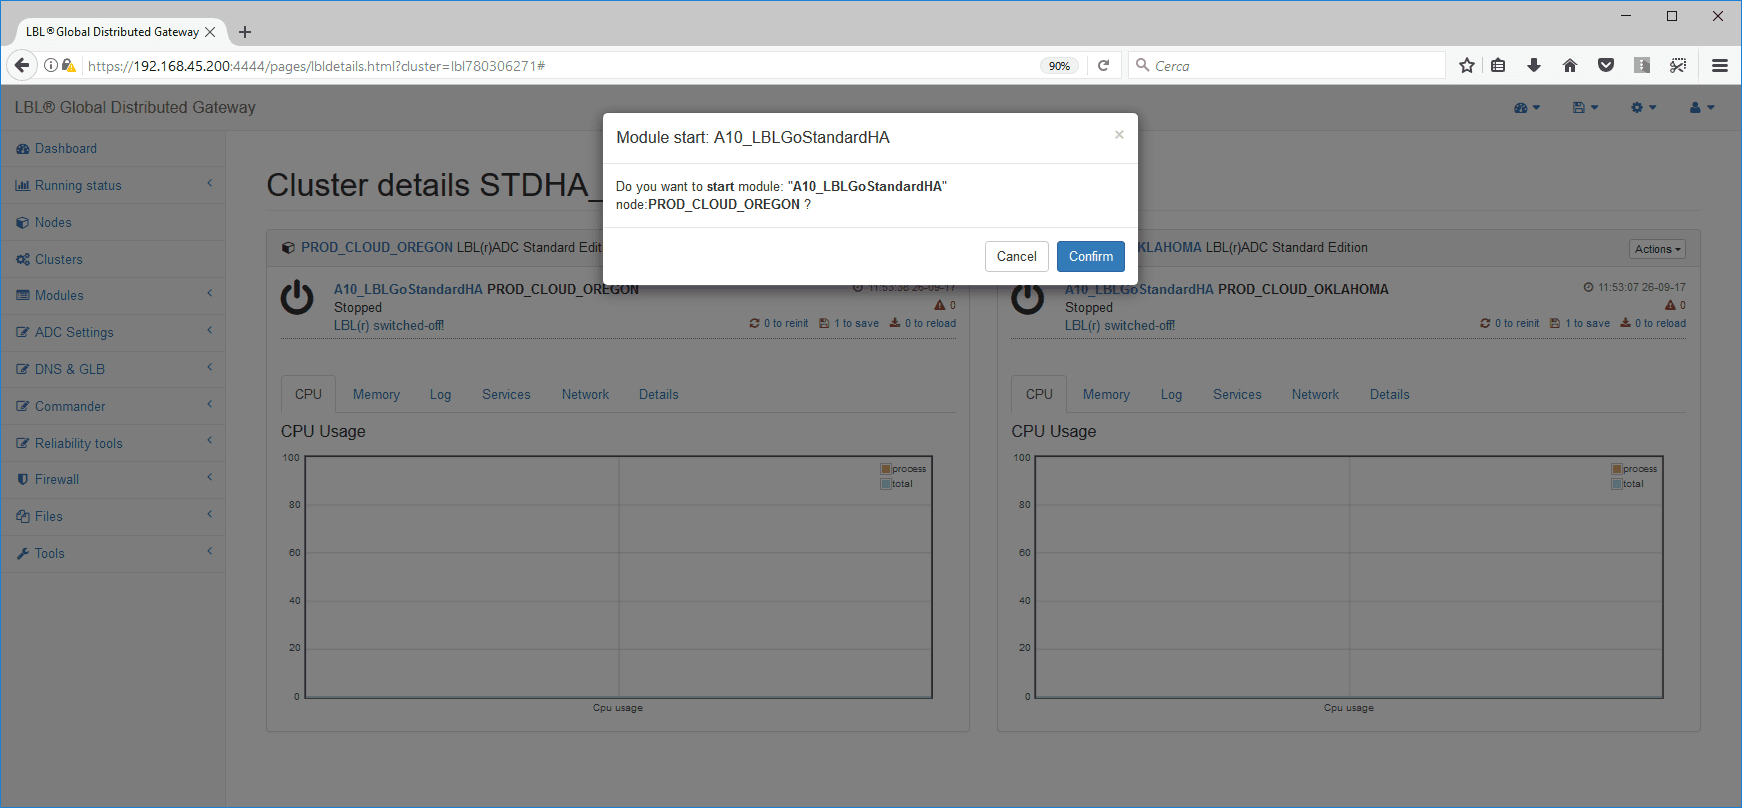
Confirmation of the operation will be requested…
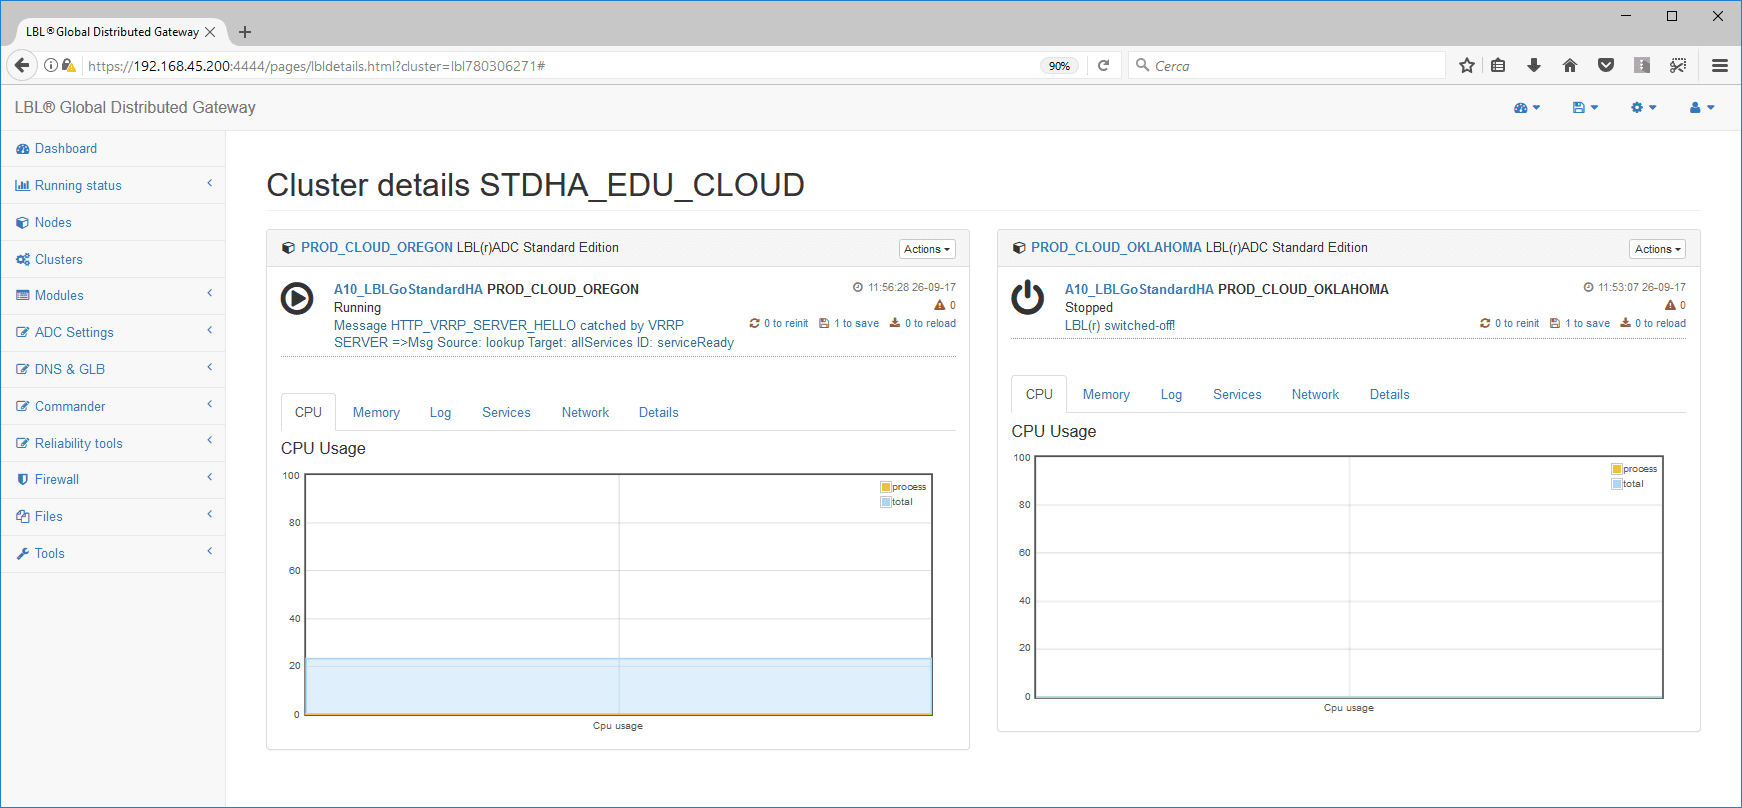
Once confirmed the symbol will change to Running and you will
start to see CPU activity…
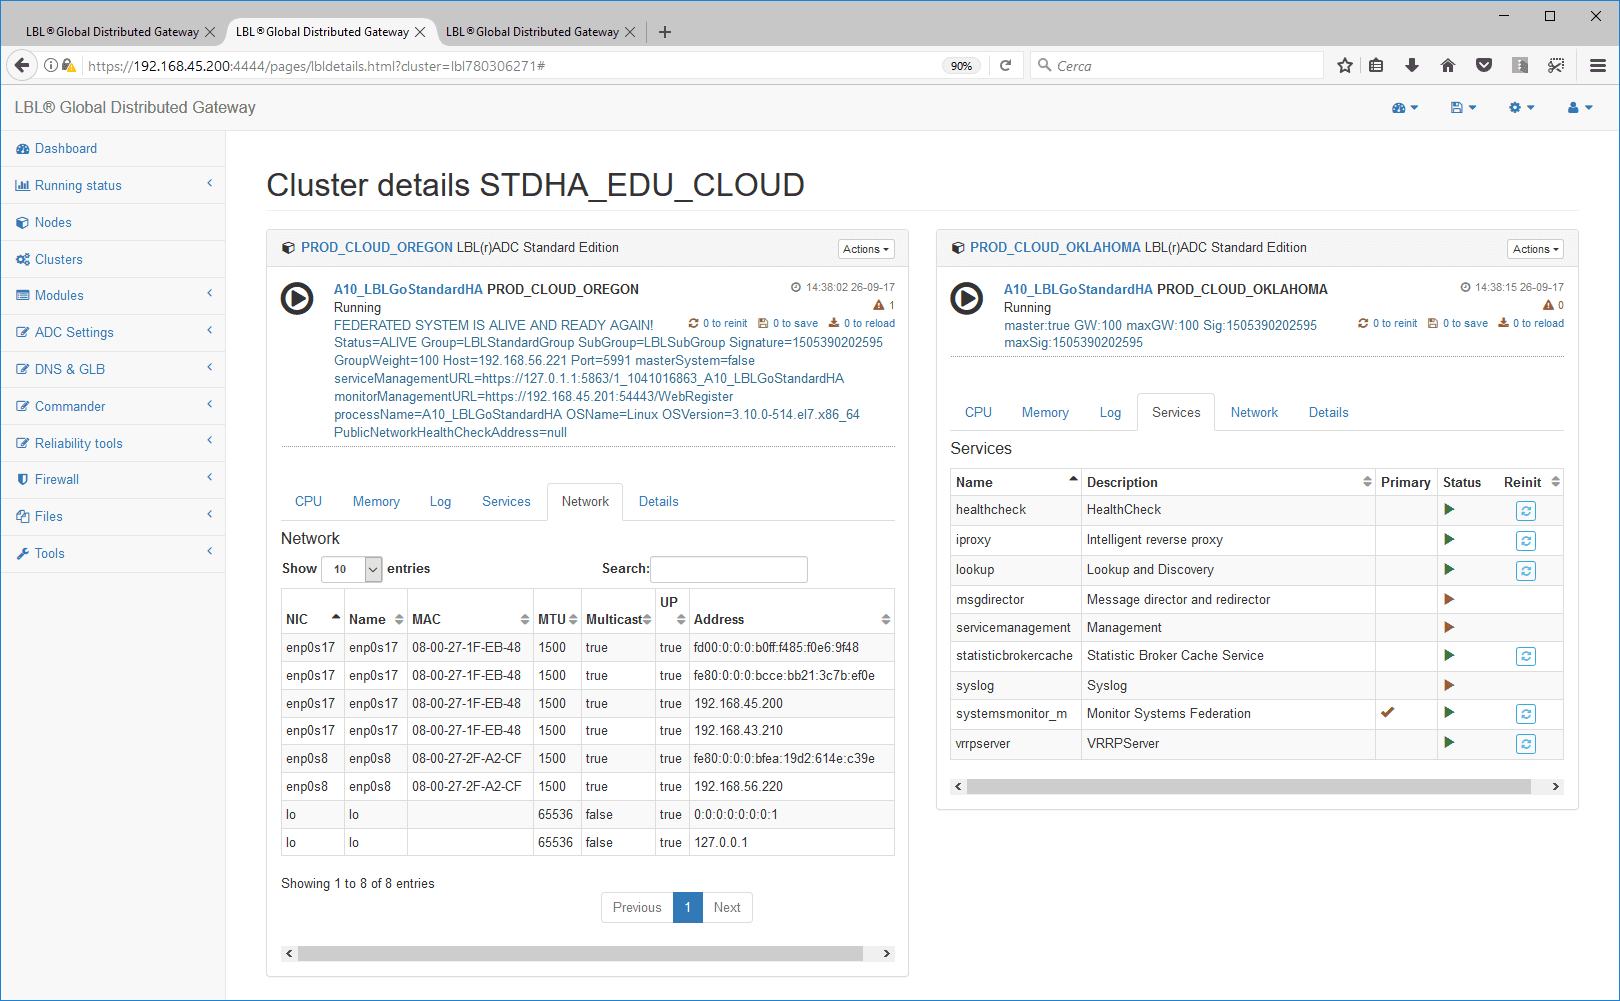
After a few moments it will be possible to check in the services panel
that
the node, being the only running, has been attributed the status of
Master…

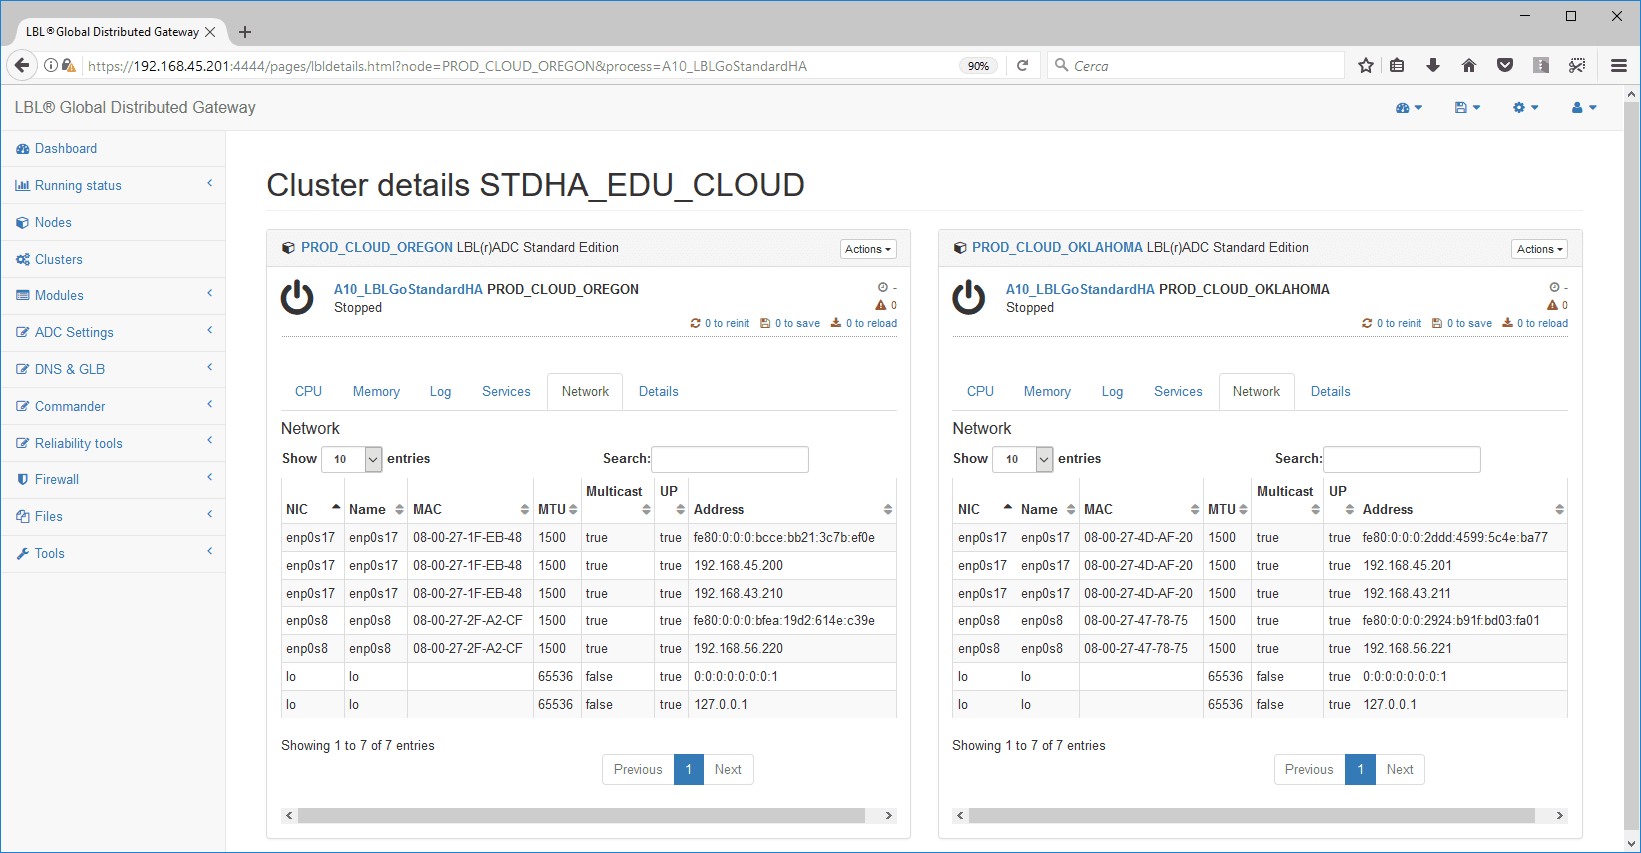
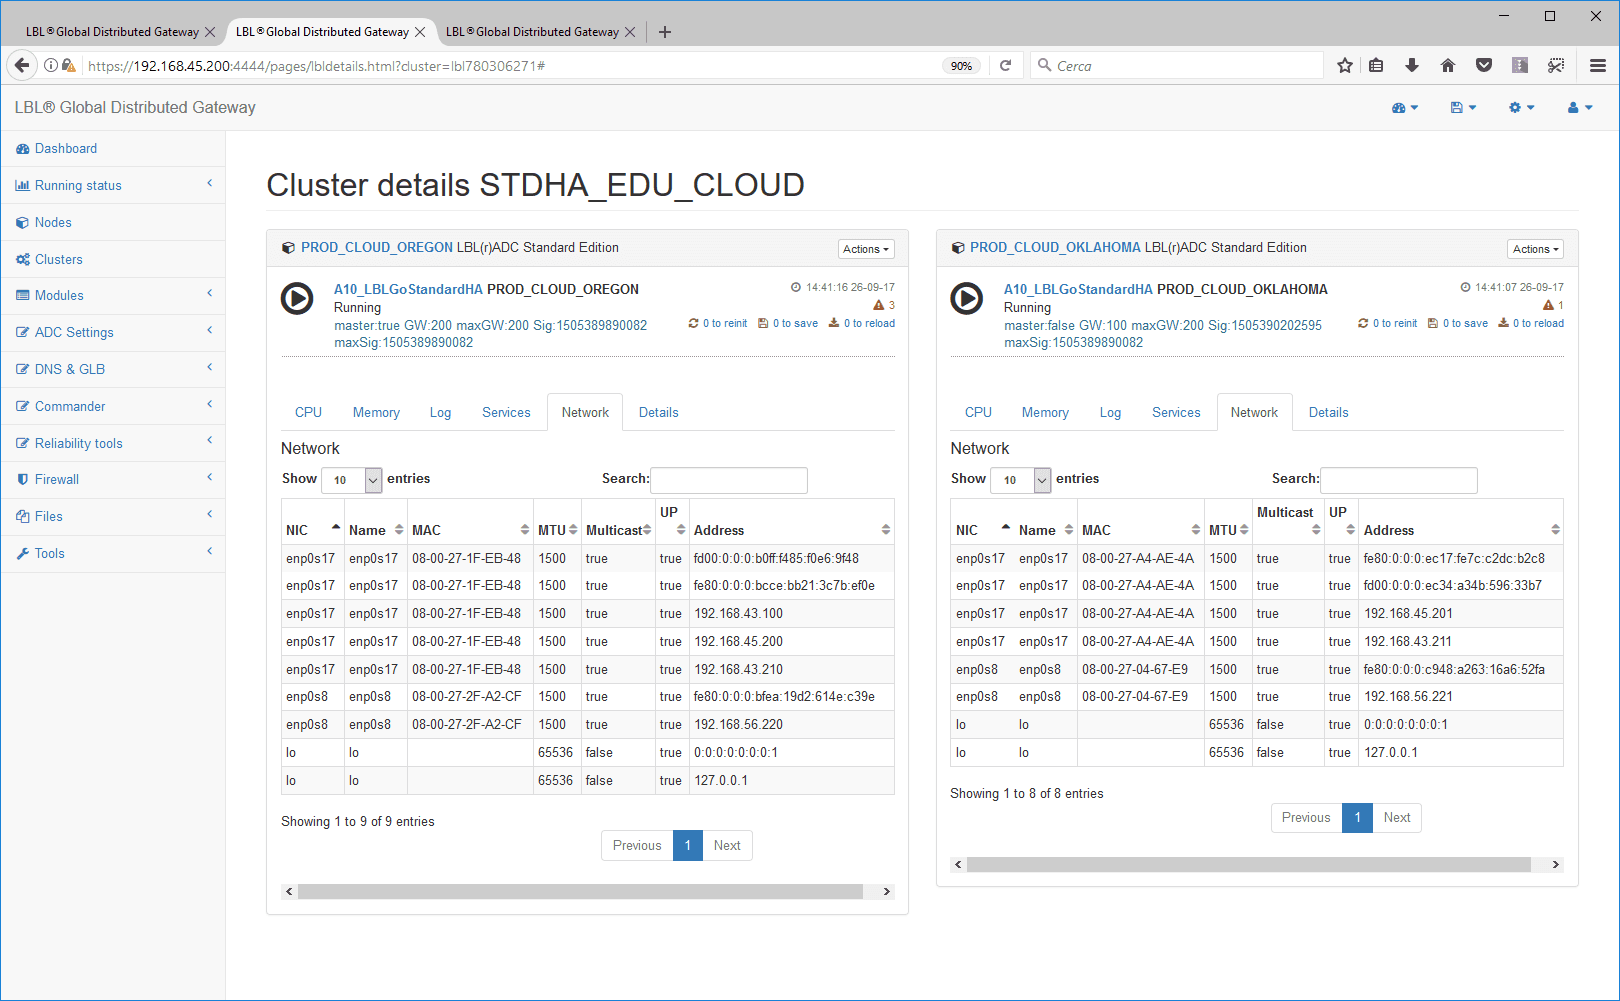
In the Networks panel you can verify the attribution
of the VIP IP address in the designated interface…
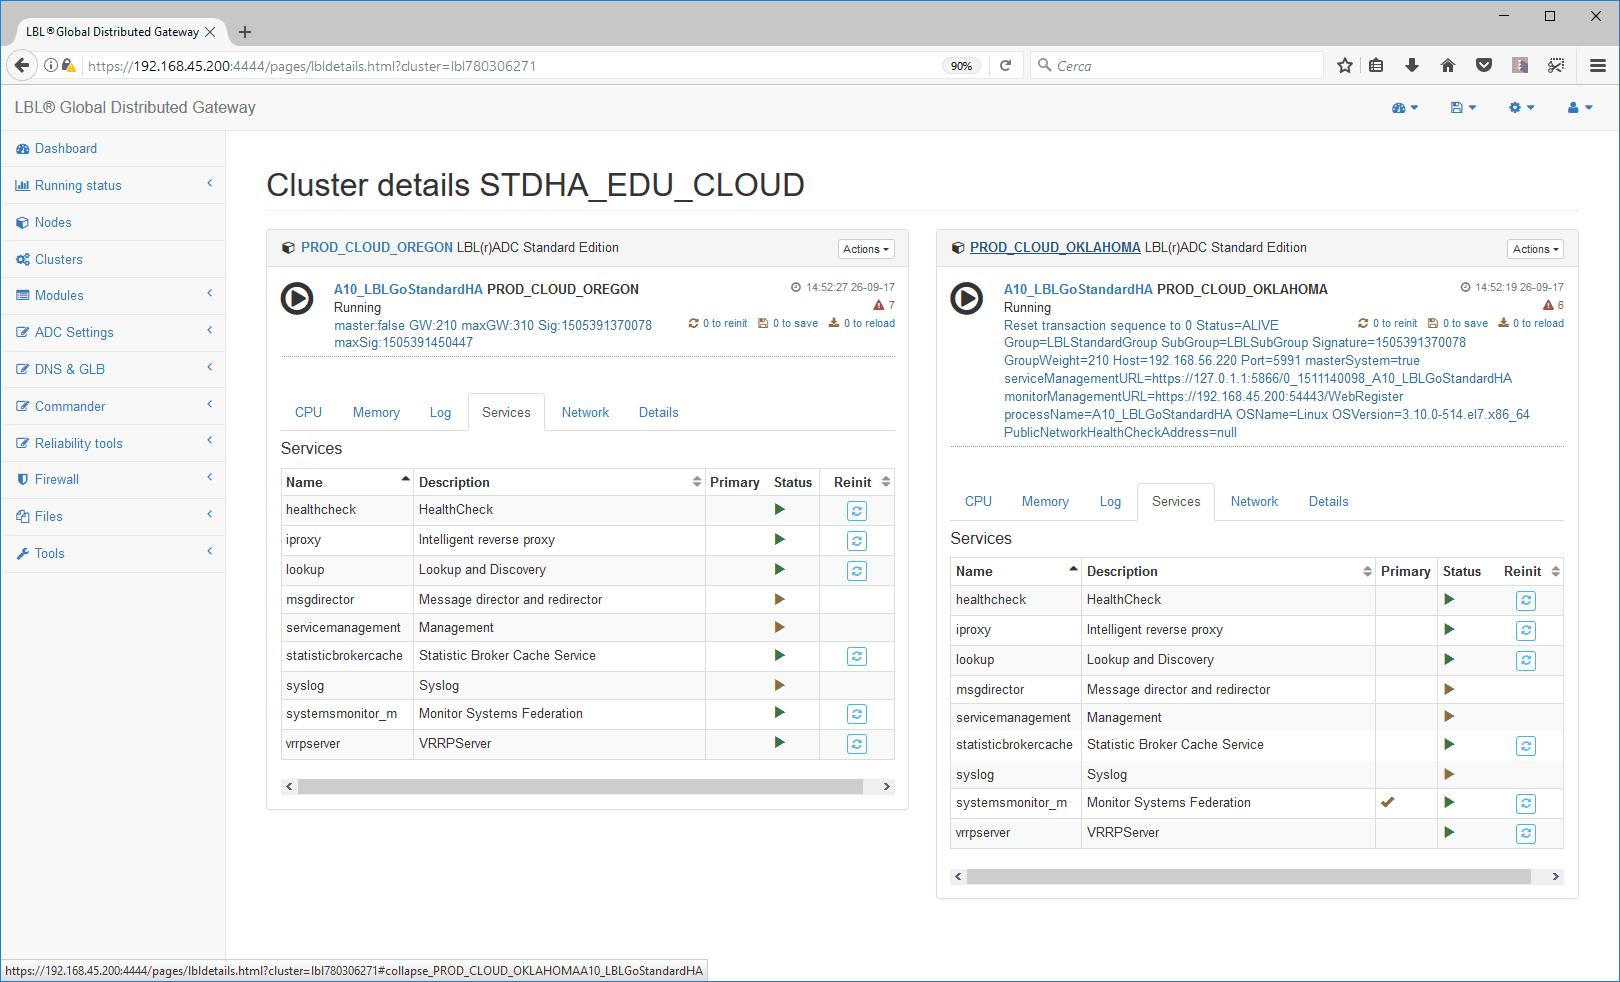
The second node of the Cluster is now starting…
As soon as you start you will notice the state change
and CPU activity of the node…
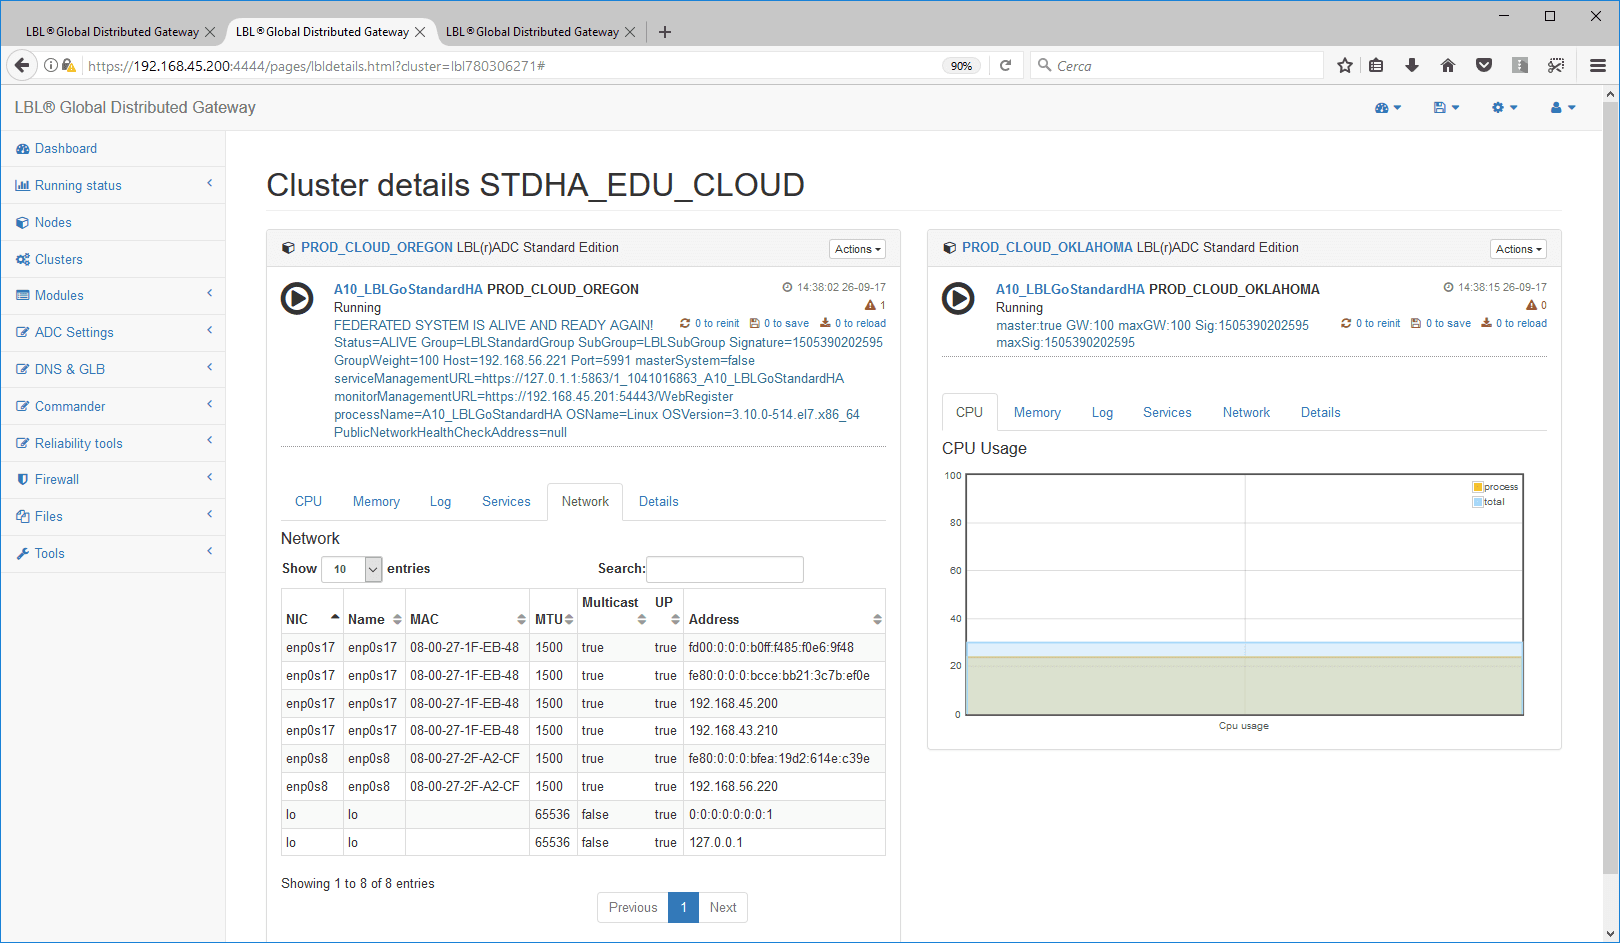
… with relative attribution of the VIP.
The virtual address has migrated to the newly started node.
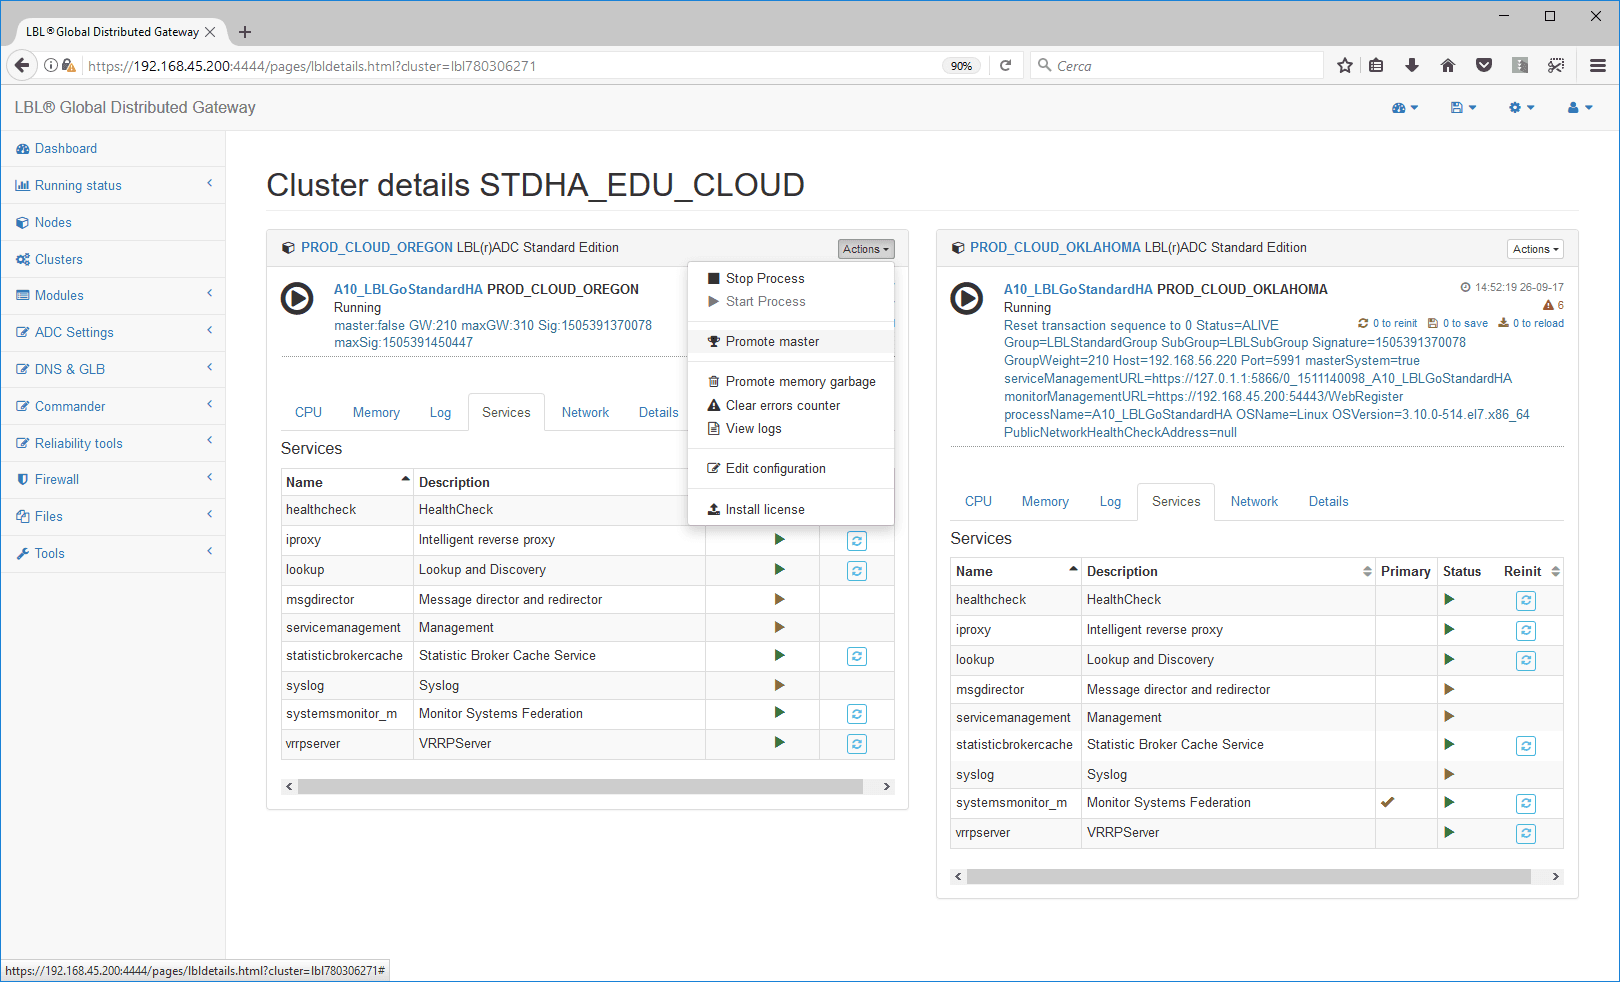
You can arbitrarily move the virtual address (VIP) from
one node to another simply by running “Promote master” from the node
panel that you want to promote to
master…
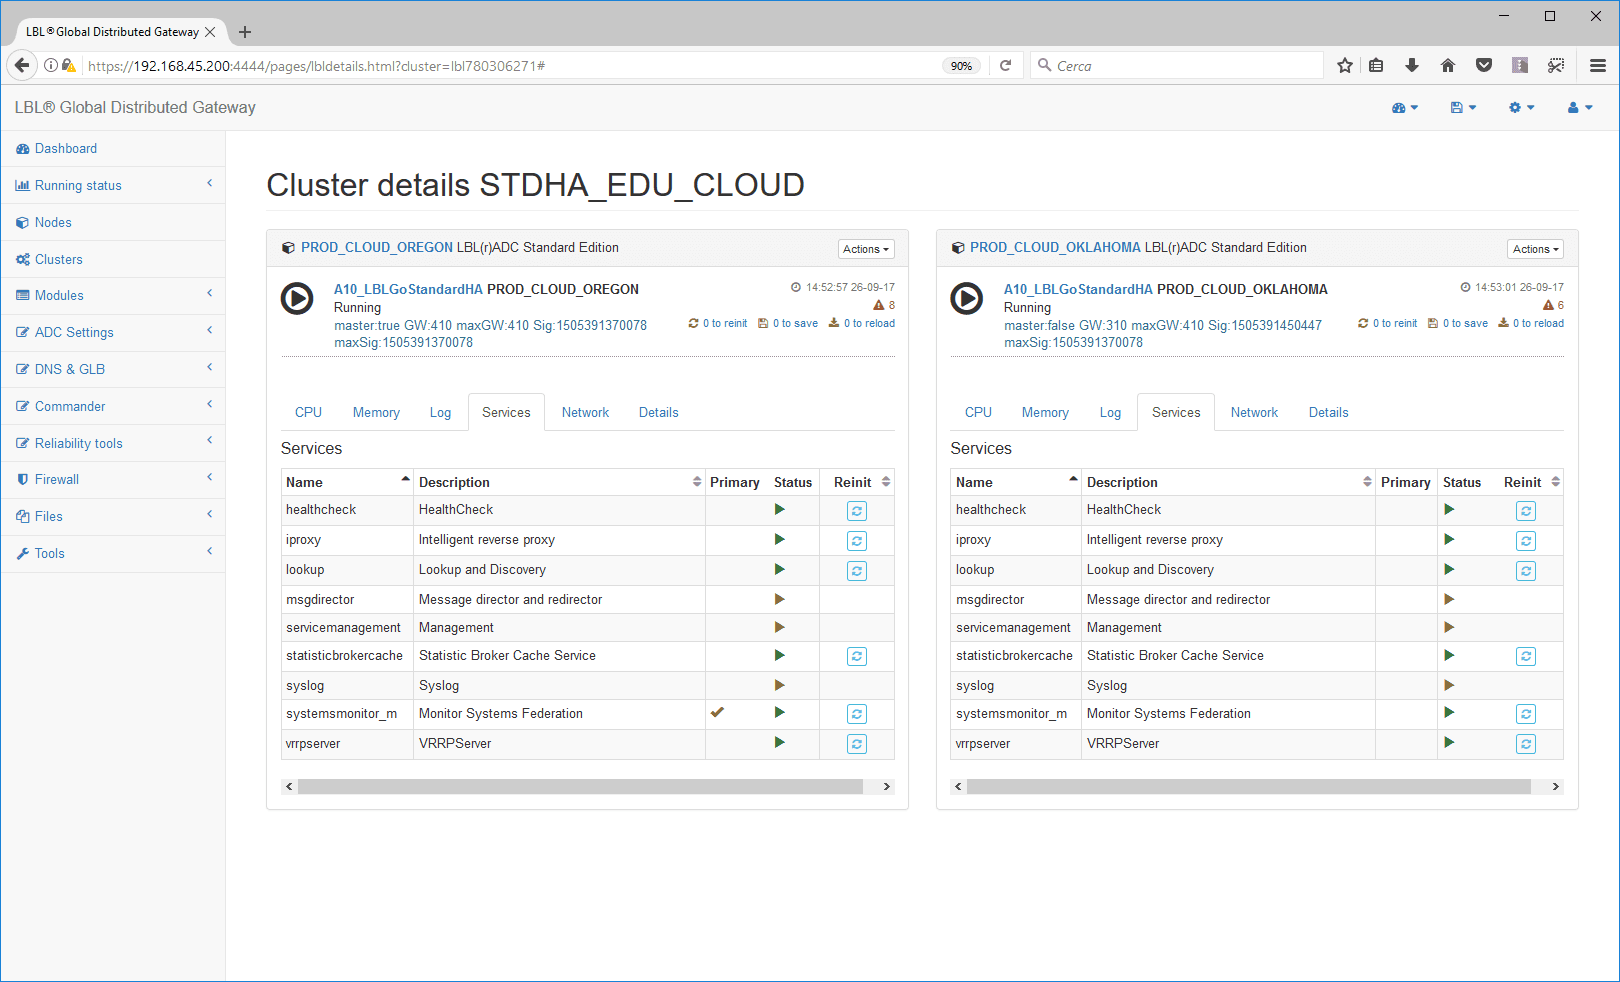
After a few moments the virtual address will migrate to the chosen node.
Enable automatic start of processes when starting VAPPs
To make start jobs automatically at virtual appliance start,
position yourself on Clusters -> [Edit]
in the “general start parameters” panel change the “process
start” parameter from “manual” to “automatic”
Save the configuration that will automatically restart
jobs with the new configuration
Describe the change operation
Both nodes of the Cluster will restart by returning to
the running situation
Master node attribution hierarchy
With OPLON ADC Standard HA, you can set
a state attribution hierarchy to master individual nodes. This feature
is
very useful in case you have sites where there is a preference to have
one master node over another in
the state of operational normality.
An example of using this feature is typically a configuration in
Business
Continuity or geographic networks with addresses located in
other sites and regions (e.g.: Elastic IPs).
To determine in advance who should assign the
start the master state, simply change the “weight” of the node that by
default is
valued at 100. In this case we will change the weight of the OKLAHOMA
node from
100 to 110.
We save the change…
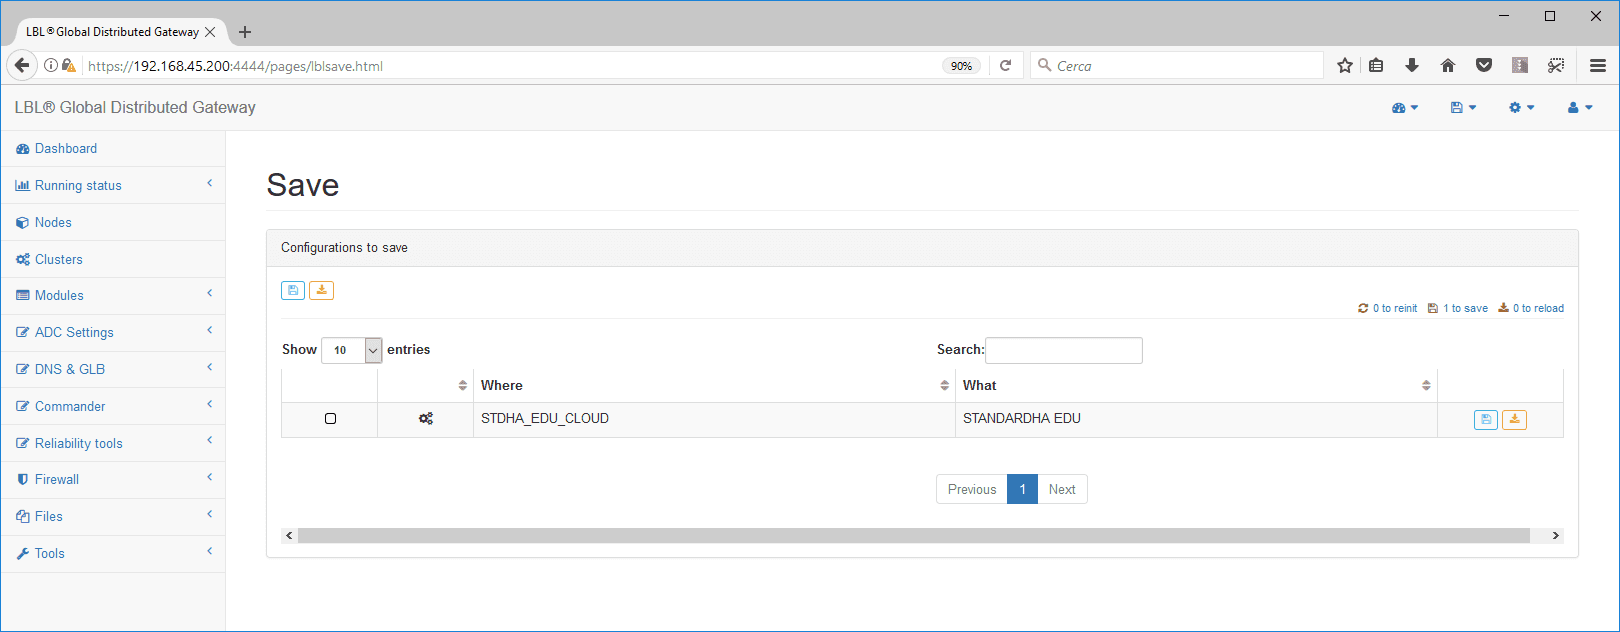
We describe the change…
We re-initialize the services associated
with determining the hierarchy
Reinit of services associated with determining hierarchy
Confirm the operation
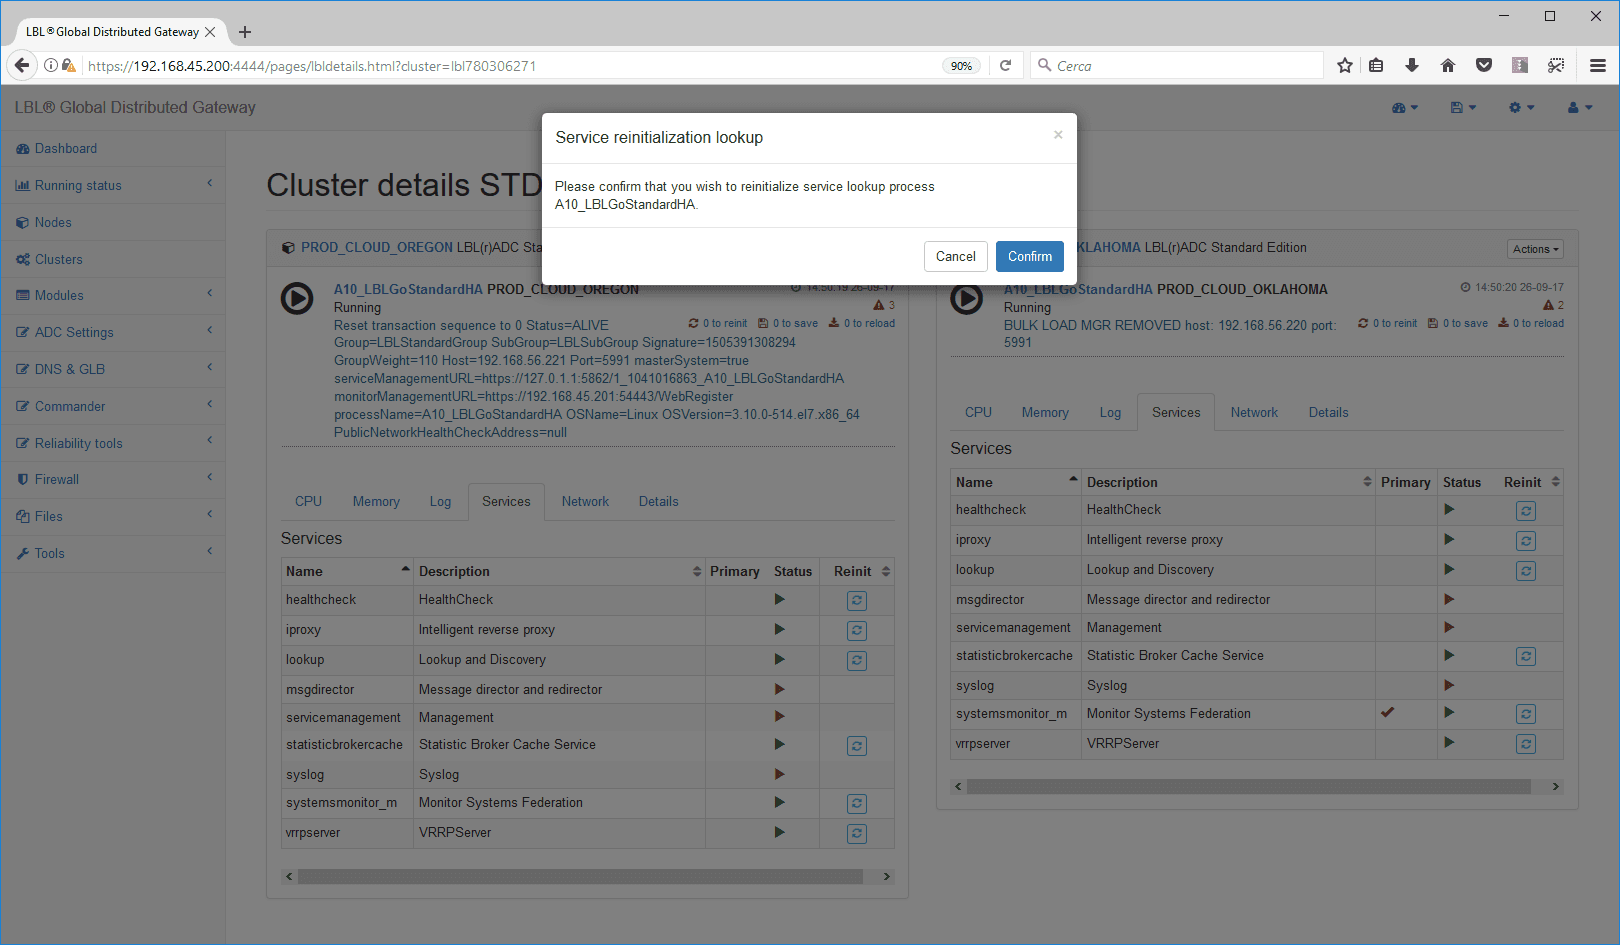
Reinit of services associated with determining hierarchy
Confirm the operation
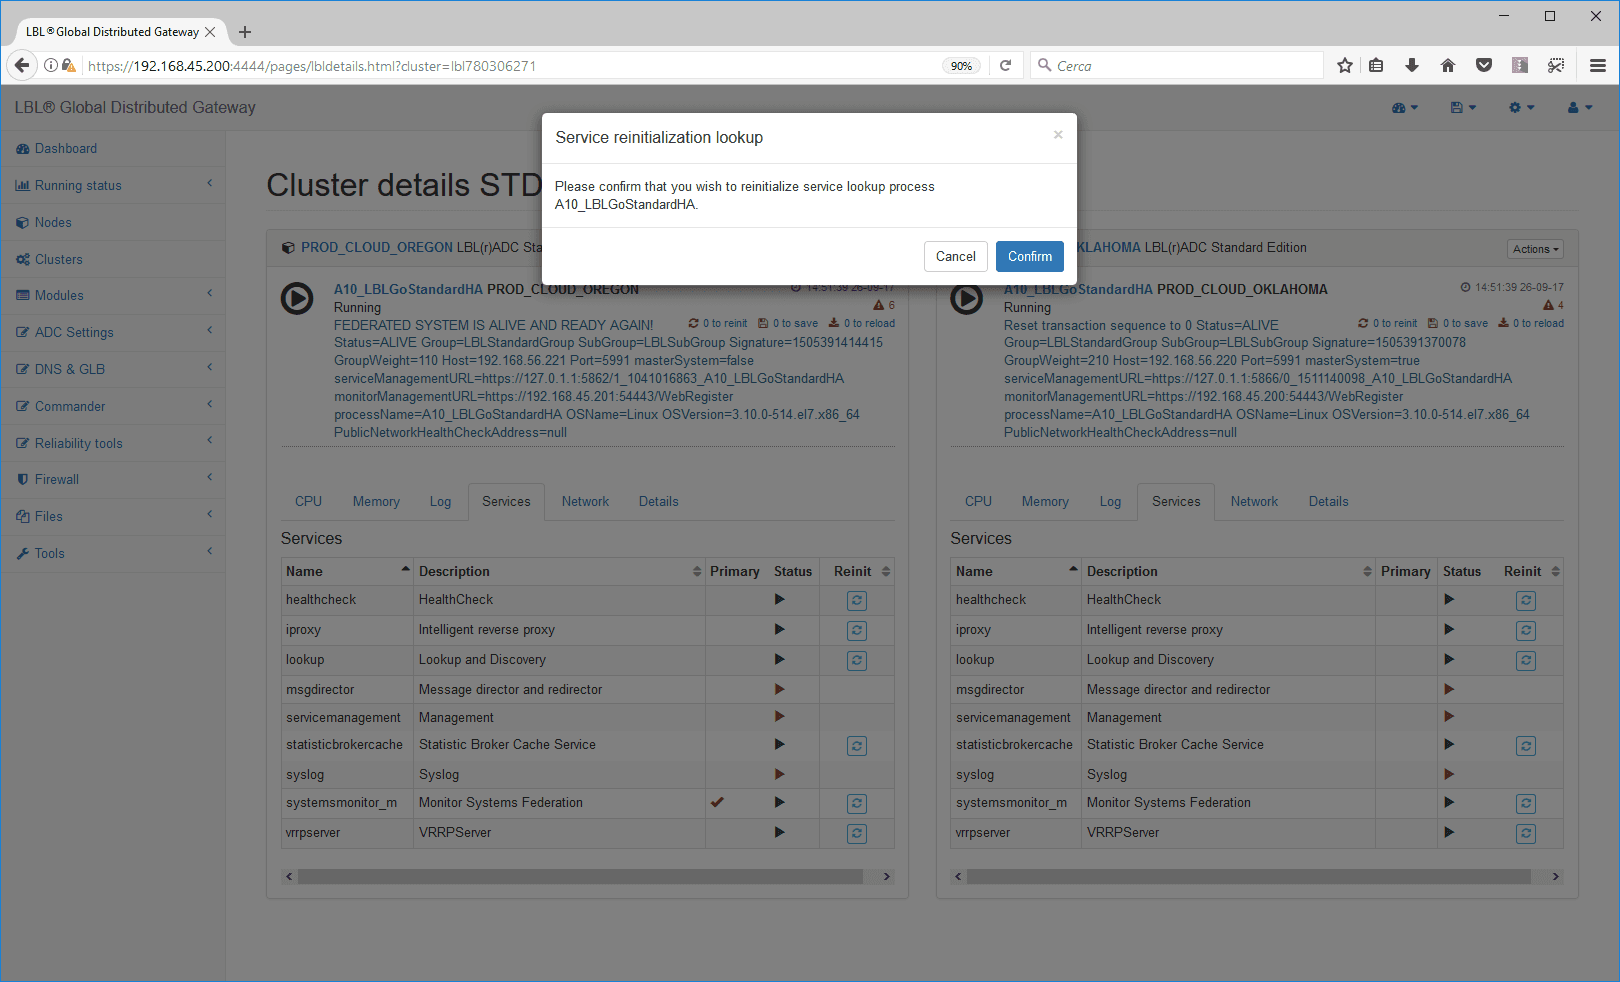
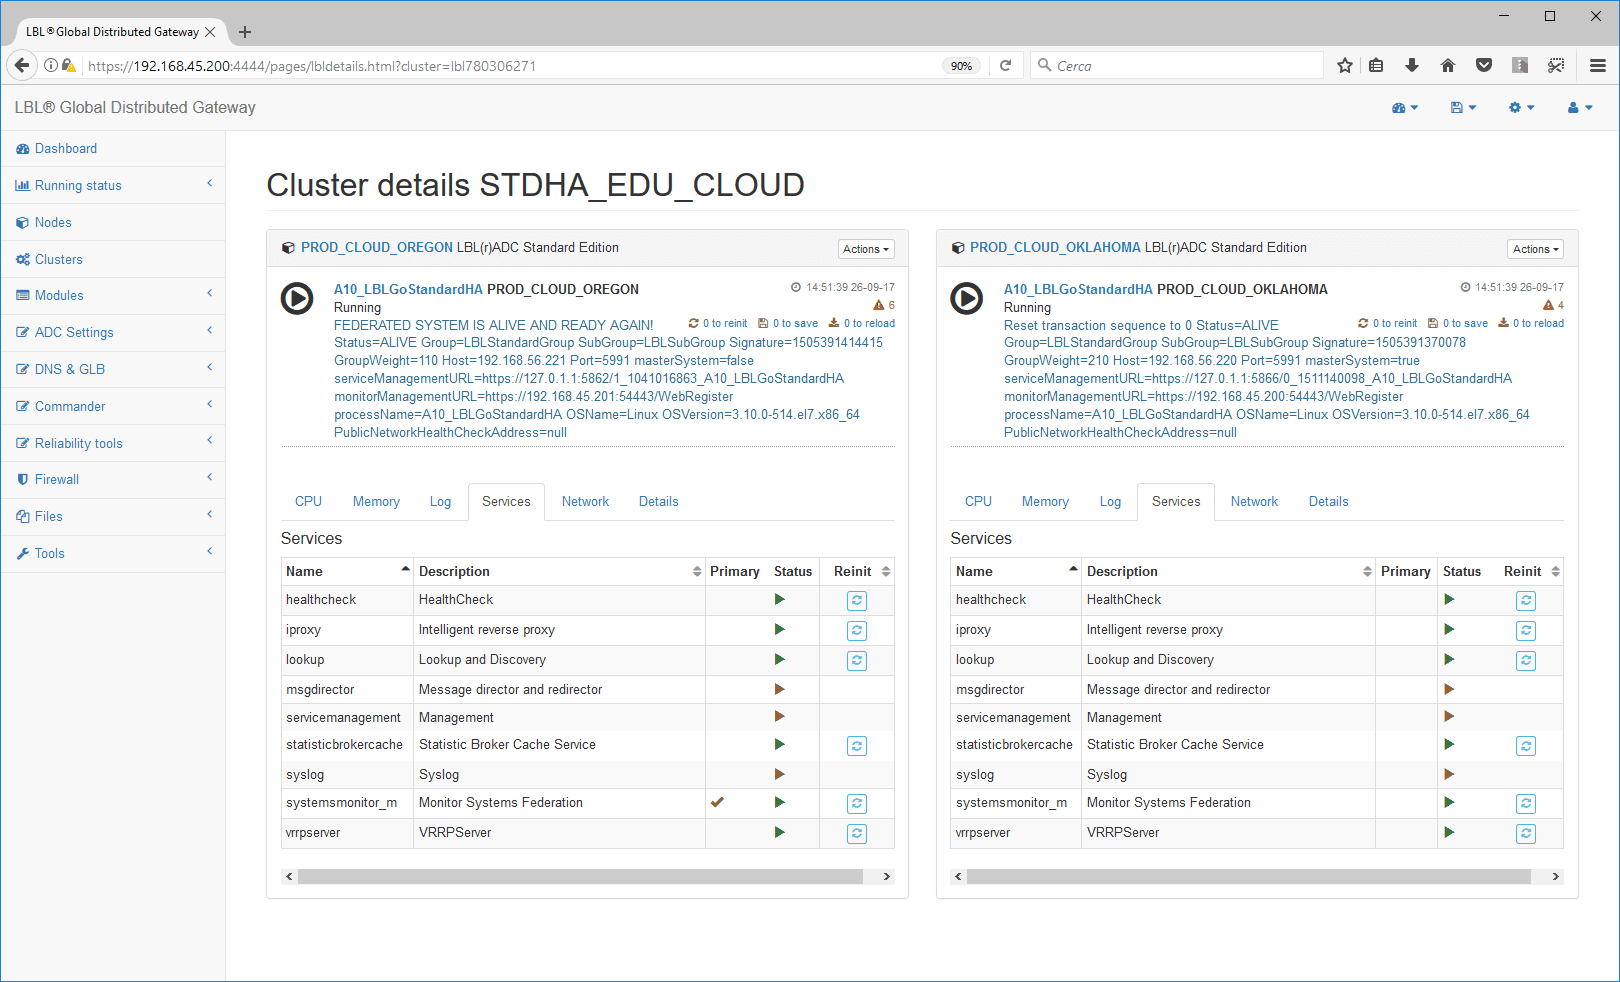
At the end of the “Reinit” of the service the Virtual IP will be
assigned
to the node with the highest “weight”.
You can always manually reassign the VIP to the other node until the
next instance restart
through the “Promote
master” command
The result of the “Promote master” is the assignment of the VIP in the
selected node in a few
moments
Cluster certification in critical environments
In extreme environments, such as aircraft, ships, industrial plants with a high risk, cluster certification can be carried out only by personnel certified in a statement digitally signed by OPLON NETWORKS SRL. The certification of the cluster in these environments requires the shipment to OPLON NETWORKS of the last page of the “installation and certification form” certifying the test.