Configuration of Oplon Secure Access
In this part of the guide, aimed at all administrators of the Oplon suite, we will see what the concepts are fundamentals of Oplon Secure Access and how to configure new resources to be accessed by third parties.
At the end of the guide you will understand the concepts of User Group and Resource and you will be able to create for the first time once a resource of type Host or Web App/Link.
Prerequisites
- You have already installed and configured the appliance as described here
- You have configured MFA as described in this guide
- (Optional) In case you want to do File Managing on Windows type resources, you have installed OpenSSH Server on each resource:
Fundamental concepts
Within OSA, there are 3 fundamental concepts that it is useful to explain in this part of the guide, and they are:
User Groups
User Groups represent a class of users all having the same privileges,
they are labels necessary to associate Resources (Hosts/Links) to users.
A User Group has a unique name and description, each User Group entered from within the interface of Oplon Secure Access, will bind to the User Groups entered in MFA as described in this guide. This will ensure that every user registered in Oplon MFA will be granted exactly the privilege described.
Resources and Locations
In Secure Access a Resource is an entity that can identify:
- a Host which is Windows,Linux or macOS
- a Remote App
- a Web App/Link
Each resource can be cataloged through a Location, i.e. a label that
it serves to logically group all the resources of the configuration.
Hosts
Within Oplon Secure Access, the Host (which is a Resource) is the representation of a physical/virtual Host consisting of its IP Address/Hostname.
For convenience, it is possible to assign a Location label to a Host, this will only serve as
logical grouping and to represent the resource in an orderly and hierarchical manner within the user interface of
Oplon Secure Access.
Different types of access can coexist inside a Host, which can be:
- SSH Access
- RDP Access
- Remote App Access
- VNC Access
- SFTP Access (File Management)
These accesses, all or some, can be assigned to the various User Group based on the desired policies.
It is also possible to assign prefixed login os, to ensure that when accessing that specific Host, the user does not have to enter a username or password.
Remote App
Remote Apps (RDP Only) live inside a Host, but are still considered separate resources. They allow you to expose only an application exposed via the Windows RDP protocol.
Web Apps/Links
A Web App/Link is a resource represented by a URL. Through Oplon Secure Access it can be accessed:
- in native HTTP/HTTPS mode
- Mediated by Oplon’s Reverse Proxy (thus guaranteeing security given by the Multi Factor Authentication)
- Publish on the internet
- in Browser Isolation mode.
Both can be resources either internal to the infrastructure or external. Depending on the type of configuration it is possible to obtain different results. In general it is useful to keep in mind that native mode requires significantly fewer resources than Browser Isolation mode which instead requires dedicated Appliances but which for pro obviously has an extra layer of security and segregation (here to understand more)
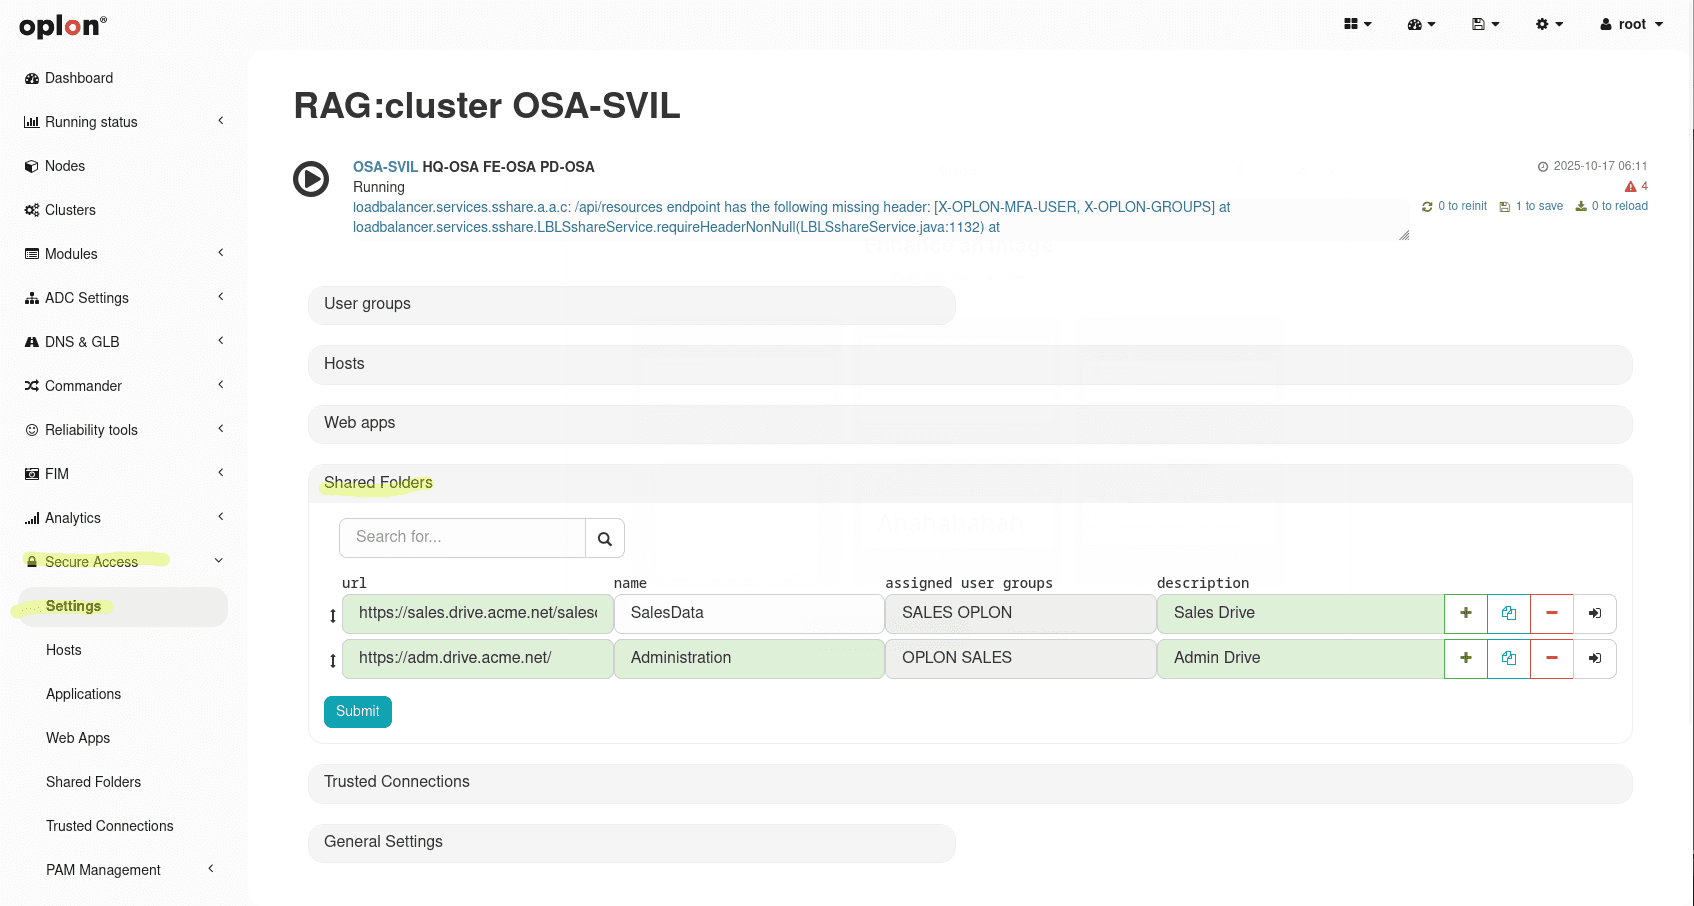
Shared Folders
Shared Folders allow mounting, via the Oplon Client (Windows, Linux, macOS), network drives protected by the platform (MFA, ZTNA, policies).
Access is always authenticated and authorized based on the assigned User Groups and configured policies.
Currently the supported protocol for mounting is WebDAV: the share is exposed to the client as a drive or mount point and all file operations are mediated and tracked by Oplon.
Trusted Connection
A Trusted Connection opens a secure channel between the host and selected backends (e.g., DB servers, Telnet, general applications).
Access is enforced via MFA, ZTNA and Oplon’s PAM policies; the Oplon Client can locally reverse‑proxy the service on localhost
on a specific port (e.g., localhost:NNNN), allowing the use of internal services without exposing public ports.
Configuration interface
To set up a new resource, you need to open the admin center
Oplon Secure Access, to https://<your-ip>:4444 and login.
From here in the left menu, expand the item Secure Access, click on Settings and open the module.
In this screen you can:
- See the list of User Groups present, with the possibility of adding new ones and deleting old ones
- See the List of Hosts, with the possibility of adding, removing and editing
- See the list of Web Apps/Links, with the possibility of adding, removing and modifying them
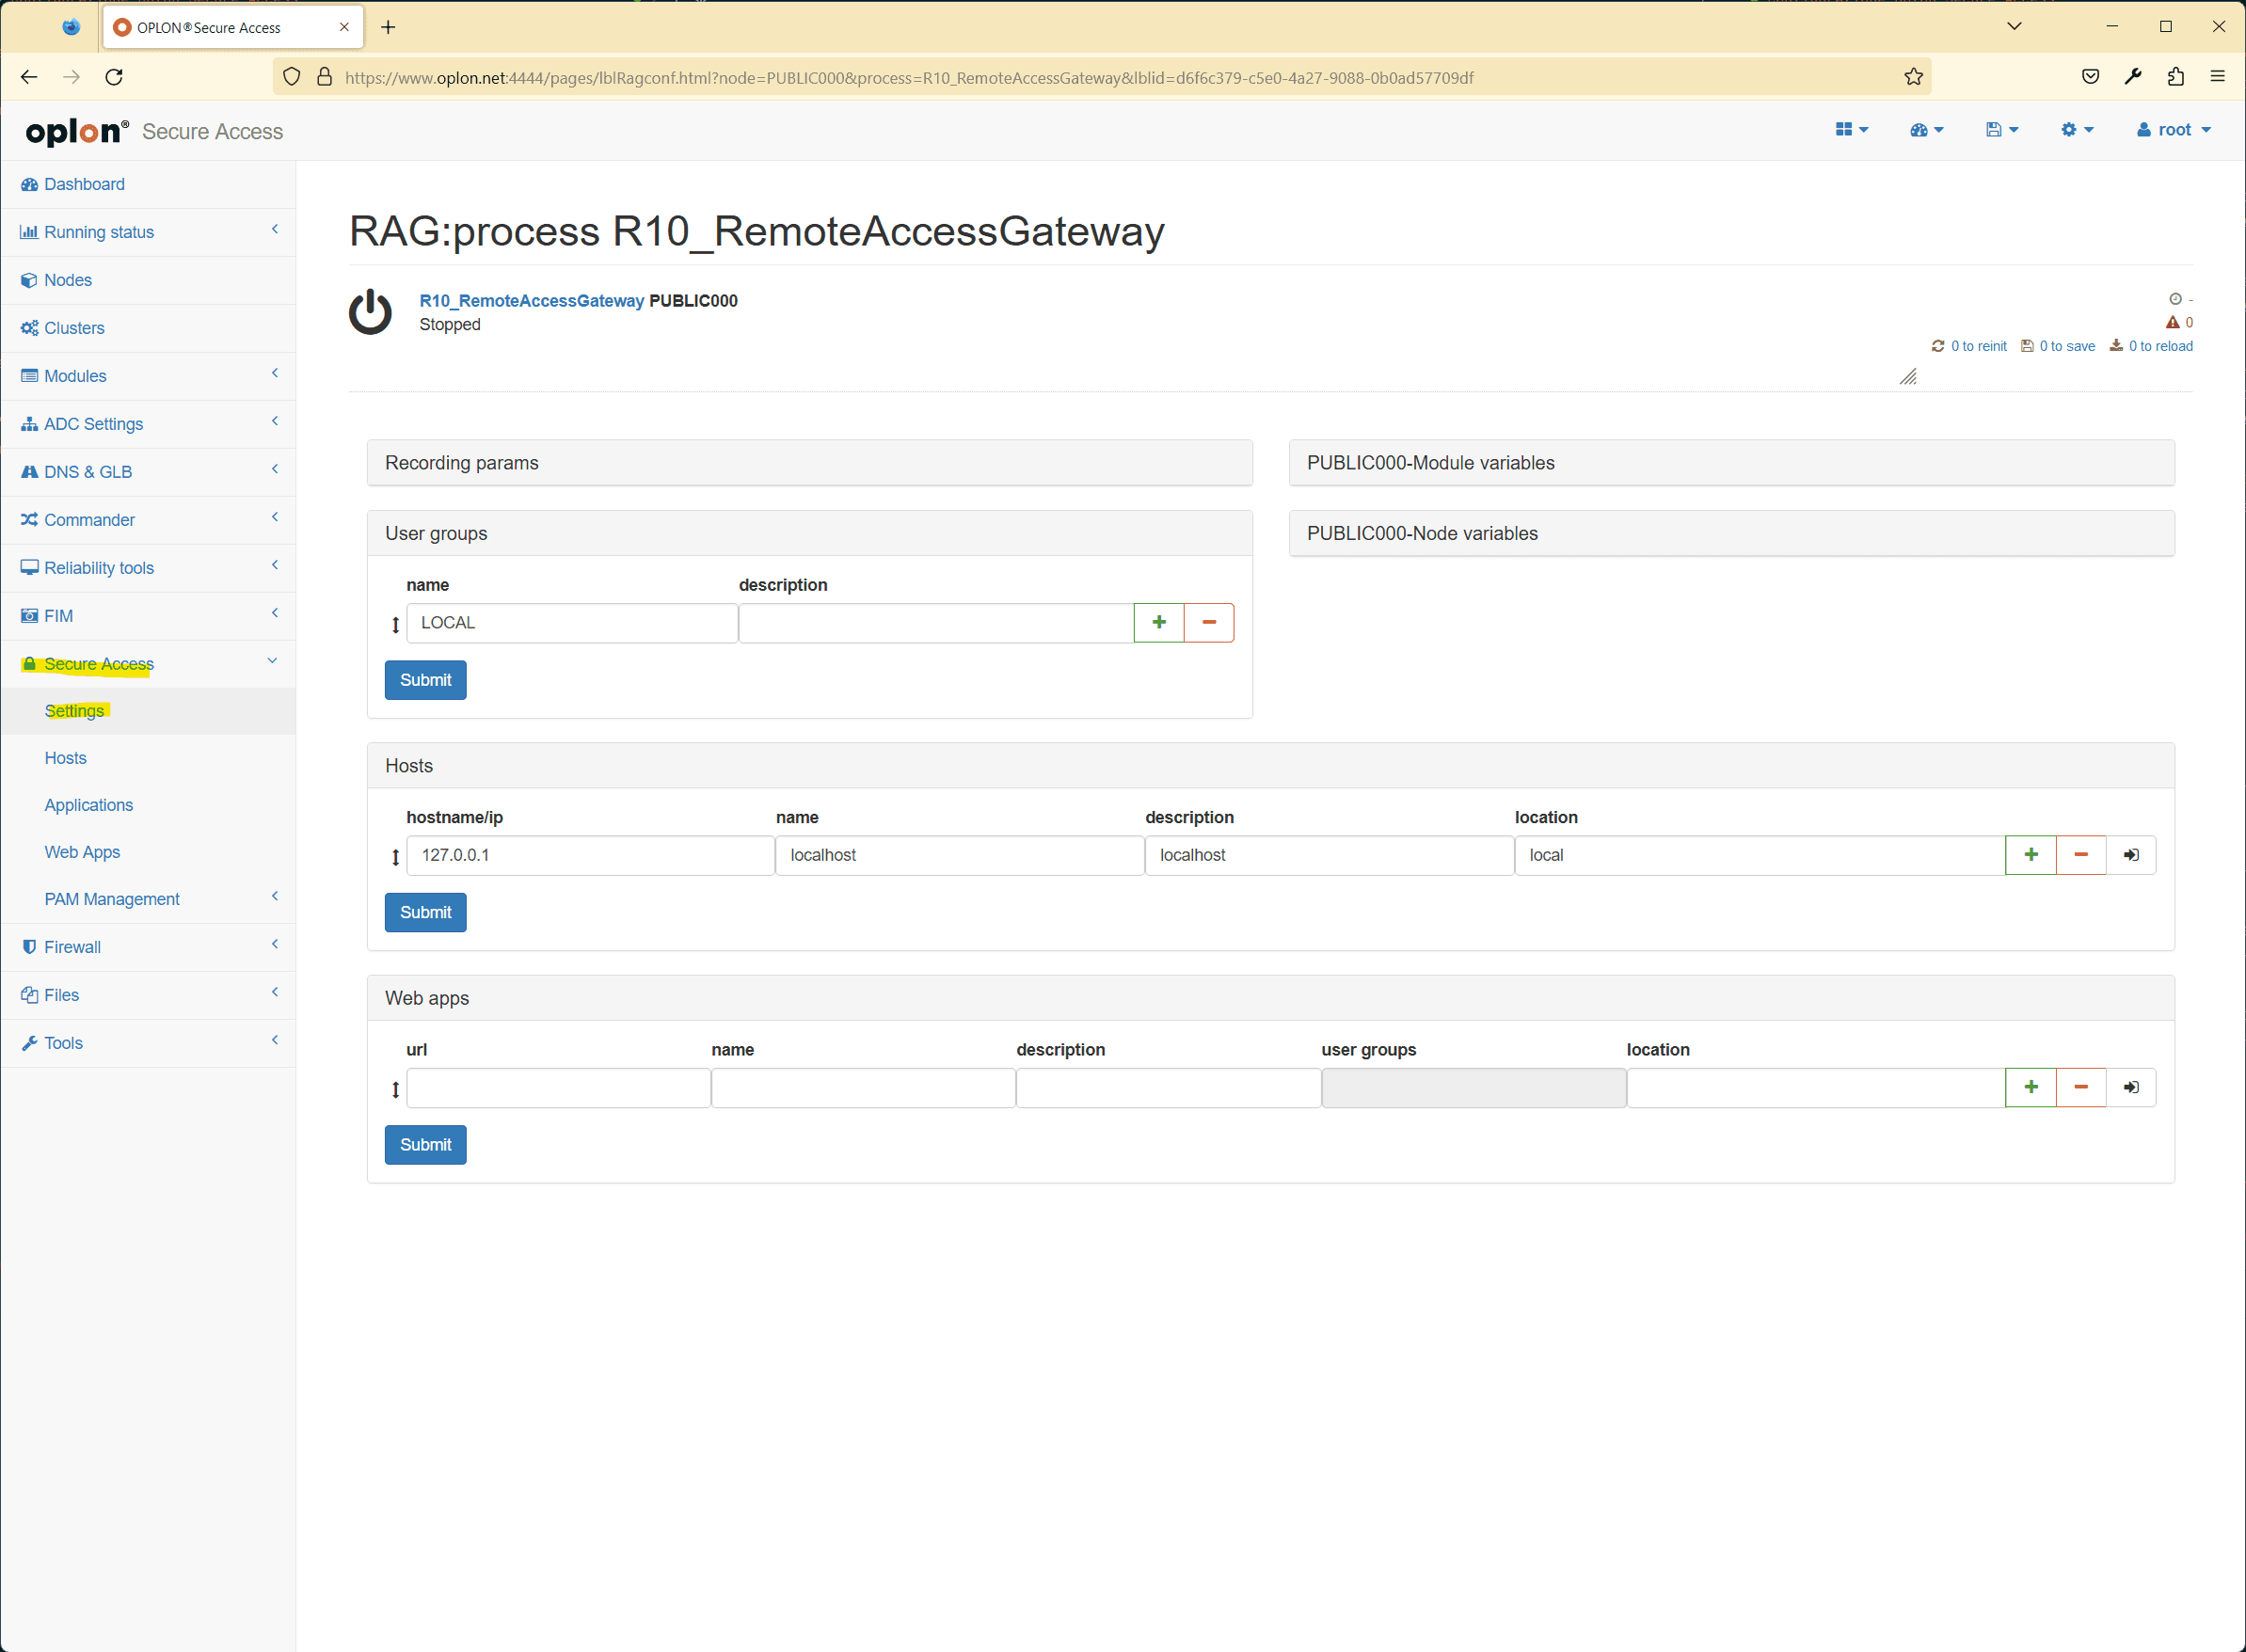
Add a new User Groups
To add a new User Group, click on the green (+) button of an already inserted User Group: this will be duplicated below to then be edited at will.
For each User Group it is possible to enable or disable the permission to use session temporary connections (a feature typically reserved for administrators) and the video recording of the sessions associated with them.
Session temporary connections are temporary connections that allow users — belonging to at least one group in which this feature is enabled — to connect to any Host, even in the absence of groups associated with the target resource.
Users with this privilege can access a resource even without groups associated with it, provided they have the relevant access credentials.

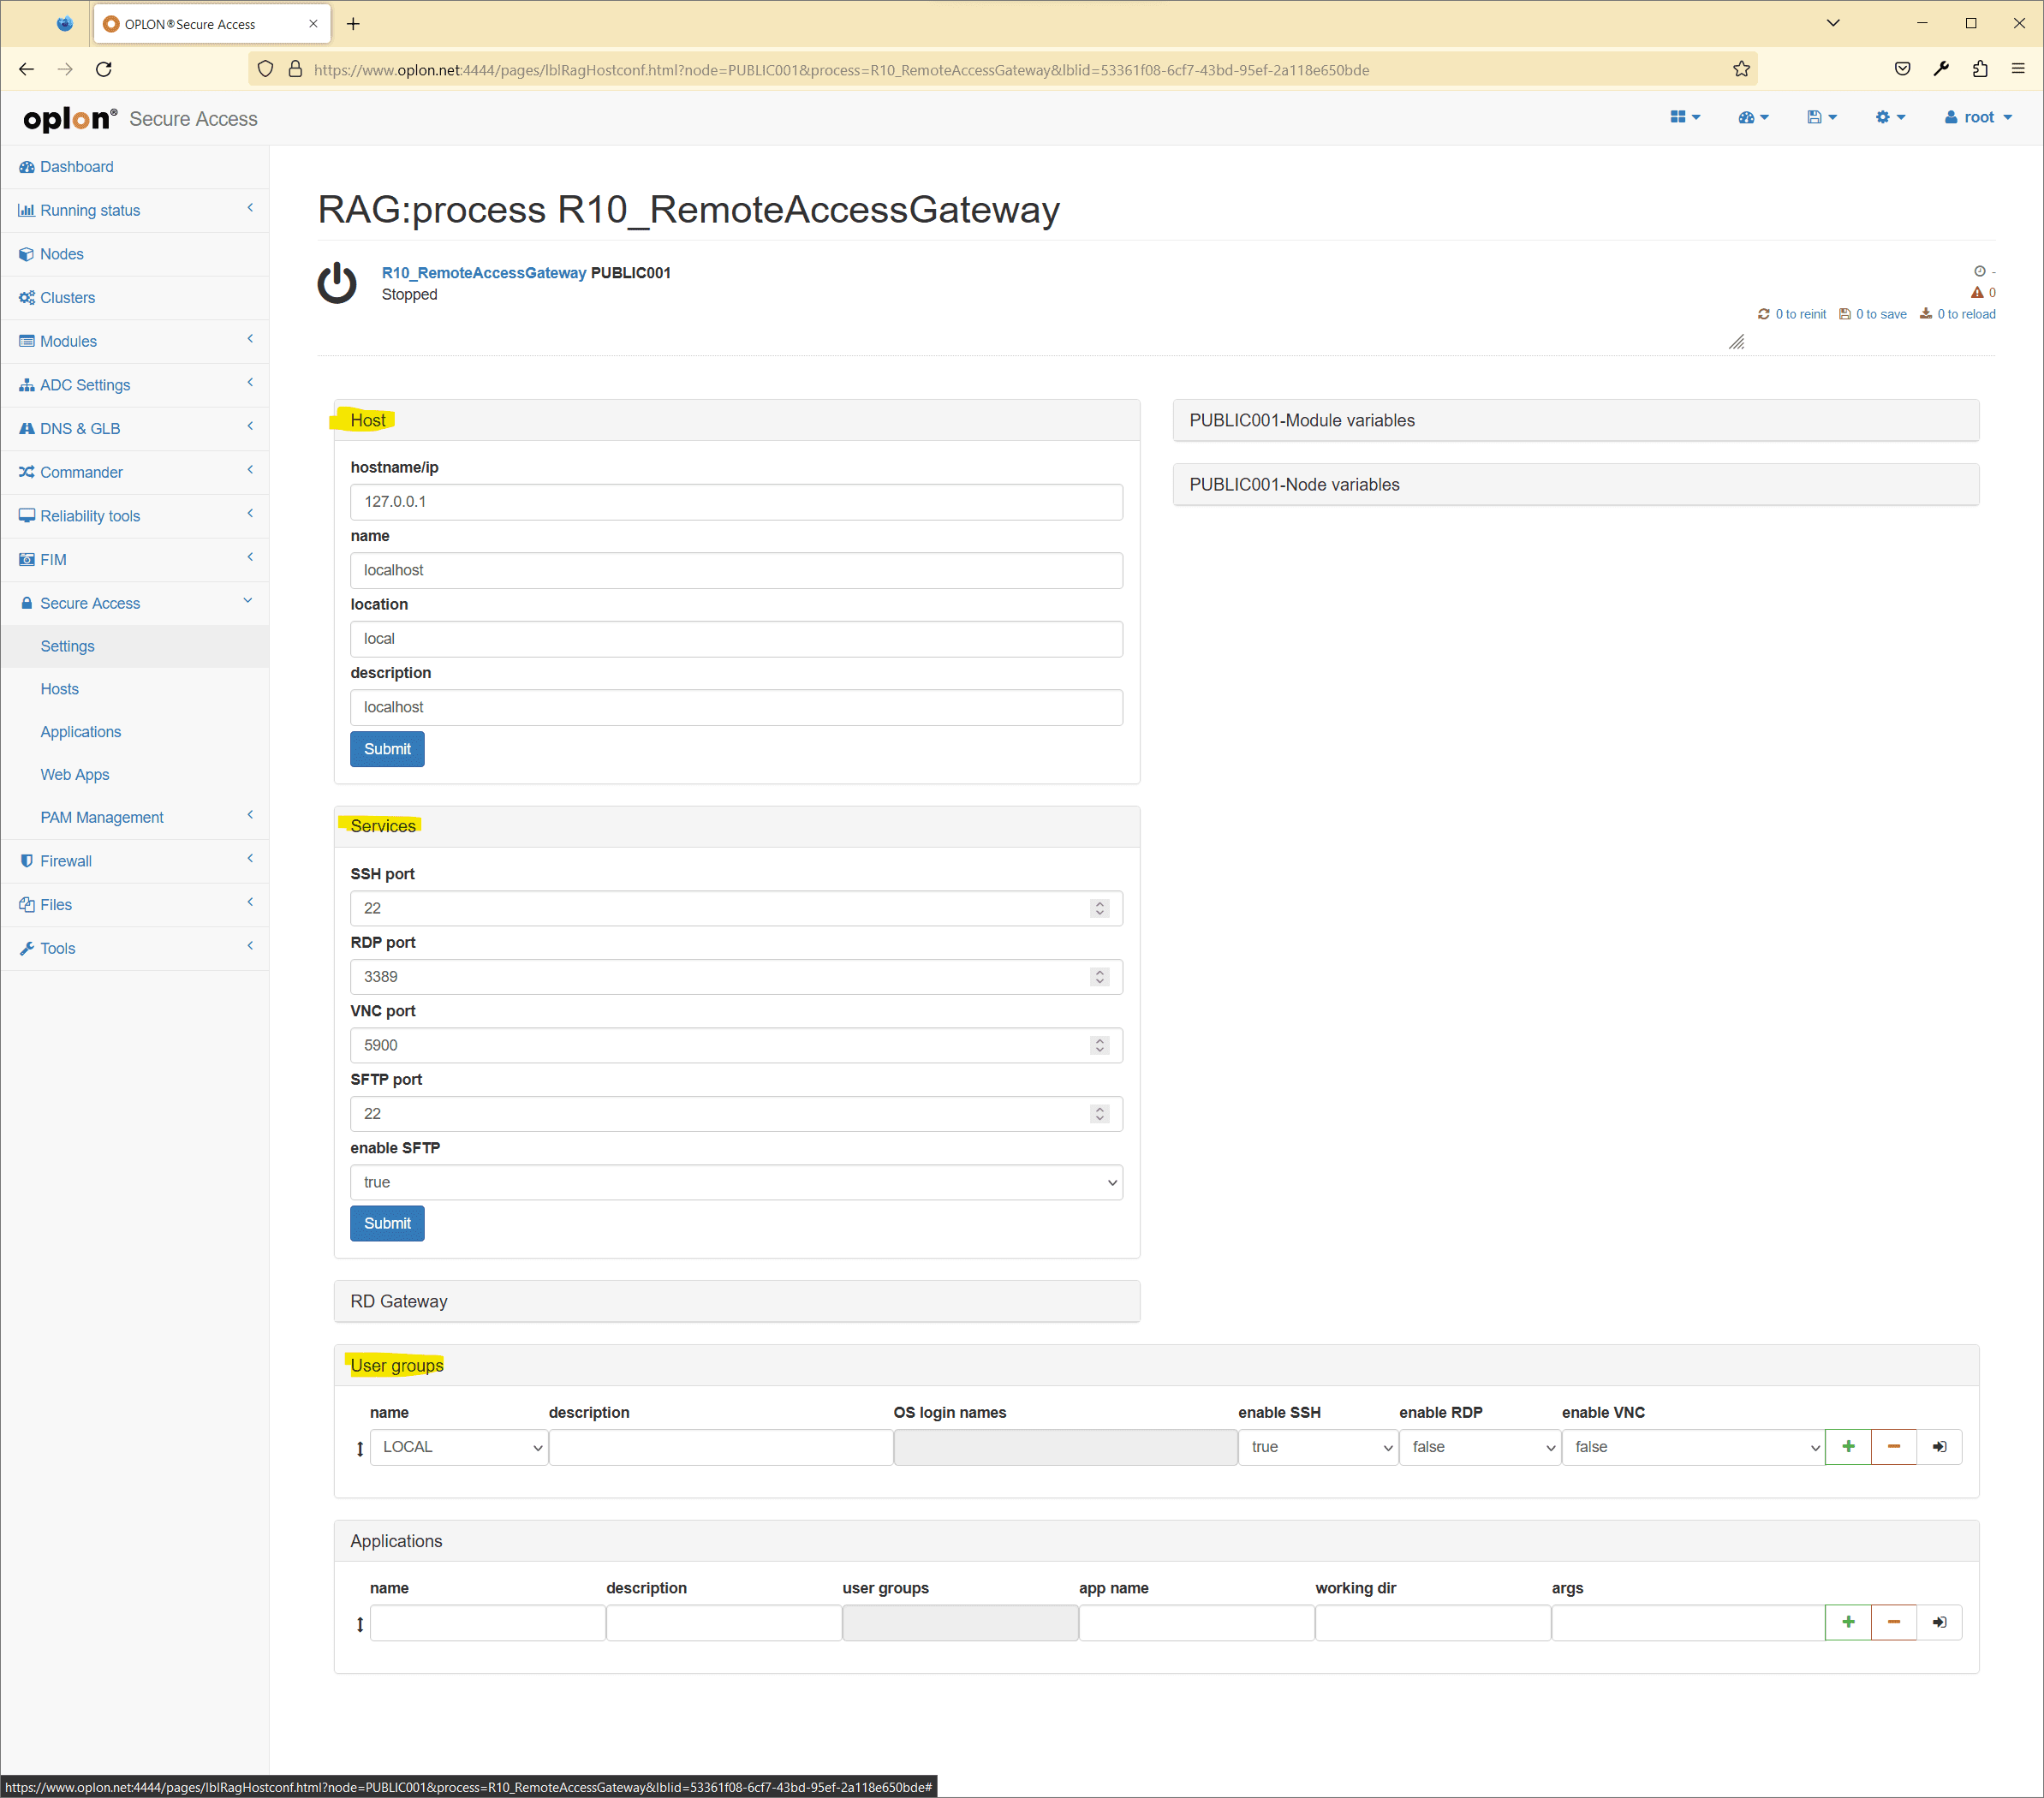
Add a new Host
To add a new Host it is necessary to click on the green (+) button of an already existing Host this will be duplicated below to then be edited at will.
To modify a Host it is recommended to enter the details using the “See Details” button
Here we can enter:
- Hostname/ip
- Name
- Location
- Description
- Services and related ports: SSH, RDP, VNC, SFTP (File Manager)…
- Any RD Gateway (RDP Only)
- The Associated User Groups
- Any Remote App (RDP Only)
Add a new Remote App
To add a new Remote App, you must necessarily start from a Host with RDP access already configured.
Then go to Secure Access > Settings and then, open a Host.
Below in Applications we can enter:
- name: that is the name that will appear in the menu
- description
- app name: the alias of the app published via RDP
- working dir: the working directory of the app (optional)
- args: the app start arguments (optional)

Remember to always carry out Save and Re-Init at the end.
Add a new Web App
To add a new Web App, you can always go to the Settings interface and find the screen at the bottom Web Apps.
Enter the minimum information here to be able to use the Web App, i.e.:
- name
- url
- location

Remember to always carry out Save and Re-Init at the end.
Browser Isolation
If you need to follow the instructions above for the native Web App, to make the Web App available in Browser Isolation mode it is necessary to activate the enable Browser Isolation option.
From here, by entering with the black arrow at the end of the line, a series of configurations/customizations can be followed specific to Browser Isolation mode only and are:

- enable Browser Isolation: serves to enable browser isolation
- Whitelisted: serves to whitelist the URL entered above. This will have the effect of blocking navigation for everyone else url if not the url itself and possibly those specified below in “White Listed Domain”:
- White Listed Domains: Here you can indicate a series of addresses not to be blocked, if you are in “Whitelisted=true”, separated by commas.
The syntax to follow is:
<scheme>://<host><path>(here for a more complete guide on the syntax)
In case of whitelist, it is not currently possible to set ports in the schema.
Adding a new Shared Folder
To add a Shared Folder just click the (+) button on the dedicated screen.
To modify a Shared Folder it is recommended to open the details using the “See Details” button.
Configurable fields:
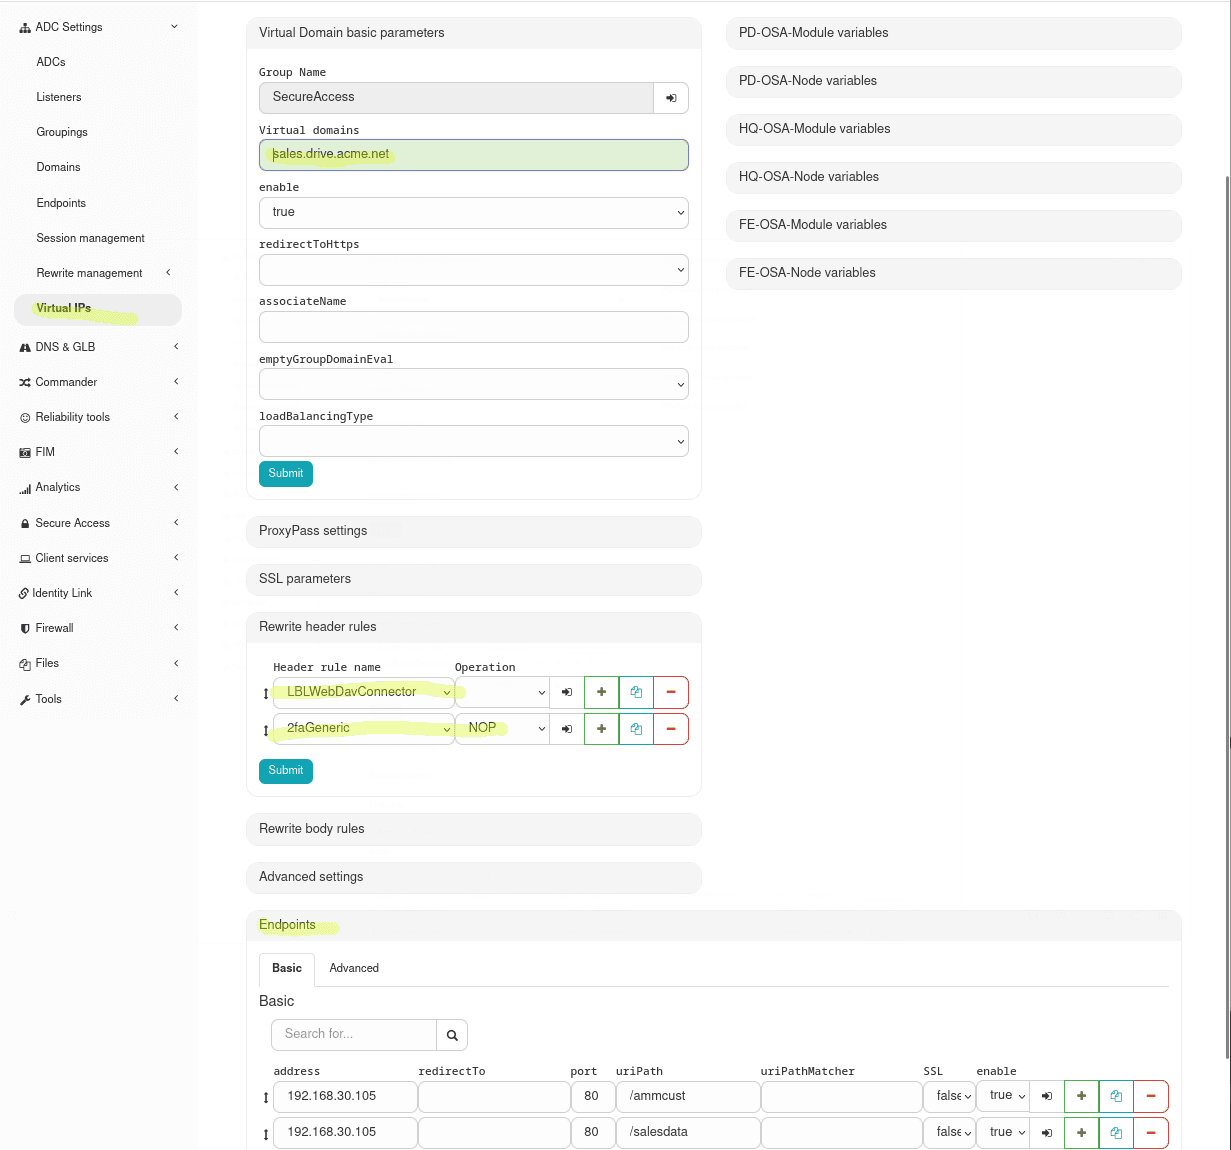
url: address via the Oplon ADC (e.g.https://sales.drive.acme.net)name: readable nameassignedUserGroups: authorizedUser Groupsdescription: short description and policy
Configuring Shared Folders on Oplon ADC
First, verify that the /api/sf/verify-token endpoint in the Secure Access grouping is present and enabled with the LBLWebDavConnector rewrite rule applied.
If the endpoint doesn’t exist (in case you are coming from an installation prior to 11.3.0), create it by cloning the /api endpoint and customizing it with the required values.
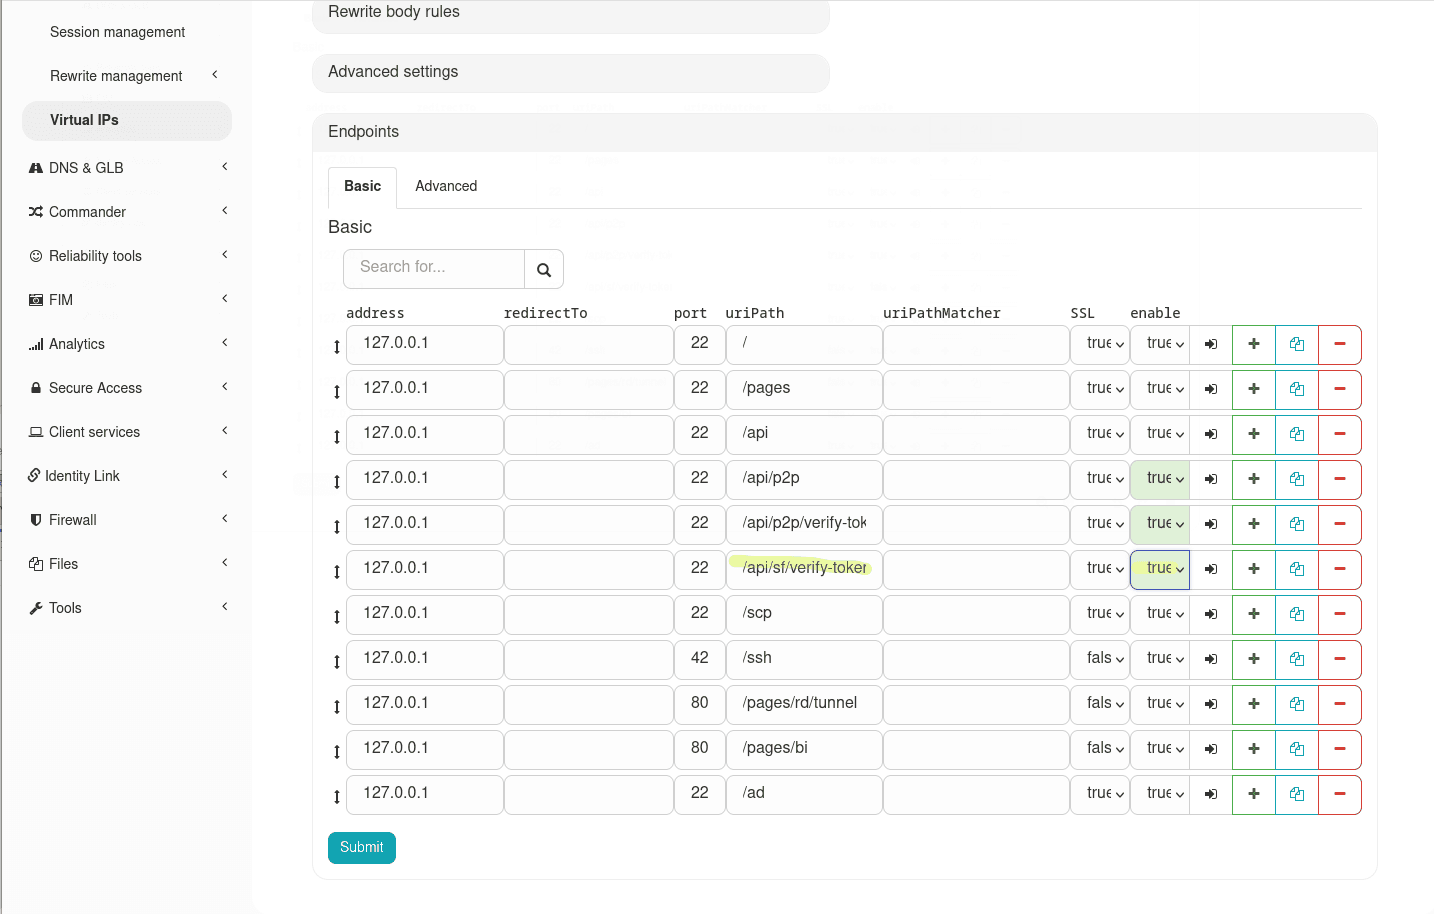
For the url to work, the Oplon ADC must reverse‑proxy to the WebDAV backend and apply the LBLWebdavConnector rewrite rule.
Minimum steps:
- create/use the virtual domain (e.g.
https://sales.drive.acme.net) - apply the
LBLWebdavConnectorrewrite rule on the route
Make sure to provide a valid SSL/TLS certificate for the reverse‑proxied domain (for example sales.drive.acme.net). A proper certificate avoids browser warnings and ensures secure connections between clients and the ADC.
If MFA is used on the same listener or grouping, you will need to set the MFA rewrite rule to NOP (as shown in the screenshot).
Firewalling files transferred with Shared Folders
To filter WebDAV files apply two rewrite rules on the same route:
LBLHTTPWebDavFileCheckHeader(rewrite header)LBLHTTPWebDavFileCheckBody(rewrite body)
Both rules are customizable: by changing the variable WHITE_LIST_EXT you set the list of allowed/blocked extensions (e.g. .exe,.bat,.js).
The rules will check headers and/or content of transfers and block disallowed files.

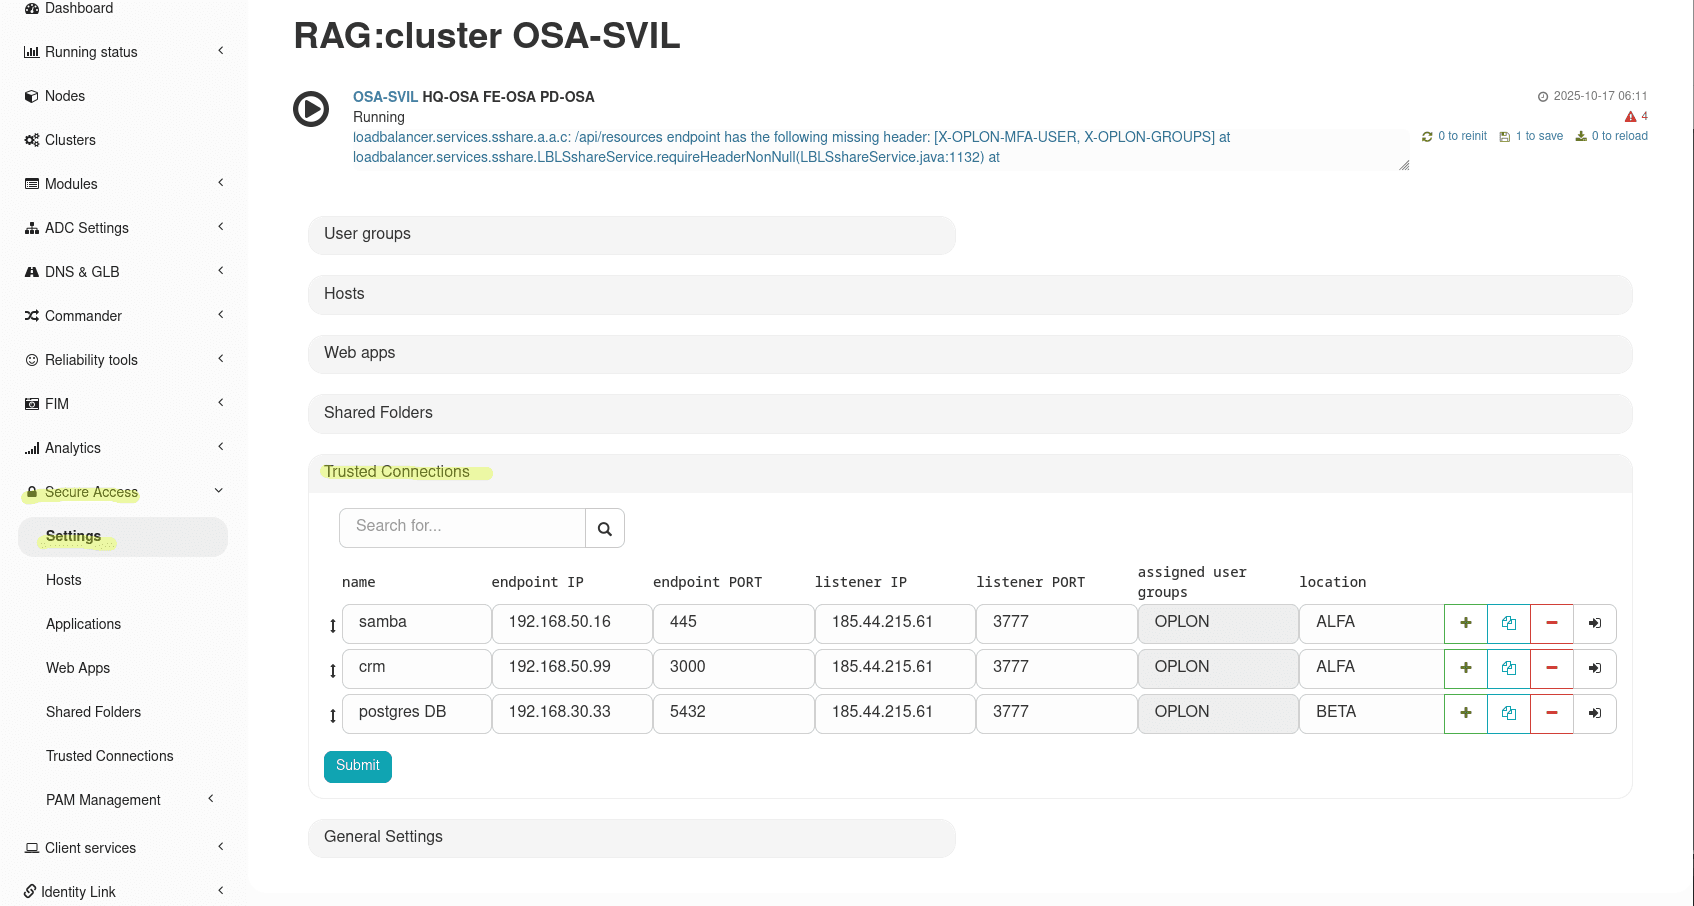
Adding a new Trusted Connection
To add a Trusted Connection click (+) in the Trusted Connections section; the duplicated entry can then be edited.
Configurable fields:
name: descriptive name of the connectiondescription: short descriptionendpoint IP: destination backend IPendpoint PORT: destination backend portlistener IP: IP on which Oplon listens for tunnel connectionslistener PORT: port on which Oplon listens for tunnel connectionslocation: logical labelconnection timeout: connection timeout (ms)upstream port: local port onlocalhostthat the Oplon Client will expose (e.g.localhost:NNNN)assignedUserGroups: authorizedUser Groups
Save and perform Save and Re‑Init.
Configuring Trusted Connections on Oplon ADC
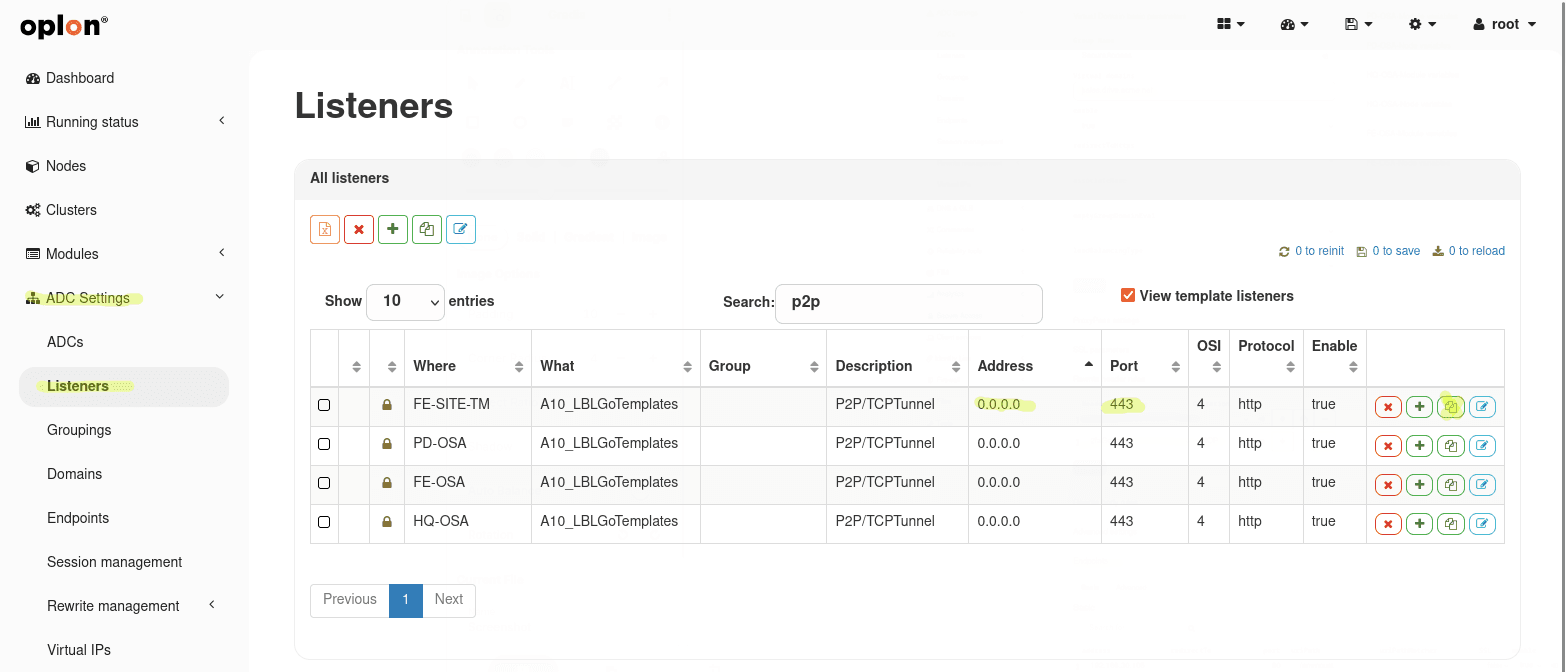
To create at least one Trusted Connection you must configure a dedicated listener on the ADC module for tunneling.
- Go to ADC Settings > Listeners and enable “View Template Listners”.
- Find the template named “Trusted Connections listener” and use the Copy button to copy it into the target ADC module.
- Modify the copied listener setting the desired address and listener PORT for tunneling.
- Note: this listener operates at Layer 4 and has the rewrite rule
LBLRWL4P2Papplied. - If the tunnel requires SSL termination or re-entry, associate the appropriate certificate (keystore/alias) to the listener and enable SSL options before saving.
- Save the changes and proceed with Save / Re‑Init of the ADC module.
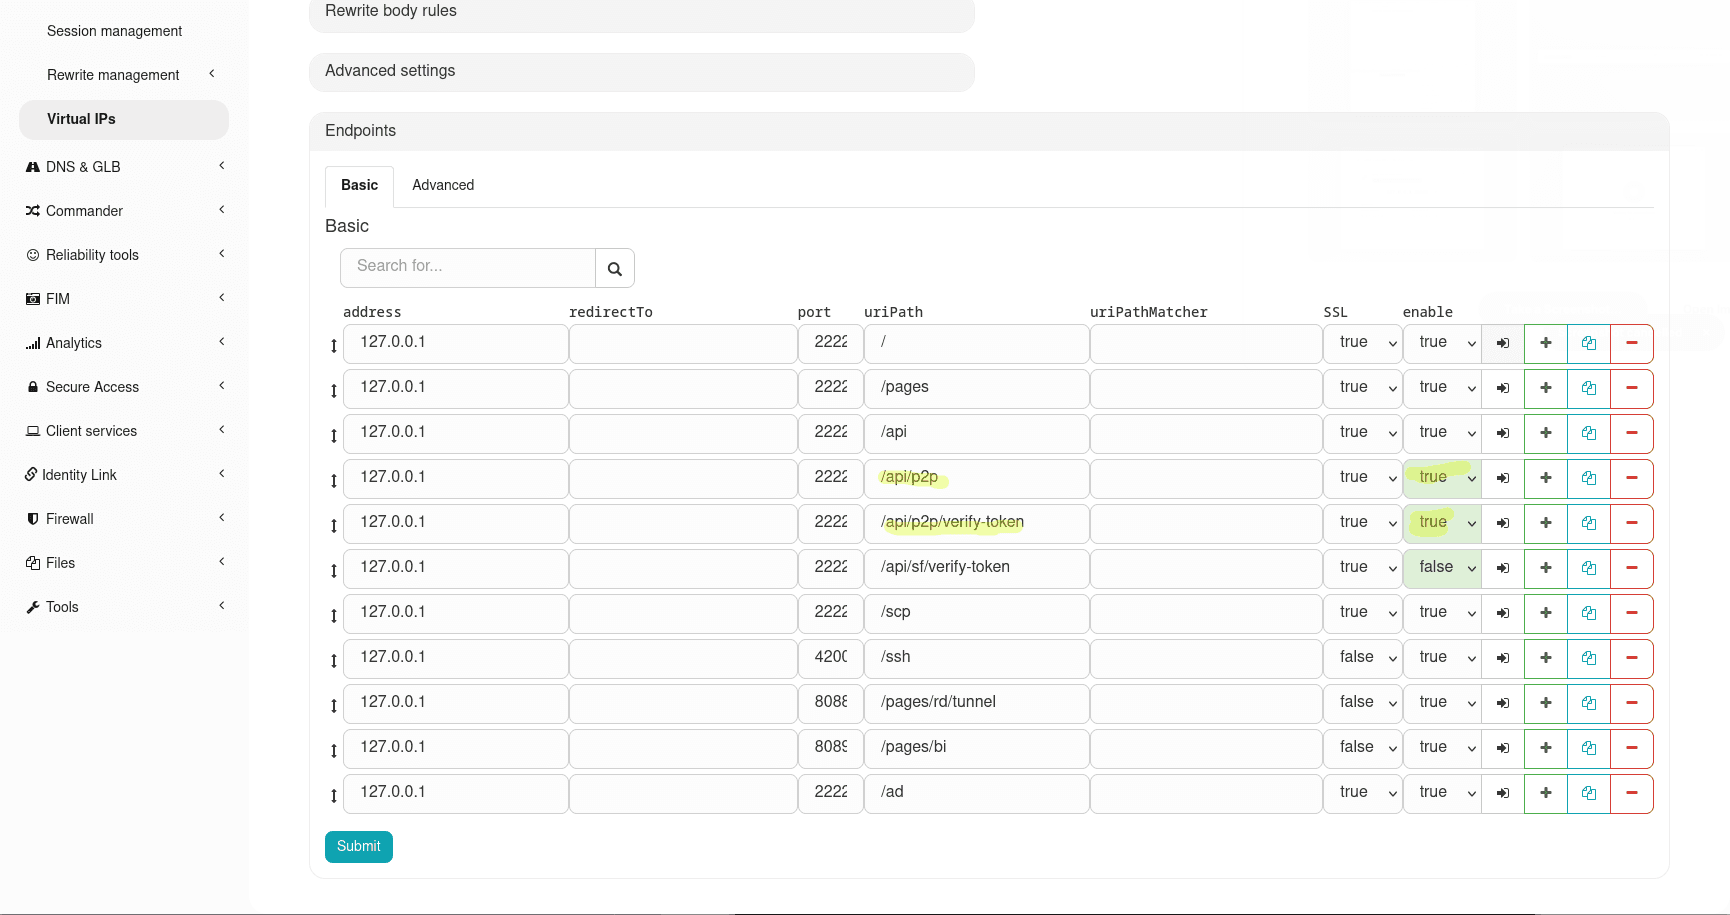
- It is also important to enable (if not already done) the two Secure Access grouping endpoints, named
/api/p2pand/api/p2p/verify-token
If the endpoints are not present (in case you are coming from an installation prior to 11.3.0), you need to create them by cloning the /api endpoint and customizing it with the required values.
| Address | Port | URI Path | RW Header Rules |
|---|---|---|---|
| 127.0.0.1 | 2222 | /api/p2p | LBLP2PConnector 2faGeneric;NOP |
| 127.0.0.1 | 2222 | /api/p2p/verify-token | LBLP2PConnector |
Make sure to provide a valid SSL/TLS certificate for the reverse‑proxied domain. A proper certificate avoids browser warnings and ensures secure connections between clients and the ADC.
User Group assignment
As previously mentioned, it will be the association of a specific User Group with a specific resource that will give a user the right to access it actually. Assigning a User Group to a resource (Host/RDP APP/Webapp-link) comes with a series of privileges/security policies, specific to the type of resource assigned, this paragraph lists them all. To assign a User Group within a resource, we can click on the green (+) button and select the new User Group from those already present from the drop-down menu.
By assigning a Resource via the User Group, we are able to:
- Enable/Disable SSH access
- Enable/Disable RDP access
- Enable/Disable VNC access
- Enable/Disable the File Manager, and if enabled:
- Enable/Disable Upload
- Enable/Disable Download
- Enable/Disable Hypercopy
- Enable/Disable copying (user)
- Enable/Disable paste (user)
- Enable/Disable Impersonification
- Enable/Disable Remote Desktop logging
- Enable/Disable SSH logging
- Enable the virtual printer
- Enable audio output
- Enable incoming audio

If at least one OS Login/AD Login is not defined on a resource assigned to a User Group, users in that group will be able to authenticate with any credentials at the prompt.
Assigning a User Group with Impersonification
Impersonification allows mapping the user’s digital identity (coming from MFA and/or Active Directory) to a specific OS Login/AD Login (e.g. domain or local user) for accessing resources.
Impersonification can come from different sources:
- MFA: defined in the MFA Manager and to summarize it can be:
- Global: a single impersonification valid everywhere (e.g.
ImpersonificationGlobal). - Per Group: specific for group membership (syntax
Group::Impersonification).
- Global: a single impersonification valid everywhere (e.g.
- Active Directory: derived from AD integration (
ImpersonificationAD).
Priority Rules:
- There can be multiple impersonifications linked to groups (from MFA), but only one for each specific group. (This takes priority over the global one)
- There can be only one AD impersonification. (This takes priority over the global one)
- There can be only one global impersonification (from MFA).
Access Logic (Strict vs Non-Strict)
Access control varies based on how the User Group is configured on the resource:
-
Non-Strict Mode (No
OS Login/AD Loginspecified in the group): Access is allowed. If an impersonification value is present (checking the group one ifGroup::Impersonificationexists, otherwise checking global or AD ifImpersonificationGlobal/ImpersonificationADexists), it will be proposed as the username for the session. -
Strict Mode (At least one
OS Login/AD Loginspecified in the group): Access is allowed only if the user’s impersonification value (checking the group one ifGroup::Impersonificationexists, otherwise checking global or AD ifImpersonificationGlobal/ImpersonificationADexists) corresponds exactly to one of theOS Loginlisted in the group configuration.
User Group assignment summary table
| OS/AD Login Names | Access Behavior |
|---|---|
| ❌ | Free: The user enters any credentials at the prompt. |
| ✅ | Bound: The user selects one of the defined users (password managed by the Vault). |
User Group assignment summary table with impersonification set to true
| OS/AD Login Names | Group::Impersonification | Global/AD Impersonification | Access Behavior |
|---|---|---|---|
| ❌ (Non-Strict) | ❌ | ✅ | Impersonated: The user enters automatically with the Global/AD identity. |
| ❌ (Non-Strict) | ✅ | ➖ | Impersonated (Group): The user enters with the Group identity (which has priority over Global). |
| ✅ (Strict) | ❌ | ✅ | Verified: Access allowed only if the Global/AD identity is present in the OS/AD Login list. |
| ✅ (Strict) | ✅ | ➖ | Verified (Group): Access allowed only if the Group identity is present in the OS/AD Login list. |
OS Login/AD Login assignment to a User Group
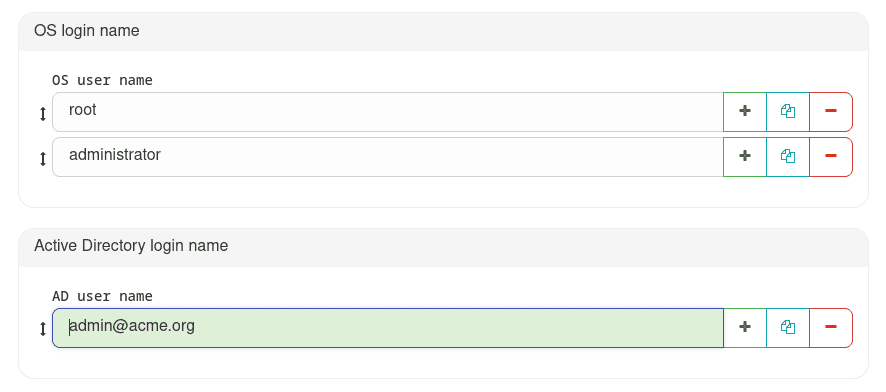
Once a User Group has been assigned within a Host, we can assign it predefined users who must exist within the host itself (OS Login) or within an Active Directory domain (AD Login).
Both, once populated, will contribute to the creation of the Secure Access Vaults, respectively we will have an:
- OS Login Vault for local machine users
- AD Login Vault for domain users For this part, refer to the following sections and the vault configuration page.
Here we can insert as many users as those with whom we want to allow access for that specific User Group.
Inserting even a single user disables the possibility for the User Group to access with any credential, forcing subsequent accesses with only the indicated credentials.
By inserting even just a single username, users belonging to that User Group will be forced to enter only with that username and to enter the corresponding passwords each time.
If you also want to enter a password, so that the user does not have to remember, know or enter it every time, refer to the following paragraphs.
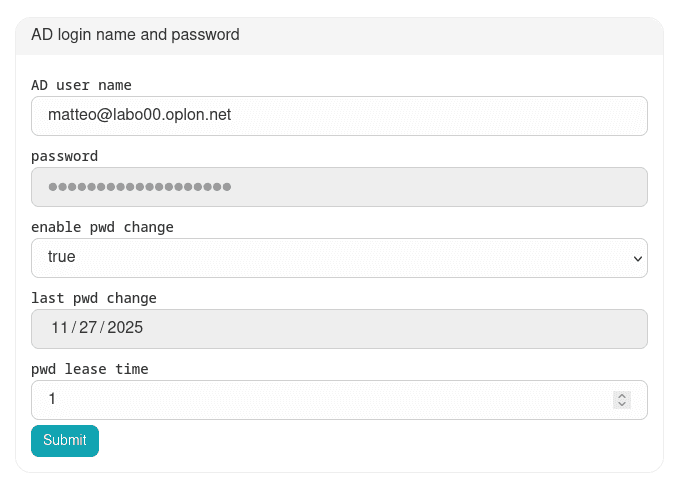
Password Entry for an OS Login (Host Vault)
To assign the password to an OS Login (assigned to a User Group) of a Host, you must go to the Host Vault section via the menu: PAM Management > Vault Manager > Host Vault
Search for the corresponding resource from the search bar and click the green key button
to edit the OS Login Names.
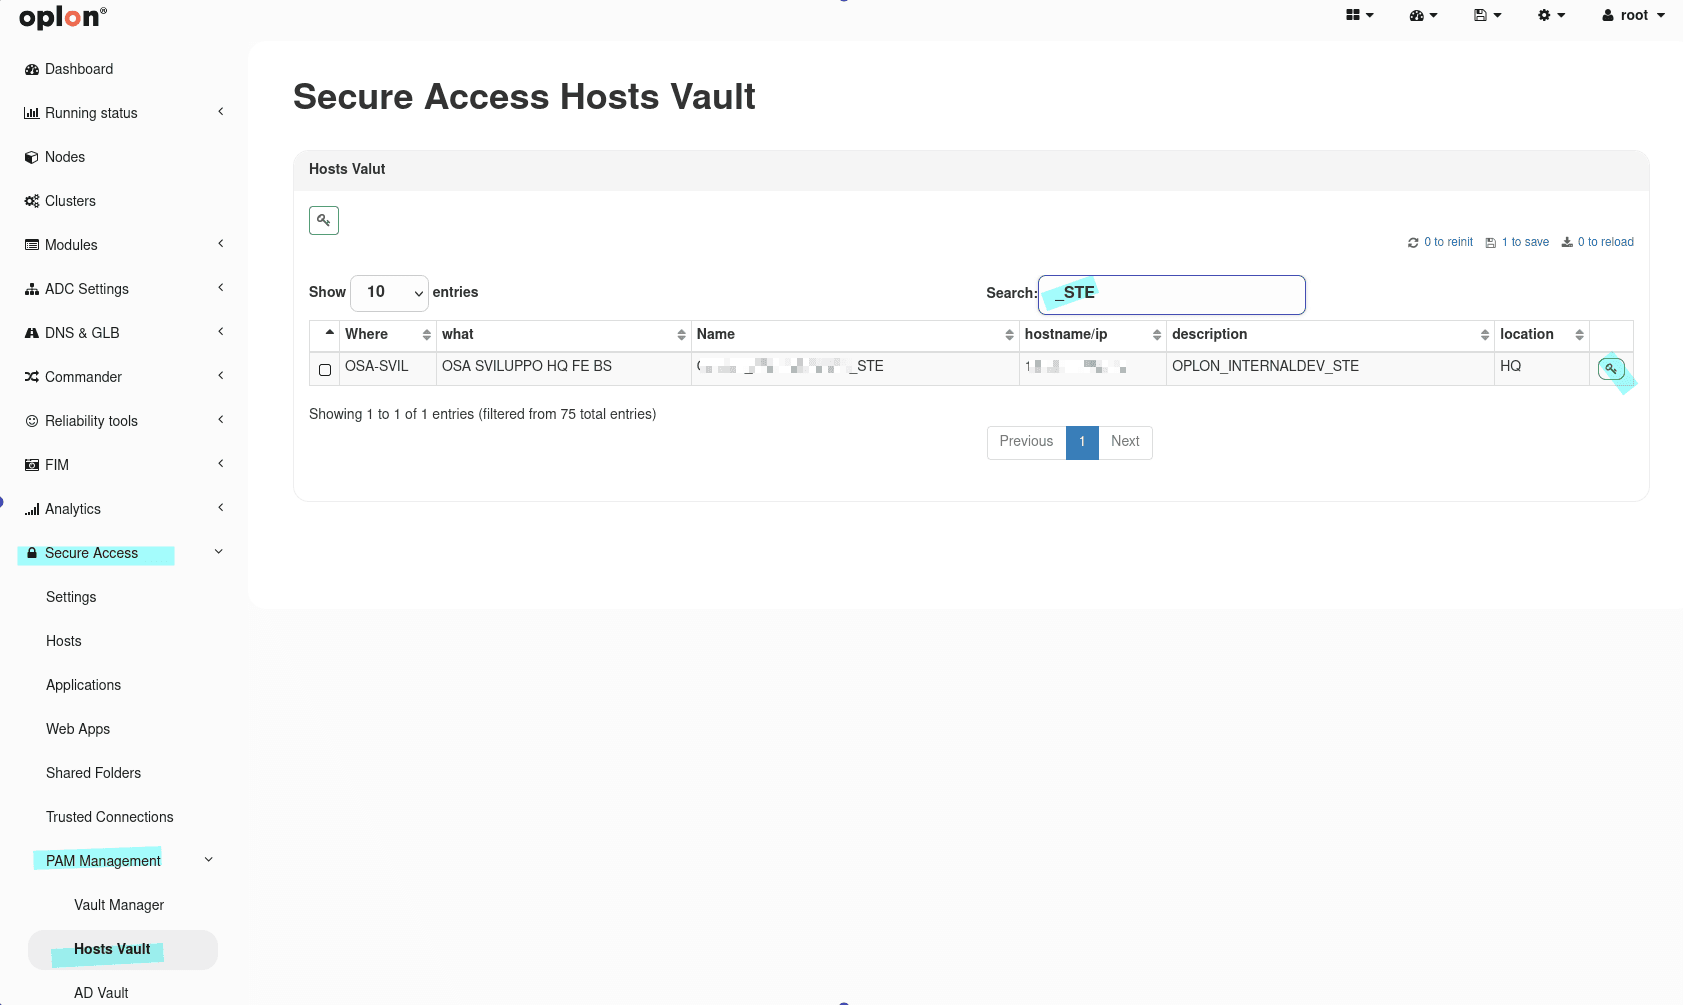
From here, select the users for whom you want to enter passwords from the drop-down menu and enter the
corresponding passwords
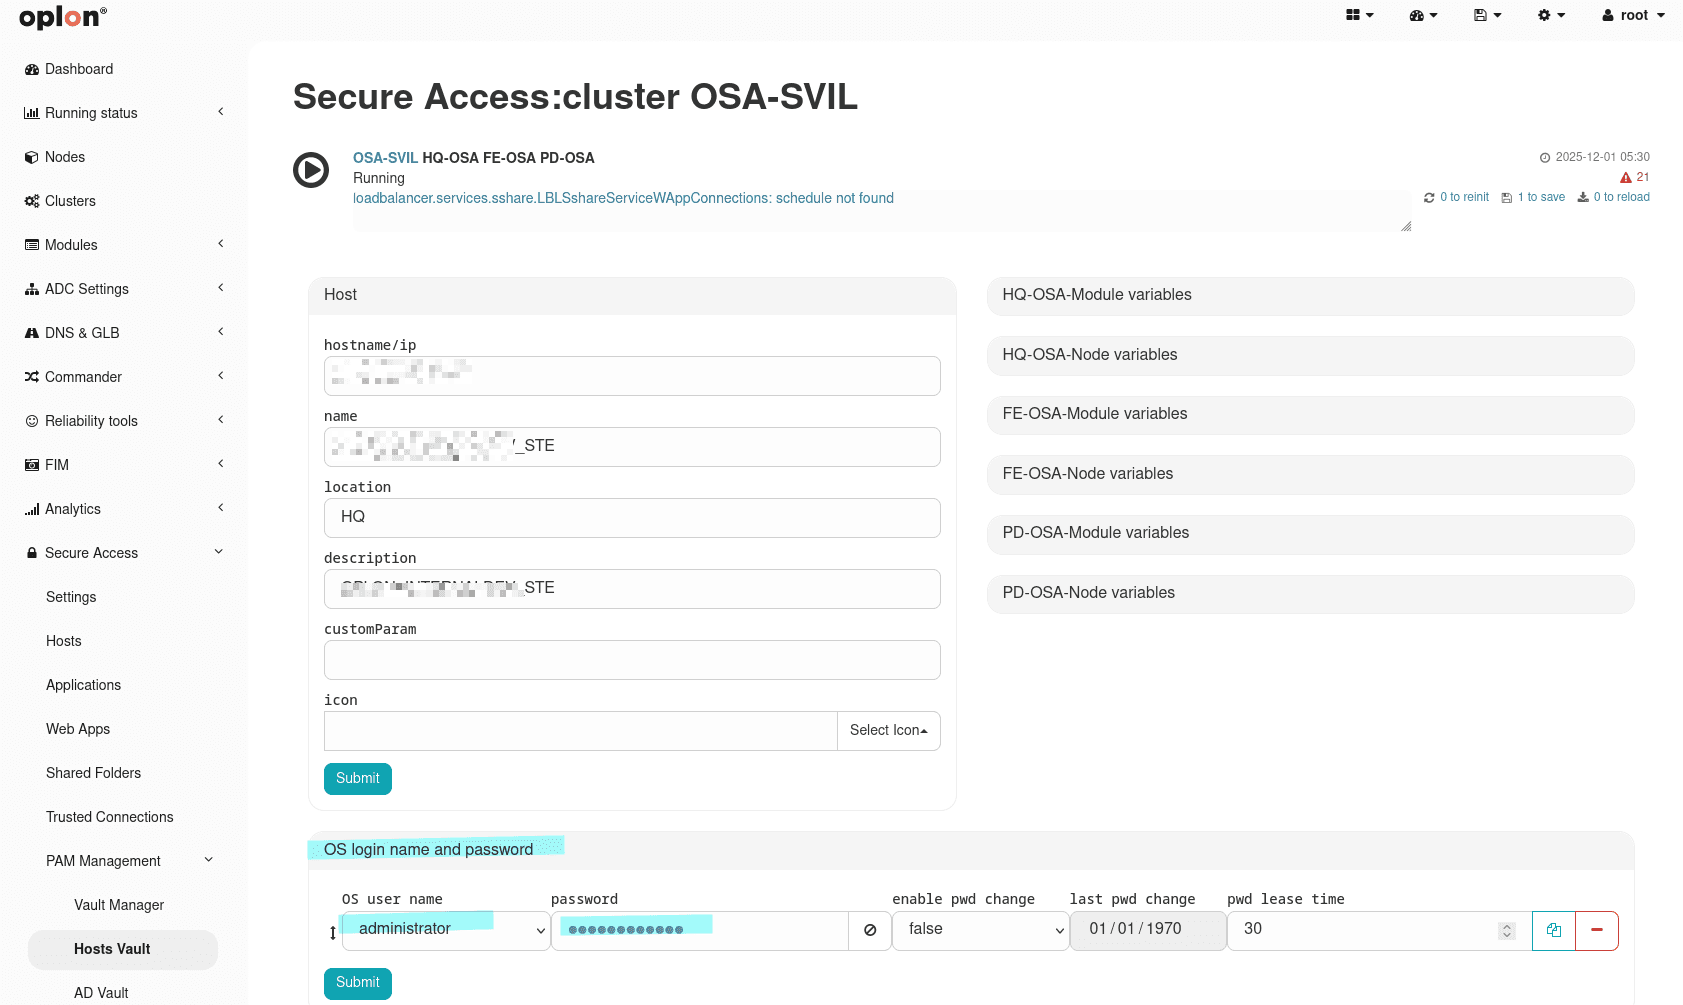
Remember to always perform Save and Re‑Init.
Password Entry for an AD Login (AD Vault)
To assign the password to an AD Login (assigned to a User Group) of a Host, you must go to the AD Vault section via the menu: PAM Management > Vault Manager > AD Vault
Search for the corresponding AD username from the search bar and click the green key button
to edit the AD Login Names.
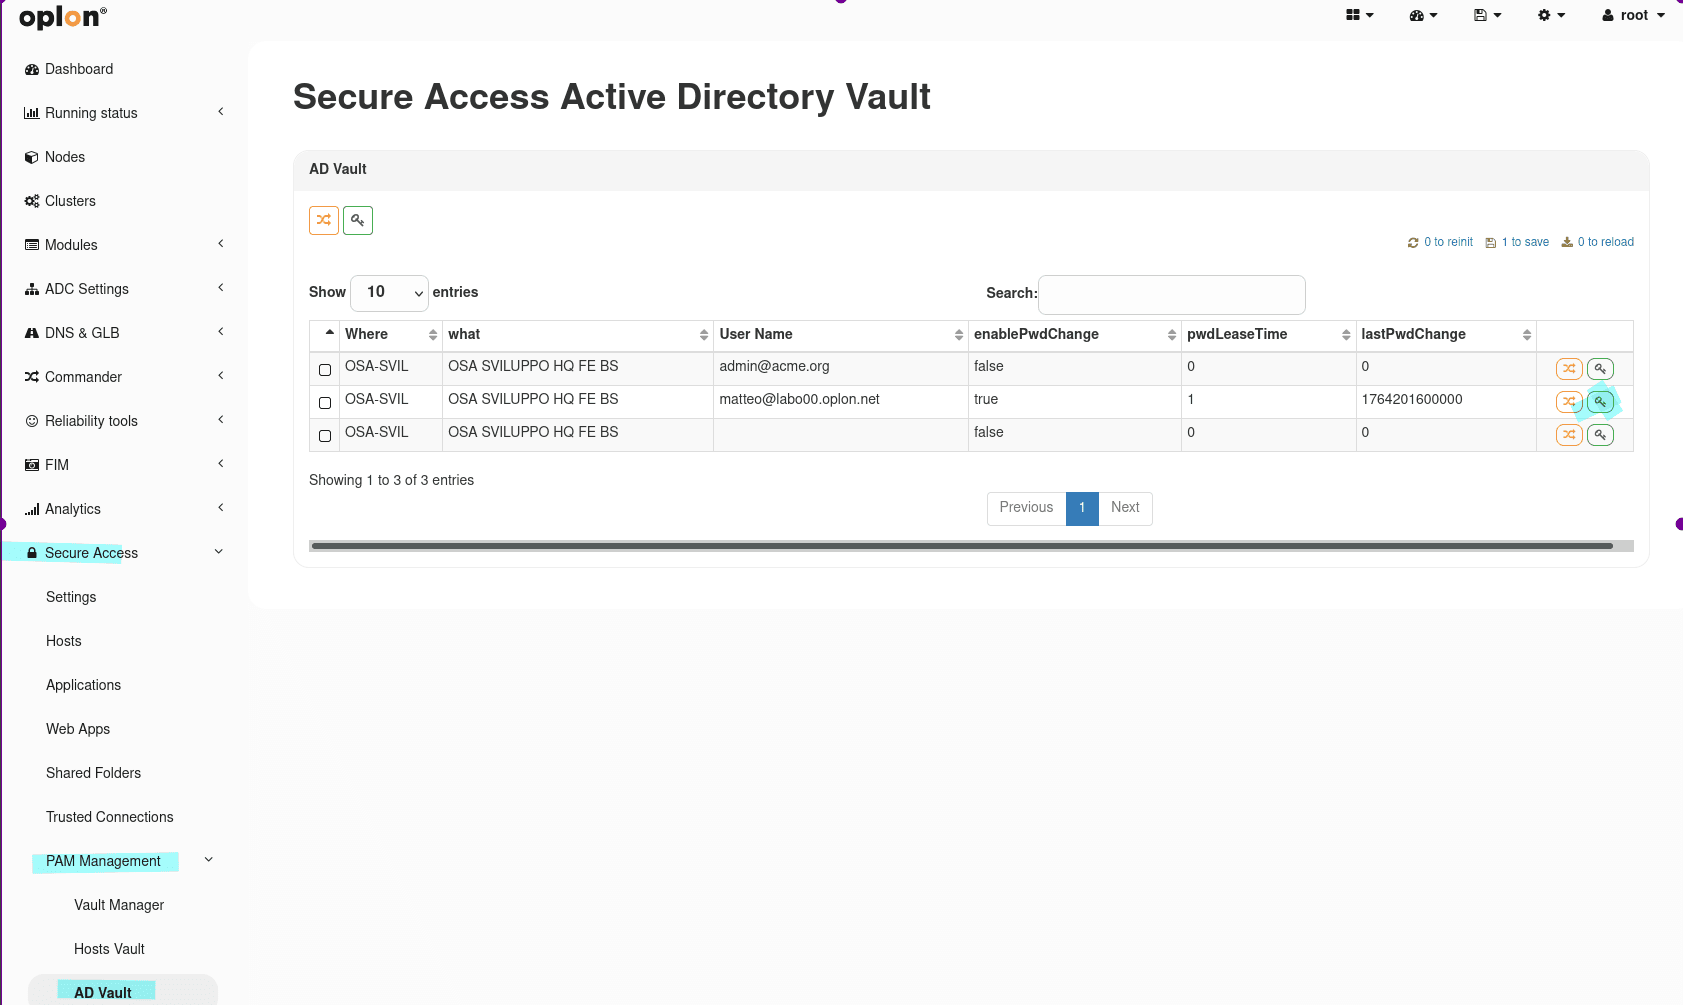
From here it is possible to enter the corresponding password:
Remember to always perform Save and Re‑Init.
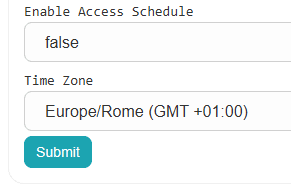
Access Schedule
This feature allows you to control when a machine can be accessed or used. The settings are defined in each User Group assigned to the resource.
The parameters of the User Group are:
- Enable access schedule: indicates whether to enable the time restriction;
- Time zone: indicates the time zone to which the time restriction applies.
In the User Group details, there is a panel called Access Schedule that defines the access rules.

Configuration parameters
| Parameter | Type | Description |
|---|---|---|
enable | boolean | Indicates whether the time restriction is active. If false, access is always allowed |
daily | boolean | If true, the check is daily; if false, a continuous absolute interval between two time instants is applied |
fromDate | string (YYYY-MM-DD) | Start date |
toDate | string (YYYY-MM-DD) | End date |
fromTime | string (HH-MM) | Start time |
toTime | string (HH-MM) | End time |
Access logic
-
enable = false: no restrictions, access is always allowed (the other parameters do not affect the result). -
enable = trueanddaily = false: Absolute scheduling. Access is allowed only within a continuous interval between:fromDate + fromTimeandtoDate + toTime. Example:Parameter Value fromDate2025-10-01 fromTime08:00 toDate2025-10-05 toTime19:00 Access is valid only from 01/10 at 08:00 to 05/10 at 19:00.
-
enable = trueanddaily = true: Daily recurring schedule. The window is valid only if:- The current date falls between
fromDateandtoDate - The time falls within the window defined by
fromTimeandtoTime
Condition Example Access logic fromTime < toTime08:00 – 17:00 Access only between 08:00 and 17:00 on the same day fromTime > toTime22:00 – 06:00 Access after 22:00 or before 06:00 (crosses midnight) - The current date falls between
Summary table
| Enable | Daily | Interval type | Evaluation logic | Access allowed |
|---|---|---|---|---|
| false | any | None | No restrictions | Always |
| true | false | Absolute window | Continuous control | now ∈ [fromDate+fromTime , toDate+toTime] |
| true | true | Daily window | Recurring control | today ∈ [fromDate , toDate] and now in range |
Trusted Connections parameters
In the Trusted Connection listener, you can set the protocol parameter to trusted-connection, thus getting a client timeout of 12 hours (the default is 7 and a half minutes). If the connection remains inactive beyond this limit, it is automatically closed.
In the L4.conf configuration file contained in the conf folder of the ADC module (platform, standardHA or enterprise), you can specify additional rules.
- TRUST_CONN_TRACE=val: val can be
trueorfalse. Enables/disables verbose logs for debugging; - TRUST_CONN_LEASE_TIME_CUT_CONN=n: n is a value in milliseconds representing the connection timeout (if set, the minimum between the listener’s protocol value and this value is taken);
- TRUST_CONN_INTERVAL_TO_TOUCH=n: n is a value in milliseconds representing how often to perform traffic verification to reset the connection timeout.
Network Metrics
The metrics monitoring feature allows you to analyze client network performance in real time and store historical data. The data collected is displayed via an interactive graph in the client interface and sent to the backend for storage and historical analysis.
This feature is designed to:
- Monitor the quality of client–server communication
- Identify latency anomalies and network instability
- Support troubleshooting and performance analysis activities
The metrics are calculated directly by the client and represent the actual network conditions perceived by the user.
Displaying metrics
A time graph is available in the client interface, located in the settings menu under Network Metrics.
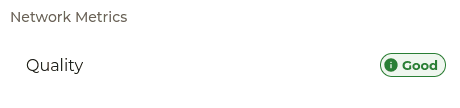
A preview of the client’s connection quality is displayed in real time:
- good
- mediocre
- poor
Clicking on the colored chip opens the interactive graph showing real-time metrics for the last 5 minutes or so.
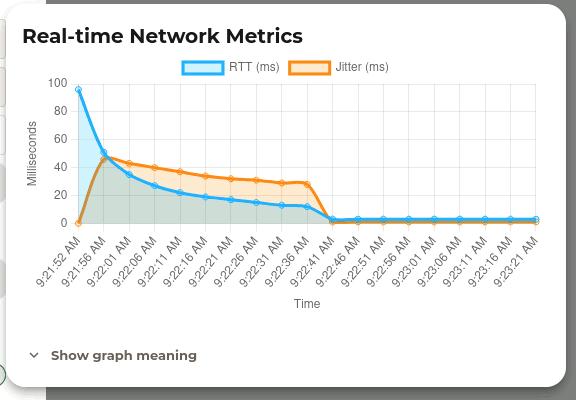
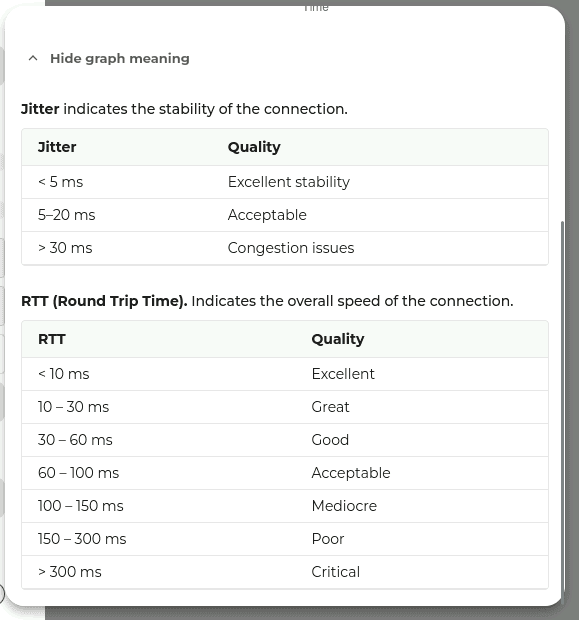
The data shown in the graph are:
- TTR: measures network latency;
- Jitter: measure how stable this latency is over time (connection stability).
Clicking on Show graph meaning opens a section describing the data with the relevant reference values.
In the Oplon Secure Access administration interface at: https://<your-ip>:4444
you can find the metrics for all clients by going to: Running Status > Reports, selecting the DB to which the data was sent and then clicking on User Network Metrics.
Kerberos Auth
Oplon Secure Access can authenticate against resources using Kerberos, delegating the authentication to a Kerberos server (e.g. a Windows Domain Controller/KDC) instead of relying on the credentials entered by the user.
To enable it, go to Secure Access > Settings and scroll down to the Kerberos Config section, at the bottom right of the page.
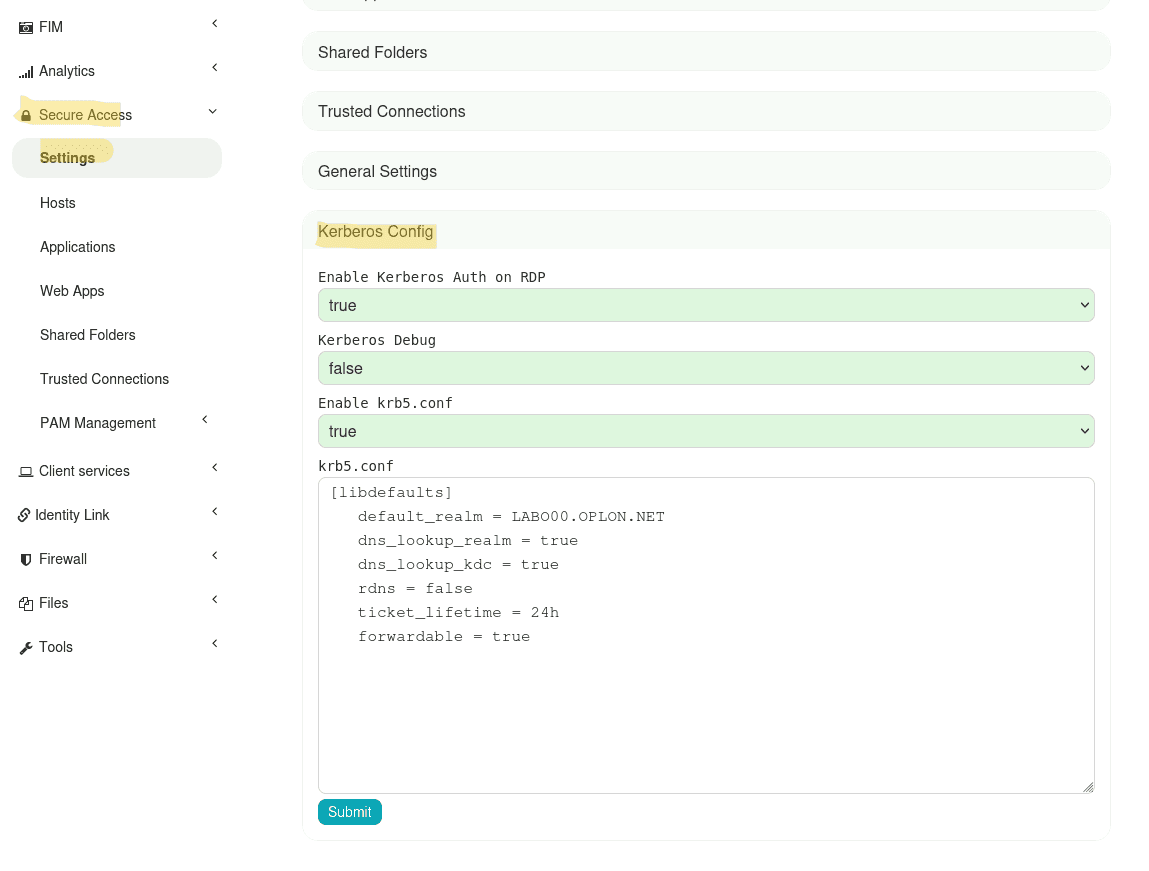
Here you can find the following parameters:
- Kerberos Debug: enables verbose debug logging on the ADC for Kerberos authentication. It is useful to troubleshoot configuration problems and should be enabled only while investigating an issue.
- enable krb5.conf: tells the ADC to take into account the configured Kerberos authentication server. Set it to
trueand fill in thekrb5.conffield below with the correct configuration. - krb5.conf: the actual Kerberos client configuration, following the same syntax used on Unix/Linux systems. In most cases it is enough to change the
realmwith your own; for more advanced scenarios you can configure it exactly like akrb5.confon Linux.
Make sure the realm and KDC entries in krb5.conf match your Active Directory domain, otherwise Kerberos authentication will fail.
Enabling Kerberos Authentication on RDP
To use Kerberos authentication on RDP accesses, in addition to the configuration above you need to:
- Set enable kerberos auth on rdp to
truein the Kerberos Config section. - Configure a connection parameter on the
R00_DesktopBridgeservice: open its Linux OS Start Parameters and change the startup container fromdesktopgatetodesktopgate_k.
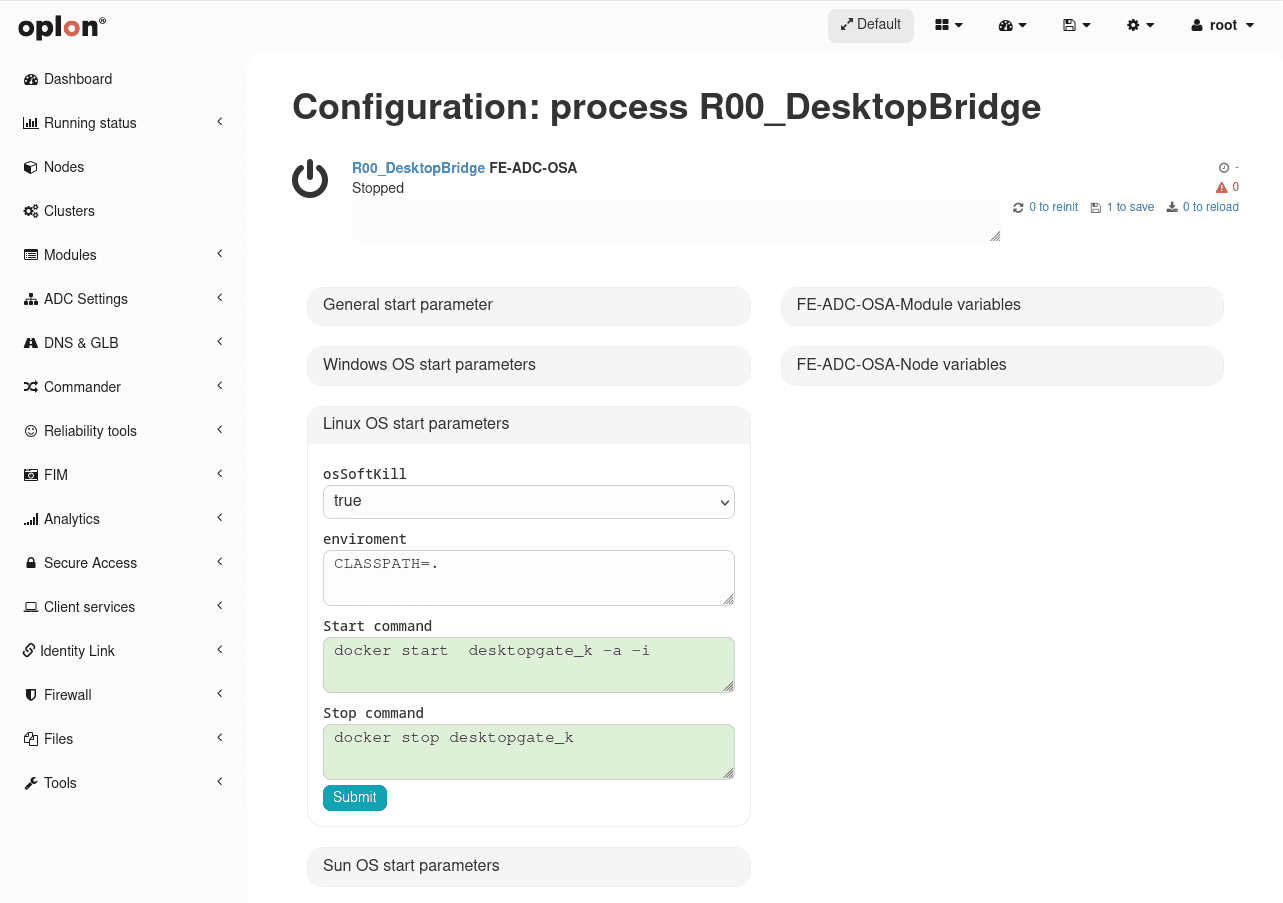
Remember to always carry out Save and Re-Init at the end.