EC2 setup
Introduction
This document describes the configuration settings Oplon Application Delivery Controller EC2 (Amazon AWS) environments.
The document aims to be a reference to make the most of elastic IP's capabilities in highly reliable geographical environments and to support the self-scaling of application components.
Prerequisites
Installing Oplon ADC modules in an EC2 environment is facilitated by the use of Amazon images available as Amazon Machine Images (AMI) templates.
The systems to be chosen may be either CentOS-derived and Ubuntu-derived.
Depending on the EC2 features you're going to use, Oplon ADC Virtual Appliances will need to have adequate permissions to successfully run management bees.
Oplon ADC will generally use the following APIs:
EC2 Elastic IP
ec2-assign-private-ip-addresses\
ec2-associate-address\
ec2-unassign-private-ip-addresses
EC2 Auto Scaling
ec2 describe-instances
EC2 Installation Diagram
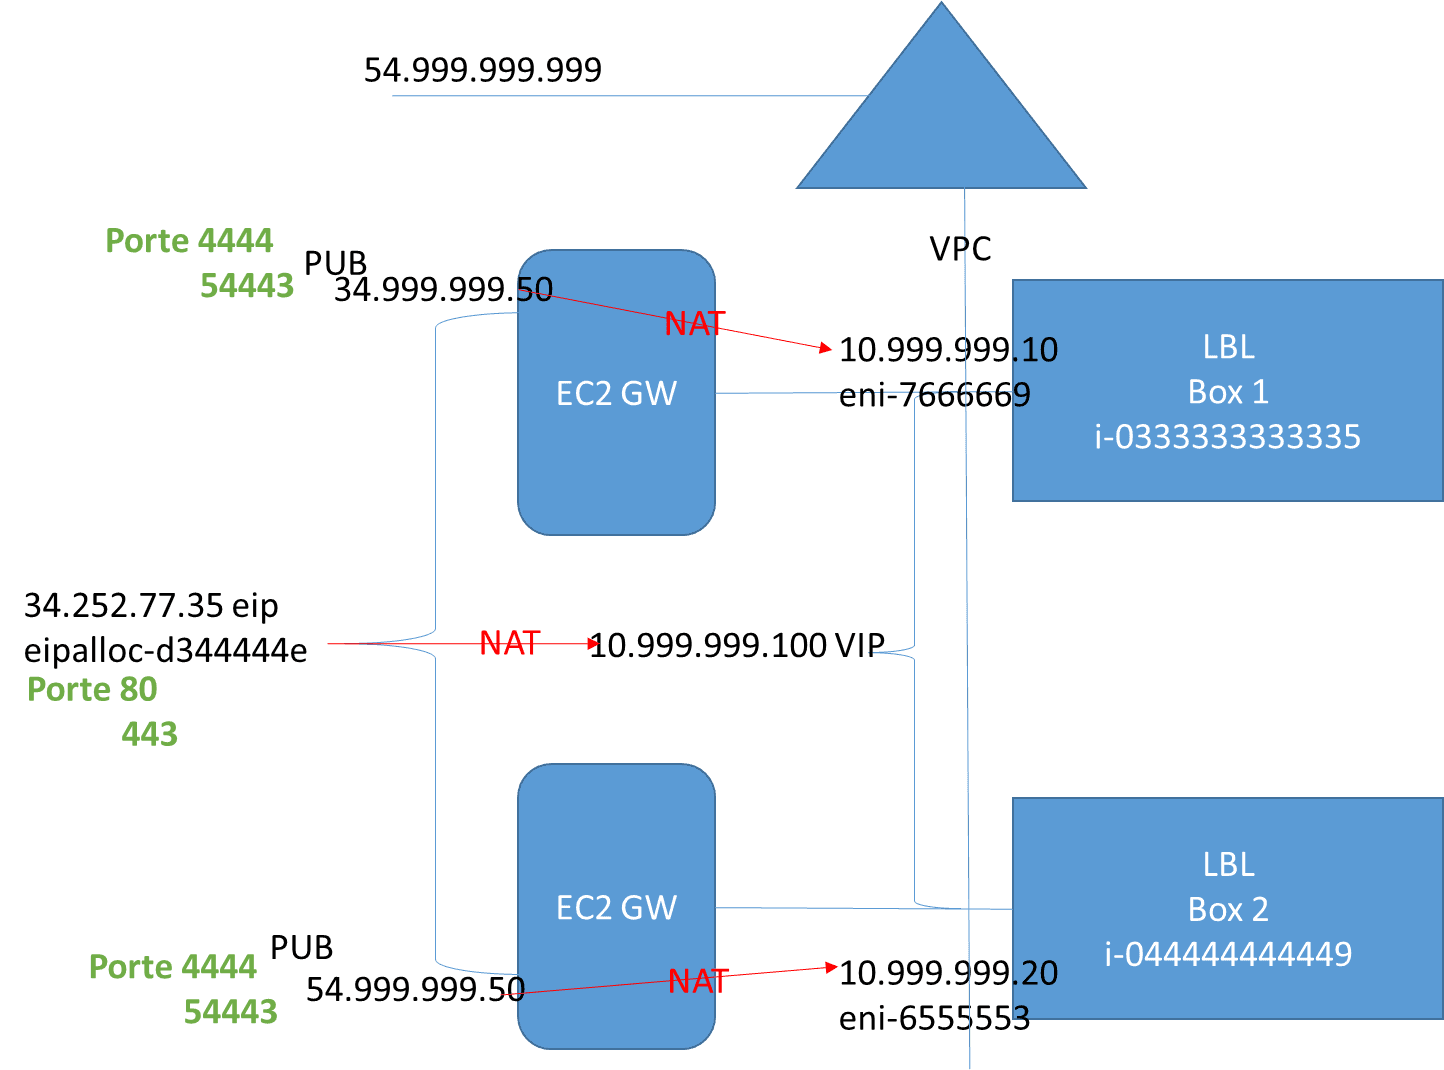
The installation schema is summarized below and includes two ADC OPLOs in this configuration with an IP Elastic address that will be managed by Oplon ADC. Before you begin the installation, make sure that you have all the elements and prepare a scheme similar to the one proposed with IP addresses and EC2 identifiers for cards and instances.
Oplon ADC installation and update
-
Join as root user in the virtual appliance in Amazon EC2
-
Verify that your system has Internet access in order to download
-
Navigate to the root directory
cd/
- Create the /share directory and change permissions
mkdir /share
chmod 777 /share- Upload packages taken from www.Oplon.net (opens in a new tab) to the /share directory of the virtual appliance:
Package list:
-- jdk-8u66-linux-x64.tar.gz
-- jce_policy-8.zip
-- LBLLoadBalancer_aai_009_00y_00x.zip
-- LBLLoadBalancer_datawarehouse_009_00y_00x.zip
-- LBLManagementConsole_aai_009_00y_00x.zip
-- LBLSetup_aai_009_00y_00x.zip
-- LBL_INSTALL_UPDATE_FROM_009001000_TO_00900y00x.sh- Navigate to /share and run from root (sudo --i):
sh LBL_INSTALL_UPDATE_FROM_009001000_TO_00900y00x.sh
-
The update system will prompt you to back up before proceeding with the upgrade if a pre-existing Oplon installation exists
-
If the file jce_policy-8.zip is present, the updater will ask you to confirm the JCE Unlimited Stength Jurisdiction installation
-
Attention: If you first install, you must respond with y (yes) when prompted to update the operating system to adjust the operating system provided by Amazon
-
After the installation or upgrade is finished, set or verify the management address and if the administrative and delegated logins and passwords are set. If preset, you will notice 3 asterisks in the password fields
-
After the upgrade is complete, exit the GUI (logout) and re-enter to regain full use of the start of the tools through the icons.
-
Make sure that the Oplon daemon has been included in the programs to be run at the start. If it had not been included in the programs to start the startup, the program /etc/init.d/S96LBLVirtualApplianceStarter has already been set up by the installation shell and then you just need to run
runlevel
N 3
cd /etc/rc3.d
It's in -s . /init.d/S96LBLVirtualApplianceStarter S96LBLVirtualApplianceStarter
reboot
Oplon ADC & EC2 Elastic IP
To enable Oplon ADC & EC2 Elastic IP from root features go to lblhome and in the legacy bin directory change the normal network operation with the EC2 Elastic IP management.
lblhome
pwd
/TCOProject/bin/LBL/LBL_HOME
legacybin/Linux/ cd
cp LBLNetwork.sh LBLNetwork.sh.org
cp LBLNetworkEC2.sh LBLNetwork.sh
It's LBLNetwork.sh you
... search and compile all the commands with the interfaces, network, and password names:
-- ec2-assign-private-ip-addresses
-- ec2-associate-address
-- ec2-unassign-private-ip-addresses
The commands you can also test them from the commando line to make sure that you have completed the configuration correctly.
To set and verify commands, you need the values that replace the red keywords listed below with the values previously taken from the schema
Environment Variables to Be Verified on User Ami Instance
JAVA_HOME/usr/lib/jvm/jre; export JAVA_HOME

EC2_AMITOOL_HOME/opt/aws/amitools/ec2; export EC2_AMITOOL_HOME

EC2_HOME/opt/aws/apitools/ec2; export EC2_HOME

PATH-\$PATH:/opt/aws/bin; export PATH

Region= region EC2

eni-99999999

XX_ADDRESS_XX-Elastic IP

XX_USER_KEY_XX - user key

XX_USER_PASSWORD_XX - user password

ec2-assign-private-ip-addresses --region eu-west-1 -n eni-99999999
--secondary-private-ip-address XX_ADDRESS_XX --allow-reassignment -O
XX_USER_KEY_XX -W XX_USER_PASSWORD_XX

ec2-associate-address --region eu-west-1 -n eni-99999999 -a
eipalloc-99999999 --private-ip-address XX_ADDRESS_XX -O XX_USER_KEY_XX
-W XX_USER_PASSWORD_XX

ec2-unassign-private-ip-addresses --region eu-west-1
--network-interface eni-99999999 --secondary-private-ip-address
XX_ADDRESS_XX -O XX_USER_KEY_XX -W XX_USER_PASSWORD_XX
Oplon ADC Internal Virtual IP and EC2 Elastic IP
To set the EC2 Elastic IP address, you must have an internal virtual address, not an eip, set by Oplon ADC, that can be reached by all nodes that make up the cluster, such as the heart-beat interface. You must then set up a virtual address that will actually serve as the management of the Amazon EC2 gateway, which will not have a corresponding local address in the two virtual appliances.
<virtualAddressesMgr>
        <virtualAddress enable="true"
                            description="virtual address heart-beat"
                            address="10.999.999.100"
                            netmask="255.255.255.0"
                            healthCheckPort="80"
                            healthCheckSSL="false"
                            healthCheckUriPath="/LBLHealthCheck">
                <virtualInterface device="eth2"
                                    deviceName="eth2"/>
	<publicNetworkHealthCheckPolicy>
                          <publicNetwork address="8.8.8.8"/>
                          <publicNetwork address="8.8.4.4"/>
	</publicNetworkHealthCheckPolicy>
	<backendNetworkHealthCheckPolicy>
                           <backendNetwork address="8.8.8.8"/>
                           <backendNetwork address="8.8.4.4"/>
</backendNetworkHealthCheckPolicy>
        </virtualAddress>

        <virtualAddress enable="true"
                            description="virtual address elastic"
                            address="192.168.43.114"
                            netmask="255.255.255.0"
                            healthCheckPort="80"
                            healthCheckSSL="false"
                            healthCheckUriPath="/LBLHealthCheck">
                <virtualInterface device=""
                                    deviceName=""/>
                <publicNetworkHealthCheckPolicy>
                </publicNetworkHealthCheckPolicy>
                <backendNetworkHealthCheckPolicy>
                </backendNetworkHealthCheckPolicy>
            </virtualAddress>
        </virtualAddressesMgr>
Oplon ADC setup endpoints
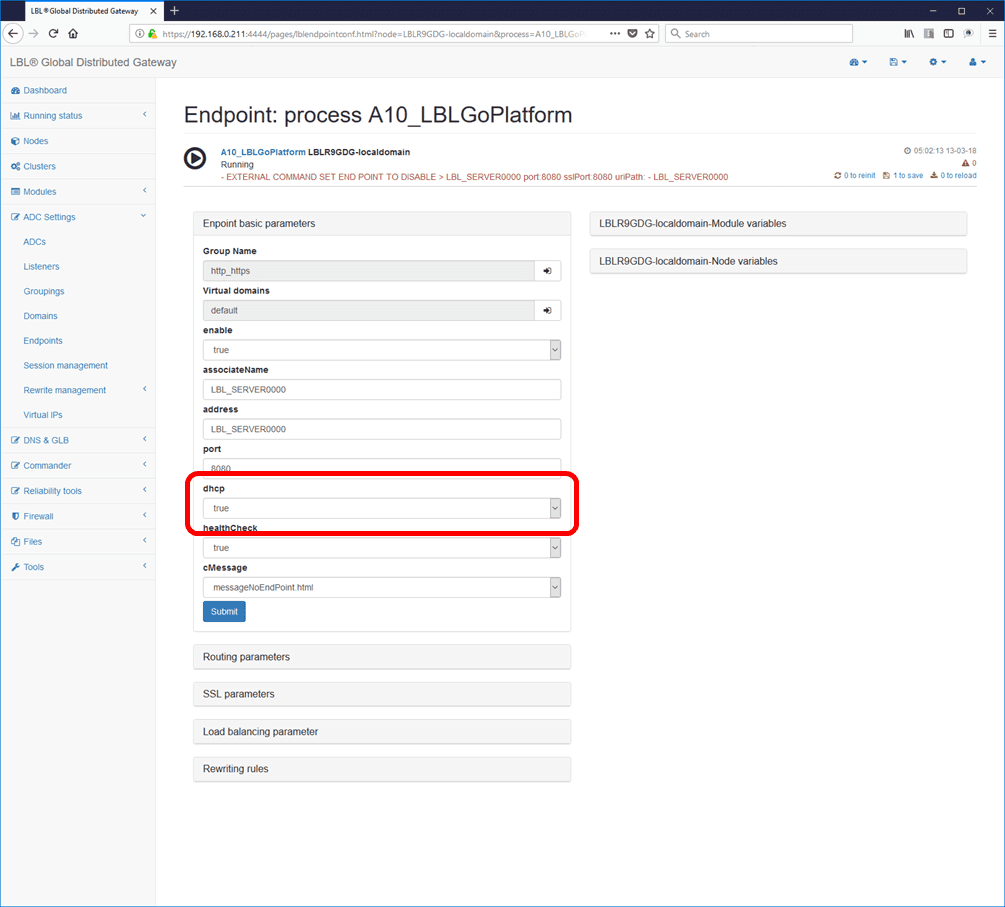
As endpoints you will have to create as many endpoints as you expect will be managed.
The peculiarity of the services to be managed is that the associative name and host name must have a prefix, as in the example LBL_SERVER and a station numbering. Es 0000 00001 etc.
These names will be used by the system to associate autoscaling addresses that will be gradually generated and destroyed.
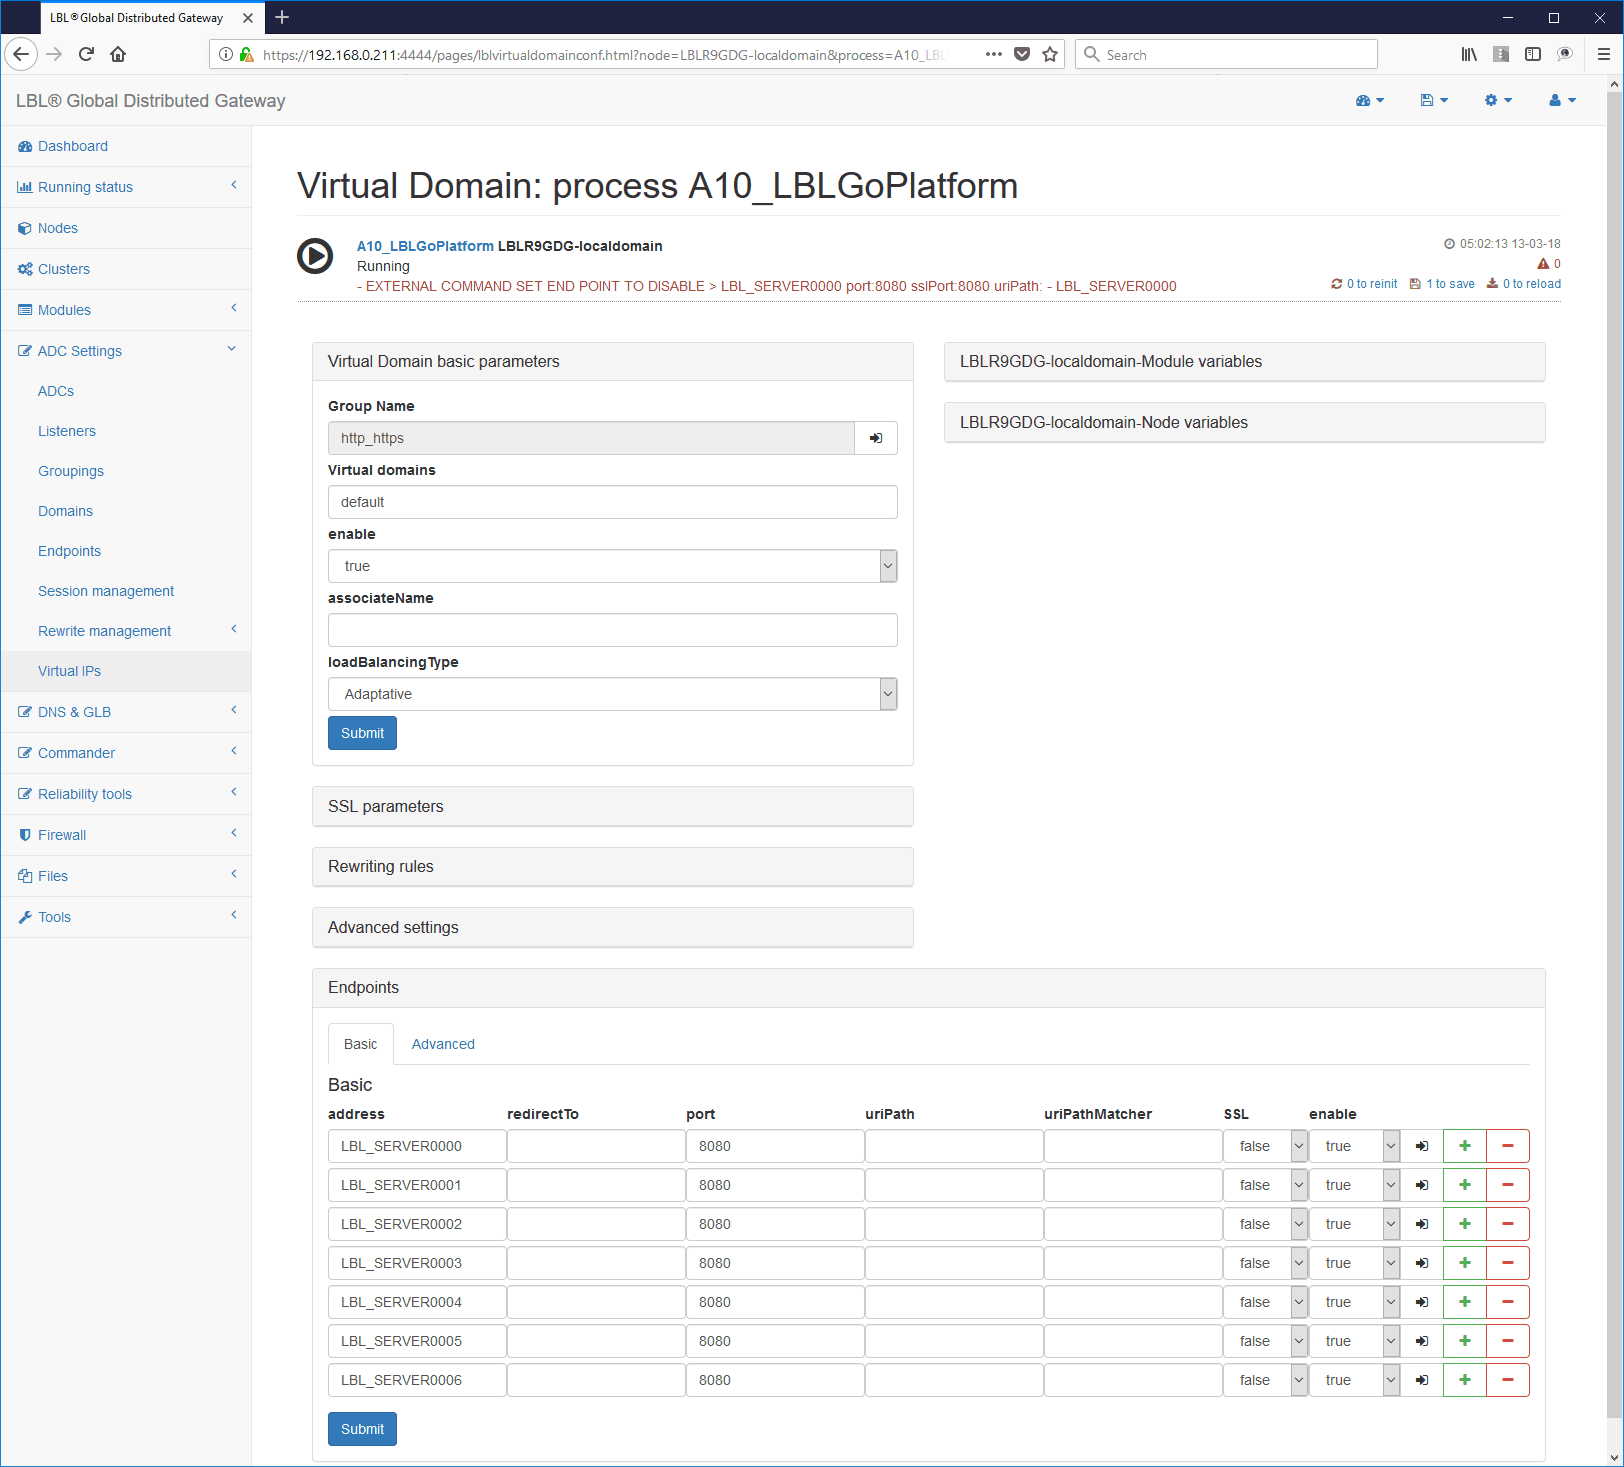
Another peculiarity is that all endpoints must have as the parameter "dhcp" set to true to indicate that there will be a variable address.
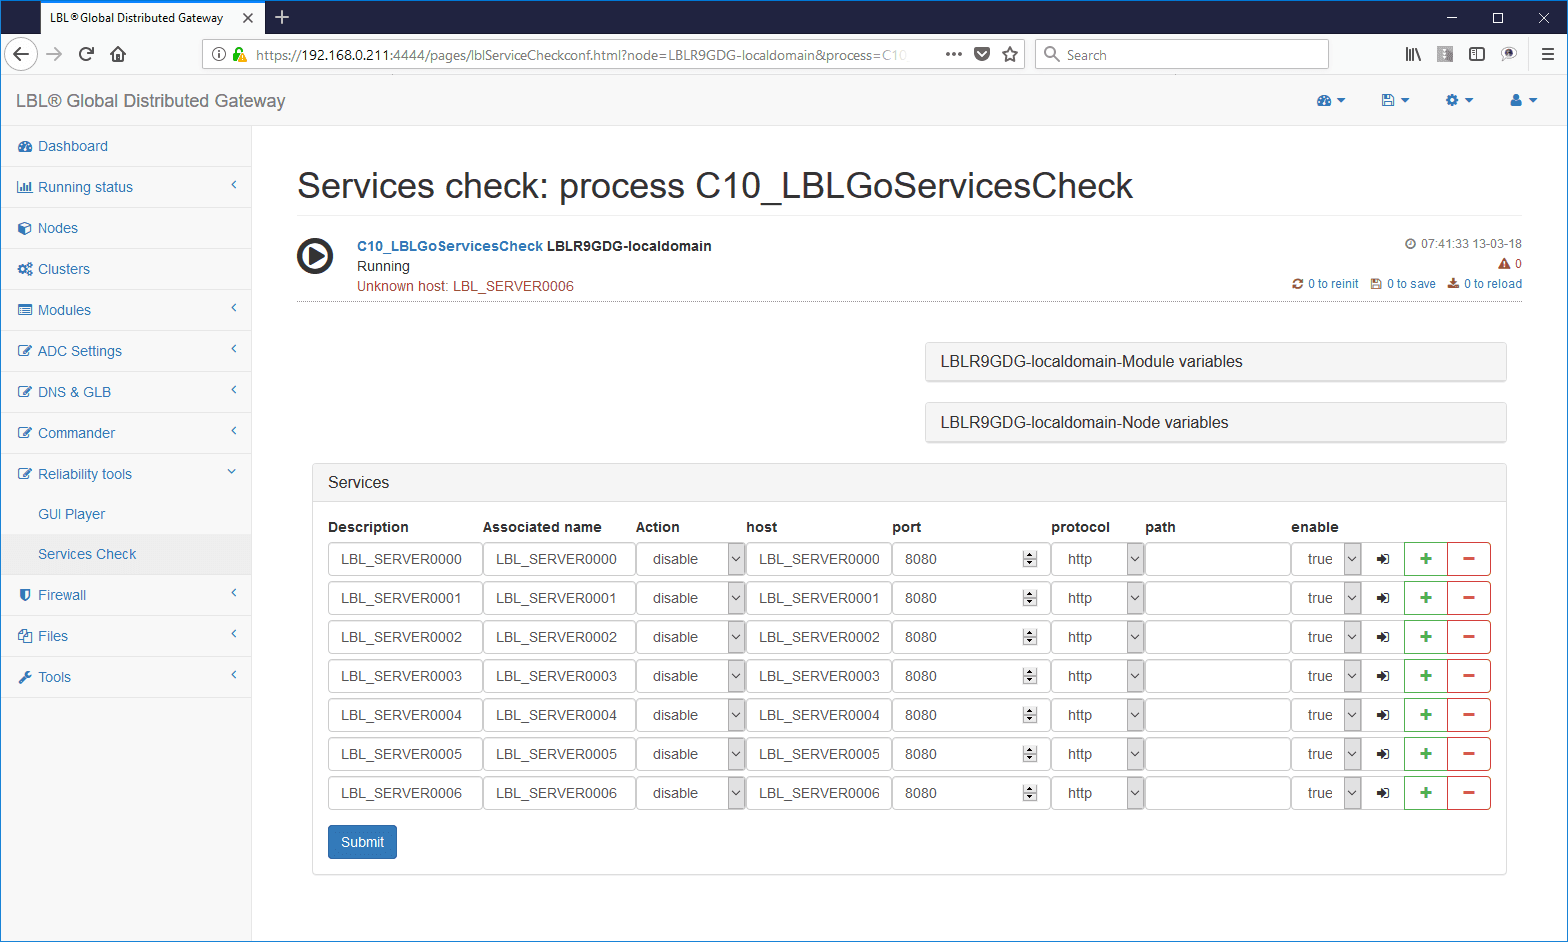
Oplon ADC setup services check
In services check set as many health checks as there are servers that you plan to get to manage.
The peculiarity of the services to be monitored is that the associative name and host name must have a prefix, as in the example LBL_SERVER and a station numbering. Es 0000 00001 etc.
These names will be used by the system to associate autoscaling addresses that will be gradually generated and destroyed.
When you have finished running the start module "Automatic"
Oplon ADC setup endpoints scaling
To enable autoscaling, you must arrange a shell that performs the request through EC2 bees that list the addresses of the currently available servers.
Es. /TCOProject/bin/addresslist.sh:
aws ec2 describe-instances --region eu-west-1 --instance-ids --(aws
autoscaling describe-auto-scaling-instances --region eu-west-1
--output text --query "AutoScalingInstances[?
AutoScalingGroupName.'prd-nginx-asg']. InstanceId") --query
"Reservations[-]. Instances[a]. "IP:PrivateIpAddress" --output text
Make the shell executable:
chmod 700 /TCOProject/bin/addresslist.sh

Once the shell test is finished through the GUI go into modules endpoints scaling and compile the following parameters:
OS cmd : TCOProject/bin/addresslist.sh
Prefix -LBL_SERVER
Num. Format : %04d (this value will result in LBL_SERVER0000 server
names)
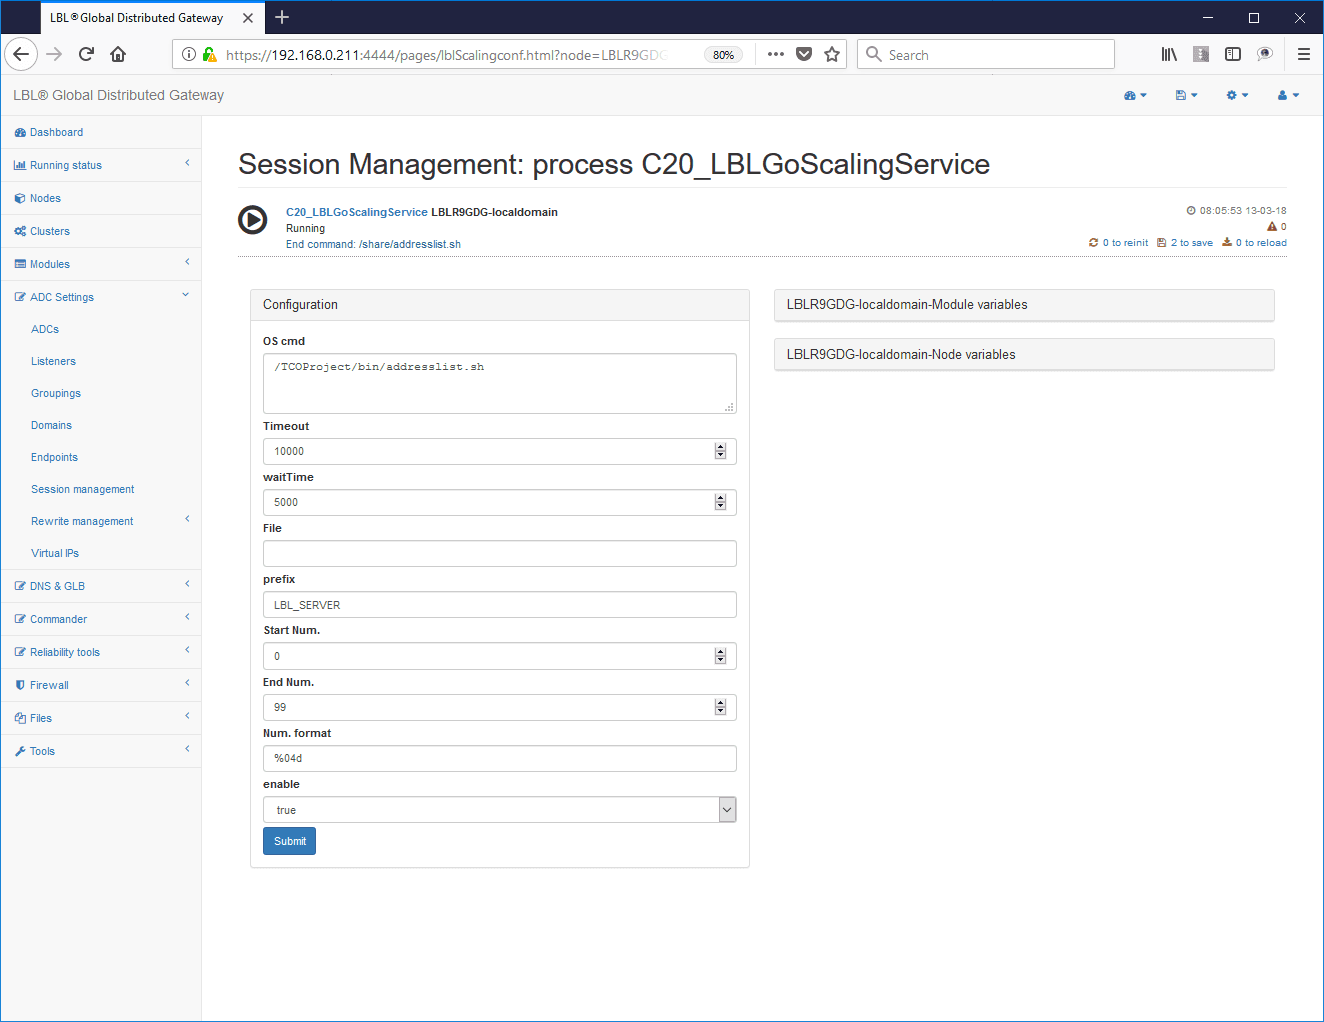
When you have finished running the start module "Automatic"