IPv4-IPv6 first step datacenter transition
Introduction
Internet Protocol version 6 is perhaps one of the most described protocols in computer history and this document aims to be a synthesis of the main features to familiarize itself with its specificities and begin to introduce this powerful tool.
IPv6, despite being born to solve the limitations of the IPv4 protocol, encounters considerable difficulties of adoption in the real world and this is due to the huge spread that the IPv4 protocol has had over the years.
We think it is time to start using this formidable tool which, for these very reasons, has had a time of refinement that not all technologies can afford.
In this first draft of this document we will not deliberately delve into the low-level features of the protocol, already widely covered on the Internet, but we will focus on some peculiarities of the protocol and especially in the way the technology is adopted in mission-critical and business-critical environments.
Why IPv6
The first question anyone has ever approached about IPv6 technology is:
Why IPv6?
Our answer is that the adoption of IPv6 Simplify.
Like all technologies, IPv6 must initially be understood to be appreciated. The approach to appreciating IPv6 is in understanding its use before in understanding its operation.
The extended introduction of IPv6, in a world thought and fully realized in IPv4, is definitely a slow introduction. The number of "client" applications and devices still not IPv6 compliant are many and sincerely as of the current date (July 19, 2012) I would not recommend to an ecommerce site to have as its only public IP an IPv6! In contrast, in a datacenter, with hundreds or even thousands of virtual machines, I think the choice to use IPv6 is a facilitator.
Goal
The problem we want to solve is the chronic IP addressing deficiency of our server farm that is growing at a dizzying rate thanks to the virtualization and the immense power that servers now provide us with.
We do not want to immediately transform our server farm completely into IPv6 but we want to familiarize themselves with the protocol first and then, once we understand the potential, extend its use.
We then identify a possible service to be provided in IPv6 and begin to make the first considerations and preliminary checks.
The goal is to be able to access via IPv4 and IPv6 by having a service pool at IPv6 as the backend. IPv4 and IPv6 addressing will be made available to clients through VIPs.
Evaluating the environment
The first assessment should be aimed at the environment on which we have made the choice to test the delivery of services in IPv6. I will not dwell on operating systems because now all those available today make available the possibility to use both IPv4 and IPv6. For our examples we will use MS Windows, Linux and Solaris at the same time.
Our project, mainly of services provided by a datacenter, plans to use some components such as web servers and application servers. The investigation should therefore tend to check whether the web servers or application servers used provide for or at least do not exclude the use of IPv6.
Server components such as application servers and web servers, which are kept up-to-date, typically use IPv4 and IPv6 protocols. If you don't find documentation to run the first few tests, you just have to try. In mission-critical or business-critical environments, we strongly recommend that you consult with the manufacturer.
All applications written with languages created for the network, such as Java, use socket usage classes with IPv4 or IPv6 addressing, e.g.:
java.lang.Object
extended by java.net.InetAddress
extended by java.net.Inet4Address
extended by java.net.Inet6Address
This is obviously not enough in the case of mission-critical or business-critical applications, but to carry out the first tests is enough.
128 address bits
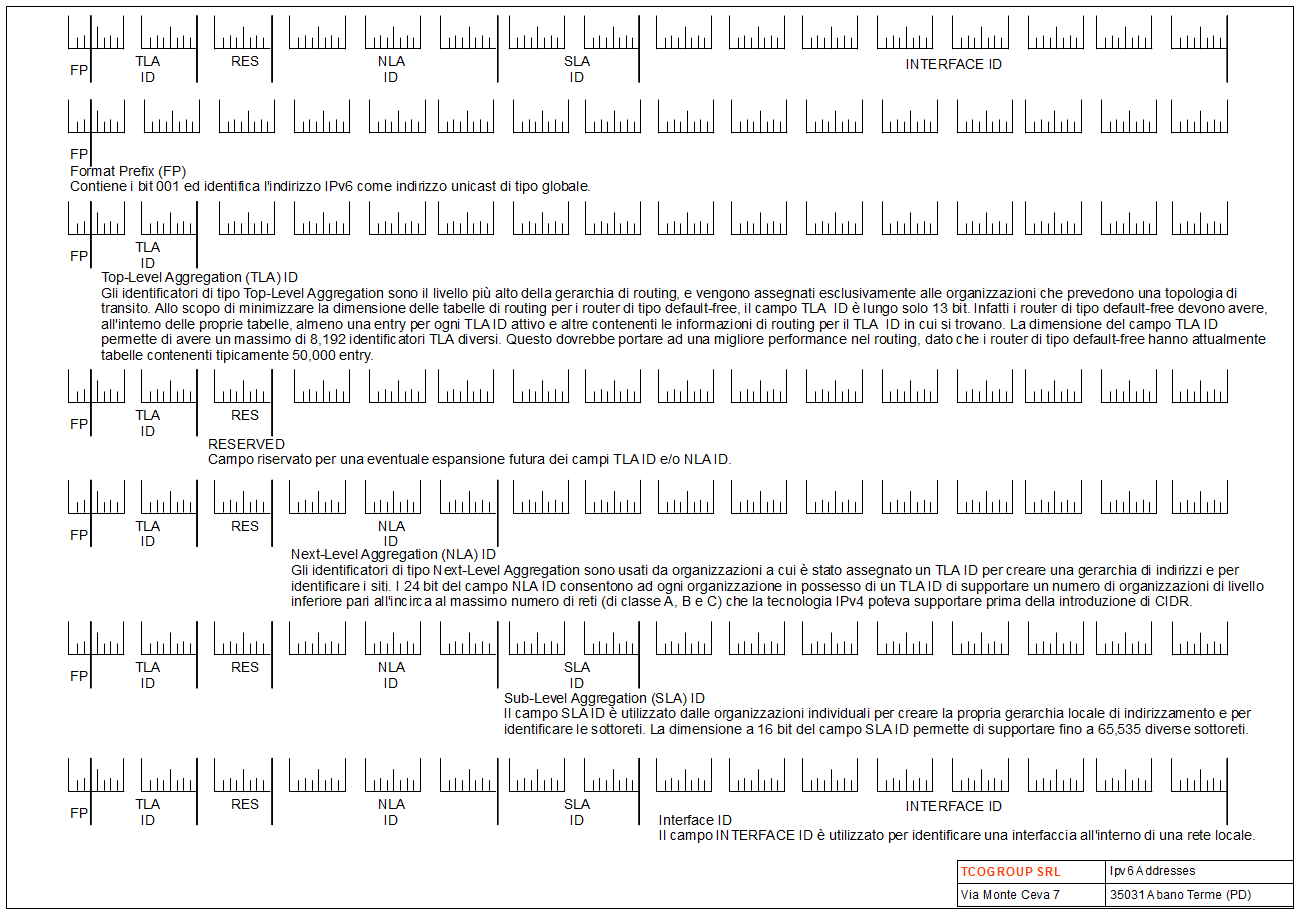
One of the first goals of this chapter is to understand how to use the 128 bits of IPv6. The 128 bits, expressed in 16-bit groups to facilitate hexadecimal computation, were designed to be talking addresses and below a first representation of their global subdivision (Aggregate Table Global).
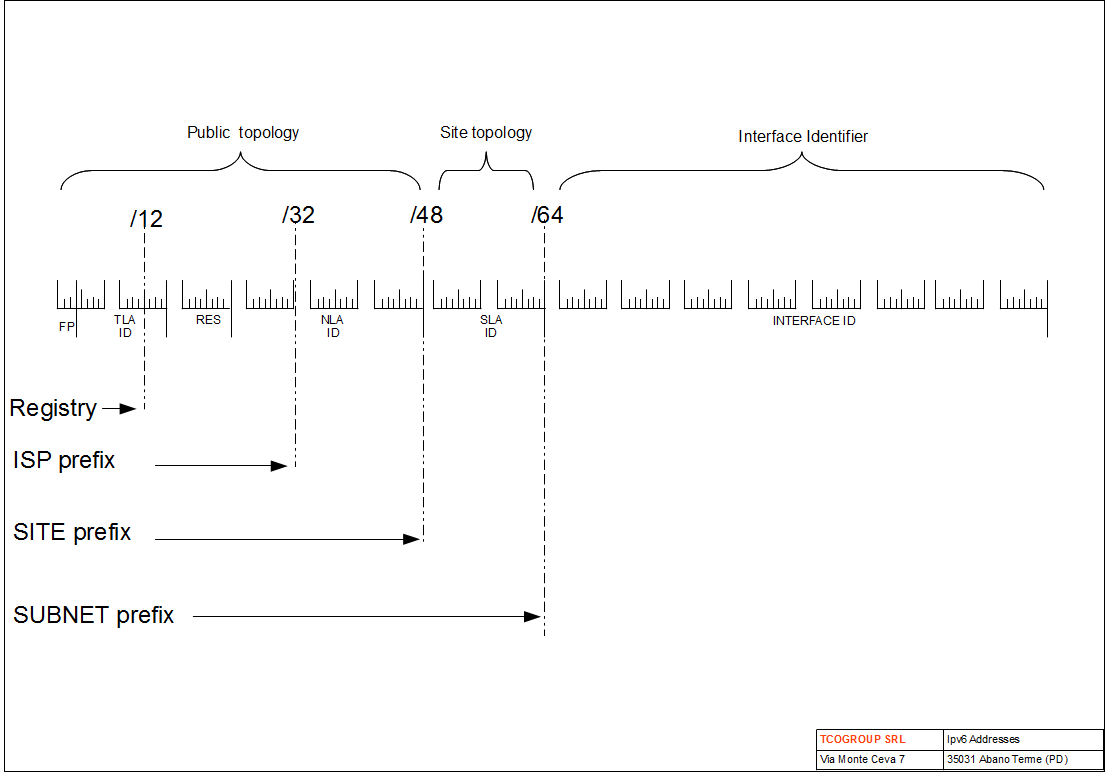
This is the representation that is used to assign "talking" identifiers and divide the address into logical parts to 128 bits. It is important to store it for collections because, as we will see later, this logical subdivision can be used, in whole or in part, also for addressings within the datacenter giving order and readability.
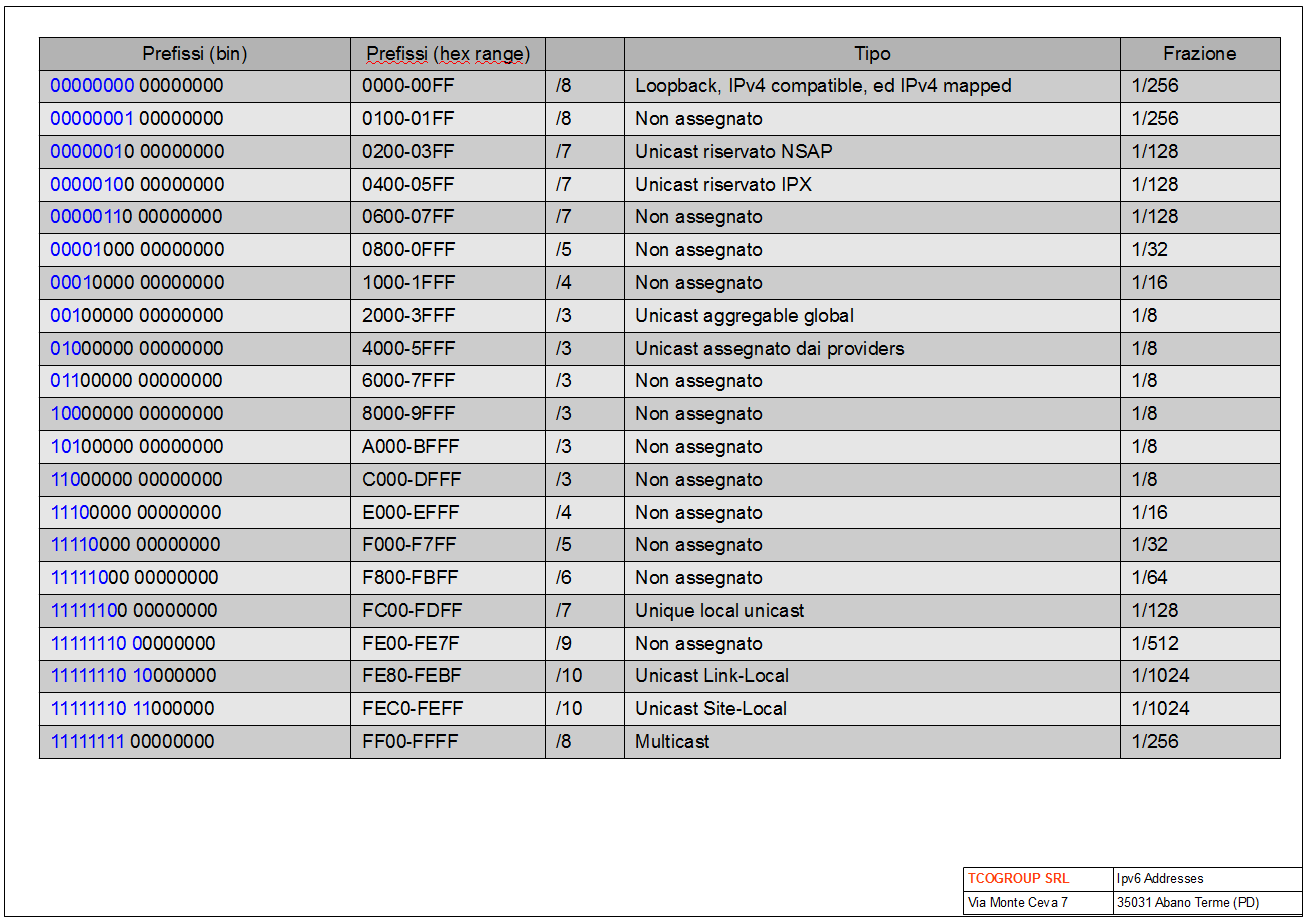
Another note we reserve for the first 16 bits. These contain the essential information to make the recognition of packages and determine their type. The table below summarizes the address categories.
The IPv6 addressing categories can be grouped into type addresses:
-
Unicast: node addresses
-
Multicast: Node group addresses
-
Anycast-- Service addresses, such as multicast addresses identify a group of nodes. Unlike multicasts, packets will be delivered to the nearest node (based on the metrics on the routers) relative to the sending node
Below, taking up the last table, we'll go to detail the single usage by set.
Unicast
In general, IPv6 addresses are designed for a logical split consisting of two parts: Subnet prefix and Host identifier.
The Subnet prefix, also called netmask, identifies the network that it belongs to. The Subnet prefix is expressed in the number of bits from the left to the right of the IPv6 address.
Typically, 128-bit addressing is used with 64-bit Subnet prefix, leaving the remaining 64 bits to identify individual devices.
The network prefix (first 64-bit)
The interface ID (last 64 bits)
XXXX:XXXX:XXXX:XXXX: XXXX:XXXX:XXXX:XXXX
Subnet prefix (64bits) Host identifier (64bit)
The host can be identified manually or by using the interface identifier (mac address): the mac address is recalculated for use as the host part of the IPv6 -EUI 64 address.
EuI EUI-64 format
-
The interface ID:
-
Uniquely identifies an interface
-
Must be unique on a link
-
Can be derived from the identifierEUI-64
-
-
The EUI-64 identifier is based on the same principle as the MAC Addressd as the evolution:
-
Identifies the manufacturer and the "serial number" of an equipment (with 64 bits)
-
There is a procedure that allows you to switch from EUI-48 ID (mac-address) to EUI-64 ID (refer to the abundant documentation on the Internet)
-
Multicast (FF00-FFFF range)
The Multicast identifies messages that need to propagate one --->> to many.
Unlike the IPv4 Multicast, the IPv6 Multicast replaces the TTL with the "Scoped Address" that determines its propagation scopes.
The format of the "Scoped Address" is as follows:
FF<flags><scope>::<group id>
-
FF - Multicast Identifier
-
permanent 0, 1 temporary. By definition, all addresses that are not statically allocated by IANA are temporary. 120 bits are available to try different addressing patterns.
-
Scope
-
1 node-local
-
2 link-local
-
5 site-local
-
8 organization-local
-
And global
-
-
group id-identifier within a scope

In our examples, this address will be used as a tool for lookup-discovery procedures and for maintaining the lease time of cluster nodes through HeartBeat.
Anycast
Anycast addresses, which cannot be distinguished from a specific FP, are addresses assigned to a set of interfaces, usually belonging to different nodes. It must be explicitly indicated that you are assigning a Anycast address.
Anycast addresses identify the server closest to the sender and can be used as fail-overs if the nearest server is not available. Some Anycast addresses have been reserved for specific uses such as Router and Mobile IPv6 home-agent discovery.
Choosing internal addressing
For internal datacenter routing, we're going to use the Unicast addressing type by having to identify a resource precisely. Not wanting to be dependent on a directory composed of the network interface but wanting to orient the addressing to the services we will use a class address: FC00 FDFF Unique local unicast.
With the prefixes expressed by the range FC00-FDFF we will build a "talking" address to immediately identify the segment of the network to which we are referring.
Addressing FC00 FDFF Unique local unicast is detailed:
| 7 bits 40 bits 16 bits 64-bits

+--------+-+------------+-----------+----------------------------+

| Prefix L Global ID Subnet ID Interface ID

+--------+-+------------+-----------+----------------------------+
Prefix FC00:/7 prefix locally identifies an IPv6 unicast addresses.
L Set to 1 is locally assigned
Set to 0 for future use
Global ID 40-bit global identifier used to create a global unique prefix.
Subnet ID 16-bit Subnet ID is the identifier of the subnet within the site.
Interface ID 64-bit Interface ID as defined in [ADDARCH].
To demonstrate the use of the Subnet Prefix (aka Netmask) in the exercises that follow we will use a 48-bit Subnet Prefix by allocating the remaining 80bits to the host identifier.
The Subnet prefix is set at the time of the address set by adding a slash and the subnet bit value in the terminal:
Es. Solaris: ifconfig e1000g3:1 inet6 fd00:cc:c9:5::/48 Up
Linux: ifconfig eth3 inet6 add fd00:cc:c9:4::/48 Up
MS Windows: netsh interface ipv6 add address LBLMonitor addr-fd00:cc:c9:2::/48
e.g.1 The network prefix (first 48 bits)
Host ID (last 80 bits)
XXXX:XXXX:XXXX:XXXX: XXXX:XXXX:XXXX:XXXX
Subnet prefix (48bit) Host identifier (80bit)
In this example, we'll use a netmask of 48 bits more than enough to demonstrate the use of netmask, which is not subject to constraints excluding the first 16 bits that identify the address type.
So let's say you have an address organization that can express our network:
fd00:c9:c9:1::

# | | | | |

# | | | | Local host ----

# | | | -------host group

# | | ----------network group c9-public ca-private
cb-backend cc-management

# | -------------primary group

---------------address type (unique link local unicast)
This type of addressing allows us in a single moment to identify which network you are referring to e.g.:
fd00:c9:c9:1:: refers to the public network
fd00:ca:c9:1:: refers to the private network
fd00:cB:c9:1:: Refers to the backend network
fd00:cC:c9:1:: refers to the management network
We want to highlight that the subdivision is completely arbitrary and limited only by the use of the Subnet prefix (netmask) that identifies the "scope" of our network in the first 48 bits. Our address therefore has a Subnet prefix of /48 bits, everything beyond the 48th bit identifies the resource, the service delivery point.
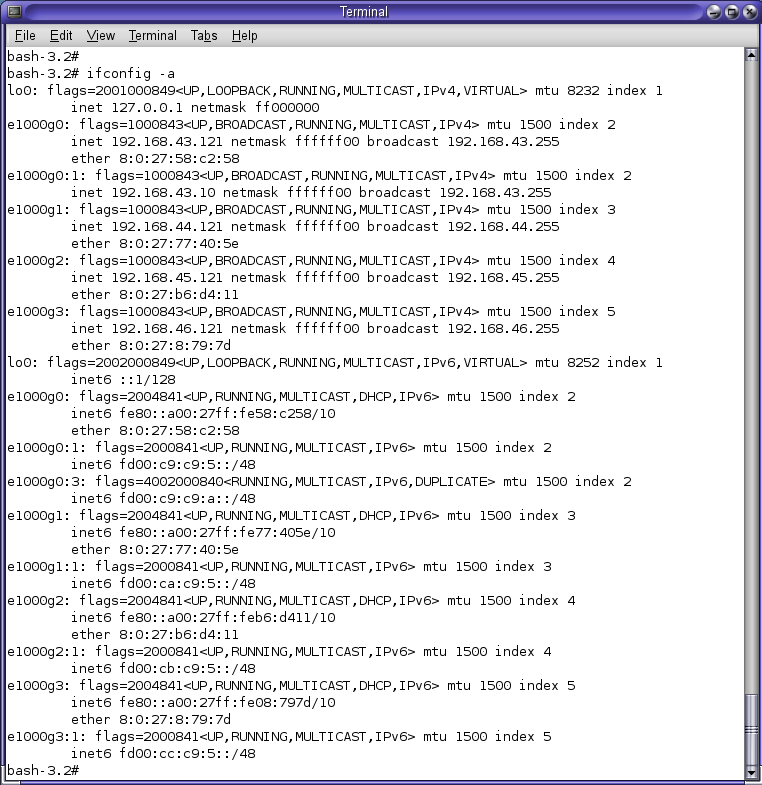
Here's a look for Linux and MS Windows and Solaris snaps that show a hypothetical IPv6-routed server:
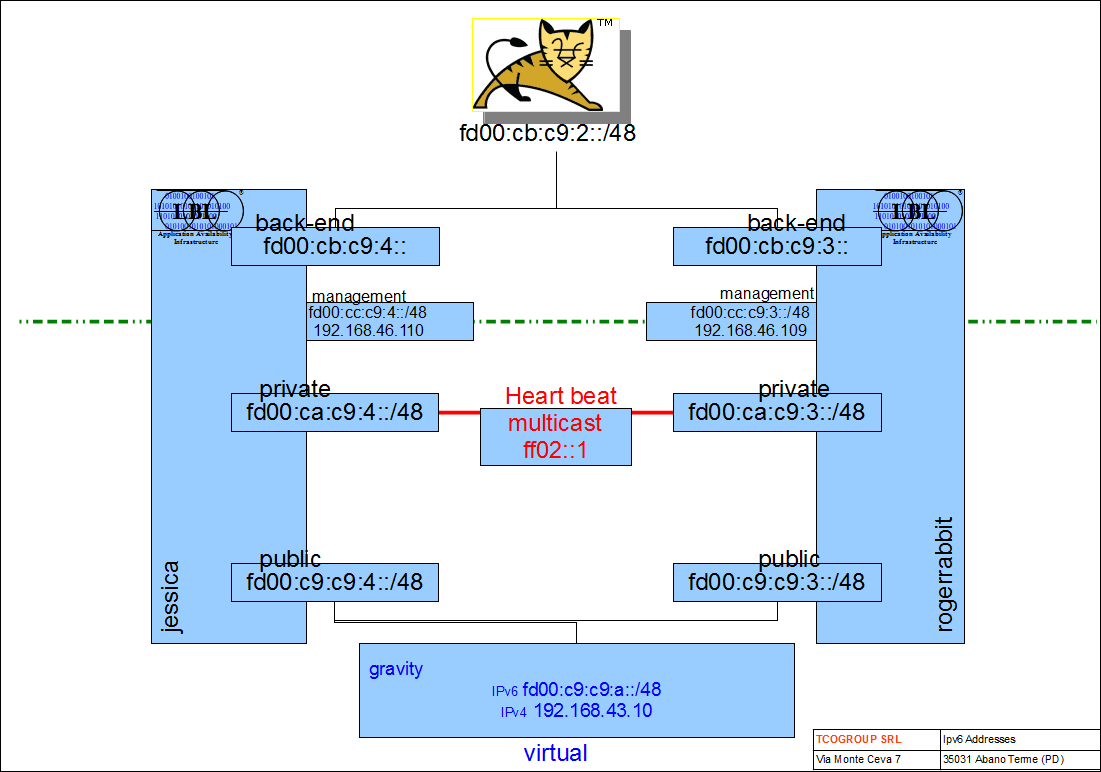
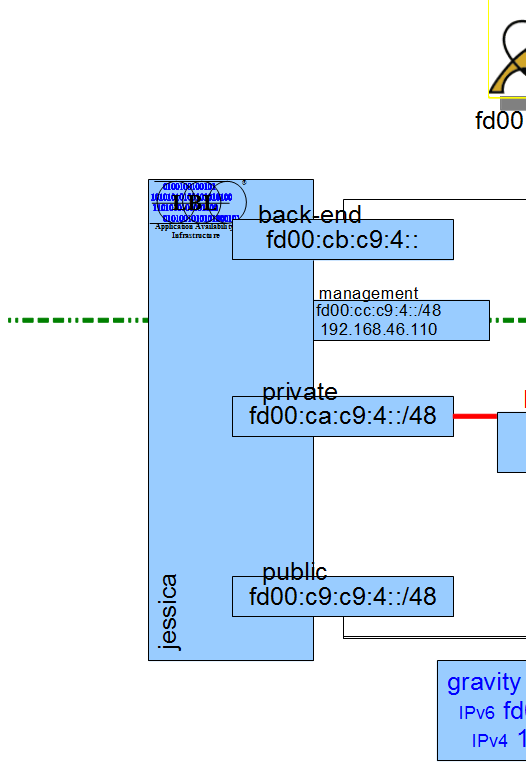
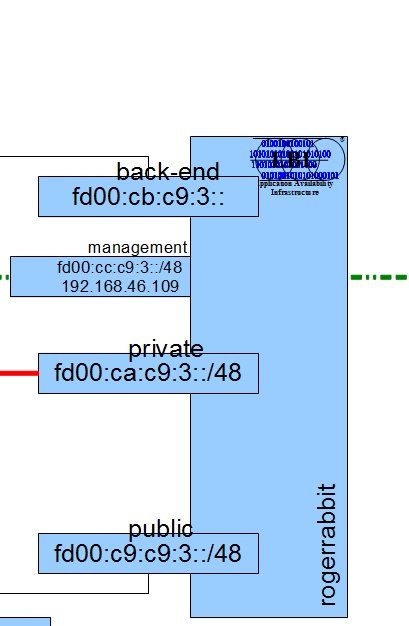
Address plan
For this addressing plan, we therefore have four types of network:
Virtual Public Private BACK-END Management
For the VIRTUAL network we will have both an IPv4 address (192.168.43.10) is an IPv6 address (fd00:c9:c9:a:/48). This will allow the routing layer to be able to "listen" in both IPv4 and IPv6 by giving clients the ability to access IPv4 or IPv6 regardless of the same resources that are certified only in IPv6.
Duplicate Address Discovery and High Availability
To place an IP address in high reliability, you must migrate the address from one node to another node. IPv6 introduces the Duplicate Address Discovery (aka DAD) service, which allows, in normal situations, to detect routing duplication and automatically disables the duplicate address. This feature, which is useful for clients, should be disabled for network interfaces that you use as high-reliability (VIP) support because they may cause the address to be disabled during migration.
The deactivation mode is different on each operating system and will be explained below with examples for MS Windows, Linux, and Solaris.
MS Windows:
With MS Windows (Windows Vista / Server 2008 or Windows 7 / Server 2008 R2 or higher) you can disable the IPv6 DAD service by using the command Netsh. The procedure is to derive the NIC index and then deactivate the service.
1-NIC index detection:
netsh interface ipv6 show interfaces

Idx Met. MTU Status Name

--- ---------- ---------- ------------
---------------------------

1 50 4294967295 connected Loopback Pseudo-Interface 1

14 25 1500 connected Wireless network connection

10 20 1500 connected LBLPublic

17 50 1280 disconnected isatap. A7670B47-0AAE-4DAC-9BE5-

25 50 1280 disconnected isatap.homenet.telecomitalia.it

15 50 1280 disconnected Teredo Tunneling Pseudo-Interface

12 50 1477 disconnected Bluetooth network connection

27 50 1280 disconnected isatap. 278375D9-F269-47C8-BEF2-

21 20 1500 connected VirtualBox Host-Only Network
2-Disabling the DAD service for the discovered interface:
netsh interface ipv6 set interface "10" dadtransmits-0

Ok.
3-Verifying that you have deactivated:
netsh interface ipv6 show interface "10"

LBLPublic Interface Parameters

----------------------------------------------

IfLUID : ethernet_6

IfIndex : 10

Status : connected

Metric: 20

MTU link : 1500 bytes

Reachable time: 18500 ms

Base reachable time : 30000 ms

Retransmission interval : 1000 ms

**DAD transmissions : 0**

Site prefix length : 64

Site ID : 1

Forwarding : disabled

Announcements : disabled

Neighboring router discovery : enabled

Detection of unattainability neighboring routers : enabled

Router Discovery : enabled

Managed Address Configuration : enabled

Other configuration options with status : enabled

Vulnerable host submissions : disabled

Vulnerable host receptions : disabled

Use automatic metric : enabled

Ignore default routes : disabled

Announced router duration: 1800 seconds

Announce default route : disabled

Current hop limit : 0

Force ARPND activation patterns : disabled

Targeted MAC activation models : disabled
Linux
To disable the DAD feature on Linux, you must identify the interface
name through the ifconfig -a command and then set the parameters:
net.ipv6.conf.<interface_name>.dad_transmits
net.ipv6.conf.<interface_name>.accept_dad
Setting the parameters should be performed to the system startup by adding the following lines (example with eth0) to the /etc/sysctl.conf file:
net.ipv6.conf.eth0.dad_transmits is 0
net.ipv6.conf.eth0.accept_dad plus 0
After restarting the operating system, check whether the setting was actually received through the command:
sysctl net.ipv6.conf.eth0.accept_dad
net.ipv6.conf.eth0.accept_dad plus 0
sysctl net.ipv6.conf.eth0.dad_transmits
net.ipv6.conf.eth0.dad_transmits is 0
Oracle SOLARIS
Solaris uses a DAD algorithm set to Optimistic by default (see Oracle^®^ Solaris Administration: IP Services And Solaris IP Duplicate Address Detection
James Carlson). For the use of HA features we have disabled, for interfaces and for specific addresses, the transmission of duplicate address detection.
To do this, you simply act on the parameters of the ndp daemon and set the disable through the DupAddrDetectTransmits variable.
With an editor, add the following commands for each virtual address management interface to the /etc/inet/ndpd.conf file:
if e1000g0:3 DupAddrDetectTransmits 0
prefix fd00:c9:c9:a:/48 e1000g0:3
When you have finished setting the parameters, run the following command to update the daemon:
pkill -HUP in.ndpd
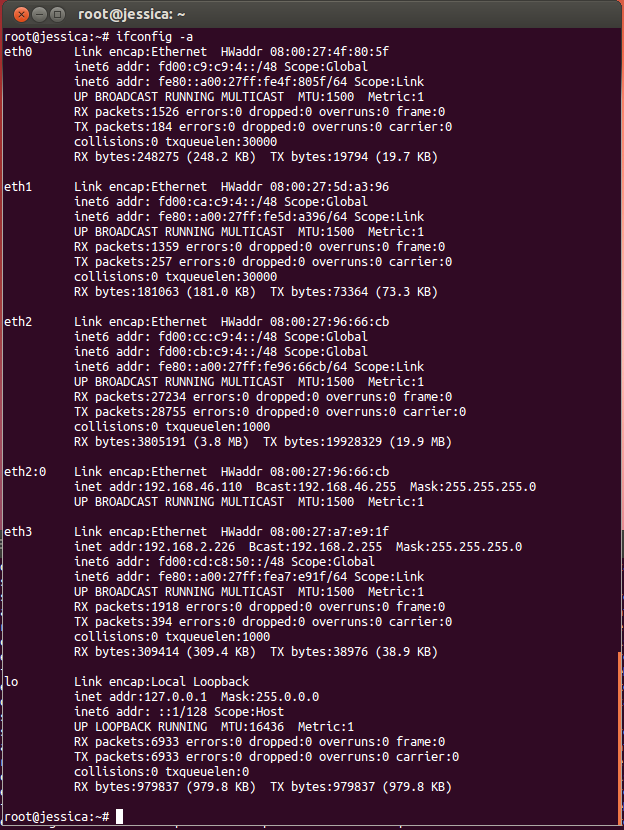
Jessica Operating System Setup
The Jessica setup will be done in a Linux operating system where 4 network interfaces will be set. We used a Ubuntu distribution with revisone kernel 3. For convenience, we've left the old IPv4 interfaces commented. To enable them, simply unsoe comments. The monitor interface (aka management) was placed in an alias having wanted to use the fourth network interface (eth3) to exit to the Internet (useful in the initial setup, it will be disabled in production):
FILE: /etc/networks/interfaces
This file describes the network interfaces available on your system
and how to activate them. For more information, see interfaces(5).
 The loopback network interface
car him

iface lo inet loopback
The primary network interface
car eth0

#iface inet static eth0

address 192.168.43.110

netmask 255.255.255.0

iface eth0 inet6 static

address fd00:c9:c9:4::/48
The private network interface
car eth1

#iface inet static

address 192.168.44.110

netmask 255.255.255.0

up route add -net 224.0.0.0 netmask 240.0.0.0 dev eth1

iface eth1 inet6 static

address fd00:ca:c9:4::/48
The backend network interface
car eth2

#iface inet static

address 192.168.45.110

netmask 255.255.255.0

iface eth2 inet6 static

address fd00:cb:c9:4::/48
The management network interface
car eth2:0

iface eth2:0 inet static

address 192.168.46.110

netmask 255.255.255.0

iface eth2 inet6 static

address fd00:cc:c9:4::/48
The internet network interface
car eth3
iface eth3 inet dhcp
#pre-up /sbin/ifconfig $IFACE mtu 1300
#iface inet static
address 192.168.46.110
netmask 255.255.255.0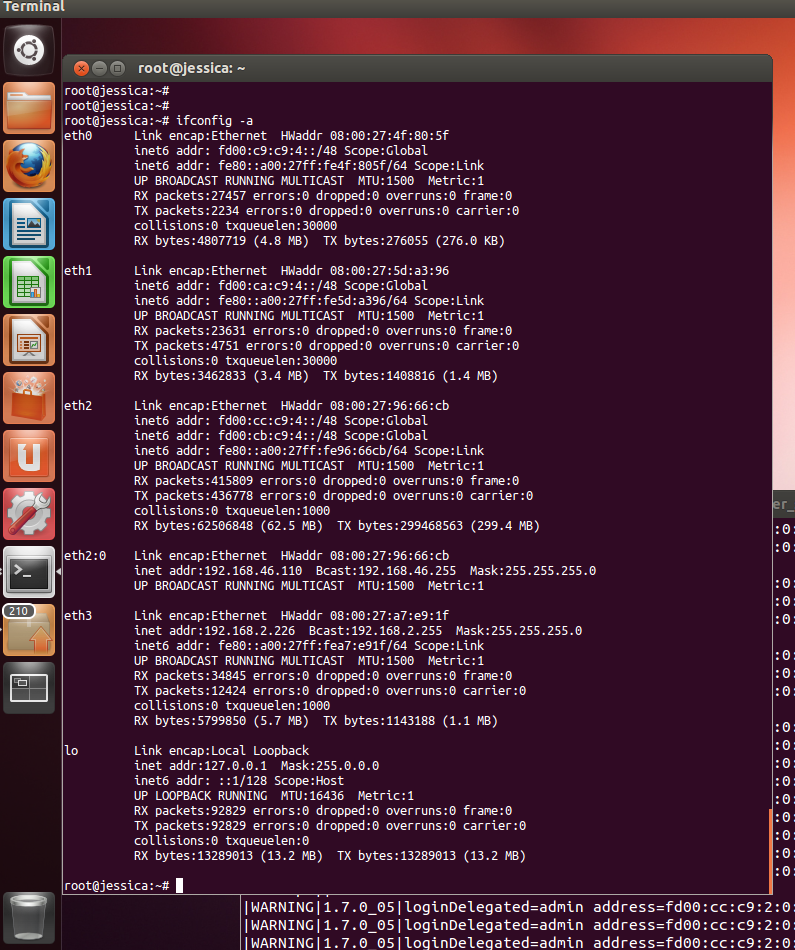 After performing a reboot by running
ifconfig -a you should get this configuration:
After performing a reboot by running
ifconfig -a you should get this configuration:
Roger Rabbit Operating System Setup
RogerRabbit's installation is analogous to Jessica's installation. If we are in a virtualized environment, we could clone the virtual machine and then modify the hostname and static addresses. Again, an alias was used as the management address so that you could dhcp assign the eth3 network adapter and then log in to the Internet. The latter address, convenient in the initial setup, will be disabled in production.
FILE: /etc/networks/interfaces
This file describes the network interfaces available on your system
and how to activate them. For more information, see interfaces(5).
The loopback network interface
car him

iface lo inet loopback
The primary network interface
car eth0

#iface inet static eth0

address 192.168.43.109

netmask 255.255.255.0

iface eth0 inet6 static

address fd00:c9:c9:3::/48
The private network interface
car eth1

#iface inet static

address 192.168.44.109

netmask 255.255.255.0

up route add -net 224.0.0.0 netmask 240.0.0.0 dev eth1

iface eth1 inet6 static

address fd00:ca:c9:3::/48
The backend network interface
car eth2

#iface inet static

address 192.168.45.109

netmask 255.255.255.0

iface eth2 inet6 static

address fd00:cb:c9:3::/48
The management network interface
car eth2:0

iface eth2:0 inet static

address 192.168.46.109

netmask 255.255.255.0

iface eth2 inet6 static

address fd00:cc:c9:3::/48
The internet network interface
car eth3
iface eth3 inet dhcp
#pre-up /sbin/ifconfig $IFACE mtu 1300
#iface inet static
address 192.168.46.109
netmask 255.255.255.0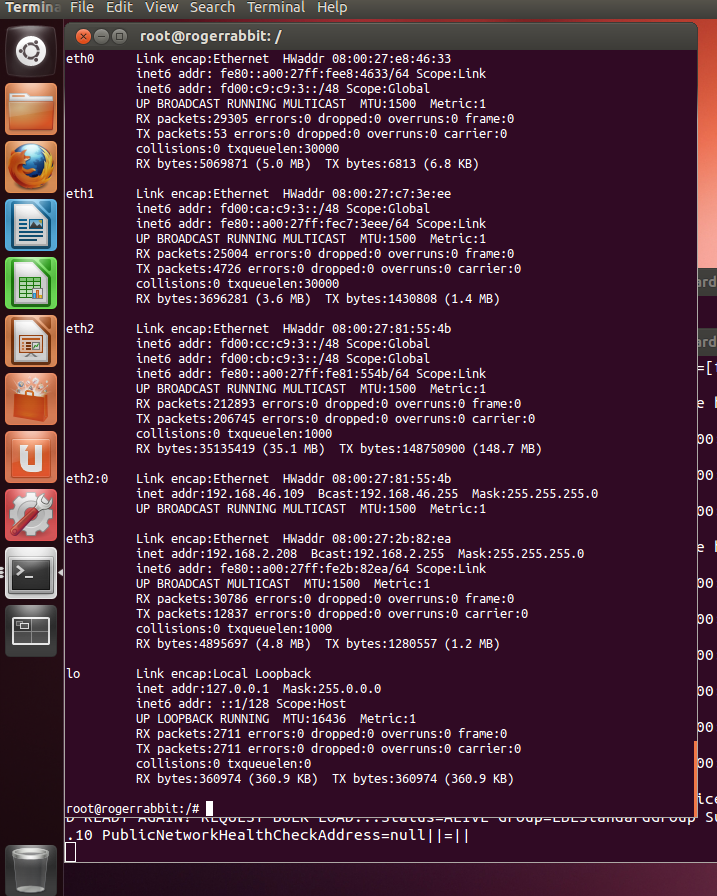 After you have performed a rogerrabbit
reboot and running ifconfig -a you should get this configuration:
After you have performed a rogerrabbit
reboot and running ifconfig -a you should get this configuration:
Setup Oplon Application Delivery Controller Jessica
For simplicity, we'll use comments on management console snaps of the most significant parts.
The vrrpserver, certified on the private network, is an HTTP server and serves to exchange routing information between Oplon Application Delivery Controller nodes. The IPv6 address is the IPv6 address for the private HeartBeat network.
[fd00:ca:c9:4::]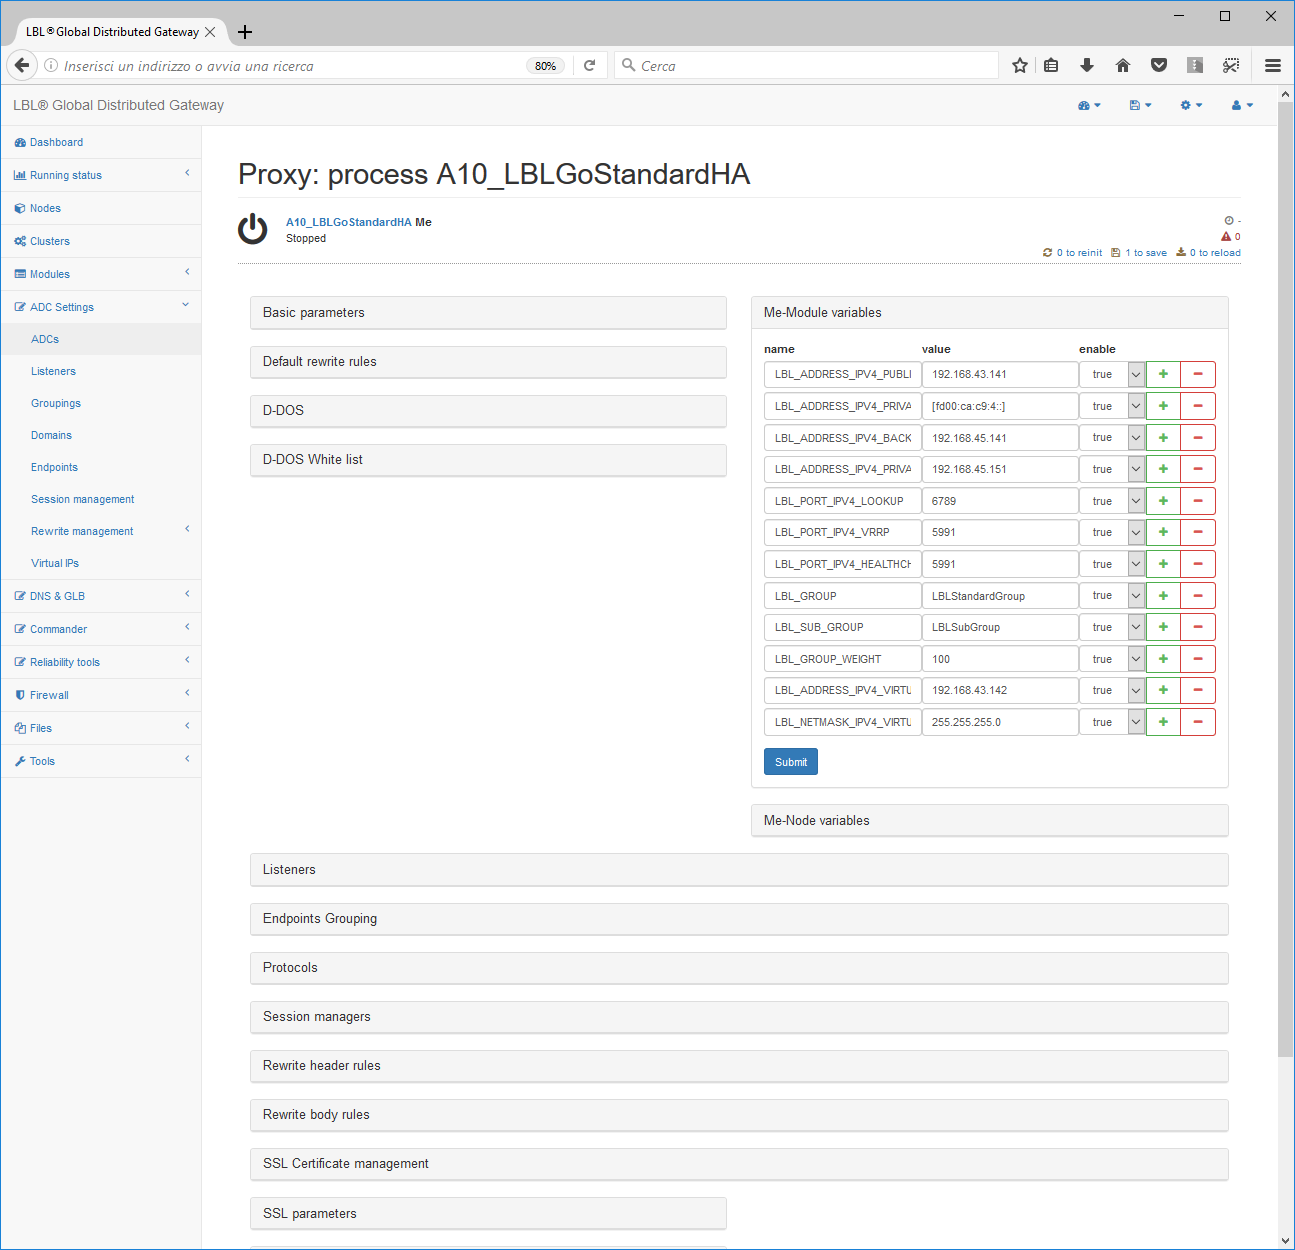
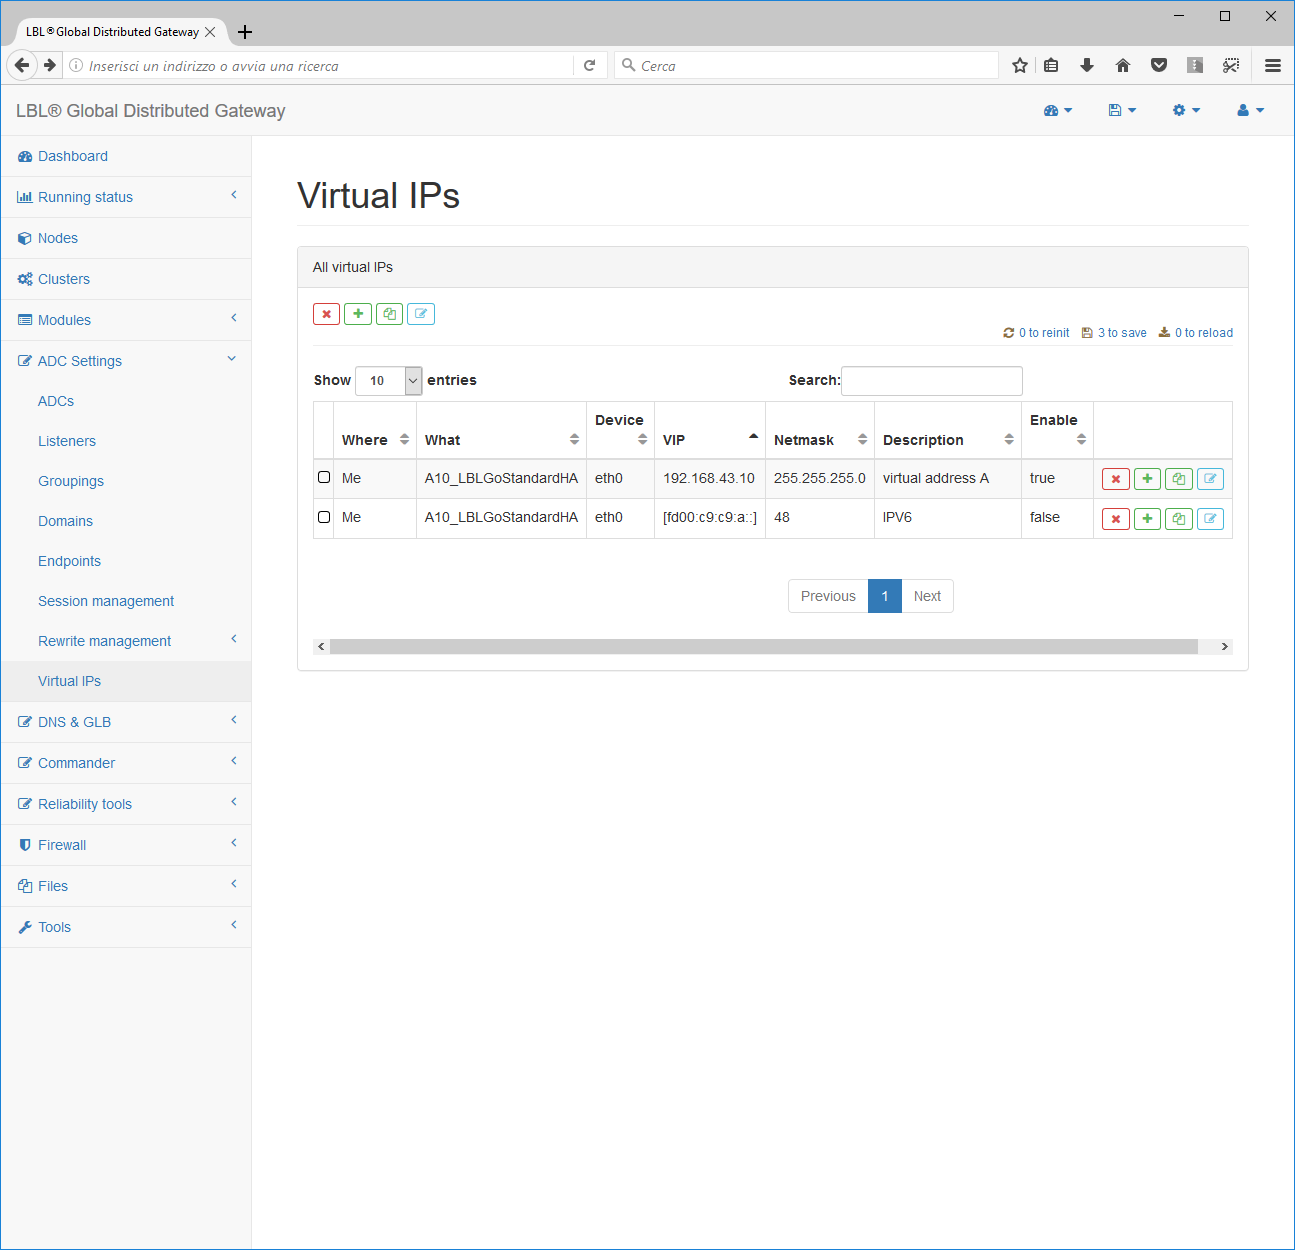
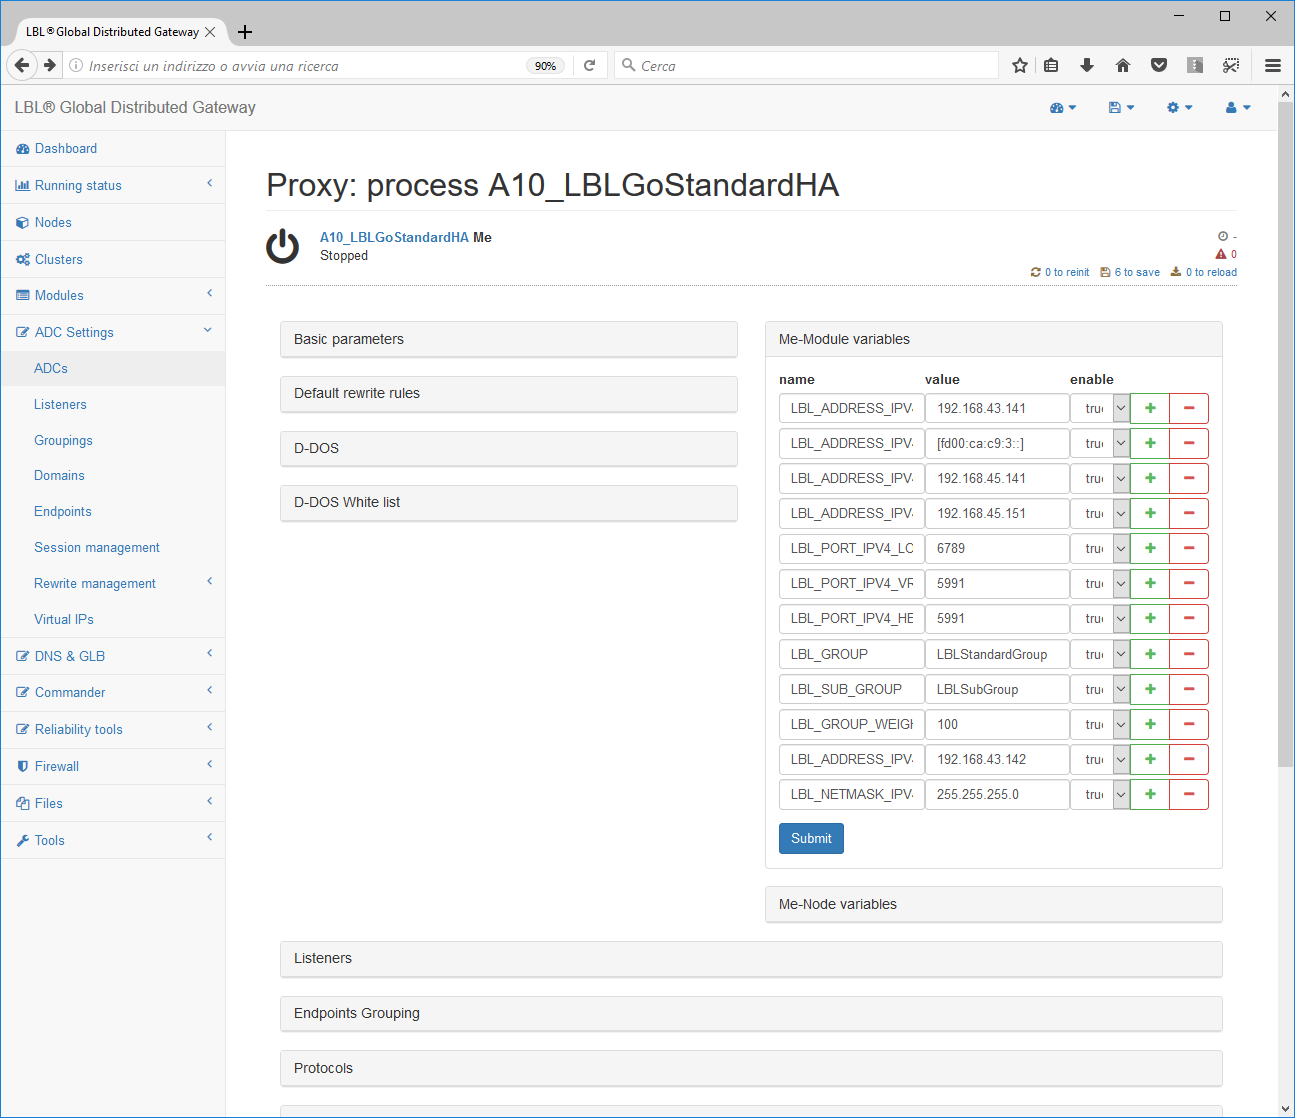
In systemsmonitor_m, it is interesting to note that you can provide IPv4 and IPv6 virtual addresses (VIPs) very easily. Oplon Application Delivery Controller automatically distinguishes IPv6 addresses from IPv4 through their own peculiar definition and then sets network cards appropriately accordingly.
Another thing to note is that for Linux IPv6 addresses can be added to the Network Card definition directly without the need to use aliases as is the case with IPv4.
The configuration of the statistics collector, if embedded, should not be changed. If you were to use a centralized IPv6 broker, the remoteServerURL parameter must be changed as follows:
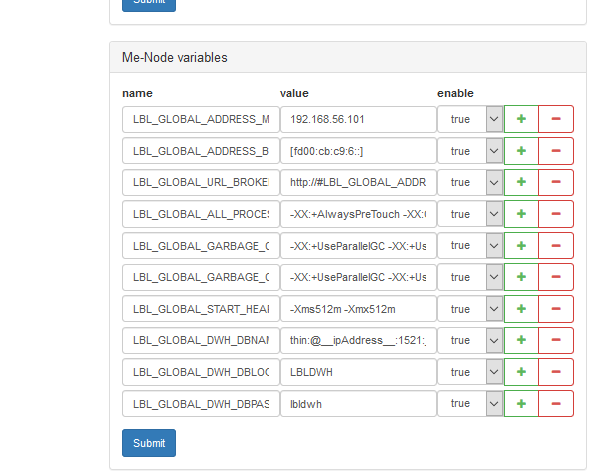
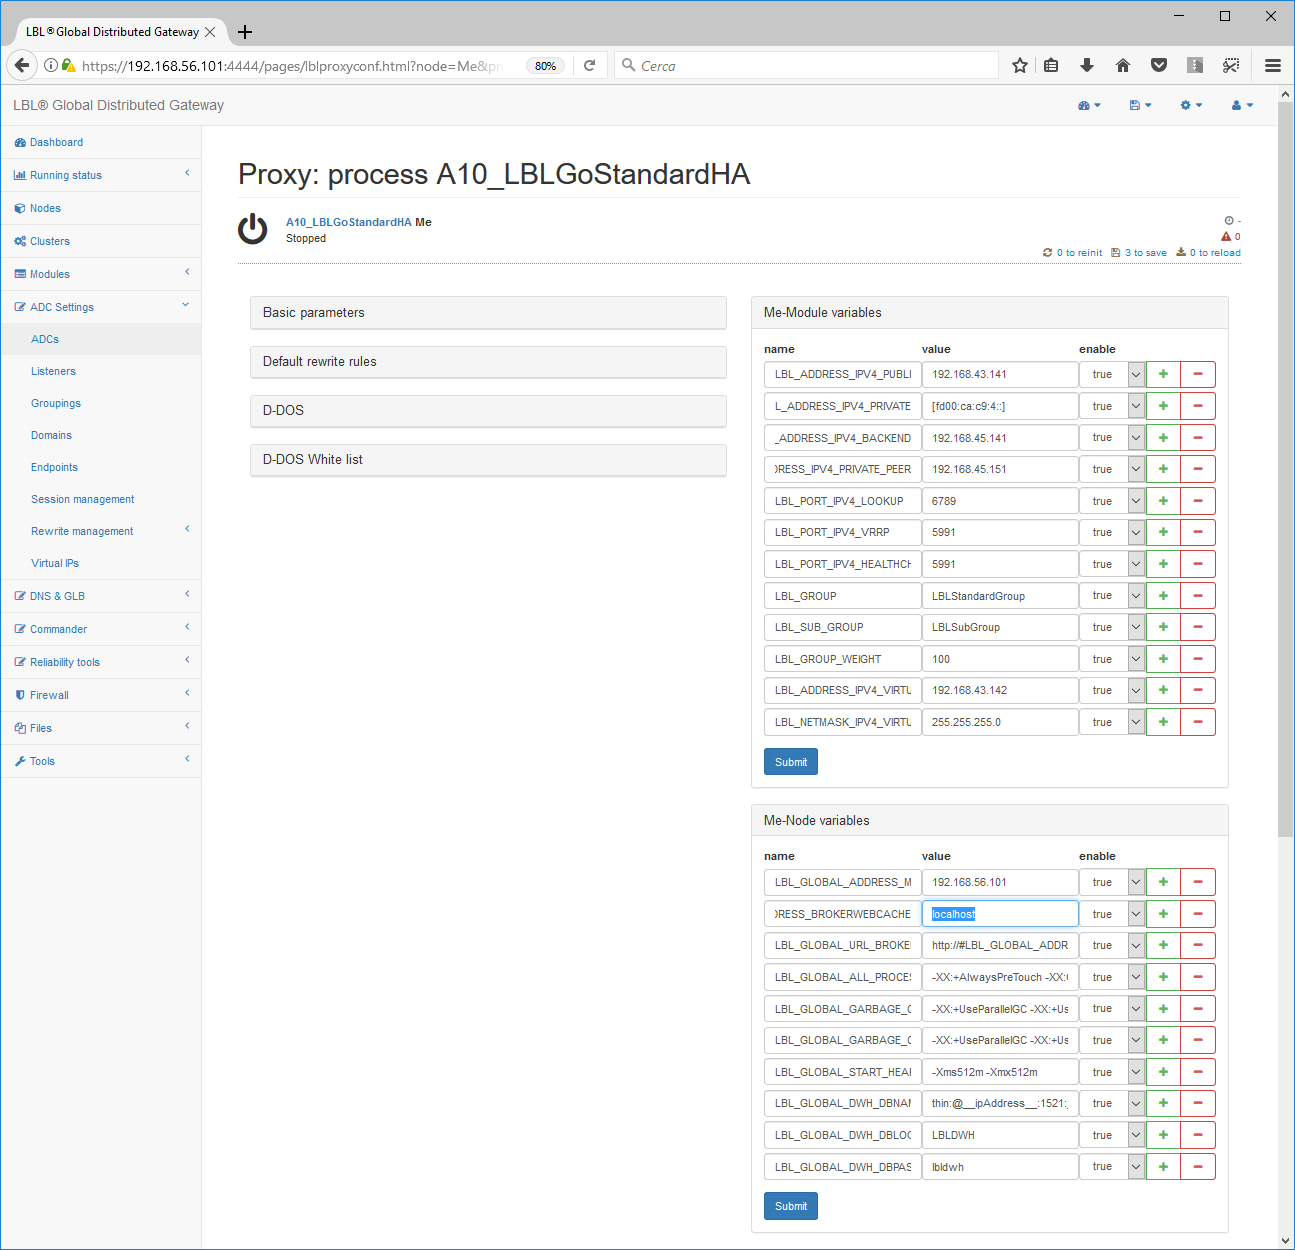
Example of remoteServerURL IPv6:
LBL_GLOBAL_ADDRESS_BROKERWEBCACHE=[fd00:cb:c9:6::]
The lookup file instructs Oplon Application Delivery Controller to search for the other nodes through The HeartBeat's private network. As with IPv4, LBL requires that you specify the address of the interface where the multicast or UDP will be multicasted so that messages are not propagated across all networks. The multicast or UDP address used is still link-local and therefore scope lan.
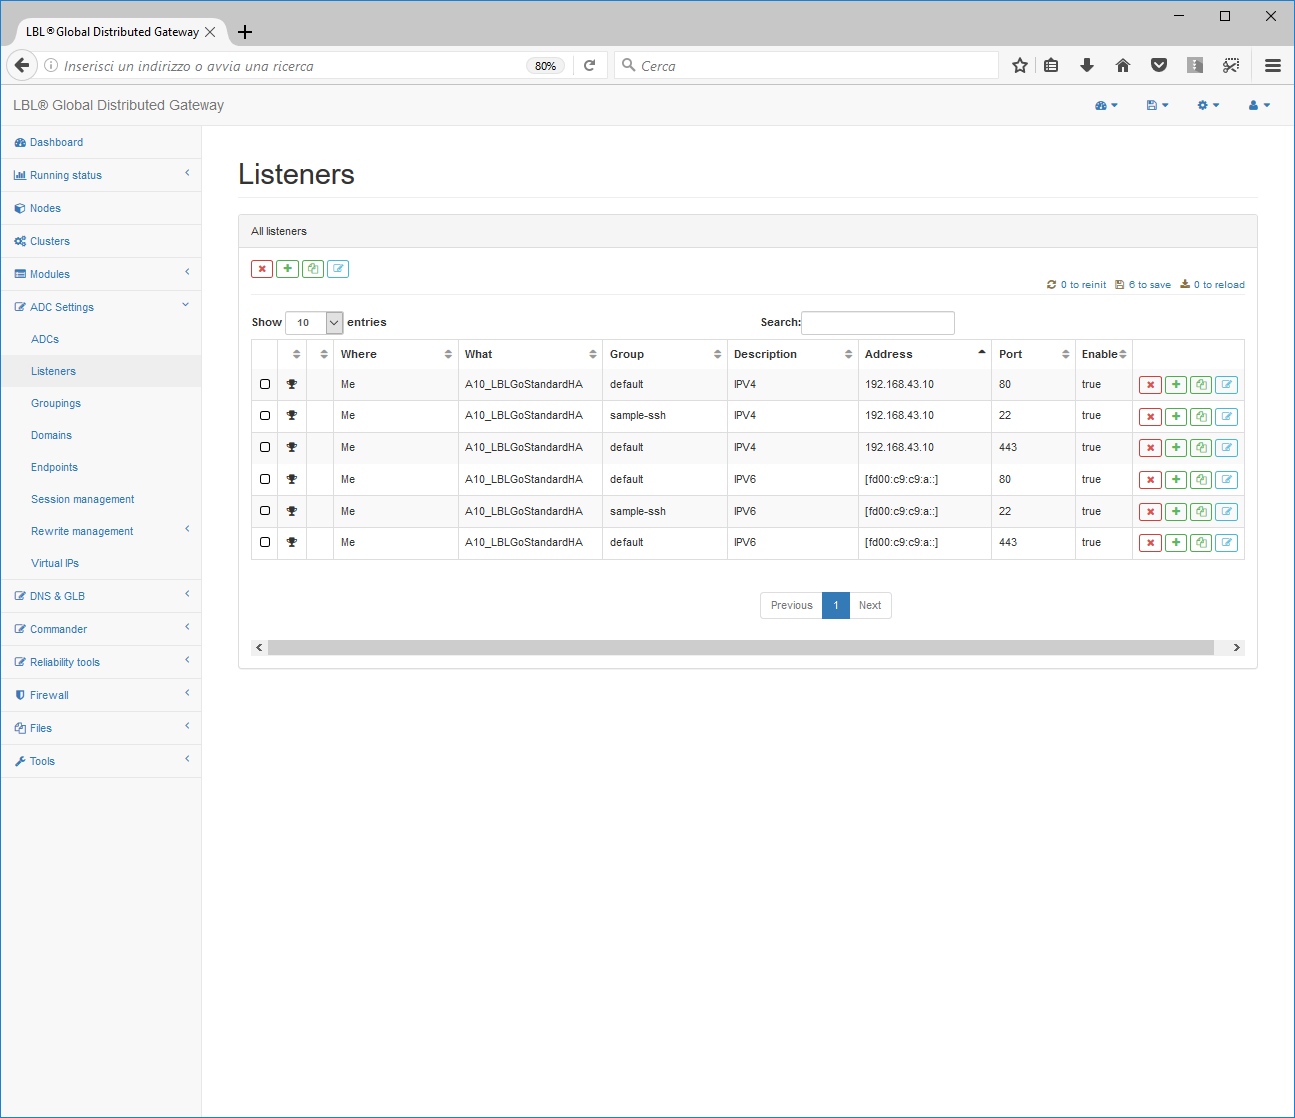
We've finally reached the routing and balancing configuration file. In
paragraph <listeners> a novelty can be observed, namely the possibility
of indicating multiple listening addresses for the same bind. In this
case it allows us to set in the same paragraph <bind> IPv4
addresses and IPv6 addresses.
In the paragraph reserved for <endpoints> you can see how the
resources where the services are attested are indicated.
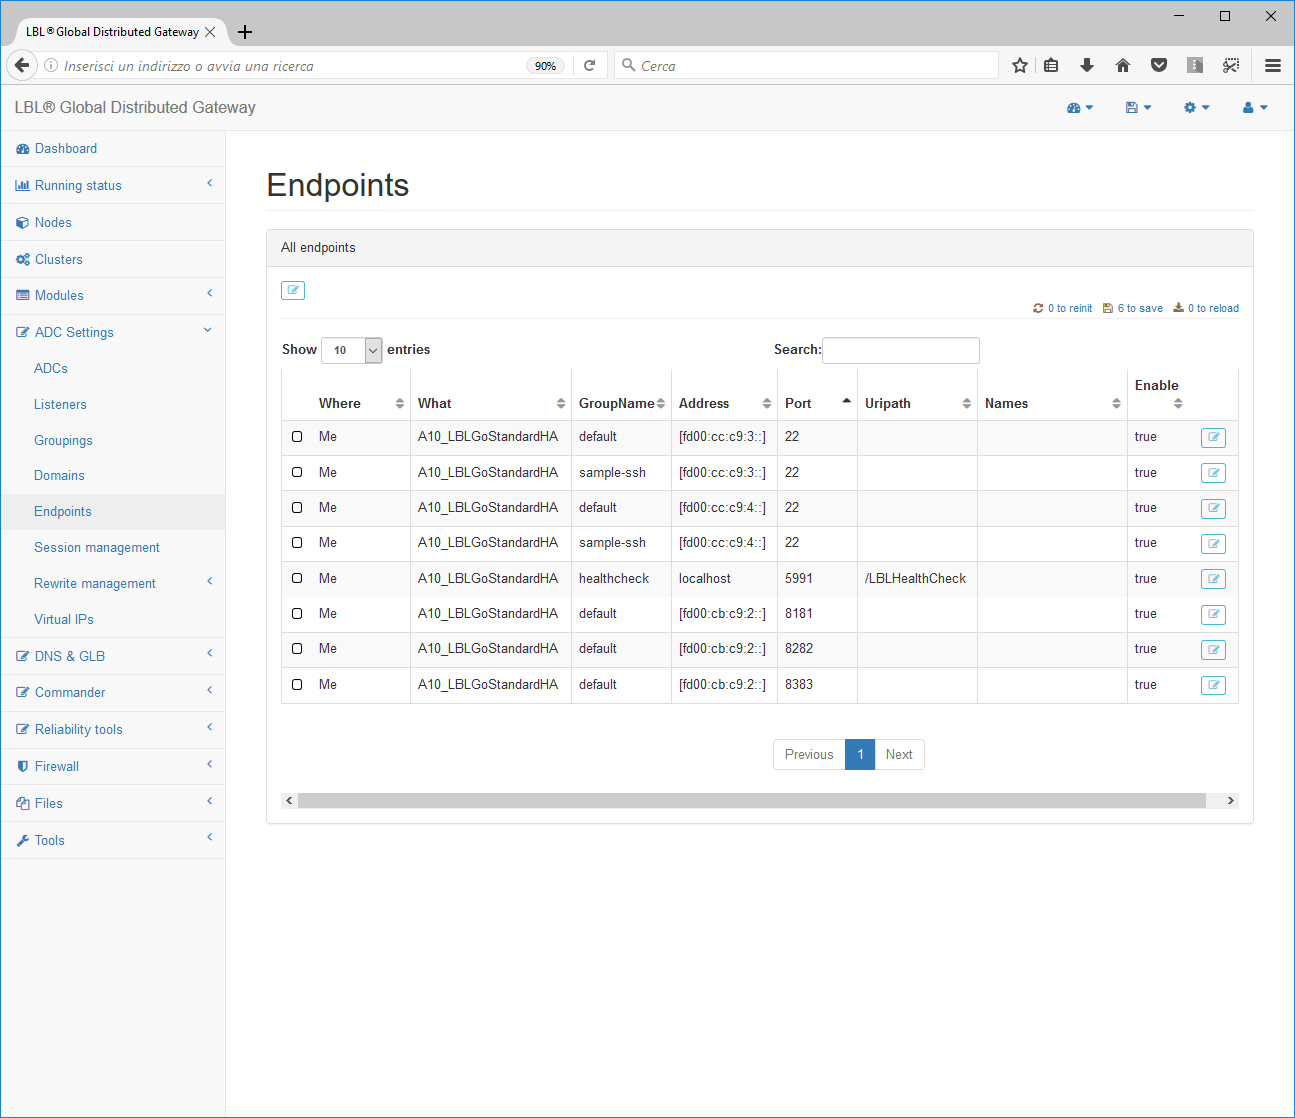
As with IPv4, the HealthCheck service is not affected by changes by being a loopback service for use by the fail-over system of Oplon nodes Application Delivery Controller.
Setup Oplon Application Delivery Controller Roger Rabbit
In the same way as Jessica below we'll go to detail the setup of the routing component Oplon Application Delivery Controller. The settings are identical for the IPv6 gateway routing component. They are obviously typed for node-related components.
The vrrpserver is an HTTP service that, through the private HeartBeat network, exchanges routing information between nodes in the balancing cluster.
As with Jessica, the lookup file instructs Oplon Application Delivery Controller to search discovery of other nodes through HeartBeat's private network. As with IPv4, LBL requires that you specify the address of the interface where the UDP multicast will be performed in order not to propagate messages across all networks. The UDP multicast address used is still link-local and therefore scoped lan.
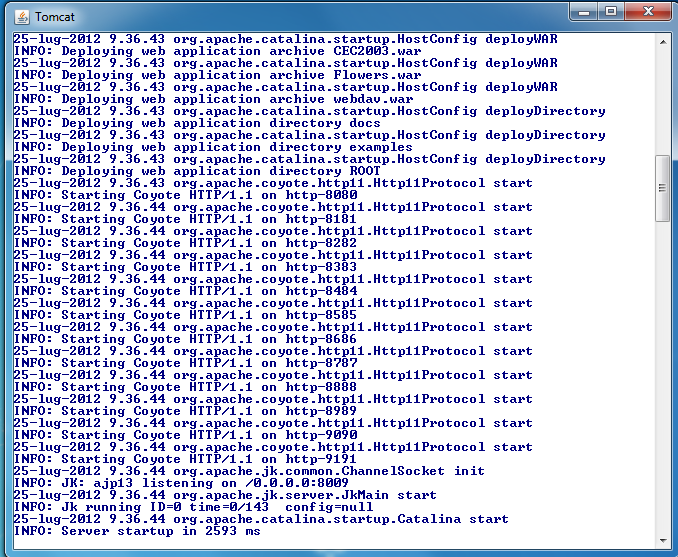
Tomcat Service Start
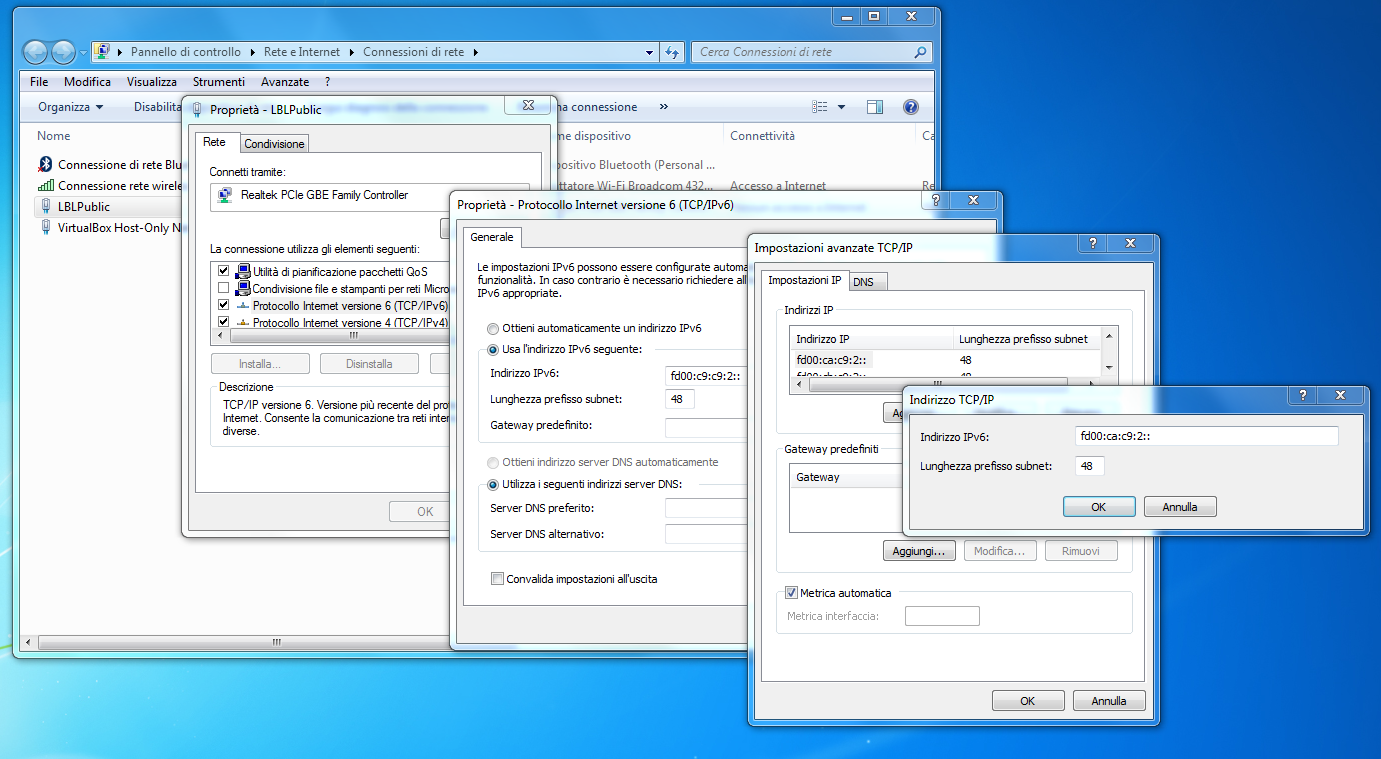
The start of the Tomcat service will be carried out in this case on an MS Windows server to allow you to verify this platform as well.
To set the backend IPv6 address you will proceed as from image by going to Control Panel, Network and Internet, Network Connections, and then in the NIC you choose, set the IPv6 address as shown in the image...
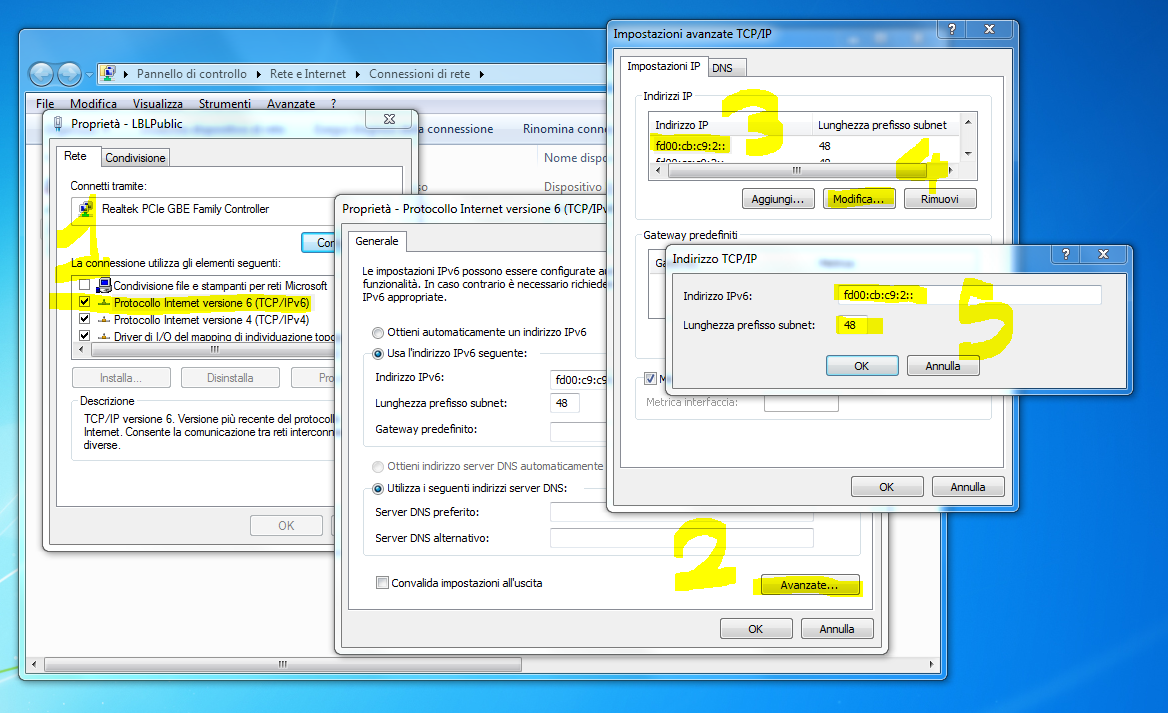
Once set, you can start tomcat, which by default listens to all interfaces and then also to the IPv6 address...
Testing Oplon Application Delivery Controller IPv6 gateway
At this point we just have to access through the browser the services provided in IPv6 regardless of IPv4 or IPv6....
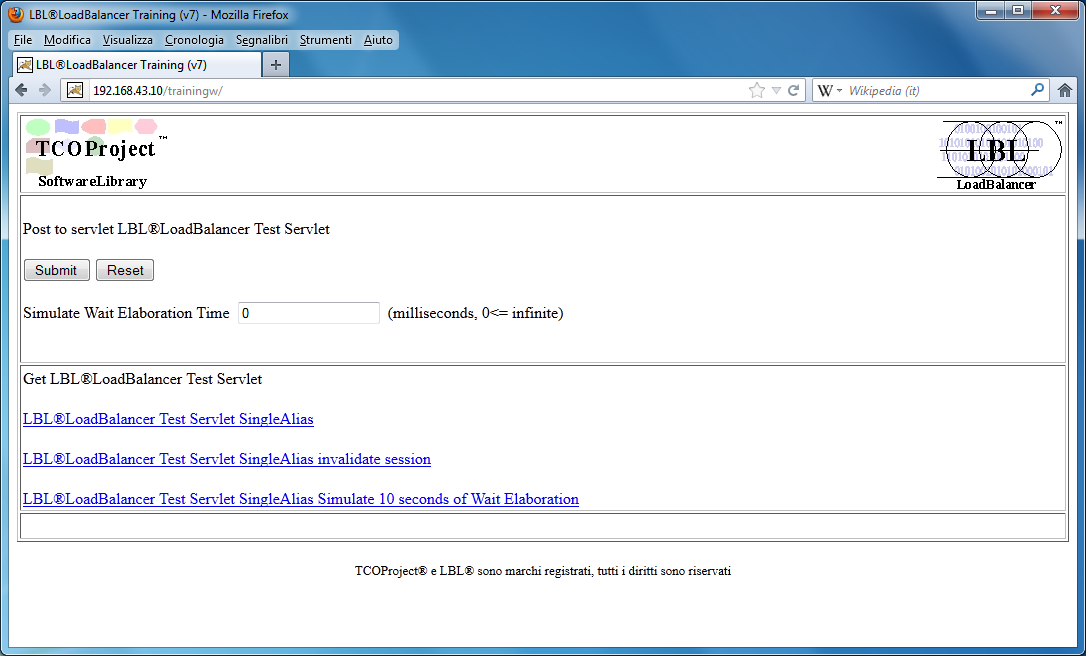 IPv4...
http://192.168.43.10/trainingw/ (opens in a new tab)
IPv4...
http://192.168.43.10/trainingw/ (opens in a new tab)
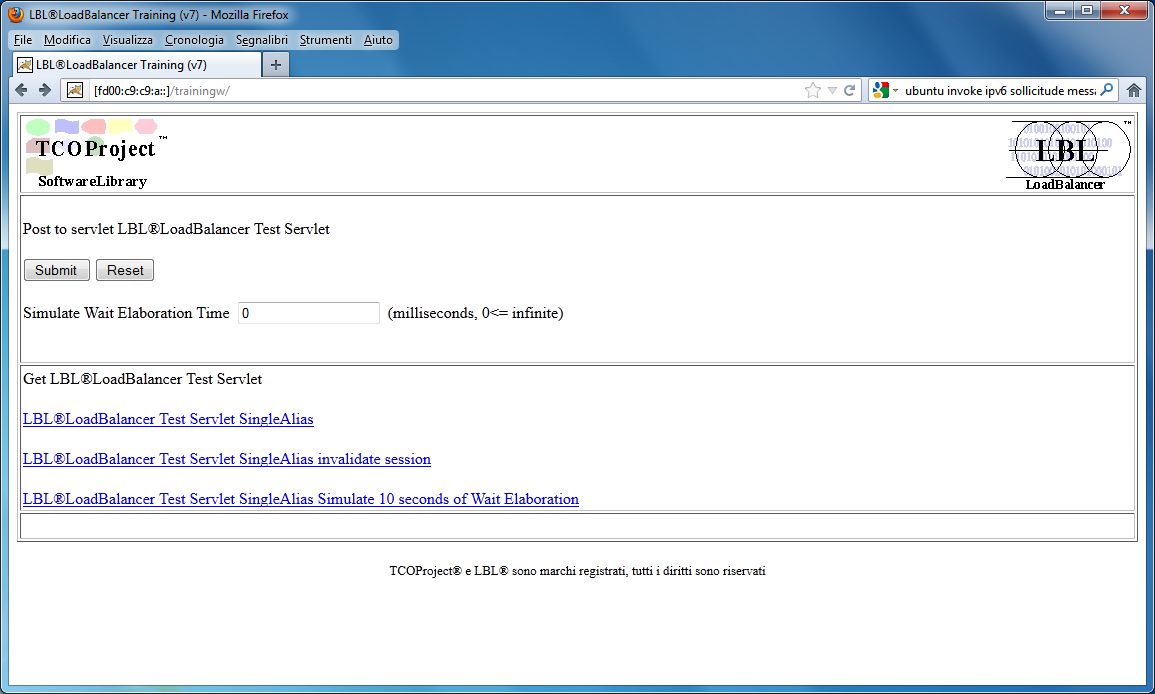 IPv6...
http://[fd00:c9:c9:a:]/trainingw/
IPv6...
http://[fd00:c9:c9:a:]/trainingw/
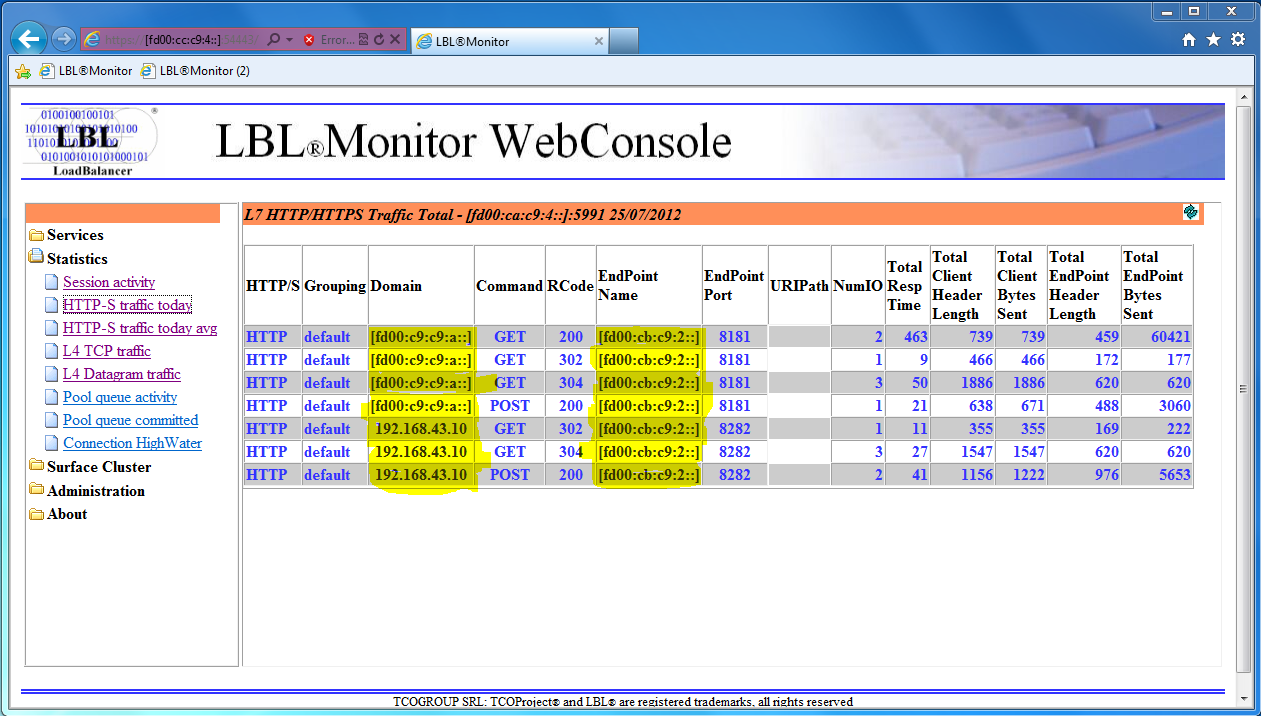
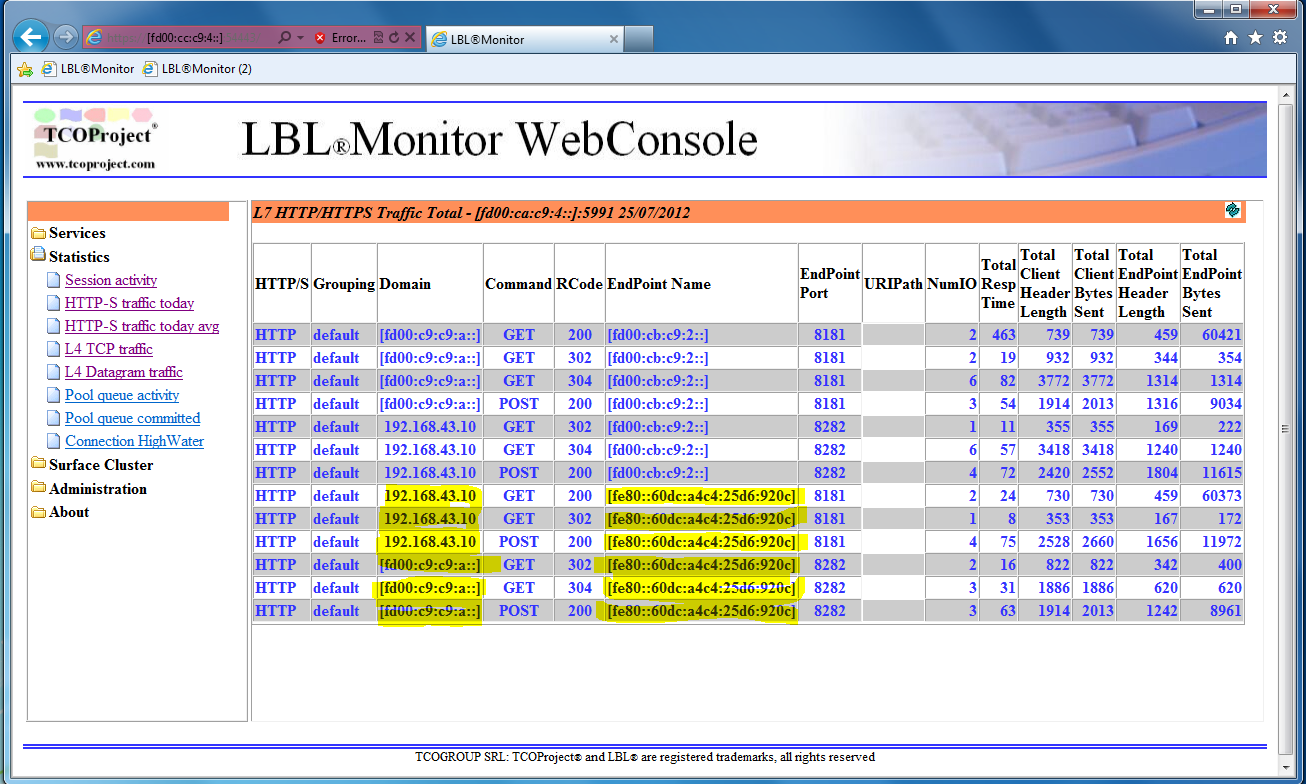
The result of the routing can be appreciated from the following image where regardless of the request engagement, virtual IPv4 or IPv6, forwarding is done in the service placed in the backend in IPv6.
Let's now disable routings on endpoints attested to the static backend IPv6 address and set up the same Tomcat service attested however in the self-configured address of the same server...
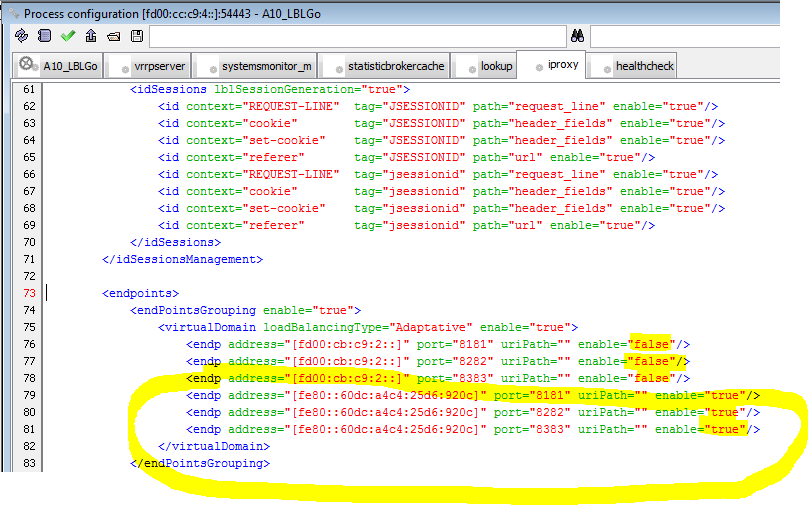
 The result is a forwarding of requests from
IPv4 and IPv6 virtual addresses to the IPv6 backend with a
self-configured address...
The result is a forwarding of requests from
IPv4 and IPv6 virtual addresses to the IPv6 backend with a
self-configured address...
Conclusion
At the end of this document we can say that the practical use of IPv6 is not dissimilar to the use of IPv4, while at the same time giving flexibility and order in the assignment of addresses at a much higher level allowing to make the most of the possibilities offered by virtualization. Application compatibility Oplon Application Delivery Controller it is guaranteed by offering a platform that allows to softly introduce the new addressing giving the possibility also to operators to familiarize themselves with this protocol and the whole world created around it such as DNS, security policies, routing.
Acronyms and definitions
IPv4 Internet Protocol version 4 IPv6 Internet Protocol version 6 Endpoint Backend service Listener Service access point Netmask Subnet prefix in IPv6 Subnet prefix Netmask in IPv4 DAD, NEW NEW NEW Duplicate Address Discovery
Aggregate Table Global IPv6 Summary and Description Table