Configuration of Oplon Secure Access
In this part of the guide, aimed at all administrators of the Oplon suite, we will see what the concepts are fundamentals of Oplon Secure Access and how to configure new resources to be accessed by third parties.
At the end of the guide you will understand the concepts of User Group and Resource and you will be able to create for the first time once a resource of type Host or Web App/Link.
Prerequisites
- You have already installed and configured the appliance as described here
- You have configured MFA as described in this guide
- (Optional) In case you want to do File Managing on Windows type resources, you have installed OpenSSH Server on each resource:
- Guide (opens in a new tab) for Windows >= 10 and Windows Server >= 2019
- Guide (opens in a new tab) all other previous Windows and Windows Server versions
Fundamental concepts
Within OSA, there are 3 fundamental concepts that it is useful to explain in this part of the guide, and they are:
User Groups
User Groups represent a class of users all having the same privileges,
they are labels necessary to associate Resources (Hosts/Links) to users.
A User Group has a unique name and description, each User Group entered from within the interface of Oplon Secure Access, will bind to the User Groups entered in MFA as described in this guide. This will ensure that every user registered in Oplon MFA will be granted exactly the privilege described.
Resources and Locations
In Secure Access a Resource is an entity that can identify:
- a Host which is Windows,Linux or macOS
- a Remote App
- a Web App/Link
Each resource can be cataloged through a Location, i.e. a label that
it serves to logically group all the resources of the configuration.
Hosts
Within Oplon Secure Access, the Host (which is a Resource) is the representation of a physical/virtual Host consisting of its IP Address/Hostname.
For convenience, it is possible to assign a Location label to a Host, this will only serve as
logical grouping and to represent the resource in an orderly and hierarchical manner within the user interface of
Oplon Secure Access.
Different types of access can coexist inside a Host, which can be:
- SSH Access
- RDP Access
- Remote App Access
- VNC Access
- SFTP Access (File Management)
These accesses, all or some, can be assigned to the various User Group based on the desired policies.
It is also possible to assign prefixed login os, to ensure that when accessing that specific Host, the user does not have to enter a username or password.
Remote App
Remote Apps (RDP Only) live inside a Host, but are still considered separate resources. They allow you to expose only an application exposed via the Windows RDP protocol.
Web Apps/Links
A Web App/Link is a resource represented by a URL. Through Oplon Secure Access it can be accessed:
- in native HTTP/HTTPS mode
- Mediated by Oplon's Reverse Proxy (thus guaranteeing security given by the Multi Factor Authentication)
- Publish on the internet
- in Browser Isolation mode.
Both can be resources either internal to the infrastructure or external. Depending on the type of configuration it is possible to obtain different results. In general it is useful to keep in mind that native mode requires significantly fewer resources than Browser Isolation mode which instead requires dedicated Appliances but which for pro obviously has an extra layer of security and segregation (here to understand more)
Configuration interface
To set up a new resource, you need to open the admin center
Oplon Secure Access, to https://<your-ip>:4444 and login.
From here in the left menu, expand the item Secure Access, click on Settings and open the module.
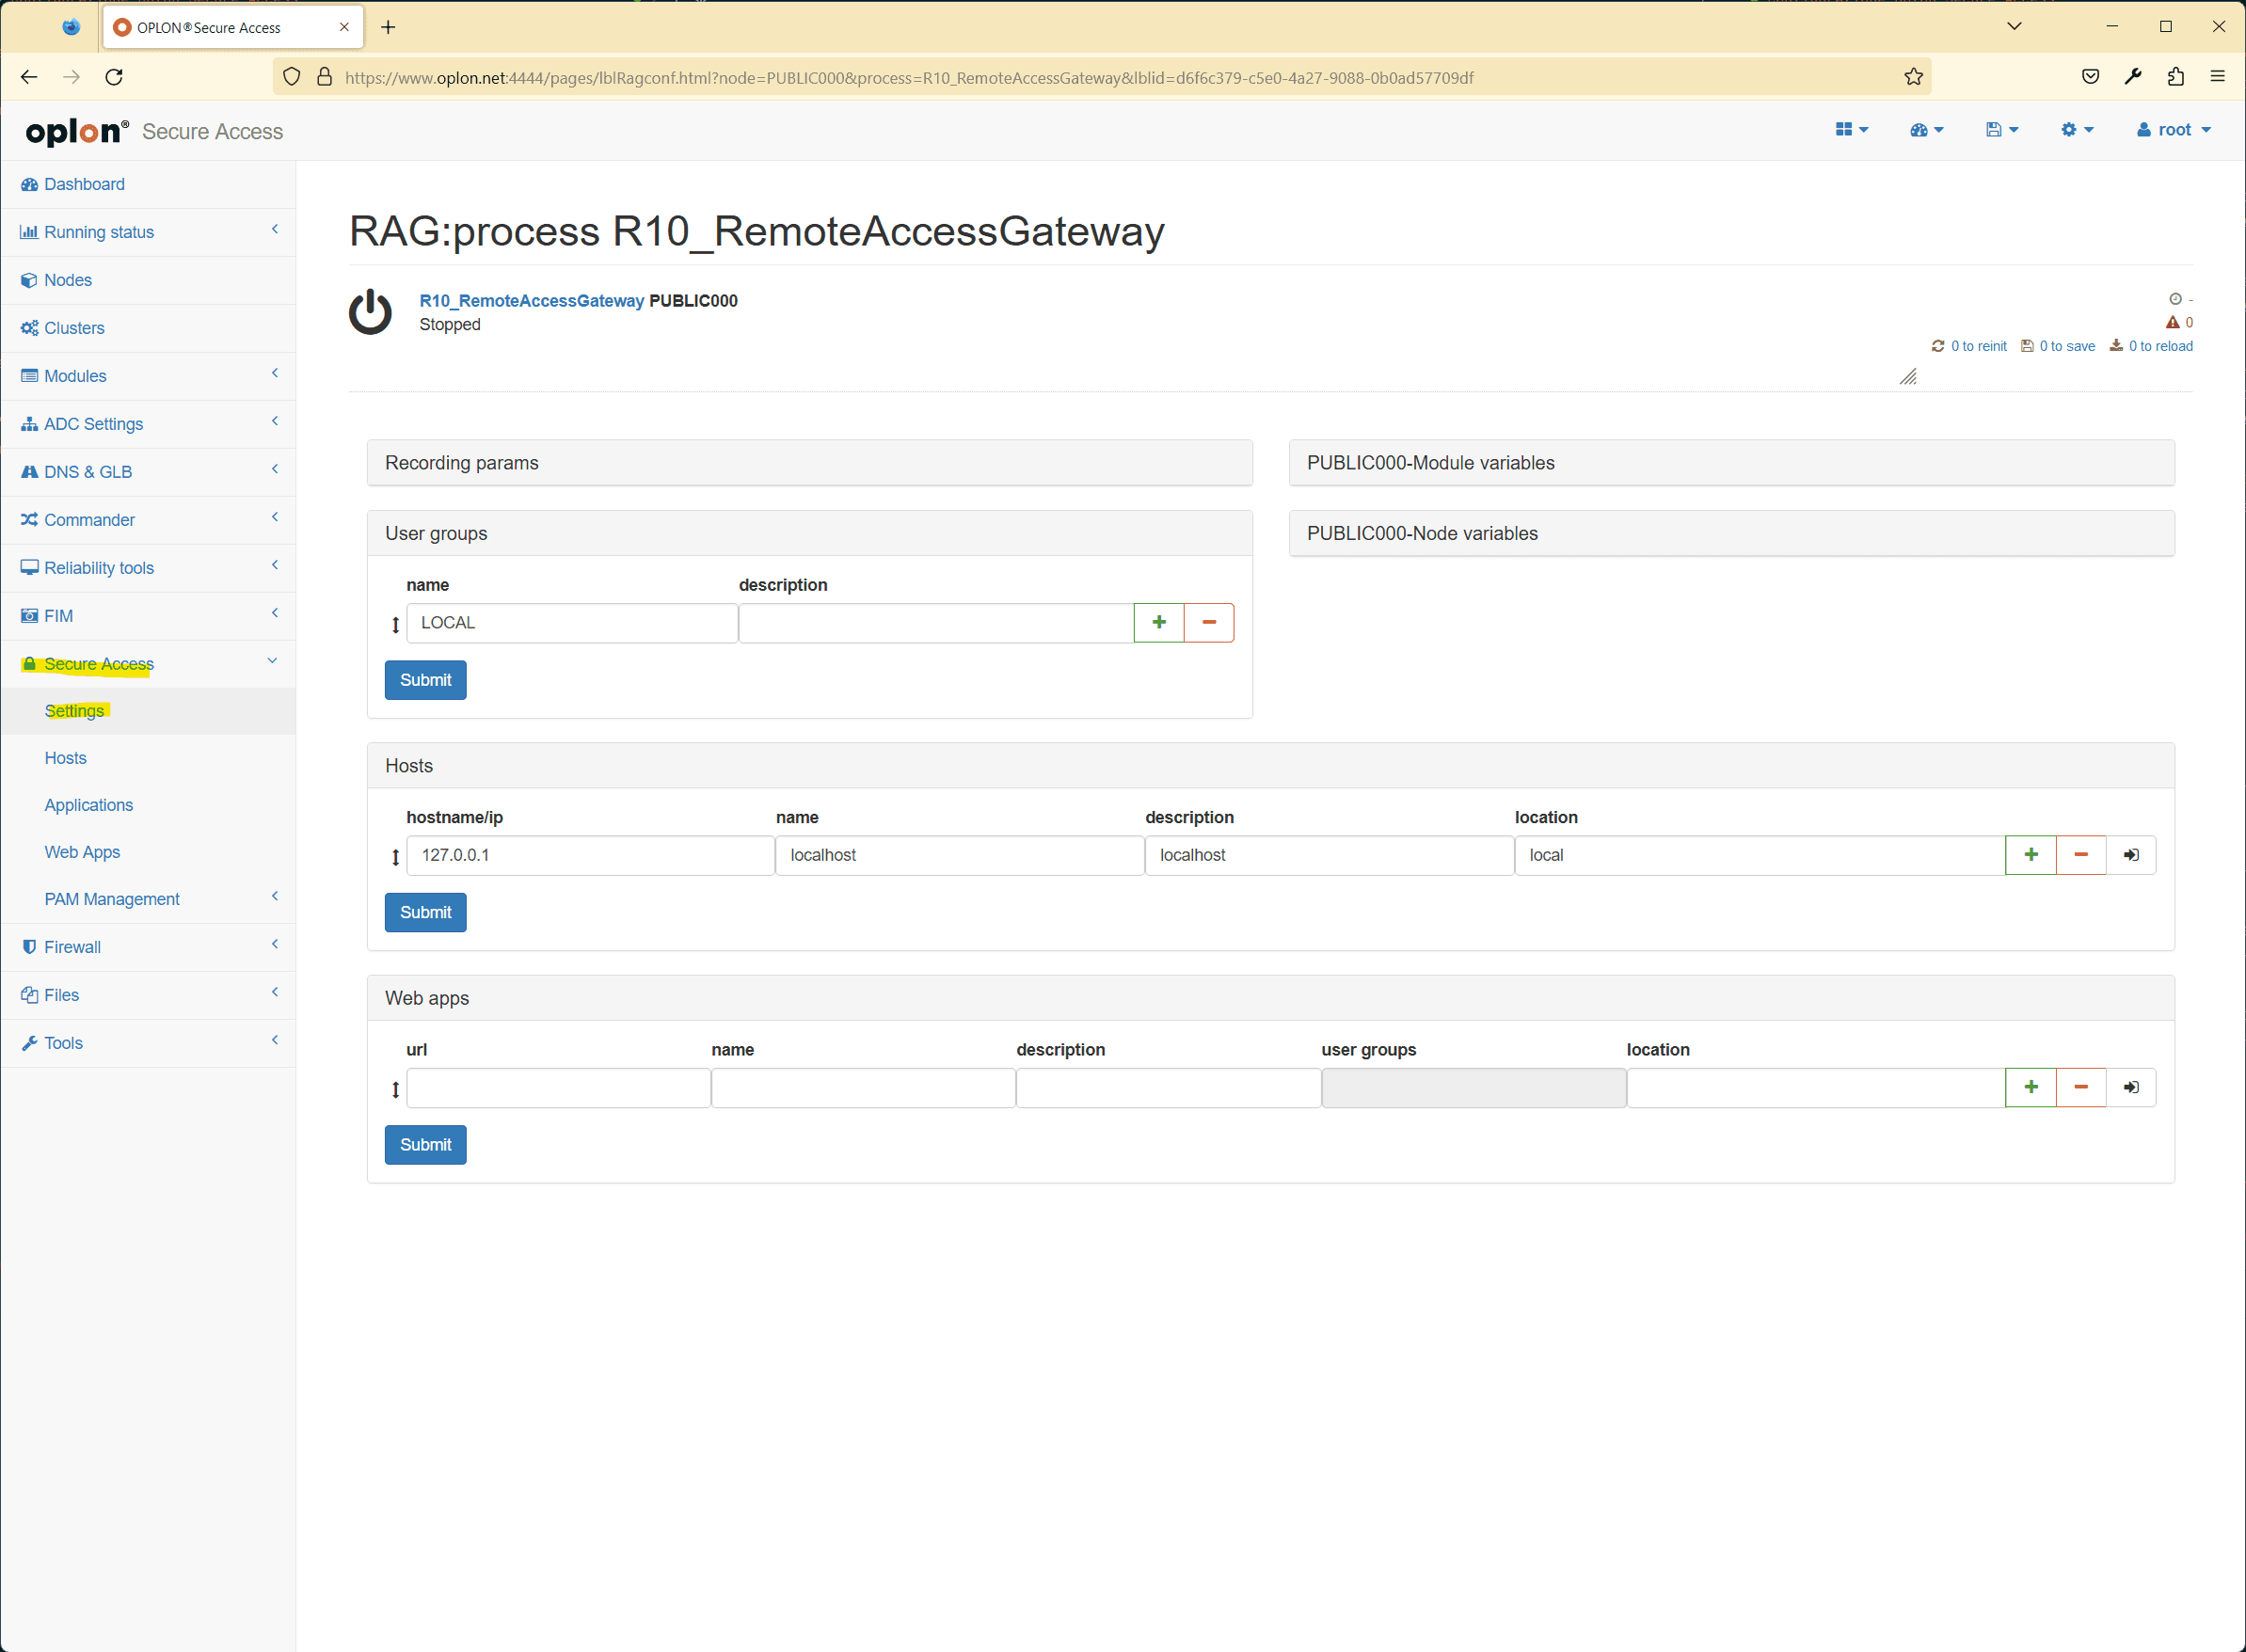
In this screen you can:
- See the list of User Groups present, with the possibility of adding new ones and deleting old ones
- See the List of Hosts, with the possibility of adding, removing and editing
- See the list of Web Apps/Links, with the possibility of adding, removing and modifying them
Added new User Groups
To add a new User Group, click on the green (+) button of an already inserted User Group this will be duplicated below to then be edited at will
Add a new Host
To add a new Host it is necessary to click on the green (+) button of an already existing Host this will be duplicated below to then be edited at will.
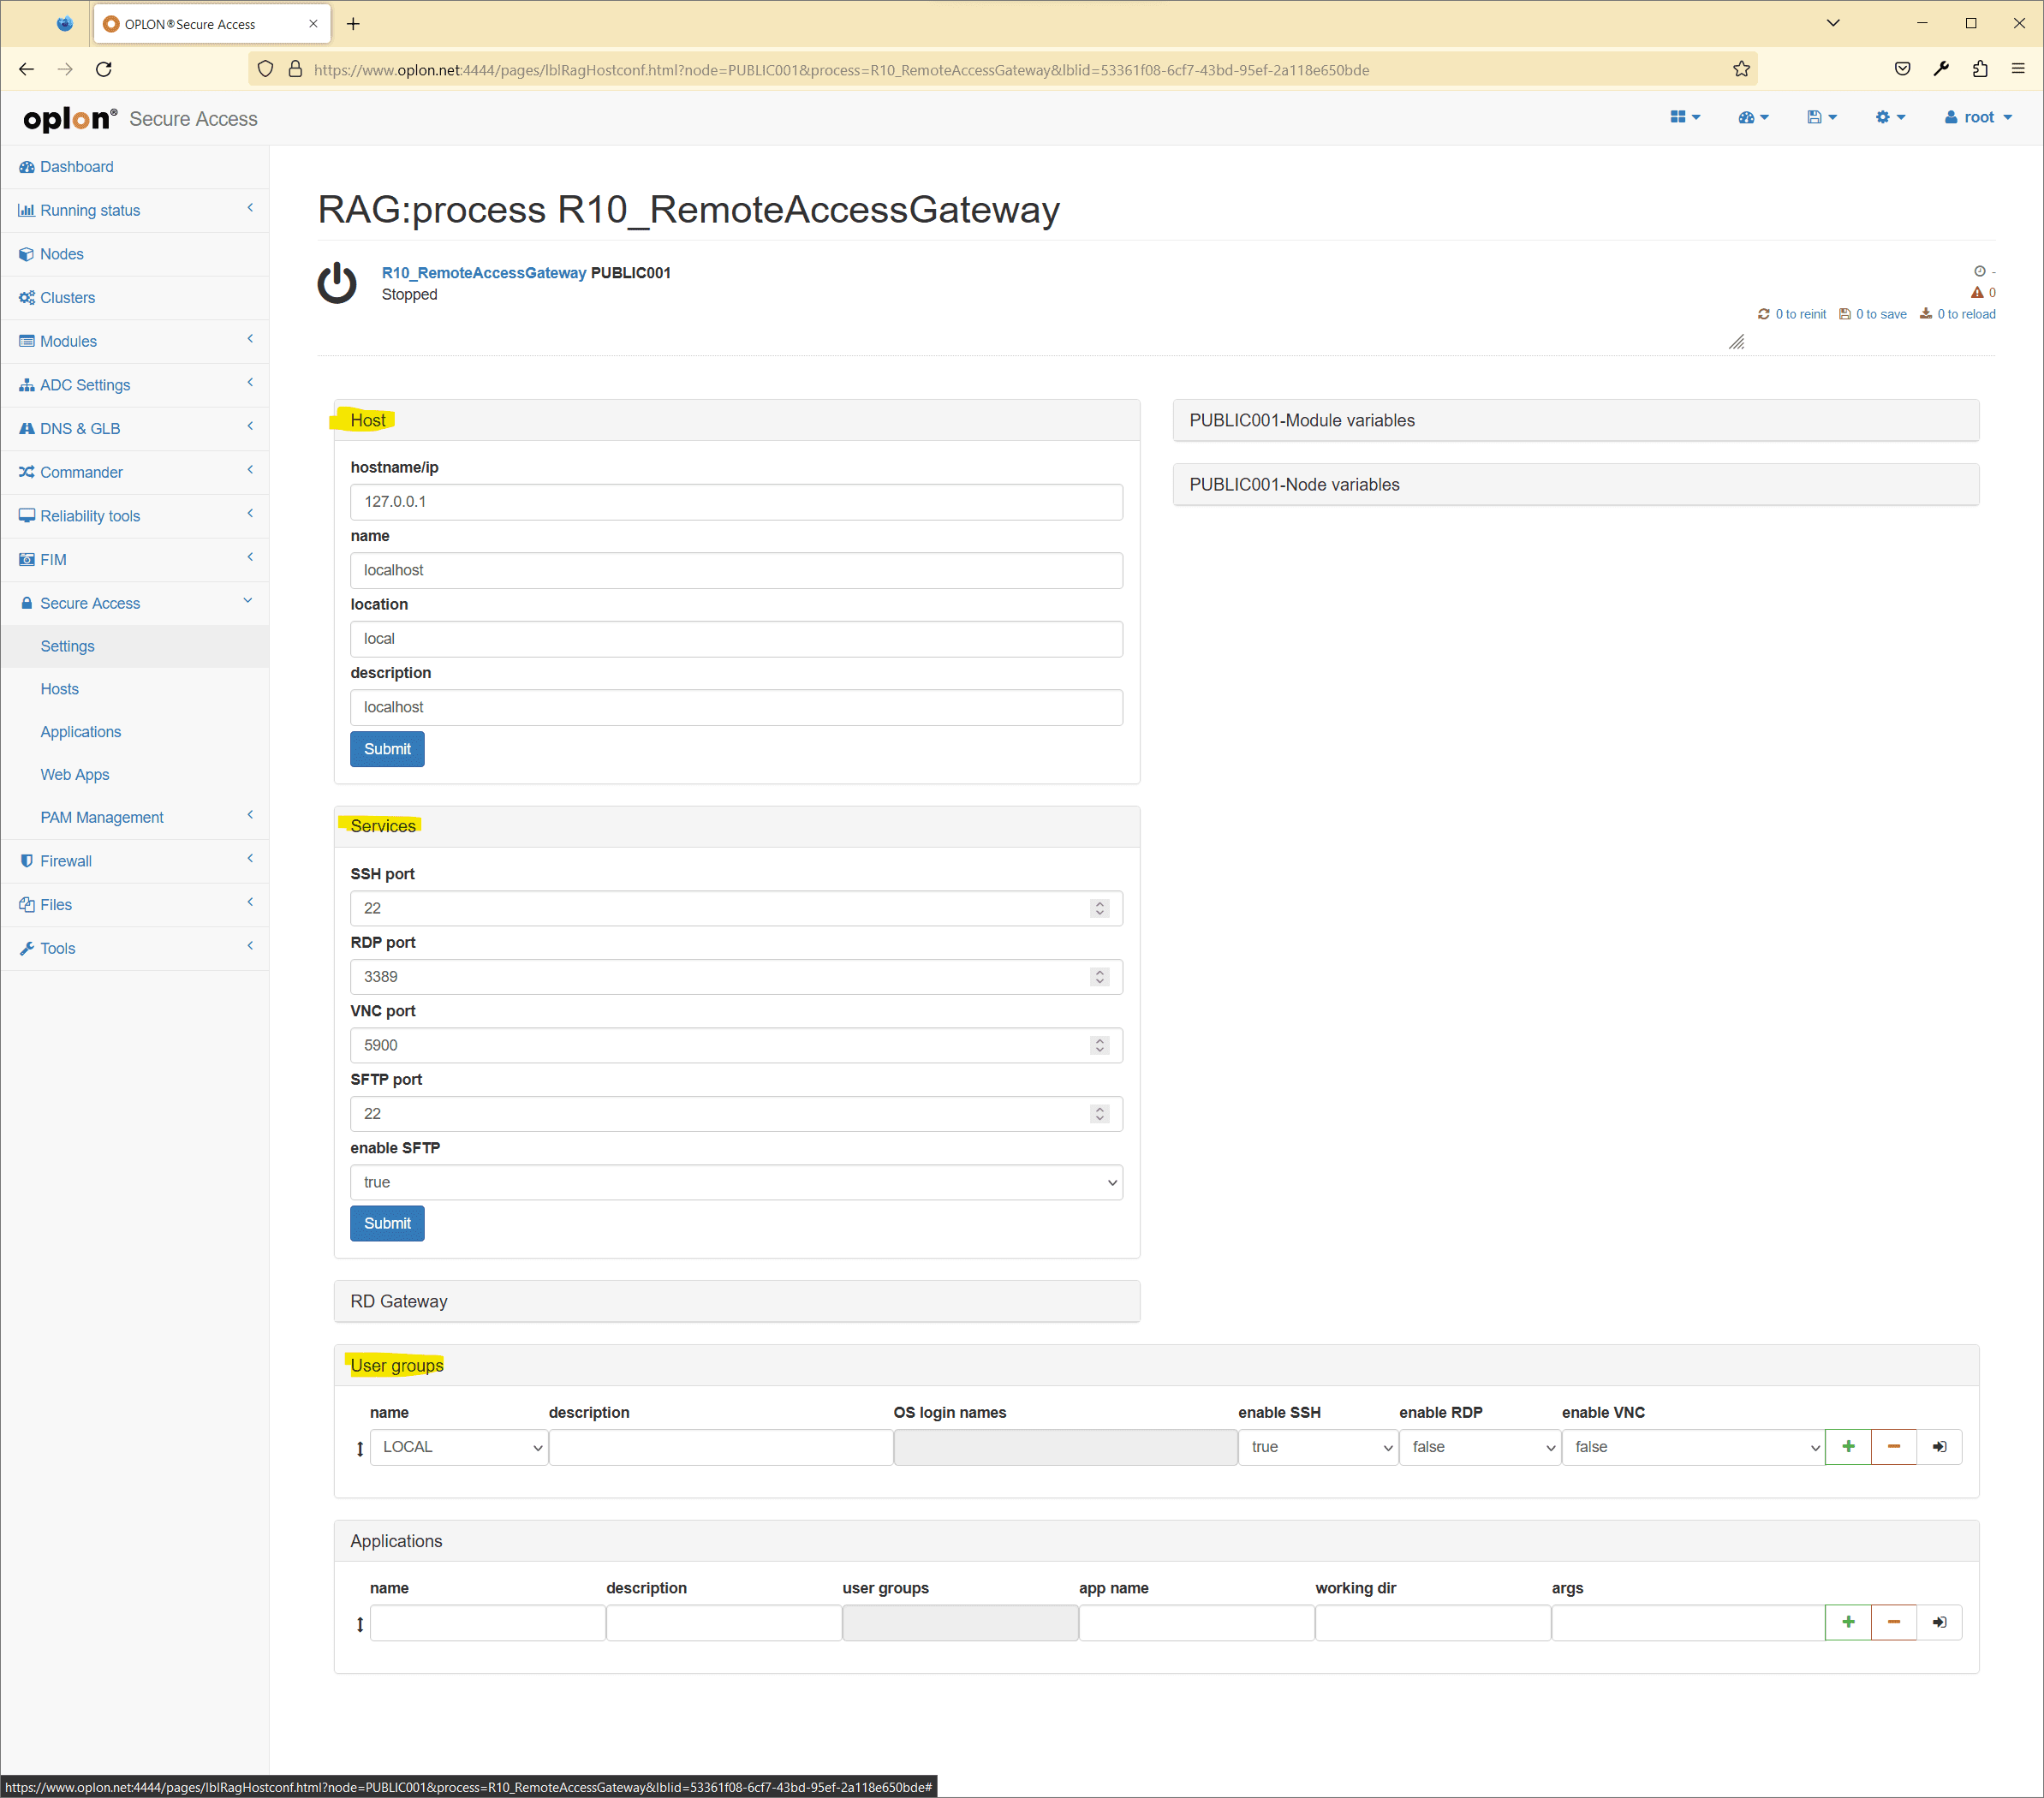
To modify a Host it is recommended to enter the details using the "See Details" button
Here we can enter:
- Hostname/ip
- Name
- Location
- Description
- Services and related ports: SSH, RDP, VNC, SFTP (File Manager)...
- Any RD Gateway (RDP Only)
- The Associated User Groups
- Any Remote App (RDP Only)
Add a new Remote App
To add a new Remote App, you must necessarily start from a Host with RDP access already configured.
Then go to Secure Access > Settings and then, open a Host.
Below in Applications we can enter:
- name: that is the name that will appear in the menu
- description
- app name: the alias of the app published via RDP
- working dir: the working directory of the app (optional)
- args: the app start arguments (optional)

Remember to always carry out Save and Re-Init at the end.
Add a new Web App
To add a new Web App, you can always go to the Settings interface and find the screen at the bottom Web Apps.
Enter the minimum information here to be able to use the Web App, i.e.:
- name
- url
- location

Remember to always carry out Save and Re-Init at the end.
Browser Isolation
If you need to follow the instructions above for the native Web App, to make the Web App available in Browser Isolation mode it is necessary to activate the enable Browser Isolation option.
From here, by entering with the black arrow at the end of the line, a series of configurations/customizations can be followed specific to Browser Isolation mode only and are:

- enable Browser Isolation: serves to enable browser isolation
- Whitelisted: serves to whitelist the URL entered above. This will have the effect of blocking navigation for everyone else url if not the url itself and possibly those specified below in "White Listed Domain":
- White Listed Domains: Here you can indicate a series of addresses not to be blocked, if you are in "Whitelisted=true", separated by commas.
The syntax to follow is:
<scheme>://<host><path>(here (opens in a new tab) for a more complete guide on the syntax)
User Group assignment
As previously mentioned, it will be the association of a specific User Group with a specific resource that will give a user the right to access it actually. Assigning a User Group to a resource (Host/RDP APP/Webapp-link) comes with a series of privileges/security policies, specific to the type of resource assigned, this paragraph lists them all. To assign a User Group within a resource, we can click on the green (+) button and select the new User Group from those already present from the drop-down menu.
By assigning a Resource via the User Group, we are able to:
- Enable/Disable SSH access
- Enable/Disable RDP access
- Enable/Disable VNC access
- Enable/Disable the File Manager, and if enabled:
- Enable/Disable Upload
- Enable/Disable Download
- Enable/Disable Hypercopy
- Enable/Disable copying (user)
- Enable/Disable paste (user)
- Enable/Disable Impersonification
- Enable/Disable Remote Desktop logging
- Enable/Disable SSH logging
- Enable the virtual printer
- Enable audio output
- Enable incoming audio

It should be remembered that once the User Groups have been assigned within a Host, they will have the possibility to login with any credentials inside the machine.
Assigning a User Group with Impersonification
The concept of Impersonification is an additional abstraction, introduced to aid the configuration of permissions
linked to resources and User Groups. It is used to resolve some configuration classes such as that of
tie a domain user to a user that is typical of that specific organization, without having configured an integration with Active Directory.
The impersonation will bind with the ID/Impersonification set on the [MFA] side (/mfa/manager) or the domain user that comes from an AD type configuration
Once a User Group has been assigned to a resource, it is possible to enable impersonation through the appropriate menu dropdown. Once set to true we can find ourselves in two cases:
- Impersonification non-strict: is when there is no associated OS login
- Impersonification strict: it is when there is at least one associated OS login Name
The logic that follows Oplon Secure Access to give an impersonation permission is as follows:
- The user will have access to the resource if and only if it has the same associated User Group e
- the associated User Group is in non-strict mode, or
- the associated User Group is in strict mode and among the list of user OS Login names there is the impersonation set for that user
In both cases the user will only have access with the Impersonation (if set)
User Group assignment summary table
| User Groups | Impersonation | OS Login Names | Expected result | |
|---|---|---|---|---|
| ✅ | ➡️ | All users belonging to the group can log in with any username and password | ||
| ✅ | ✅ | ➡️ | All users belonging to the group can enter ONLY with that set of usernames (and possibly passwords if entered in the Vault) | |
| ✅ | ✅ | ➡️ | All users belonging to the group can enter ONLY with only the username (impersonification/id) set by the MFA interface or by the domain user arriving from AD | |
| ✅ | ✅ | ✅ | ➡️ | All users belonging to the group can log in with their impersonation IF AND ONLY IF the assigned User Group contains among the OS Login Names the impersonation set by the MFA interface or by the domain user arriving from AD |
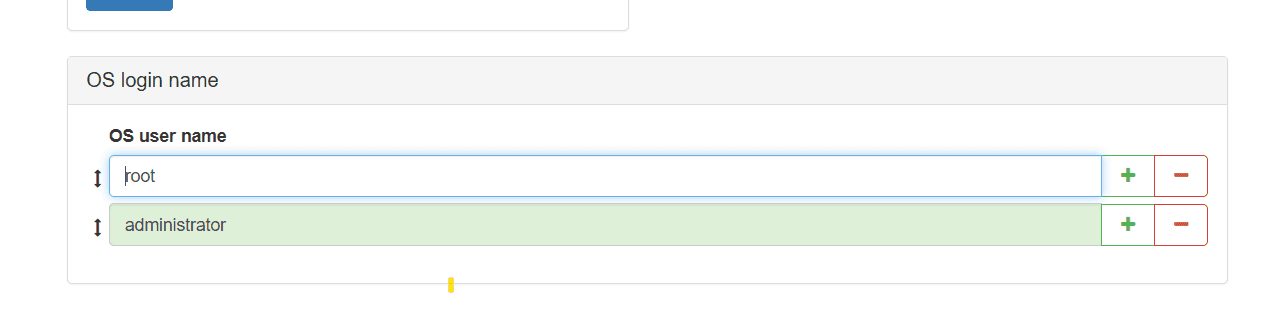
OS Login assignment to a User Group
Once a User Group has been assigned within a Host, we can assign pre-set users to it. Here we can enter as many users as there are those with whom we want to access that specific User Group.
The insertion of even a single user disables the possibility for the User Group to access with any credential forcing subsequent accesses with only the credentials indicated.
By inserting only the Username, the user who tries to access the resource will be able to request only the password.
If you also want to enter a password, to ensure that the user does not need to remember it every time, just follow this guide.
Password Entry for an OS Login (Host Vault)
To assign the password to an OS Login (assigned to a User Group) of a Host, you must go in the Host Vault section via the menu
PAM Management > Vault Manager > Vault Hosts
Search for the corresponding resource from the search bar and click the green key button
to edit the OS Login Names.
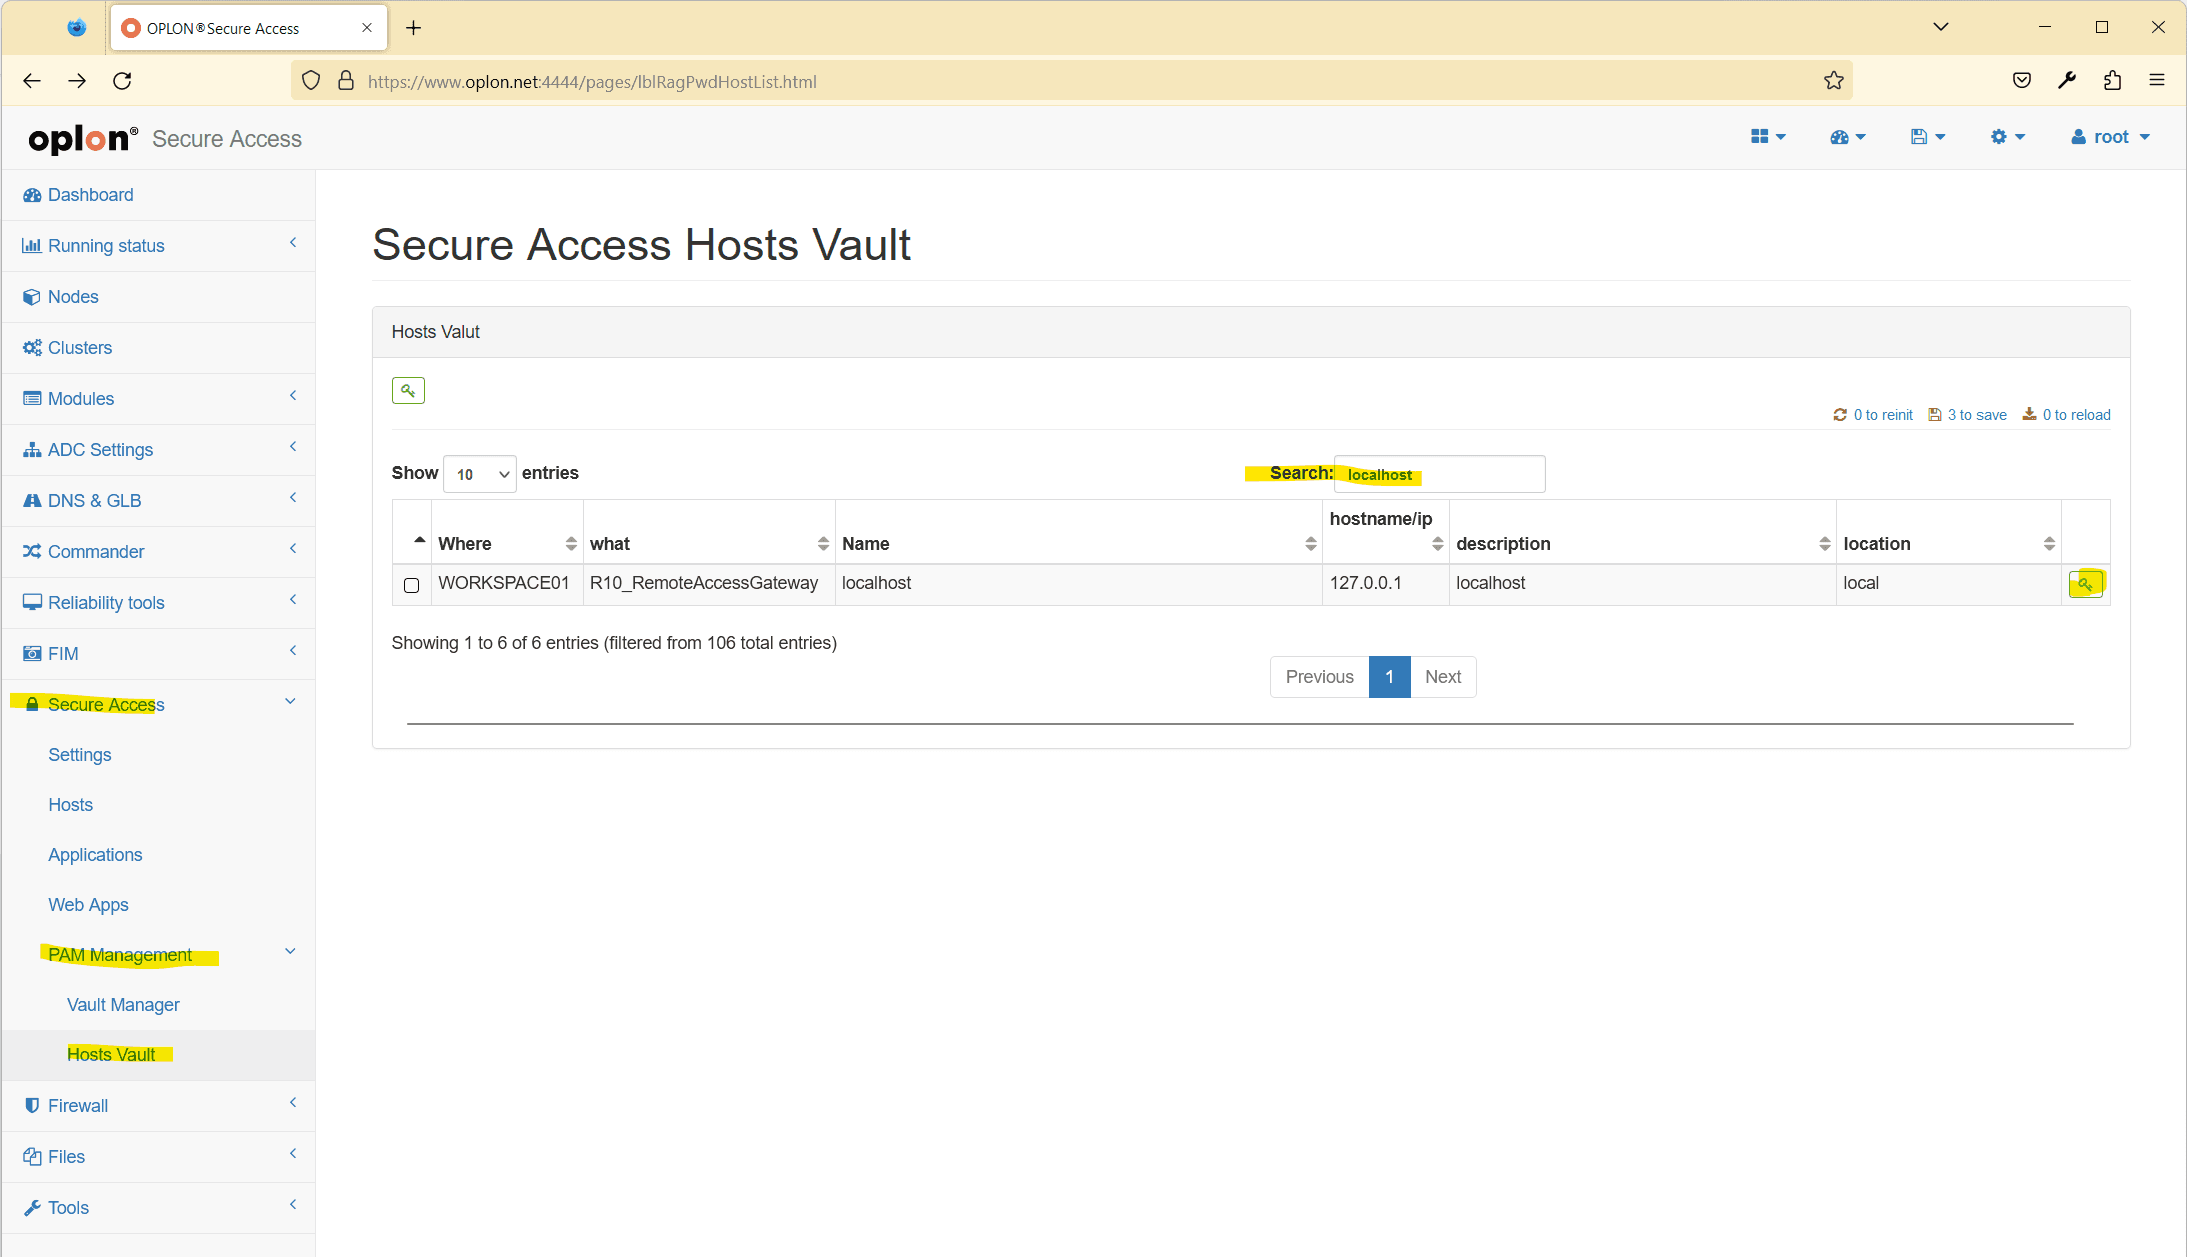
From here, select the users whose passwords you want to enter from the drop-down menu and enter them
corresponding passwords
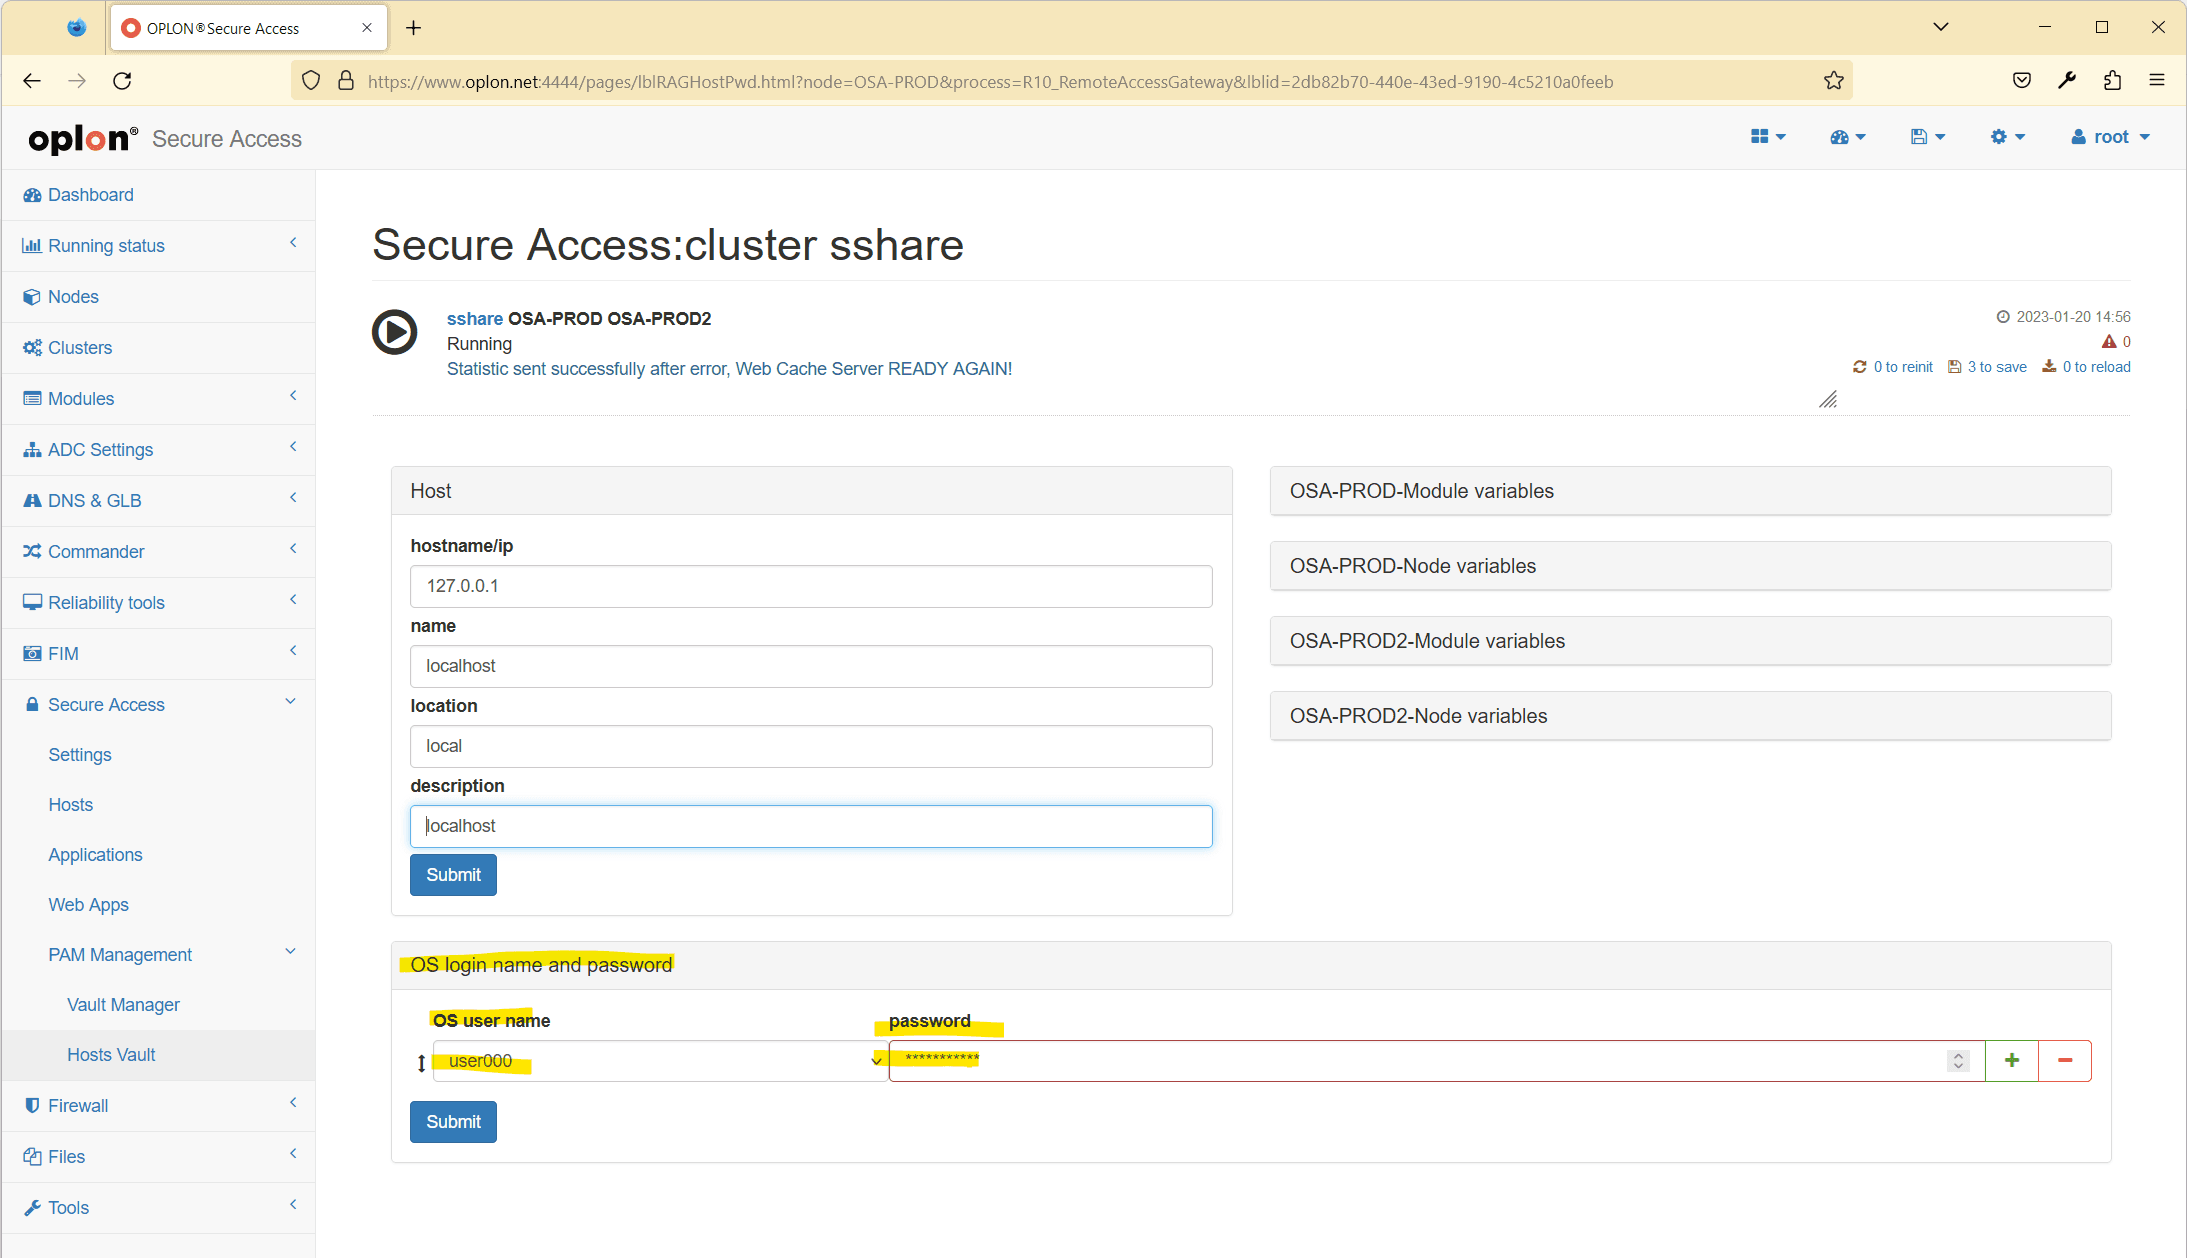
Remember to always carry out Save and Re-Init at the end.