Oplon Client — User guide
Oplon Client is the Oplon Secure Access desktop application for Windows, macOS and Linux. It is required whenever access needs a local component on the workstation: mounting shared network folders, reaching Layer 4 services in PAM/ZTNA mode, performing posture checks. Secure Access remains plugin-free and agentless (no VPN, no persistent plugins): the client is only used for the resources that need it.
The resources the client makes available are of two kinds:
- Shared Folders: network folders mounted in the local file system, as a drive on Windows and as a mount point on macOS and Linux.
- Trusted Connections: protected access to internal services. They come in two variants, Local Proxy and NAT, described in Trusted Connections.
The client has no login of its own: authentication happens in the Secure Access console in the browser. From there you pick the resource and the console hands it over to the client, which establishes the connection. Every connection is authorized individually by the Oplon gateway.
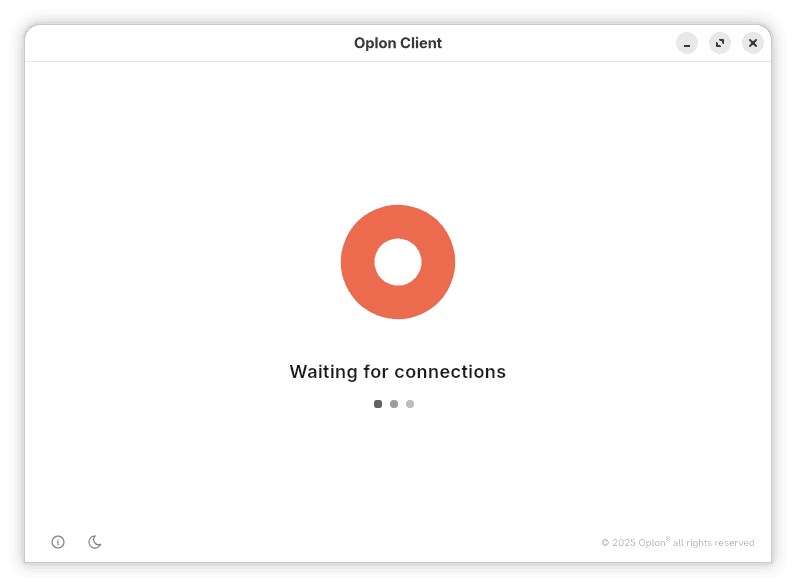
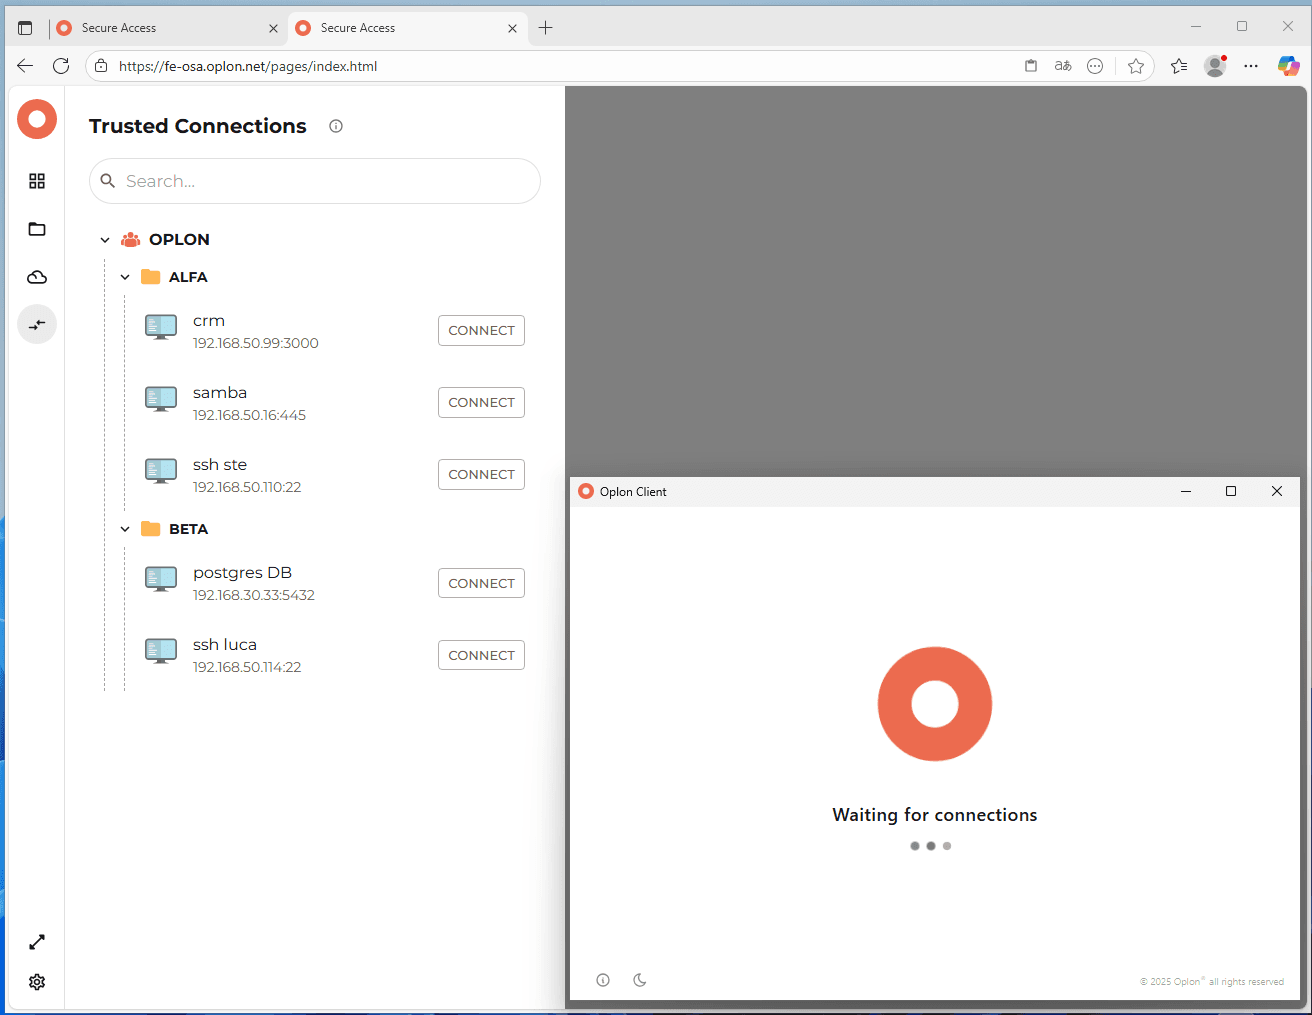
Oplon Client just after startup, waiting for requests from the console.
Compatibility
| Operating system | Versions | Architecture | Distributed package |
|---|---|---|---|
| Windows | 10 and 11 | x64 (amd64); arm64 on request | .exe installer (NSIS), signed |
| macOS | 11 Big Sur and later | Apple Silicon (arm64) | .dmg, signed and notarized |
| Linux | distributions with GTK3 + WebKit2GTK 4.1 (Debian 12+, Ubuntu 22.04+, Fedora 38+, RHEL 9+ and derivatives) | x86_64 (amd64) | .deb, .rpm, .AppImage |
Additional runtime requirements:
| System | Requirement | Notes |
|---|---|---|
| Windows | WebView2 Runtime | Installed by the installer if missing. Already present on Windows 11. |
| Windows | WinFsp | Driver used to mount Shared Folders. Installed by the installer only in administrator mode. |
| macOS | macFUSE or FUSE-T | Required to mount Shared Folders. Not included in the DMG, it must be installed separately (see Installation › macOS). Without it, Trusted Connections still work. |
| Linux | GTK3, WebKit2GTK 4.1, FUSE 3 | .deb and .rpm declare fuse3 as a dependency. For the AppImage, FUSE must already be present in the system. |
Features available per operating system
| Feature | Windows (admin install) | Windows (per-user install) | macOS | Linux (deb/rpm) | Linux (AppImage) |
|---|---|---|---|---|---|
| Shared Folders (native mount) | ✅ | ⚠️ legacy mode (network drive) | ⚠️ requires macFUSE / FUSE-T | ✅ | ✅ (FUSE required in the system) |
| Trusted Connection, Local Proxy variant | ✅ | ✅ | ✅ | ✅ | ✅ |
| Trusted Connection, NAT variant | ✅ | ❌ | ⚠️ only when started as root | ✅ | ⚠️ manual configuration |
| Automatic start at login | ✅ | ✅ | ✅ | ⚠️ manual | ⚠️ manual |
When a feature is unavailable the client disables just that one, reports it with a warning and keeps everything else working. Details are in Installation and Troubleshooting.
Installation
Windows
Run the installer and accept the Windows consent prompt (UAC).
The installer adapts to the privileges available:
| Full install (administrator) | Per-user install (without elevation) | |
|---|---|---|
| Folder | C:\Program Files\Oplon Networks\Oplon Client\ | %LOCALAPPDATA%\Programs\Oplon Networks\Oplon Client\ |
| WinFsp | installed (version 2.1.25156) | not installed |
OplonAgent service | installed and started | not installed |
| Shared Folders | native mount | legacy mode: mapped as a network drive, with some limitations on files kept open by Office applications |
| Trusted Connection NAT | available | not available |
Without elevation the installer warns with a dialog box and continues in reduced mode. To move to the full install, simply run the installer again with right click › Run as administrator, with no need to uninstall first.
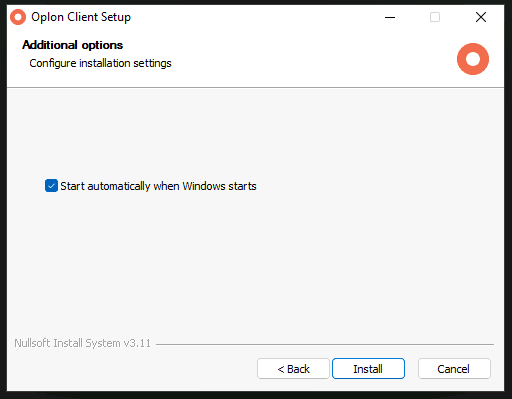
The installer offers the “Start automatically when Windows starts” checkbox, enabled by default. It can be changed at any time from the application settings.
The OplonAgent service. In full installations the privileged part of Trusted
Connection NAT (creating the virtual network adapter and the routes) is handled by
the OplonAgent system service, not by the application. The client therefore
starts and runs with no UAC prompt, because the privilege was granted once during
installation. If the service is stopped the NAT variant is no longer available and
the client reports it.
macOS
- Open the
.dmgand drag Oplon Client into the Applications folder. - Start the application from Launchpad or Finder.
Shared Folders on macOS: a FUSE component is required. macOS does not include
support for user-space filesystems, so mounting shared folders requires
macFUSE (https://macfuse.io) or FUSE-T. Installing macFUSE requires
authorizing the system extension in System Settings › Privacy & Security and a
restart. Without either one, mounting fails with an error mentioning cannot find FUSE, while Trusted Connections work normally.
Trusted Connection NAT on macOS. The NAT variant needs administrator
privileges to create the virtual network interface (utunN), and on macOS the
client only obtains them if the whole program is launched as root from a terminal:
sudo "/Applications/Oplon Client.app/Contents/MacOS/oplon_client"When started from Finder, Shared Folders and Trusted Connection Local Proxy work normally, while only the NAT variant shows as unavailable. Before using this procedure it is worth checking with your technical contact whether the assigned resources really require the NAT variant.
Linux
Recommended option: .deb or .rpm package.
sudo apt install ./oplon-client_2.1.1_amd64.deb      # Debian / Ubuntu
sudo dnf install ./oplon-client-2.1.1-1.x86_64.rpm   # Fedora / RHEL
The package installs into /opt/oplon-client/, adds the menu entry and the
oplon-client command to PATH, and grants the binary the CAP_NET_ADMIN
capability required by the NAT variant. As with Windows UAC, consent is asked only
once, at install time: from then on the client starts from the menu without
sudo.
Portable option: AppImage.
chmod +x oplon-client-2.1.1-x86_64.AppImage
./oplon-client-2.1.1-x86_64.AppImage
It requires no installation, but the NAT variant does not work as is: the AppImage content is read-only and the system ignores privileges assigned to files inside it. To enable it, extract the AppImage once and grant the capability to the extracted binary:
cd ~/opt
~/Downloads/oplon-client-2.1.1-x86_64.AppImage --appimage-extract
mv squashfs-root oplon-client
sudo setcap cap_net_admin+ep ~/opt/oplon-client/usr/bin/oplon-client
~/opt/oplon-client/AppRun         # from now on, without sudo
The folder must sit on a filesystem that supports extended attributes and is not
mounted nosuid (~ and /opt are fine, /tmp is not on some distributions),
and the setcap command must be repeated after every version update. Running
everything as root with sudo -E ./oplon-client... is not recommended, because
files written by the application and the mounted folders would end up owned by
root. If the NAT variant is needed regularly, use the .deb or .rpm package.
How to use it
The normal flow
- Start Oplon Client. The window shows the progress (Starting, System analyzed, Waiting for connections) and then waits.
- Open the Oplon Secure Access console in the browser and log in.
- In the left bar (launcher) choose the Shared Folders or Trusted Connections icon, select the resource and press Mount for folders or Connect for services.
- The console calls the client, which displays a temporary secret. Copy it and paste it into the verification screen in the console. Whenever user action is needed, the client window brings itself to the front.
- Once the secret is verified the connection is established and the app shows how to reach the resource: the mount point for a shared folder, the local address or the reachable destinations for a Trusted Connection.
- When you are done, disconnect the individual resource, or close the client to disconnect everything in an orderly way.
The client must already be running when the resource is requested from the console: delivery happens over a local channel on the workstation (see Network), so the browser and the client must be on the same computer. Only one instance can be open at a time; launching it again brings the existing window to the front.
Connection states
Every requested resource appears in the app with its own state indicator:
| State | Meaning |
|---|---|
| New mount request / New trusted connection | The request arrived from the console. |
| Waiting secret | The client is opening the session with the gateway and shows the temporary secret to copy into the console. |
| Waiting for secret validation | Secret submitted, waiting for the gateway authorization. |
| Connecting drive / Creating trusted connection | Connection in progress. |
| Drive connected / Trusted Connection established | Ready to use. |
| Warning | Connection active but with anomalies: check the details. |
| Error | Connection failed or dropped: the error text is in the resource log. |
Clicking the state indicator opens the log of that single resource, worth checking and worth quoting to support when something goes wrong.
Shared Folders
Shared folders are mounted in the local file system after the verification required by Secure Access.
-
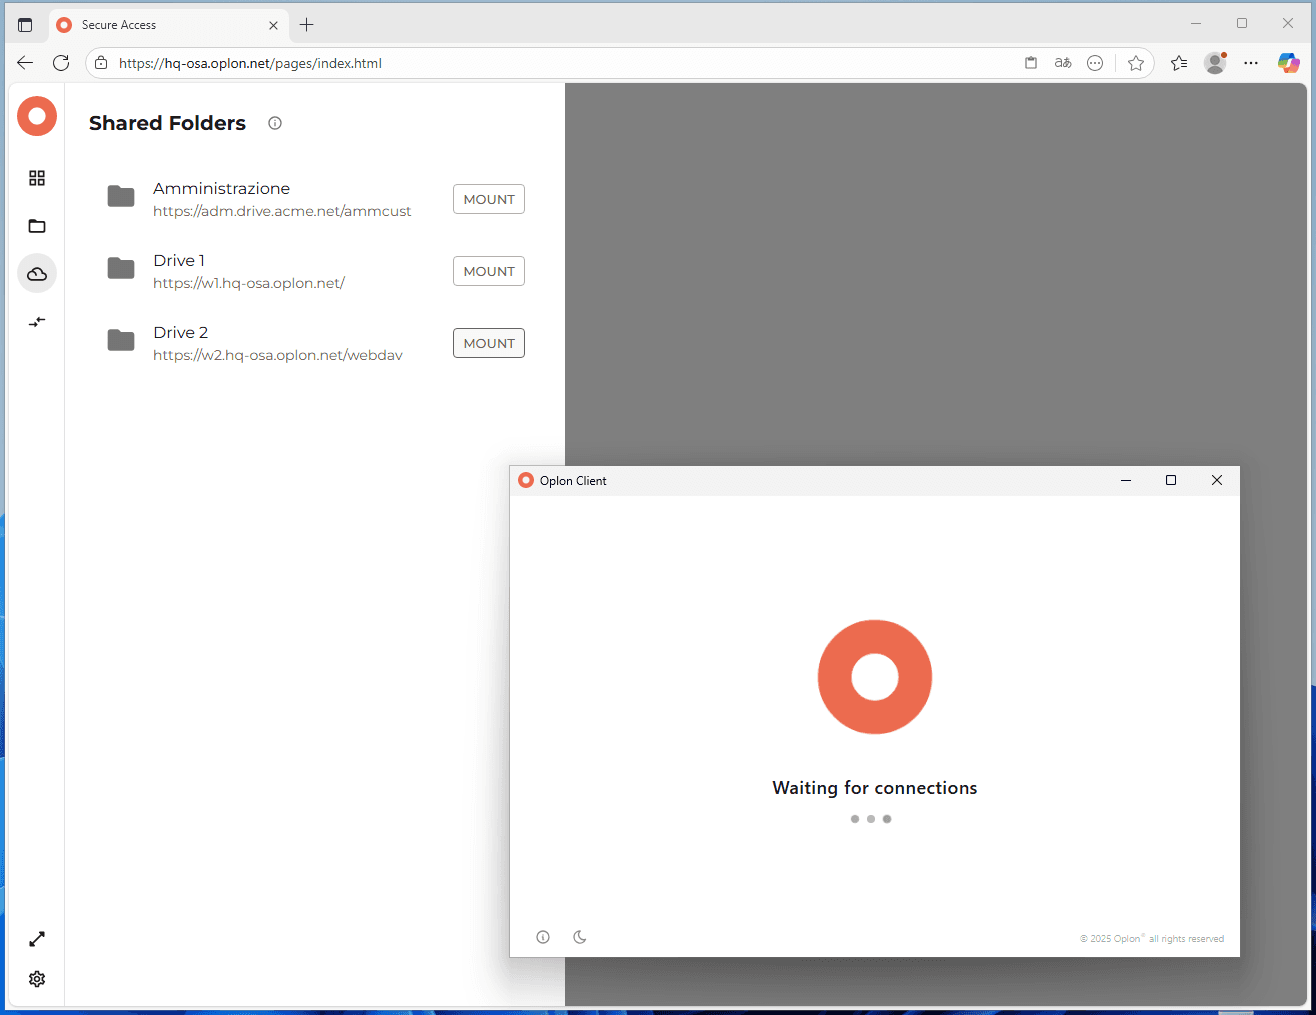
With Oplon Client already running, open the Shared Folders icon in the console launcher: it lists the available folders. Select the one you want and click Mount.
-
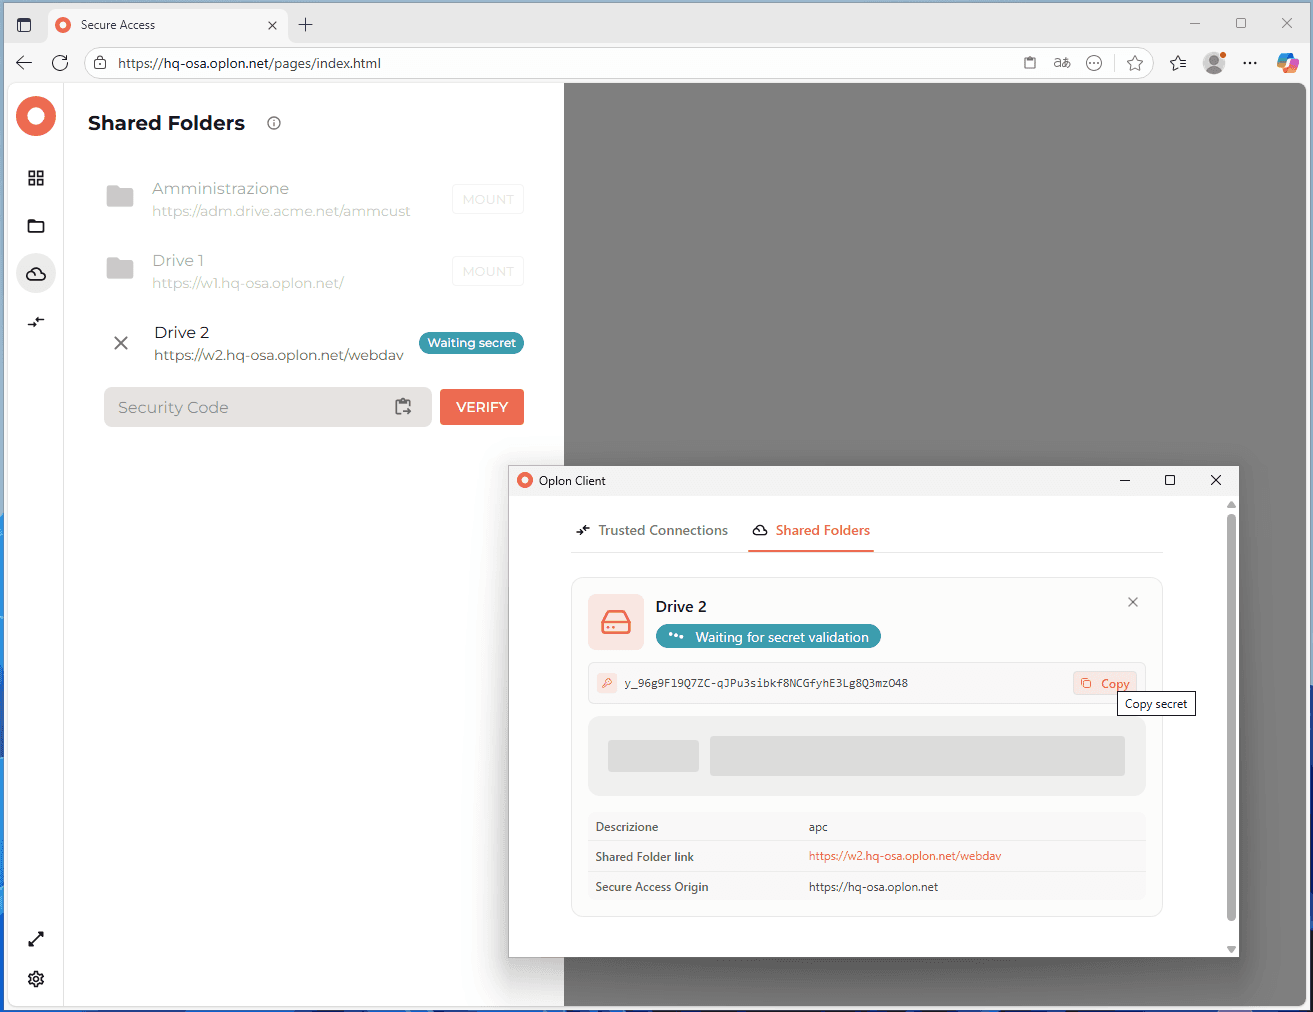
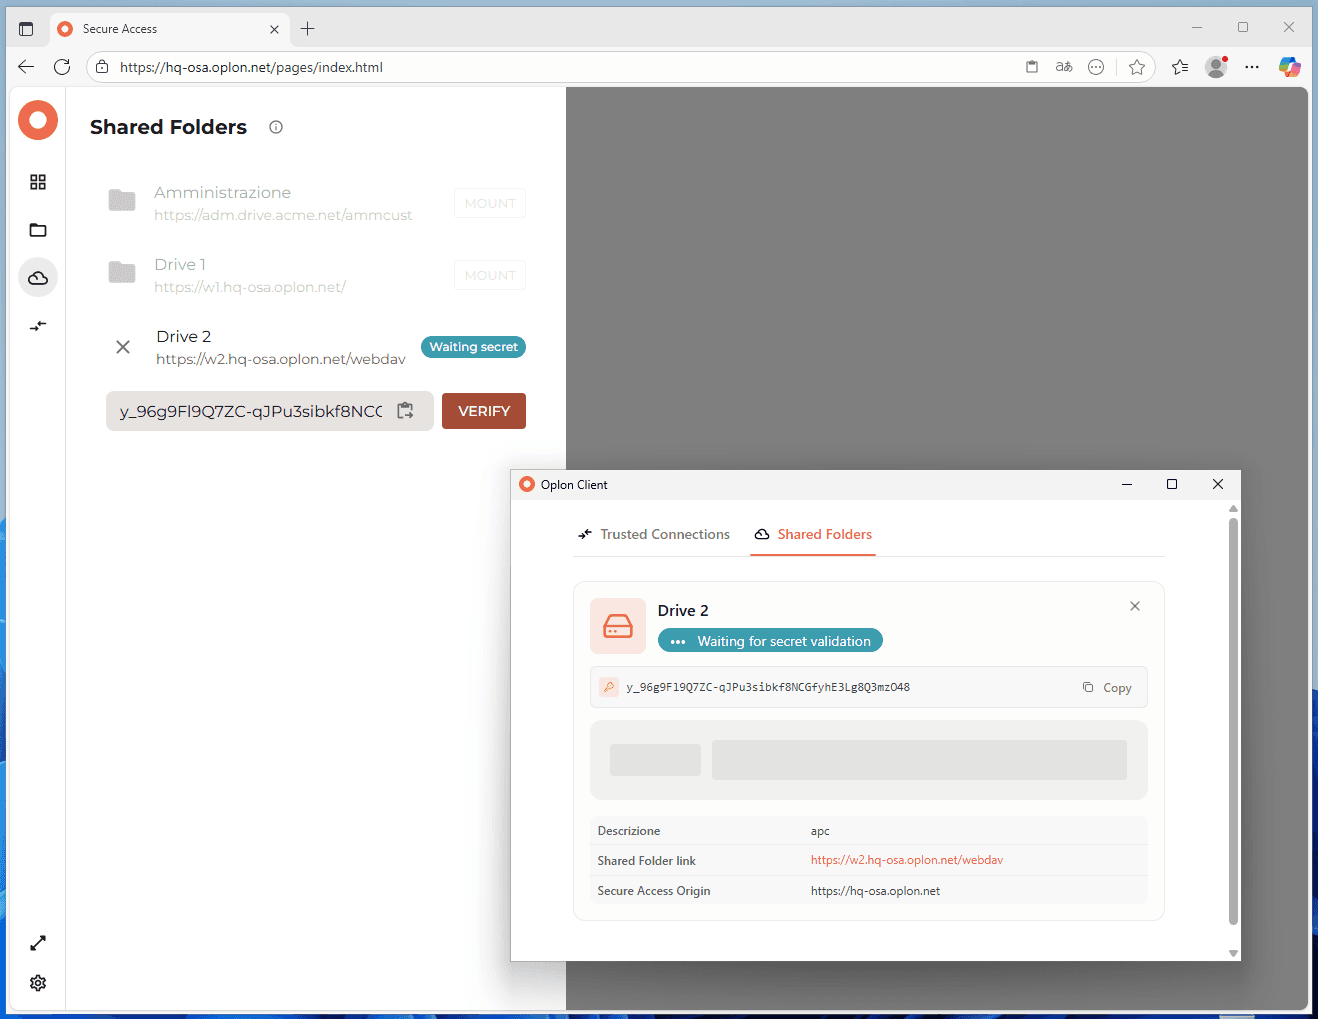
The browser makes a call to the local client, which displays a temporary secret.
-
Copy the secret from the app and paste it into the Secure Access verification screen in the browser.
-
Once verification completes the volume is mounted. The app shows “Mounted on” followed by the access point: a drive letter on Windows (
Z:), a folder on macOS and Linux (~/OplonMounts/Disk1). Clicking it opens the folder in the system file manager.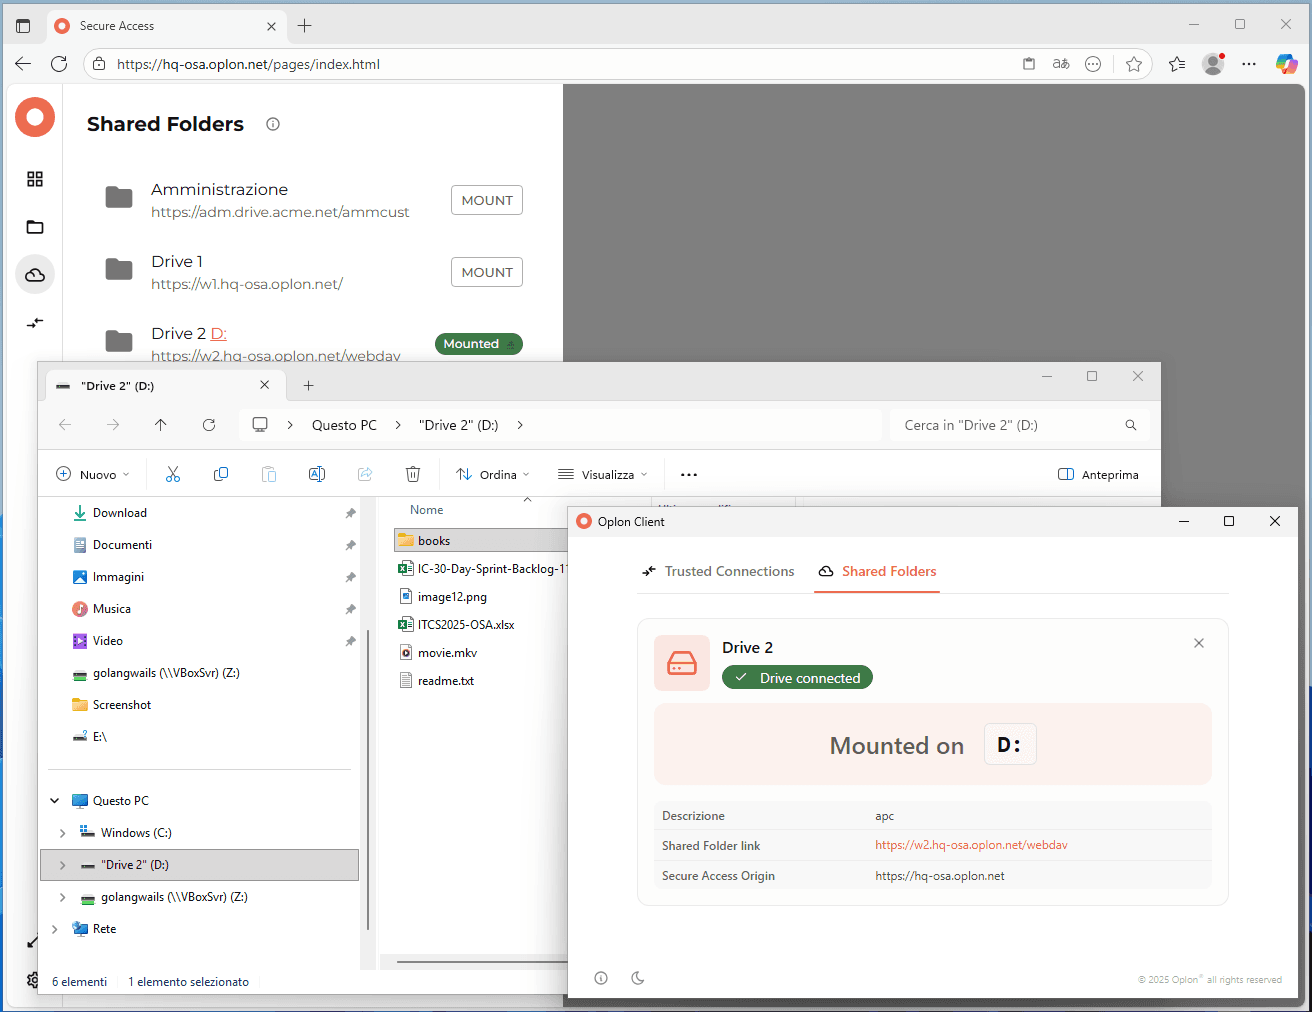
Worth keeping in mind:
- You work on the files as if they were on a local disk, but the folder is remote and writes are sent to the server in the background. Before shutting down the computer it is best to close the documents and wait for the client to finish.
- Close the client from its close button, confirming with Terminate: this way it
waits for the queued uploads to complete before unmounting. Killing the process
forcefully (Task Manager,
kill -9) can lose the most recent changes that have not been transmitted yet. - If a file cannot be synchronized, a “File Sync Errors” section appears with the file name, time and error details. Clicking the name opens the folder with the file selected; the ✕ removes the entry from the list and does not touch the file.
- The same folder cannot be mounted twice. Attempting it produces the message “WebDAV already mounted, please unmount it first”.
Trusted Connections
A Trusted Connection gives access to an internal service without exposing the network that hosts it. They come in two variants, Local Proxy and NAT: what changes is the way the service is made reachable on the workstation, not the activation procedure. The variant is decided by the gateway in the resource configuration, it is not a user choice; the one in use is shown by the label next to the resource name.
Activation is the same for both:
-
In the console launcher open the Trusted Connections icon, which lists the available services; select the one you want and click Connect.
-
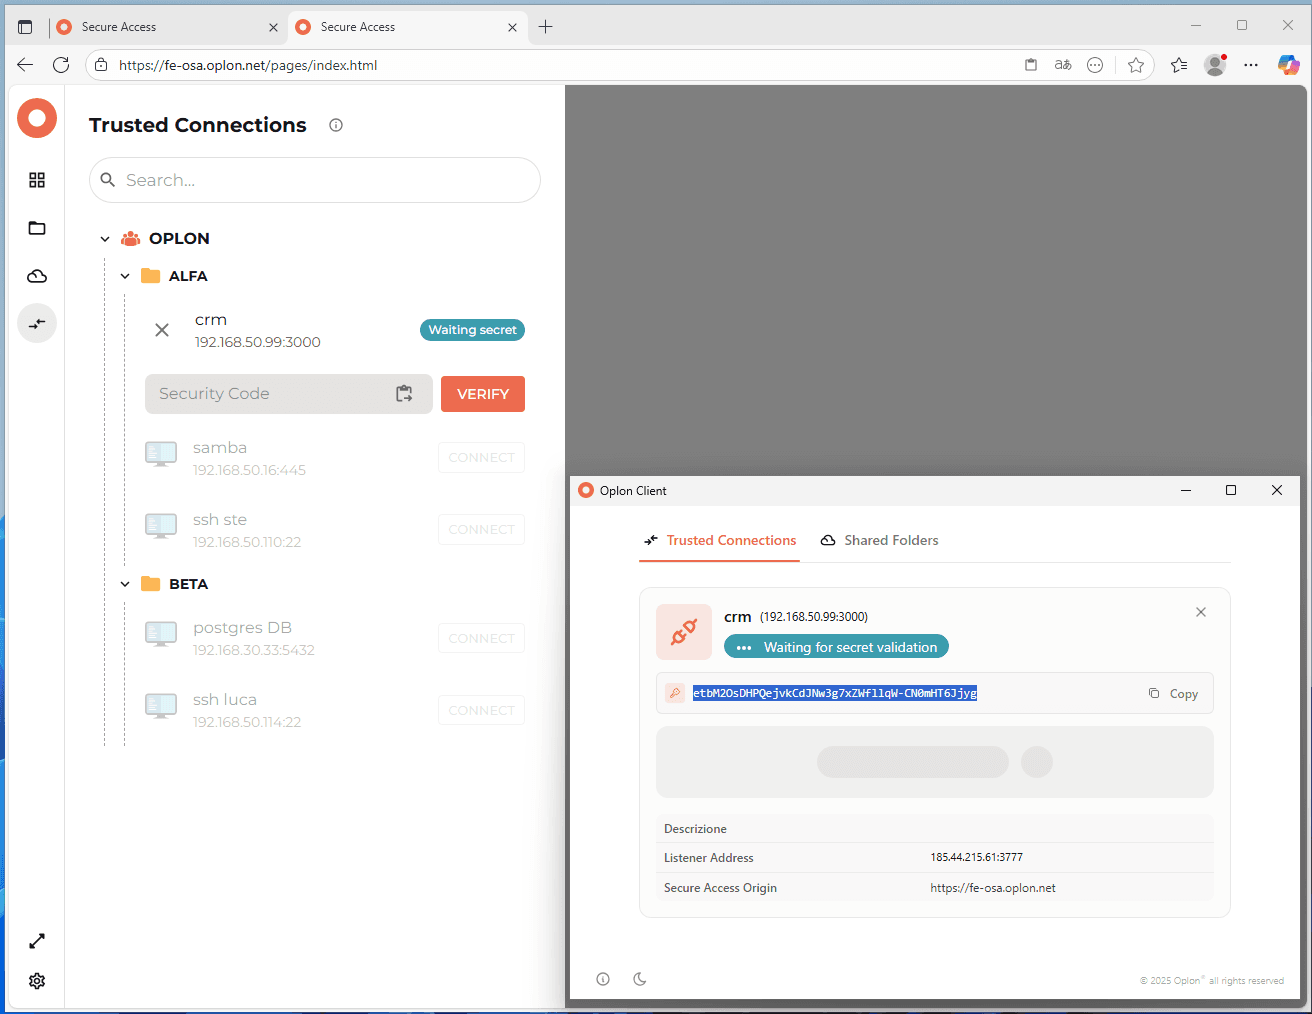
The browser makes a call to the local client: copy the temporary secret shown by the app and paste it into the Secure Access verification screen.
-
Once verification completes the connection is established and the app shows how to use it, differently depending on the variant.
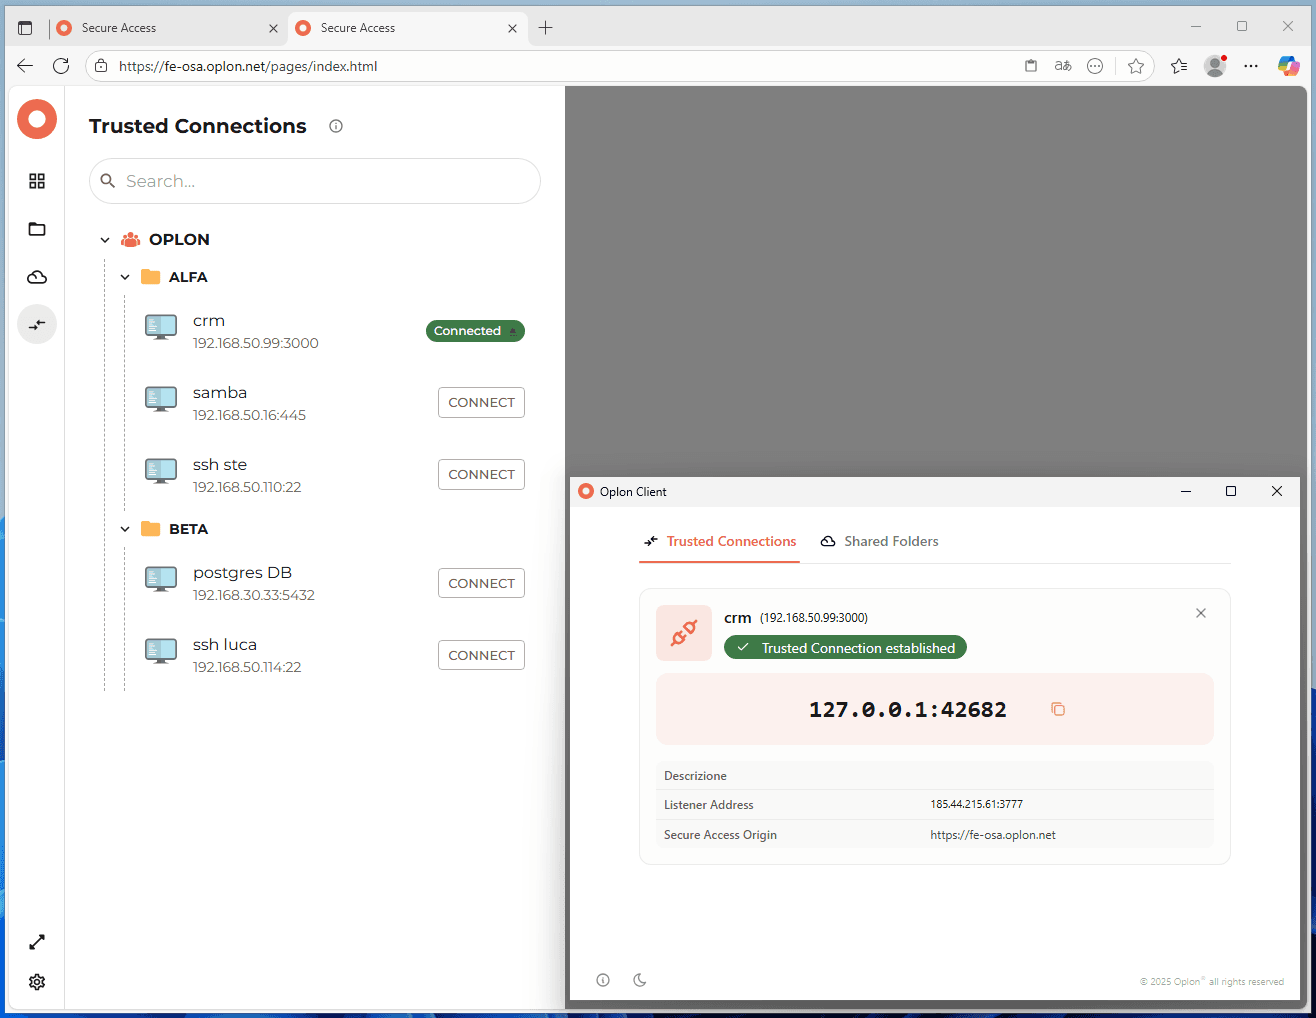
Local Proxy variant
The remote service becomes a local address. The app shows the mapping
remote-address:port → 127.0.0.1:port and two buttons, one to copy the local
address and one to open it in the browser. In your applications (database clients,
remote desktop, browsers) you use the local address instead of the real backend
address. The local port is assigned automatically, or it is the one fixed in the
resource configuration.
This variant exposes a single service and works on every operating system, with no special privileges.
NAT variant
An encrypted tunnel to the remote network is created. The app lists the “Reachable destinations”, that is the subnets reachable through the tunnel, and each destination can be copied. You keep using the real addresses of the remote network: only traffic towards those destinations goes through the tunnel, the rest of your connectivity is untouched.
A countdown appears next to the resource name, because the NAT session has a maximum duration: when it expires the tunnel closes by itself, with a warning. To continue, request the resource again from the console.
The tunnel requires network privileges on the workstation, so the NAT variant is not available on every installation: see the table in Compatibility and the installation notes for your system.
Resource details
The ⓘ button at the top left of the icon opens the details: identifier (ID), URL, Port, Origin, the address assigned inside the tunnel (Tunnel IP, NAT variant only), the availability windows (Schedule) and the session duration (TTL, with Status and Expires/Closes). The Schedule windows, when present, show the hours in which the resource can be used according to company policies: outside those hours the connection is not granted.
Disconnecting
The close button on the resource asks for confirmation (Cancel / Remove) and then unmounts the folder or closes the tunnel. Closing the application asks for a single confirmation (“Terminate Oplon Client”) and disconnects all active resources. Some resources can also be disconnected from the console.
Settings and access to logs
They open from the Info button at the bottom left of the app window.
| Item | Description |
|---|---|
| Launch at startup | Starts the client at login. Not present on Linux (see the note below). |
| Dark mode | Light/dark theme. On first start it follows the operating system setting. |
| Version / Documentation | Installed version and link to this documentation. |
| Log file path | Path of the log folder, selectable and copyable: the folder button opens it in the file manager, alternatively paste the path into your own file manager. Used to diagnose problems or to provide information to support (see Logs and What to attach to a support request). |
| EULA & Third-party Licenses | Licenses of third-party components. |
On Linux automatic start is not handled by the application. To enable it manually:
mkdir -p ~/.config/autostart
cp /usr/share/applications/oplon-client.desktop ~/.config/autostart/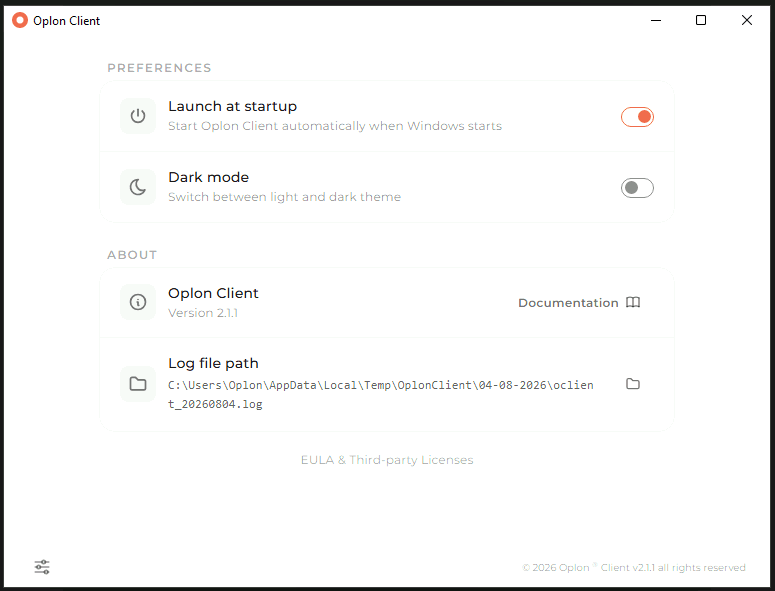
Where the files are
All paths are per user: two users on the same computer have separate settings, cache and logs.
Configuration
It holds settings.json (theme and preferences) and it is the folder where any
mTLS client certificates are to be copied (see Client certificates mTLS). It is created at every
startup, even if empty.
| System | Path |
|---|---|
| Windows | %AppData%\OplonClient\, that is C:\Users\<user>\AppData\Roaming\OplonClient\ |
| macOS | ~/Library/Application Support/OplonClient/ |
| Linux | ~/.config/OplonClient/ (or $XDG_CONFIG_HOME/OplonClient/) |
From earlier versions an oplon-client folder (lowercase) may also exist in the
same location: it is still read, but new installations use the one above.
Shared folder cache
Shared Folders use a local cache to make file reads smooth and to queue writes towards the server.
| System | Path |
|---|---|
| Windows | %LocalAppData%\OplonClient\vfs-cache\ |
| macOS | ~/Library/Caches/OplonClient/vfs-cache/ |
| Linux | ~/.cache/OplonClient/vfs-cache/ (or $XDG_CACHE_HOME/OplonClient/vfs-cache/) |
Internal structure: one subfolder per shared folder, with the technical name
sf_<code>, containing vfs/ (the data) and vfsMeta/ (the metadata). The name
is stable, so reconnecting the same resource reuses the cache instead of
recreating it.
Automatic cleanup policy, applied by the client:
| Rule | Default value |
|---|---|
| Removal of files unused for more than | 72 hours |
| Maximum cache size per shared folder | 10 GB |
The cache can be deleted by hand with the client closed and no folder mounted, and it is recreated when needed. Doing it while a folder is mounted can instead lose the writes not yet sent to the server. If disk space is a recurring problem, report it to your administrator: cache parameters are configurable centrally for each resource.
Shared folder mount points
| System | Where |
|---|---|
| Windows | first free drive letter (A: and B: excluded), e.g. Z: |
| macOS / Linux | ~/OplonMounts/Disk1, ~/OplonMounts/Disk2, … |
The ~/OplonMounts/DiskN folders remain in place, empty, even after
disconnection: this is normal, they get reused.
Logs
| What | Path |
|---|---|
| Client log (all systems) | <temporary folder>/OplonClient/<dd-mm-yyyy>/oclient_<yyyymmdd>.log |
| — on Windows | %TEMP%\OplonClient\03-08-2026\oclient_20260803.log |
| — on Linux | /tmp/OplonClient/03-08-2026/oclient_20260803.log |
| — on macOS | $TMPDIR/OplonClient/03-08-2026/oclient_20260803.log ($TMPDIR is a folder under /var/folders/...) |
| OplonAgent service log (Windows only) | C:\ProgramData\Oplon Networks\Oplon Client\agent\agent-<yyyymmdd>.log |
The path of the current log is always readable, and openable with one click, in the application settings. One file is created per day. The Windows agent logs are cleaned up automatically after 14 days; the client ones live in the system temporary folder and are removed by the normal operating system cleanups. The logs contain no passwords and no session credentials, so they can be attached to a support request.
Installed program
| System | Path |
|---|---|
| Windows (admin) | C:\Program Files\Oplon Networks\Oplon Client\ |
| Windows (per-user) | %LOCALAPPDATA%\Programs\Oplon Networks\Oplon Client\ |
| macOS | /Applications/Oplon Client.app |
| Linux (deb/rpm) | /opt/oplon-client/ (+ the oplon-client command in PATH) |
| Linux (AppImage) | wherever the .AppImage file was saved |
Network: what it opens and what it contacts
Listening on the workstation, only on the local interface (localhost) and not
reachable from other computers:
| Port | What it is for |
|---|---|
12345/TCP | Channel the console in the browser uses to hand requests to the client. It must be free: if another program occupies it, the client receives no requests. |
| variable local port | One for each Trusted Connection in the Local Proxy variant: it is the address shown by the app. |
| variable local port | Internal control channel of the Shared Folders engine, protected by credentials generated at every startup. |
Outbound connections (HTTPS, port 443):
| Destination | Why |
|---|---|
| Your organization’s Oplon gateway | Session authorization, access to shared folders, Trusted Connection tunnels. |
download.oplon.net | Compatibility check between the client version and the gateway version. |
No port is opened towards the outside and the client accepts no connections from
the network. With a very restrictive local firewall, allow traffic on localhost
and the outbound HTTPS destinations listed above.
Security and confidentiality
How credentials are handled
- Credentials used to access shared folders are valid for a single session, are requested from the gateway at connection time and are never written to disk.
- Trusted Connection NAT sessions have an expiry, shown by the app: when it expires the tunnel closes and access has to be requested again.
- With every request the client sends the gateway some technical information about the workstation (operating system and version, architecture, host and user name, domain membership, IP addresses of the interfaces), which the security policies use to decide whether the workstation is allowed.
Client certificates (mTLS)
If your organization requires mutual TLS authentication, the administrator
provides a pair of files: a certificate (.crt) and its private key (.key), in
PEM format with the key not password-protected. They must be copied into the
configuration folder given in Configuration.
Rules to follow:
- only one pair of files per folder: the first
.crtand the first.keyfound are the ones used; - on macOS and Linux set restrictive permissions on the key
(
chmod 600 client.key); - do not put the certificates in the program folder: on macOS this would invalidate the application signature, and with the AppImage it is not possible.
To check that they were loaded, look in the log at startup for the line mTLS client certificates found. If it is missing, mTLS client certificates not found
appears instead, with the path where the client was looking for them.
Troubleshooting
Warnings that may appear in the application
| Warning | Meaning and what to do |
|---|---|
| ”Trusted connection (NAT mode) is not available in this installation” | The privilege or the component needed for the tunnel is missing. Windows: per-user install or OplonAgent service stopped, reinstall as administrator or start the service. Linux: CAP_NET_ADMIN missing, use the .deb/.rpm package or follow the AppImage procedure in Installation › Linux. macOS: start as root (Installation › macOS). The warning only appears if a resource in the NAT variant was actually requested. |
| ”Shared Folders running in legacy mode” | WinFsp is not installed (Windows per-user install). Folders are mapped as network drives: they work, but some applications, typically Office with its temporary files, may have problems. Reinstall as administrator for the native mount. |
| ”Oplon Agent is not installed / is not running” | The Windows service that manages NAT tunnels is not present or is stopped. Reinstall as administrator, or start the OplonAgent service from the Services console. |
| ”Oplon Client and Oplon Agent versions do not match” | A temporary situation, typical of an update performed with the application open. Close and reopen the client; if it persists, reinstall. |
| ”WebDAV already mounted, please unmount it first” | The same folder is already connected. Disconnect it from the app and try again. |
| ”Version not compatible / Please download version X” | The client version is not compatible with the gateway. Install the version indicated in the message. |
Common symptoms
| Symptom | Typical causes and checks |
|---|---|
| The resource does not reach the client from the console | The client is not running; or port 12345 is occupied by another program; or the console is open in a browser on another computer. |
The shared folder does not mount, the error mentions cannot find FUSE | On macOS macFUSE / FUSE-T is missing: install it and authorize the system extension (Installation › macOS). |
| The shared folder mounts but does not open | On Linux with the AppImage: FUSE is not present in the system. Install the distribution’s fuse3 package. |
| Saved files do not reach the server | The client was killed forcefully before the uploads completed. Reconnect the folder and check the File Sync Errors section. |
| Repeated errors on one shared folder when several are open | Gateway-side configuration to be checked: report it to your administrator, indicating which folders were connected at the same time. |
| The Trusted Connection NAT closes after a few hours | Expected behavior, it is the session expiry. Request the resource again from the console. |
| On macOS the application shows as “damaged” | Package altered after signing. Download the DMG again from the official source and do not modify the content of the application. |
| Growing disk usage | Shared folder cache. It can be deleted with the client closed. |
What to attach to a support request
- Client version (Settings › About) and operating system with version.
- Client log file: path in Settings › Log file path, openable with the folder button.
- On Windows, for problems with Trusted Connection NAT, the agent log as well:
C:\ProgramData\Oplon Networks\Oplon Client\agent\. - The log of the resource involved (click the state indicator) and the approximate time of the problem.
Update and uninstallation
Update. Install the new version over the existing one: on Windows the
installer stops the service, replaces the files and restarts it; on macOS you
replace the application in Applications; on Linux you update the package with
the distribution package manager. Settings, certificates and cache are preserved.
With the AppImage, after replacing the file the setcap command must be run again
if the NAT variant is used.
Uninstallation.
| System | How |
|---|---|
| Windows | Settings › Apps › Installed apps › Oplon Client › Uninstall. It also removes the OplonAgent service and its logs. WinFsp, if installed by our installer, stays in the system and has to be removed separately if desired. |
| macOS | Drag Oplon Client from the Applications folder to the Bin. macFUSE / FUSE-T, if installed, stay in the system and must be removed with their own uninstaller. |
| Linux | sudo apt remove oplon-client or sudo dnf remove oplon-client. For the AppImage, delete the file or the extracted folder. |
The user’s personal data is not removed by uninstalling. For a complete cleanup, delete by hand:
- the configuration folder (Configuration), which holds the preferences and any certificates;
- the shared folder cache (Cache);
- the
~/OplonMounts/folder on macOS and Linux; - the logs in the temporary folder (Logs).
Quick reference
| Windows | macOS | Linux | |
|---|---|---|---|
| Configuration and certificates | %AppData%\OplonClient\ | ~/Library/Application Support/OplonClient/ | ~/.config/OplonClient/ |
| Shared folder cache | %LocalAppData%\OplonClient\vfs-cache\ | ~/Library/Caches/OplonClient/vfs-cache/ | ~/.cache/OplonClient/vfs-cache/ |
| Mount points | first free drive letter | ~/OplonMounts/DiskN | ~/OplonMounts/DiskN |
| Client log | %TEMP%\OplonClient\<dd-mm-yyyy>\ | $TMPDIR/OplonClient/<dd-mm-yyyy>/ | /tmp/OplonClient/<dd-mm-yyyy>/ |
| Program | C:\Program Files\Oplon Networks\Oplon Client\ | /Applications/Oplon Client.app | /opt/oplon-client/ |
| Privileges for Trusted Connection NAT | OplonAgent service (admin install) | start as root | CAP_NET_ADMIN (from the package) |